
大数据Spark实时处理--数据采集1(构建日志服务器)
- 数据产生和上报流程
- 1)客户端定时采集----->数据加密----->数据传至日志服务器上----->数据解密----->日志落地磁盘
- 2)可以考虑数据压缩
- 基于IDEA+Maven构建多Module本地开发环境
- 1)多Module带来的好处:GitHub - apache/spark: Apache Spark - A unified analytics engine for large-scale data processing
- 发现每个子工程下面都有一个pom.xml
- 单独将一个完整的项目,拆成不同的模块,这样在开发的过程中可以各司其职
- 比如说,A是开发某一个子模块的,A只用开发自己的部分,B只要将A的依赖加进去,就可以协作开发了。
- 2)多Module项目构建
- 打开IDEA----->Maven
- Project SDK:1.8 version 1.8.0_152
- 不选 Create from archetype
- 点击next
- Groupid:com.imooc.bigdata
- Artifactld:spark
- Version:1.0
- 点击next
- project name:spark
- project location:C:\Users\jieqiong\IdeaProjects\spark-train-v1
- module name:spark
- project format:.idea(directory based)
- 点击 finish
- 3)构建log-service子工程
- 左击项目----->new----->Module----->Maven----->next
- Artifactld:log-service
- Module name:log-service
- 4)删除主工程中的src
- 目前整个项目存在的文件:.idea、log-service、pom.xml、External Libraries
- 5)构建hbase子工程,同步骤3)
- 6)构建redis子工程,同步骤3)
- 7)构建ss子工程,同步骤3)
- 8)构建sss子工程,同步骤3)
- 9)主程序的pom.xml
<groupId>com.imooc.bigdata</groupId>
    <artifactId>spark</artifactId>
    <packaging>pom</packaging>
    <version>1.0</version>
<modules>
    <module>log-service</module>
</modules>
- 10)子程序的pom.xml
<parent>
        <artifactId>spark</artifactId>
        <groupId>com.imooc,bigdata</groupId>
        <version>1.0</version>
</parent>
<modelVersion>4.0.0</modelVersion>
<artifactId>log-service</artifactId>
- 11)在主程序的pom.xml中,定义常用的版本号
    <properties>
        <maven.compiler.source>1.8</maven.compiler.source>
        <maven.compiler.target>1.8</maven.compiler.target>
        <encoding>UTF-8</encoding>
        <hadoop.version>2.6.0-cdh5.16.2</hadoop.version>
    </properties>
- 12)在主程序的pom.xml中,添加仓库
- 其中hadoop的cdh版本在aliyun中是没有的
 <repositories>
        <repository>
            <id>aliyun</id>
            <url>http://maven.aliyun.com/nexus/content/groups/public</url>
        </repository>

        <repository>
            <id>cloudera</id>
            <url>https://repository.cloudera.com/artifactory/cloudera-repos/</url>
        </repository>
    </repositories>
- 13)在主程序的pom.xml中,添加依赖
- 添加依赖后,在<dependencies>处,左击----->Maven----->Reimport
<dependencyManagement>
        <dependencies>
            <dependency>
                <groupId>org.apache.hadoop</groupId>
                <artifactId>hadoop-client</artifactId>
                <version>${hadoop.version}</version>
            </dependency>

            <dependency>
                <groupId>junit</groupId>
                <artifactId>junit</artifactId>
                <version>4.12</version>
            </dependency>
        </dependencies>
 </dependencyManagement>
- 14)在子程序中,需要哪一个依赖,就添加哪一个依赖,并且不需要添加版本号,是因为从主程序继承来的。
- C:\Users\jieqiong\IdeaProjects\spark-log4j\log-web\pom.xml
- 所以主程序需要添加版本号
- 子程序中,也需要左击----->Maven----->Reimport
<dependencies>
        <dependency>
            <groupId>org.springframework.boot</groupId>
            <artifactId>spring-boot-starter-web</artifactId>
            <exclusions>
                <exclusion>
                    <groupId>org.slf4j</groupId>
                    <artifactId>slf4j-log4j12</artifactId>
                </exclusion>
            </exclusions>
        </dependency>

        <dependency>
            <groupId>org.springframework.boot</groupId>
            <artifactId>spring-boot-starter-test</artifactId>
            <scope>test</scope>
            <exclusions>
                <exclusion>
                    <groupId>org.junit.vintage</groupId>
                    <artifactId>junit-vintage-engine</artifactId>
                </exclusion>
            </exclusions>
        </dependency>

        <dependency>
            <groupId>org.springframework.boot</groupId>
            <artifactId>spring-boot-devtools</artifactId>
            <optional>true</optional>
        </dependency>
        <dependency>
            <groupId>org.slf4j</groupId>
            <artifactId>slf4j-log4j12</artifactId>
        </dependency>
        <dependency>
            <groupId>org.projectlombok</groupId>
            <artifactId>lombok</artifactId>
        </dependency>
    </dependencies>
- Spring Boot快速入门
- 1)官方地址:Spring Boot
- 2)项目目的:发一个请求到日志服务上,将日志放到日志服务器上
- 3)社区版本的IDEA没有Spring Boot
- 4)右击项目----->new----->module----->spring initializr----->next
- module sdk : project sdk(1.8)
- choose initializr service url : default https://start.spring.io
- group : com.imooc.bigdata
- artifact : log-web
- type : maven project
- packaging : jar
- java version : 8
- version : 0.0.1
- package : com.imooc.bigdata
- ----->next
- 选择web中的spring web
- spring boot : 2.5.5
- ----->finish
- 此时右下角,正在下载spring boot的依赖。
- 在log-web中有些东西是目前不需要的,删除.mvn。src中的.gitignore、help.md、mvnw、mvnw.cmd。
- log-web中的pom.xml不需要做任何改动
- 入口类:进入log-web----->src----->main----->java----->LogWebApplication.java
- 若是想运行上述的LogWebApplication.java,需要改动src/main/resources中的application.properties
- 比如说这个服务想启动在哪一个端口上,以及整个工程的上下文是什么东西,是需要进行配置的。因为我们不清楚默认的配置是什么。
- 此时application.properties是空的,开始配置application.properties
server.port=9527
server.servlet.context-path=/imooc-web
- 上述application.properties添加后,就可以在主类LogWebApplication.java中运行了。
- 看一下运行日志:Tomcat started on port(s): 9527 (http) with context path '/imooc-web'
- 打开浏览器(虽然是404错误,是因为没有代码的原因,但服务已启动):localhost:9527/imooc-web/
- 在C:\Users\jieqiong\IdeaProjects\spark\log-web\src\main\java\com\imooc\bigdata下新建一个package:controller(放置所有web请求服务)
- 测试新建web服务:在src/main//java/com.imooc.bigdata/controller下新建一个java class:HelloController.java
- 需要添加一个@Controller:即HelloController类是需要暴露出去,给外面的请求进行访问。
- 定义一个方法sayHello
- 要访问方法sayHello,是需要添加注释的:@RequestMapping这种请求方式,请求内容是/hello
- 返回内容的时候,需要添加@ResponseBody,将return的内容返回回去
- 点击左上角运行
- 打开浏览器localhost:9527/imooc-web/hello,内容为Hello:Zhang...
package com.imooc.bigdata.controller;

import org.springframework.stereotype.Controller;
import org.springframework.web.bind.annotation.RequestMapping;
import org.springframework.web.bind.annotation.ResponseBody;

@Controller
public class HelloController {

    @ResponseBody
    @RequestMapping("/hello")
    public String sayHello(){
        return "Hello: Zhang...";
    }
}
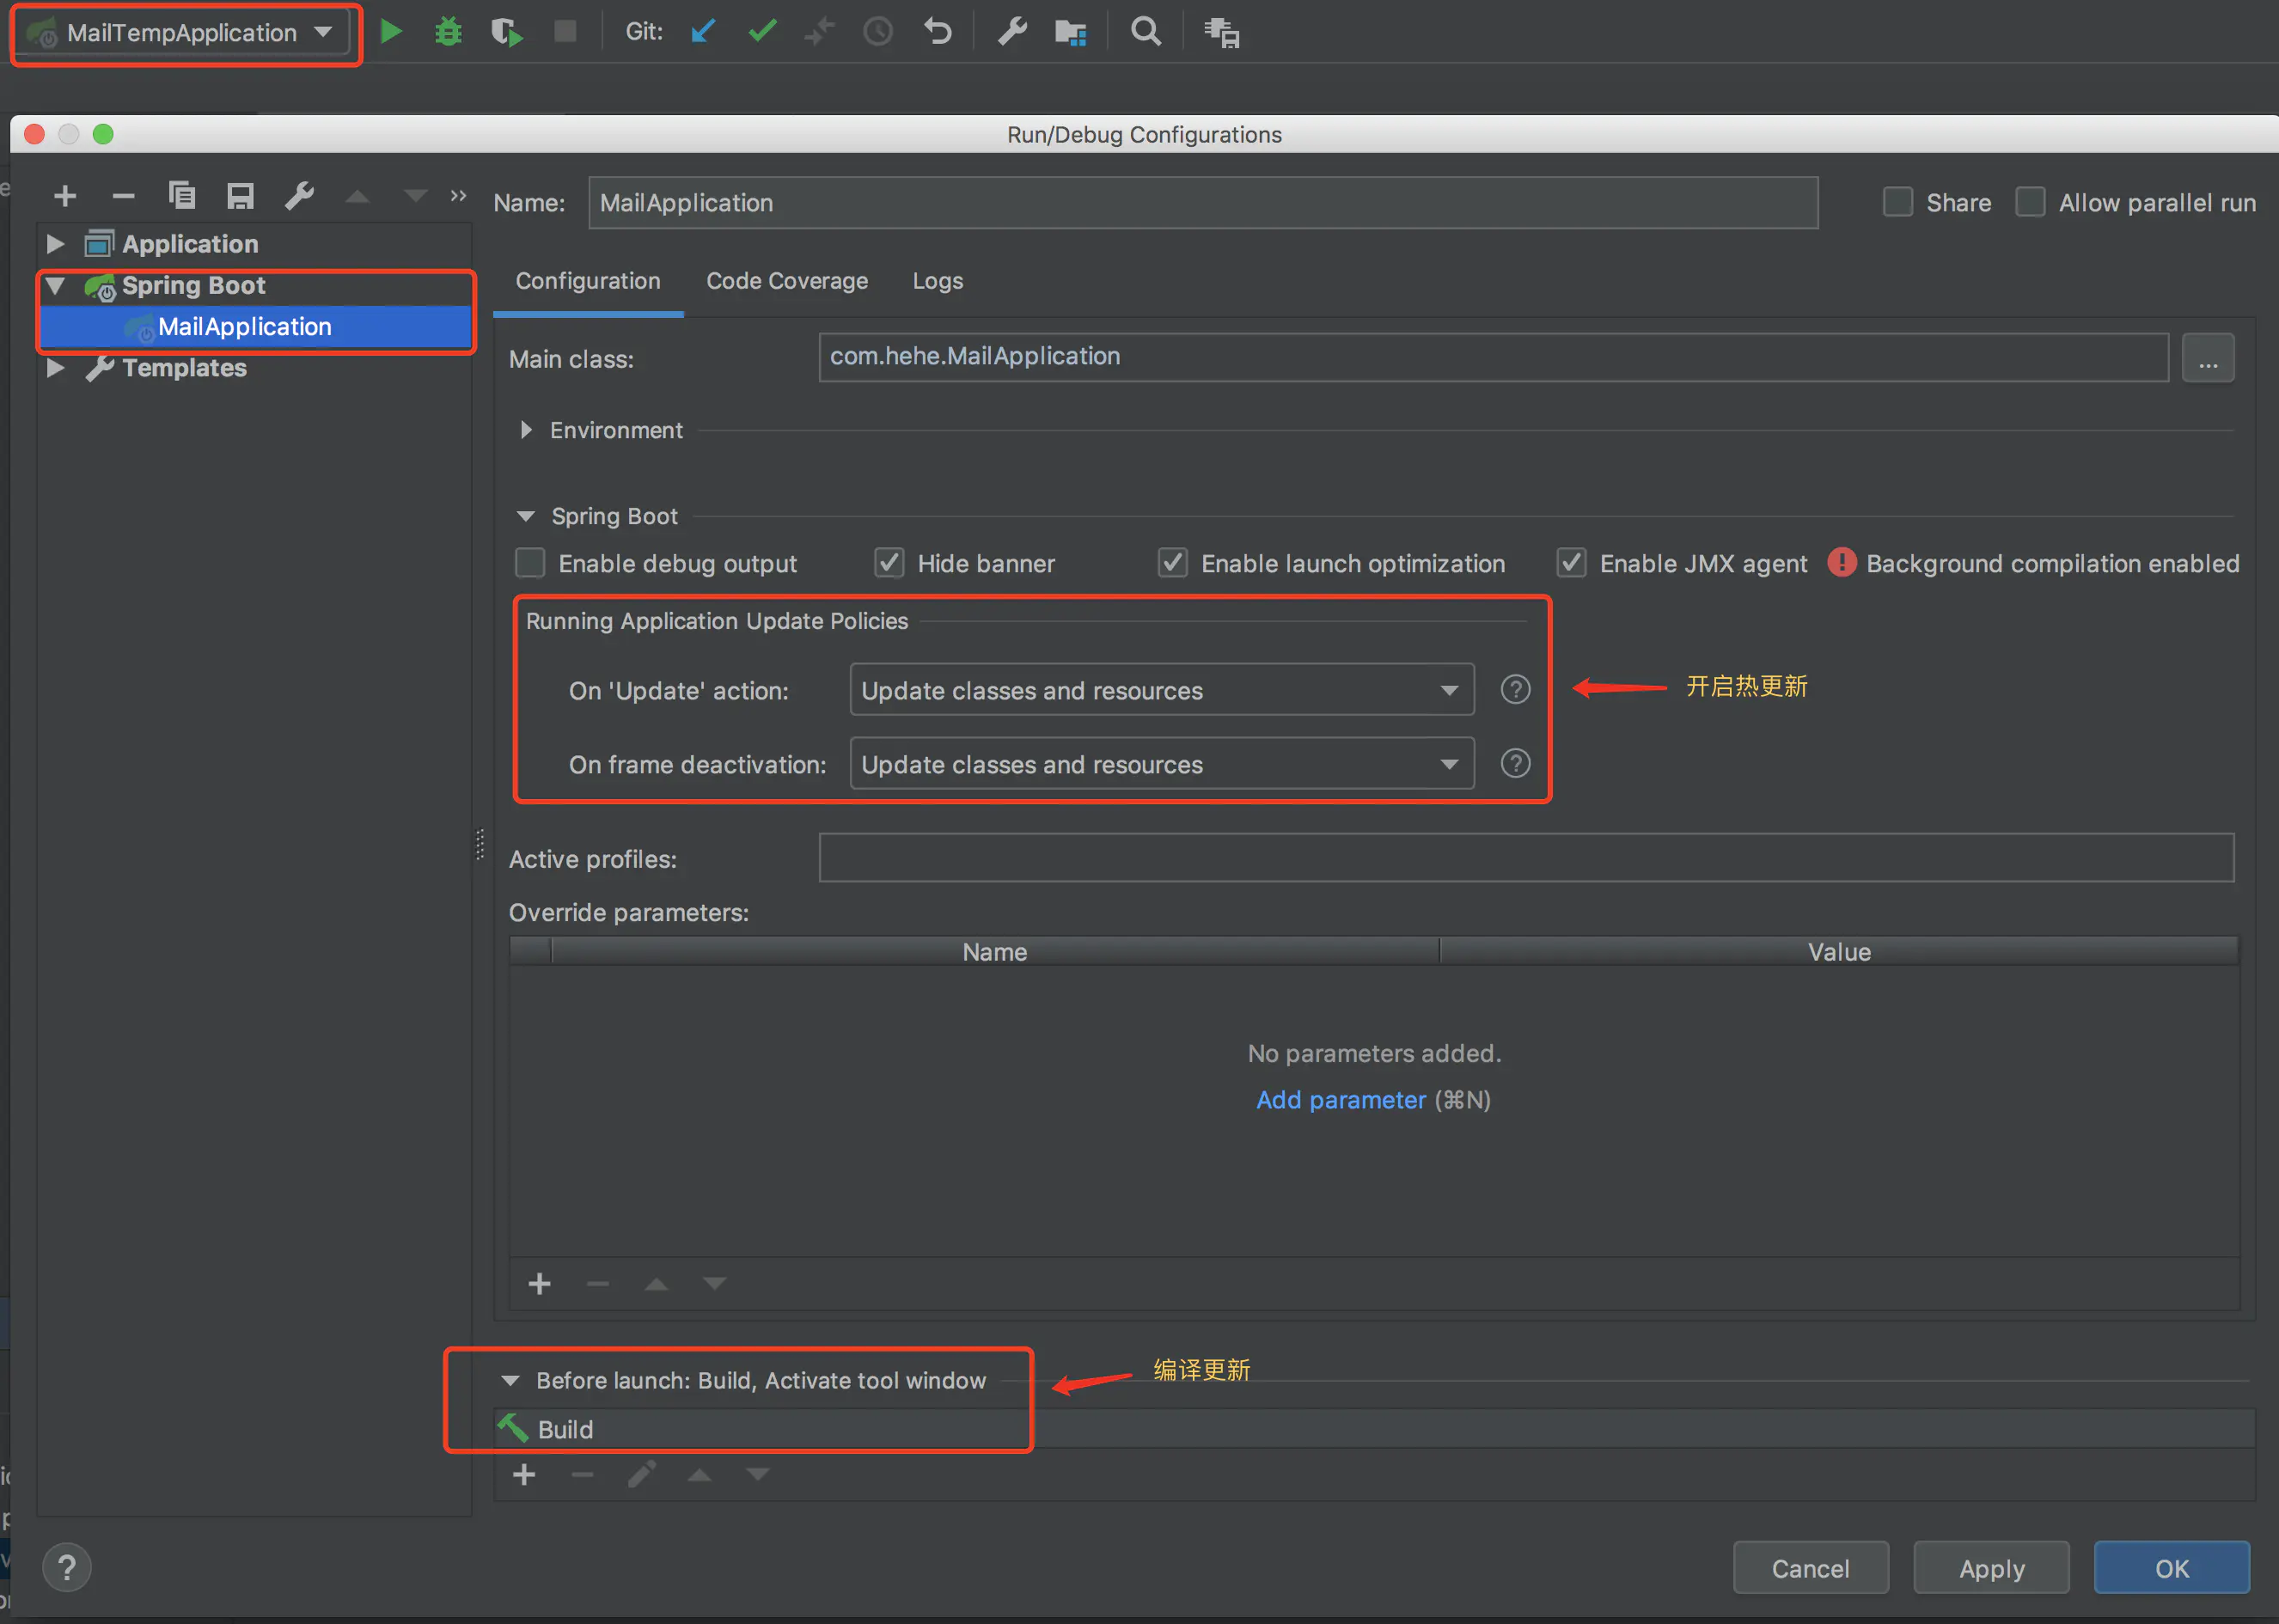
- Spring Boot热部署
- 热部署:修改代码后,在页面上及时响应,不需要重新运行代码程序
- 在log-web\pom.xml中添加依赖:
<dependency>
    <groupId>org.springframework.boot</groupId>
    <artifactId>spring-boot-devtools</artifactId>
    <optional>true</optional>
    <scope>runtime</scope>
</dependency>
<build>
    <plugins>
        <plugin>
            <groupId>org.springframework.boot</groupId>
            <artifactId>spring-boot-maven-plugin</artifactId>
            <configuration>
                <!--fork :  如果没有该项配置,肯定devtools不会起作用,即应用不会restart -->
                <fork>true</fork>
            </configuration>
        </plugin>
    </plugins>
</build>
- 顶部菜单- >Edit Configurations->SpringBoot插件->目标项目->勾选热更新。
- 在IntelliJ IDEA----->Preferences----->compiler----->勾选build project automatically----->apply
- 等待左下角依赖加载完成后
- 响应方法的测试,回到log-web\src\main\java\com\imooc\bigdata\controller,再来开发一个controller
- new----->java class:DevtoolsController.java
package com.imooc.bigdata.controller;

import org.springframework.stereotype.Controller;
import org.springframework.web.bind.annotation.RequestMapping;
import org.springframework.web.bind.annotation.ResponseBody;

@Controller
public class DevtoolsController {

    @ResponseBody
    @RequestMapping("test01")
    public String test01(){
        return "test01";
    }
}
- 点击运行,打开浏览器界面:localhost:9527/imooc-web/test01
- 然后,进入src/main/java/com/imooc/bigdata/controller/DevtoolsController.java,添加
    @ResponseBody
    @RequestMapping("test02")
    public String test02(){
        return "test02";
    }
- 等待10秒左右,web端自动刷新:localhost:9527/imooc-web/test02
- 关于Annotation注解的补充
- 1)在src/main/java/com/imooc/bigdata/controller下新建java class:WorldController.java
- 2)使用注解,可以提升开发效率
- 3)按下ctrl,再使用鼠标点击注解,即可查看注解源码
- 4)其中注解@RestController是包含上述的Controller、ResponseBody,即统一到一个注解中。
- 5)其中注解@GetMappin是等于RequestMapping
- 6)在LogWebApplication主类中,运行程序
- 7)注解@SpringBootApplication包含
@SpringBootConfiguration:配置的注解。重要的是SpringBootConfiguration只能向上层搜索,即搜索本层的及上层包中的东西。
@EnableAutoConfiguration:开启自动配置
@ComponentScan:在某一个包中,进行扫描
package com.imooc.bigdata.controller;

import org.springframework.web.bind.annotation.GetMapping;
import org.springframework.web.bind.annotation.RestController;

@RestController
public class WorldController {

    @GetMapping("/world01")
    public  String world01(){
        return "world01";
    }
}

 浙公网安备 33010602011771号