
ShoppingMall_02
01. 关于CheckBox默认点选时的动画效果的隐藏处理
在实际开发中,为达到某些效果,会为CheckBox组件配置上自定义的选中状态与效果,为了屏蔽原有的复选框,可以设置Button=“@null"来达到效果,但此时仍有个问题,钩选状态展示会按自定义的drawable来展示,但原有的点选效果仍会出来,体验很不好;
解决方法: android:background="@android:color/transparent"
02. 关于RadioGroup做导航栏时,对于图片尺寸的动态修正
在配置RadioGroup做导航栏时,我们一般是直接配置 drawableTop 来达成上面图片,下面文字的效果,但此时我们是没办法控制图片大小的,
所有在不同分辨率下看起来真的是丑得不行呀,
解决方法:动态约束图片的drawable尺寸来达到约束图片尺寸的效果;
 (position % 2 ==0 效果)
 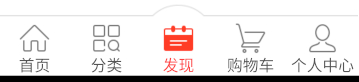 (正常修正效果)
调用方式:在加载布并标识RadioGroup对象后调用函数: eg: ReSetRadioGroupPicSize(rgMain, 128, 1);
 1 /**
 2      * @param rgView       要修正的按钮组对象
 3      * @param picSize      图片尺寸
 4      * @param showPosition 图片展示位置
 5      */
 6     private void ReSetRadioGroupPicSize(RadioGroup rgView, int picSize, int showPosition) {
 7         for (int i = 0; i < rgView.getChildCount(); i++) {
 8             RadioButton rgtn = (RadioButton) rgView.getChildAt(i);
 9             Drawable[] drawables = rgtn.getCompoundDrawables();
10             Drawable drawable = drawables[showPosition];
11             drawable.setBounds(0, 0, picSize, picSize);
12             switch (showPosition) {
13                 case 0:
14                     rgtn.setCompoundDrawables(drawable, null, null, null);
15                     break;
16                 case 1:
17                     rgtn.setCompoundDrawables(null, drawable, null, null);
18                     break;
19                 case 2:
20                     rgtn.setCompoundDrawables(null, null, drawable, null);
21                     break;
22                 case 3:
23                     rgtn.setCompoundDrawables(null, null, null,drawable);
24                     break;
25             }
26         }
27     }
03.关于多个Fragment切换时,对于不同应用模式Fragment不同加载方式的处理
a. 常规页面,基本不会轻易变化; 这种页面在初次加载后,若与其它页面切换,可使用 Hide 的方式进行切换;
b.频繁变化页面,每次重新进入这种界面时,需要重新加载内部数据,并展示最新数据;
关于b类应用,若也采用a类应用的处理方式,除首次加载时会展示相应的数据,之后每次进入,都是第一次进入的页面,因为每次切换时,都是Hide,下次进来时,都是直接Show,所以不会涉及到初始化等操作;
当然,若存在有不重新加载页面也能触触发的事件,也同样能够达到应用需求;
< 但因为我还不知道有哪些事件可以达成上述要求(初学阶段,后期若了解深了,再来此处补充说明) >
 1 /**
 2      * 切换Fragment
 3      *
 4      * @param fromFragment
 5      * @param toFragment
 6      */
 7     private void switchFragment(Fragment fromFragment, BaseFragment toFragment) {
 8         if (tmpFragment != toFragment) {
 9             tmpFragment = toFragment;
10             if (toFragment != null) {
11                 FragmentTransaction transaction = getSupportFragmentManager().beginTransaction();
12                 //隐藏当前fragment
13                 if (fromFragment != null) {
14                     //如果是购物车,则移除,
15                     if (fromFragment instanceof ShoppingCartFragment) {
16                         transaction.remove(fromFragment);
17                     } else {
18                         transaction.hide(fromFragment);
19                     }
20                 }
21                 //判断toFragment是否添加
22                 if (!toFragment.isAdded()) {
23                     transaction.add(R.id.frameLayout, toFragment).commit();
24                 } else {
25                     transaction.show(toFragment).commit();
26                 }
27             }
28         }
29     }
--> 上次关于b类应用的修正处理
问题处理关键点:就是每次进入的时候,重新加载一下数据;
--> 关键业务事件:onResume事件;
即每次页面被激活时,执行数据加载操作即可;

在对应的fragment的业务事件中,重载 onResume 事件

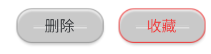
04. 关于Button 铵钮自带效果的去除;
在Android 5.0以后的版本中,定义一个button时,系统自动会加一个阴影的效果,有的时候这种效果看起来比较好,有的时候不符合UI的设计要求,这时候就需要手动去掉阴影。
原始脚本 :
 1                 <Button
 2                     android:id="@+id/btn_delete"
 3                     android:layout_width="wrap_content"
 4                     android:layout_height="35dp"
 5                     android:background="@drawable/words"
 6                     android:text="删除"
 7                     android:textColor="#303235"
 8                     android:textSize="15sp"/>
 9
10                 <Button
11                     android:id="@+id/btn_collection"
12                     android:layout_width="wrap_content"
13                     android:layout_height="35dp"
14                     android:layout_marginLeft="15dp"
15                     android:background="@drawable/wordsred"
16                     android:text="收藏"
17                     android:textColor="#ed3f3f"
18                     android:textSize="15sp"/>
原始效果: 解决方法1效果: 配置Style
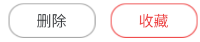

解决方法:
1. 最简易的处理方式,直接配置属性:
android:stateListAnimator="@null"
原理: 全局搜索网上所讲的常规处理方式内容: borderlessButtonStyle 并按网上所诉方式一路跟进,
最终的配置根源点在于 styles_material.xml
本来就是配置了 background , 所以下面二个参数中,也只有 stateListAnimator 为默认的效果配置了,配置 @null ,取消默认配置
1  <style name="Widget.Material.Button.Borderless">
2         <item name="background">@drawable/btn_borderless_material</item>
3         <item name="stateListAnimator">@null</item>
4     </style>
                 <Button
                    android:stateListAnimator="@null"
                    android:id="@+id/btn_delete"
                    android:layout_width="wrap_content"
                    android:layout_height="35dp"
                    android:background="@drawable/words"
                    android:text="删除"
                    android:textColor="#303235"
                    android:textSize="15sp"/>

                <Button
                    android:stateListAnimator="@null"
                    android:id="@+id/btn_collection"
                    android:layout_width="wrap_content"
                    android:layout_height="35dp"
                    android:layout_marginLeft="15dp"
                    android:background="@drawable/wordsred"
                    android:text="收藏"
                    android:textColor="#ed3f3f"
                    android:textSize="15sp"/>
2.配置样式达成效果
 1 <style name="Button_Delete" parent="@style/Widget.AppCompat.Button.Borderless">
 2         <item name="android:layout_width">wrap_content</item>
 3         <item name="android:layout_height">35dp</item>
 4         <item name="android:background">@drawable/words</item>
 5         <item name="android:textSize">15sp</item>
 6         <item name="android:textColor">#303235</item>
 7     </style>
 8
 9     <style name="Button_Collection" parent="@style/Widget.AppCompat.Button.Borderless">
10         <item name="android:layout_width">wrap_content</item>
11         <item name="android:layout_height">35dp</item>
12         <item name="android:background">@drawable/wordsred</item>
13         <item name="android:textSize">15sp</item>
14         <item name="android:textColor">#303235</item>
15     </style>
<Button
android:id="@+id/btn_delete"
android:text="删除"
style="@style/Button_Delete"
/>
<Button
android:id="@+id/btn_collection"
android:text="收藏"
style="@style/Button_Collection"
/>

 浙公网安备 33010602011771号