
Python 常用模块 random , os, sys, pickle/json
random模块
随机数
|
1
2
3
4
|
import randomprint random.random()print random.randint(1,2)print random.randrange(1,10) |
生成随机验证码
|
1
2
3
4
5
6
7
8
9
10
|
import randomcheckcode = ''for i in range(4): current = random.randrange(0,4) if current != i: temp = chr(random.randint(65,90)) else: temp = random.randint(0,9) checkcode += str(temp)print checkcode |
OS模块
提供对操作系统进行调用的接口
|
1
2
3
4
5
6
7
8
9
10
11
12
13
14
15
16
17
18
19
20
21
22
23
24
25
26
27
28
29
|
os.getcwd() 获取当前工作目录,即当前python脚本工作的目录路径os.chdir("dirname") 改变当前脚本工作目录;相当于shell下cdos.curdir 返回当前目录: ('.')os.pardir 获取当前目录的父目录字符串名:('..')os.makedirs('dirname1/dirname2') 可生成多层递归目录os.removedirs('dirname1') 若目录为空,则删除,并递归到上一级目录,如若也为空,则删除,依此类推os.mkdir('dirname') 生成单级目录;相当于shell中mkdir dirnameos.rmdir('dirname') 删除单级空目录,若目录不为空则无法删除,报错;相当于shell中rmdir dirnameos.listdir('dirname') 列出指定目录下的所有文件和子目录,包括隐藏文件,并以列表方式打印os.remove() 删除一个文件os.rename("oldname","newname") 重命名文件/目录os.stat('path/filename') 获取文件/目录信息os.sep 输出操作系统特定的路径分隔符,win下为"\\",Linux下为"/"os.linesep 输出当前平台使用的行终止符,win下为"\t\n",Linux下为"\n"os.pathsep 输出用于分割文件路径的字符串os.name 输出字符串指示当前使用平台。win->'nt'; Linux->'posix'os.system("bash command") 运行shell命令,直接显示os.environ 获取系统环境变量os.path.abspath(path) 返回path规范化的绝对路径os.path.split(path) 将path分割成目录和文件名二元组返回os.path.dirname(path) 返回path的目录。其实就是os.path.split(path)的第一个元素os.path.basename(path) 返回path最后的文件名。如何path以/或\结尾,那么就会返回空值。即os.path.split(path)的第二个元素os.path.exists(path) 如果path存在,返回True;如果path不存在,返回Falseos.path.isabs(path) 如果path是绝对路径,返回Trueos.path.isfile(path) 如果path是一个存在的文件,返回True。否则返回Falseos.path.isdir(path) 如果path是一个存在的目录,则返回True。否则返回Falseos.path.join(path1[, path2[, ...]]) 将多个路径组合后返回,第一个绝对路径之前的参数将被忽略os.path.getatime(path) 返回path所指向的文件或者目录的最后存取时间os.path.getmtime(path) 返回path所指向的文件或者目录的最后修改时间 |
sys模块
|
1
2
3
4
5
6
7
8
|
sys.argv 命令行参数List,第一个元素是程序本身路径sys.exit(n) 退出程序,正常退出时exit(0)sys.version 获取Python解释程序的版本信息sys.maxint 最大的Int值sys.path 返回模块的搜索路径,初始化时使用PYTHONPATH环境变量的值sys.platform 返回操作系统平台名称sys.stdout.write('please:')val = sys.stdin.readline()[:-1] |
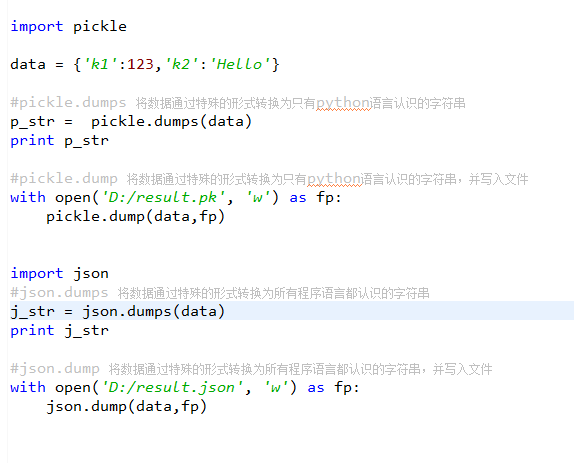
json & pickle 模块
用于序列化的两个模块
- json,用于字符串 和 python数据类型间进行转换
- pickle,用于python特有的类型 和 python的数据类型间进行转换
Json模块提供了四个功能:dumps、dump、loads、load
pickle模块提供了四个功能:dumps、dump、loads、load
shelve 模块
shelve模块是一个简单的k,v将内存数据通过文件持久化的模块,可以持久化任何pickle可支持的python数据格式
|
1
2
3
4
5
6
7
8
9
10
11
12
13
14
15
16
17
18
|
import shelved = shelve.open('shelve_test') #打开一个文件class Test(object): def __init__(self,n): self.n = nt = Test(123) t2 = Test(123334)name = ["alex","rain","test"]d["test"] = name #持久化列表d["t1"] = t #持久化类d["t2"] = t2d.close() |
xml处理模块
xml是实现不同语言或程序之间进行数据交换的协议,跟json差不多,但json使用起来更简单,不过,古时候,在json还没诞生的黑暗年代,大家只能选择用xml呀,至今很多传统公司如金融行业的很多系统的接口还主要是xml。
xml的格式如下,就是通过<>节点来区别数据结构的:
xml协议在各个语言里的都 是支持的,在python中可以用以下模块操作xml
|
1
2
3
4
5
6
7
8
9
10
11
12
13
14
15
|
import xml.etree.ElementTree as ETtree = ET.parse("xmltest.xml")root = tree.getroot()print(root.tag)#遍历xml文档for child in root: print(child.tag, child.attrib) for i in child: print(i.tag,i.text)#只遍历year 节点for node in root.iter('year'): print(node.tag,node.text) |
修改和删除xml文档内容
自己创建xml文档
|
1
2
3
4
5
6
7
8
9
10
11
12
13
14
15
16
|
import xml.etree.ElementTree as ETnew_xml = ET.Element("namelist")name = ET.SubElement(new_xml,"name",attrib={"enrolled":"yes"})age = ET.SubElement(name,"age",attrib={"checked":"no"})sex = ET.SubElement(name,"sex")sex.text = '33'name2 = ET.SubElement(new_xml,"name",attrib={"enrolled":"no"})age = ET.SubElement(name2,"age")age.text = '19'et = ET.ElementTree(new_xml) #生成文档对象et.write("test.xml", encoding="utf-8",xml_declaration=True)ET.dump(new_xml) #打印生成的格式 |
PyYAML模块
Python也可以很容易的处理ymal文档格式,只不过需要安装一个模块,参考文档:http://pyyaml.org/wiki/PyYAMLDocumentation
ConfigParser模块
用于生成和修改常见配置文档,当前模块的名称在 python 3.x 版本中变更为 configparser。
来看一个好多软件的常见文档格式如下
|
1
2
3
4
5
6
7
8
9
10
11
12
|
[DEFAULT]ServerAliveInterval = 45Compression = yesCompressionLevel = 9ForwardX11 = yes[bitbucket.org]User = hg[topsecret.server.com]Port = 50022ForwardX11 = no |
如果想用python生成一个这样的文档怎么做呢?
|
1
2
3
4
5
6
7
8
9
10
11
12
13
14
15
16
|
import configparserconfig = configparser.ConfigParser()config["DEFAULT"] = {'ServerAliveInterval': '45', 'Compression': 'yes', 'CompressionLevel': '9'}config['bitbucket.org'] = {}config['bitbucket.org']['User'] = 'hg'config['topsecret.server.com'] = {}topsecret = config['topsecret.server.com']topsecret['Host Port'] = '50022' # mutates the parsertopsecret['ForwardX11'] = 'no' # same hereconfig['DEFAULT']['ForwardX11'] = 'yes'with open('example.ini', 'w') as configfile: config.write(configfile) |
hashlib模块
用于加密相关的操作,3.x里代替了md5模块和sha模块,主要提供 SHA1, SHA224, SHA256, SHA384, SHA512 ,MD5 算法
|
1
2
3
4
5
6
7
8
9
10
11
12
13
14
15
16
17
18
19
20
21
22
23
24
25
26
27
28
29
30
31
32
33
34
35
36
37
38
39
40
41
42
43
44
45
46
47
48
49
50
51
52
|
import hashlibm = hashlib.md5()m.update(b"Hello")m.update(b"It's me")print(m.digest())m.update(b"It's been a long time since last time we ...")print(m.digest()) #2进制格式hashprint(len(m.hexdigest())) #16进制格式hash'''def digest(self, *args, **kwargs): # real signature unknown """ Return the digest value as a string of binary data. """ passdef hexdigest(self, *args, **kwargs): # real signature unknown """ Return the digest value as a string of hexadecimal digits. """ pass'''import hashlib# ######## md5 ########hash = hashlib.md5()hash.update(b'admin')print(hash.hexdigest())# ######## sha1 ########hash = hashlib.sha1()hash.update(b'admin')print(hash.hexdigest())# ######## sha256 ########hash = hashlib.sha256()hash.update(b'admin')print(hash.hexdigest())# ######## sha384 ########hash = hashlib.sha384()hash.update(b'admin')print(hash.hexdigest())# ######## sha512 ########hash = hashlib.sha512()hash.update(b'admin')print(hash.hexdigest()) |
python 还有一个 hmac 模块,它内部对我们创建 key 和 内容 再进行处理然后再加密
|
1
2
3
4
|
import hmach = hmac.new(b'wueiqi')h.update(b'hellowo')print h.hexdigest() |

 浙公网安备 33010602011771号