

代码放在这里:wzyonggege/python-wechat-itchat
词云那里可以换成小黄人图片
---------------------------------------------------------------------------------------------------
0. itchat
最近研究了一些微信的玩法,我们可以通过网页版的微信微信网页版,扫码登录后去抓包爬取信息,还可以post去发送信息。
然后发现了itchat这个开源项目,作者是@LittleCoder,已经把微信的接口完成了,大大的方便了我们对微信的挖掘,以下的功能也通过itchat来实现。
安装itchat这个库
pip install itchat
先来段简单的试用,实现微信的登录,运行下面代码会生成一个二维码,扫码之后手机端确认登录,就会发送一条信息给‘filehelper’,这个filehelper就是微信上的文件传输助手。
import itchat

# 登录
itchat.login()
# 发送消息
itchat.send(u'你好', 'filehelper')
除了登录和发送消息我们还可以这么来玩,往下走~
1. 微信好友男女比例
想统计下自己微信里好友的性别比例,当然也是很简单,先获取好友列表,统计列表里性别计数
import itchat

# 先登录
itchat.login()

# 获取好友列表
friends = itchat.get_friends(update=True)[0:]

# 初始化计数器,有男有女,当然,有些人是不填的
male = female = other = 0

# 遍历这个列表,列表里第一位是自己,所以从"自己"之后开始计算
# 1表示男性,2女性
for i in friends[1:]:
    sex = i["Sex"]
    if sex == 1:
        male += 1
    elif sex == 2:
        female += 1
    else:
        other += 1

# 总数算上,好计算比例啊~
total = len(friends[1:])

# 好了,打印结果
print u"男性好友:%.2f%%" % (float(male) / total * 100)
print u"女性好友:%.2f%%" % (float(female) / total * 100)
print u"其他:%.2f%%" % (float(other) / total * 100)
好看看结果:
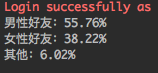
(好吧,暴露了我男性友人较多的真相~~)
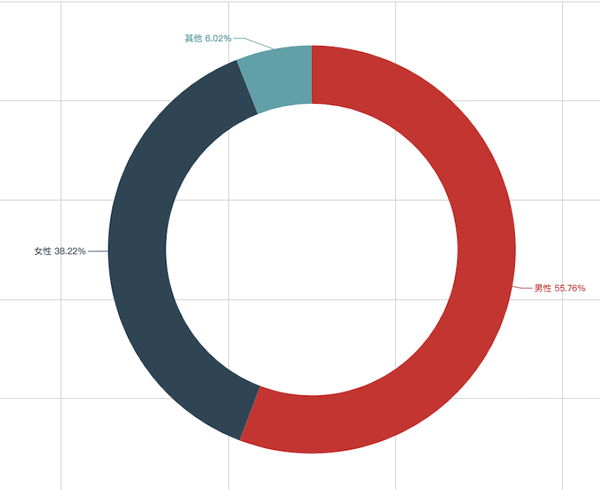
好像不够直观,有兴趣的朋友可以加上可视化的展示,我这里用基于python的Echarts(有机会再细讲)
先安装了
pip install echarts-python
展示比例一般使用百分比圆饼表吧
# 使用echarts,加上这段
from echarts import Echart, Legend, Pie

chart = Echart(u'%s的微信好友性别比例' % (friends[0]['NickName']), 'from WeChat')
chart.use(Pie('WeChat',
              [{'value': male, 'name': u'男性 %.2f%%' % (float(male) / total * 100)},
               {'value': female, 'name': u'女性 %.2f%%' % (float(female) / total * 100)},
               {'value': other, 'name': u'其他 %.2f%%' % (float(other) / total * 100)}],
              radius=["50%", "70%"]))
chart.use(Legend(["male", "female", "other"]))
del chart.json["xAxis"]
del chart.json["yAxis"]
chart.plot()
登登登登~
2. 好友个性签名词云
获取好友列表的时候,返回的json信息中还看到了有个性签名的信息,脑洞一开,把大家的个性签名都抓下来,看看高频词语,还做了个词云。
# coding:utf-8
import itchat

# 先登录
itchat.login()

# 获取好友列表
friends = itchat.get_friends(update=True)[0:]
for i in friends:
    # 获取个性签名
    signature = i["Signature"]
print signature
先全部抓取下来
打印之后你会发现,有大量的span,class,emoji,emoji1f3c3等的字段,因为个性签名中使用了表情符号,这些字段都是要过滤掉的,写个正则和replace方法过滤掉
for i in friends:
# 获取个性签名
    signature = i["Signature"].strip().replace("span", "").replace("class", "").replace("emoji", "")
# 正则匹配过滤掉emoji表情,例如emoji1f3c3等
    rep = re.compile("1f\d.+")
    signature = rep.sub("", signature)
    print signature
接来下用jieba分词,然后制作成词云,首先要安装jieba和wordcloud库
pip install jieba
pip install wordcloud
代码
# coding:utf-8
import itchat
import re

itchat.login()
friends = itchat.get_friends(update=True)[0:]
tList = []
for i in friends:
    signature = i["Signature"].replace(" ", "").replace("span", "").replace("class", "").replace("emoji", "")
    rep = re.compile("1f\d.+")
    signature = rep.sub("", signature)
    tList.append(signature)

# 拼接字符串
text = "".join(tList)

# jieba分词
import jieba
wordlist_jieba = jieba.cut(text, cut_all=True)
wl_space_split = " ".join(wordlist_jieba)

# wordcloud词云
import matplotlib.pyplot as plt
from wordcloud import WordCloud
import PIL.Image as Image

# 这里要选择字体存放路径,这里是Mac的,win的字体在windows/Fonts中
my_wordcloud = WordCloud(background_color="white", max_words=2000,
                         max_font_size=40, random_state=42,
                         font_path='/Users/sebastian/Library/Fonts/Arial Unicode.ttf').generate(wl_space_split)

plt.imshow(my_wordcloud)
plt.axis("off")
plt.show()
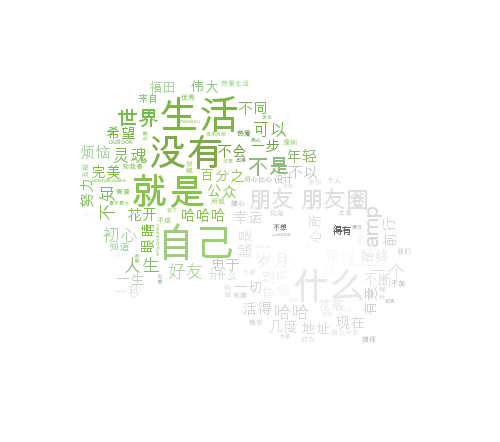
运行代码
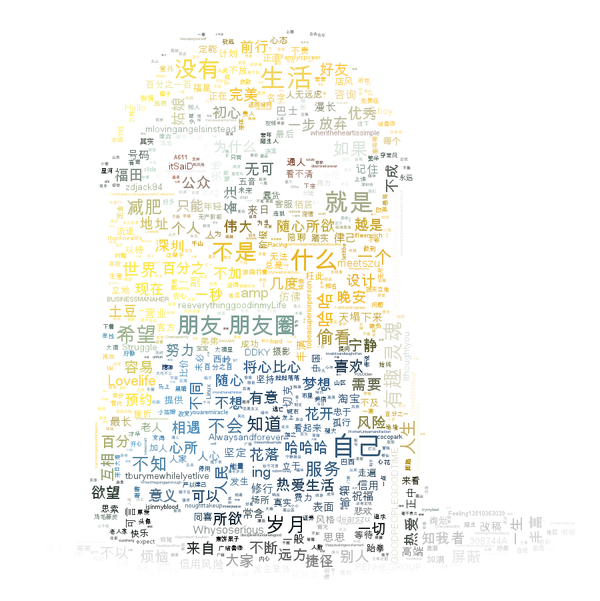
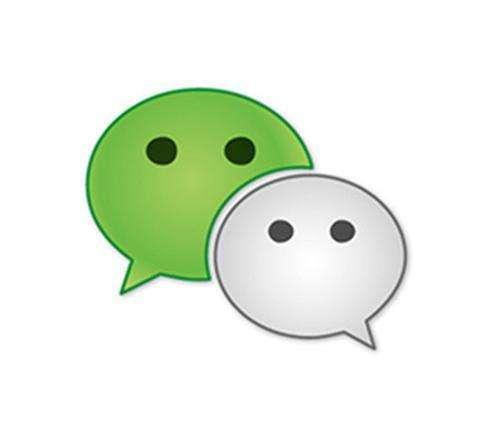
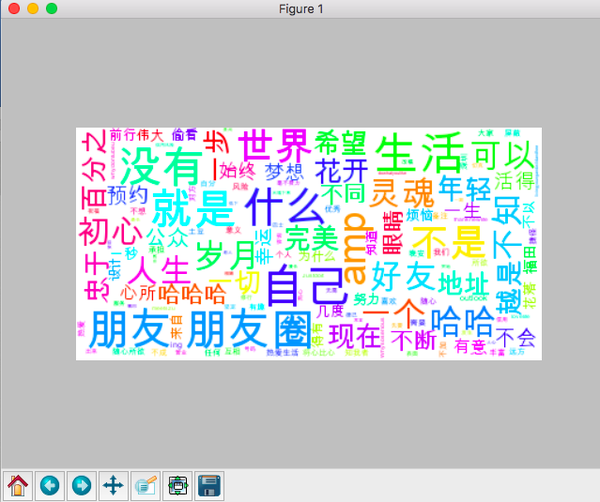 这。。好像有点丑,根据wordcloud用法,我可以找一张图来生成配色方案,我这里找了一张微信的logo
修改一下代码
# wordcloud词云
import matplotlib.pyplot as plt
from wordcloud import WordCloud, ImageColorGenerator
import os
import numpy as np
import PIL.Image as Image


d = os.path.dirname(__file__)
alice_coloring = np.array(Image.open(os.path.join(d, "wechat.jpg")))
my_wordcloud = WordCloud(background_color="white", max_words=2000, mask=alice_coloring,
                         max_font_size=40, random_state=42,
                         font_path='/Users/sebastian/Library/Fonts/Arial Unicode.ttf')\
    .generate(wl_space_split)

image_colors = ImageColorGenerator(alice_coloring)
plt.imshow(my_wordcloud.recolor(color_func=image_colors))
plt.imshow(my_wordcloud)
plt.axis("off")
plt.show()

# 保存图片 并发送到手机
my_wordcloud.to_file(os.path.join(d, "wechat_cloud.png"))
itchat.send_image("wechat_cloud.png", 'filehelper')
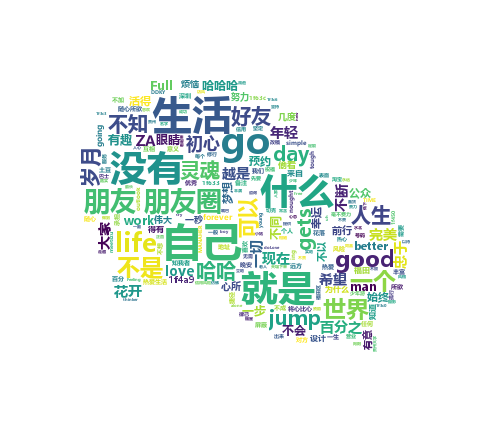
嗯~好像还可以,这是Mac下生成的,附一个win10下生成的
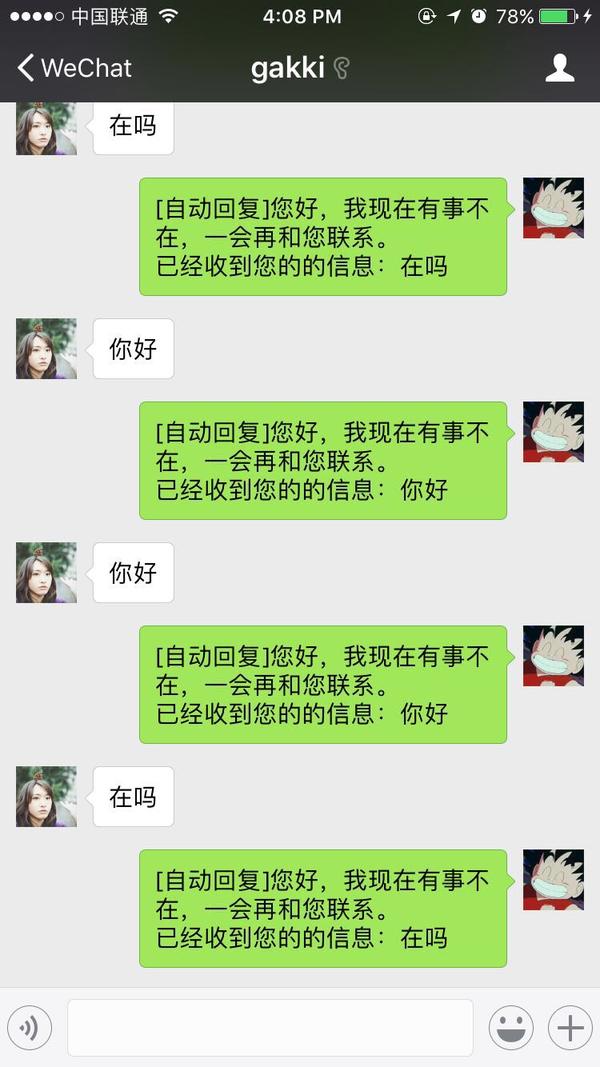
3. 微信自动回复
接着来实现一个类似qq上的自动回复,原理就是接收到消息,就发消息回去,同时发一条给文件助手,就可以在文件助手中统一查看消息。
代码很简单,来看看
#coding=utf8
import itchat

# 自动回复
# 封装好的装饰器,当接收到的消息是Text,即文字消息
@itchat.msg_register('Text')
def text_reply(msg):
    # 当消息不是由自己发出的时候
    if not msg['FromUserName'] == myUserName:
        # 发送一条提示给文件助手
        itchat.send_msg(u"[%s]收到好友@%s 的信息:%s\n" %
                        (time.strftime("%Y-%m-%d %H:%M:%S", time.localtime(msg['CreateTime'])),
                         msg['User']['NickName'],
                         msg['Text']), 'filehelper')
        # 回复给好友
        return u'[自动回复]您好,我现在有事不在,一会再和您联系。\n已经收到您的的信息:%s\n' % (msg['Text'])

if __name__ == '__main__':
    itchat.auto_login()

    # 获取自己的UserName
    myUserName = itchat.get_friends(update=True)[0]["UserName"]
    itchat.run()
运行后会保持登录状态,开启自动回复模式,手机上查看:
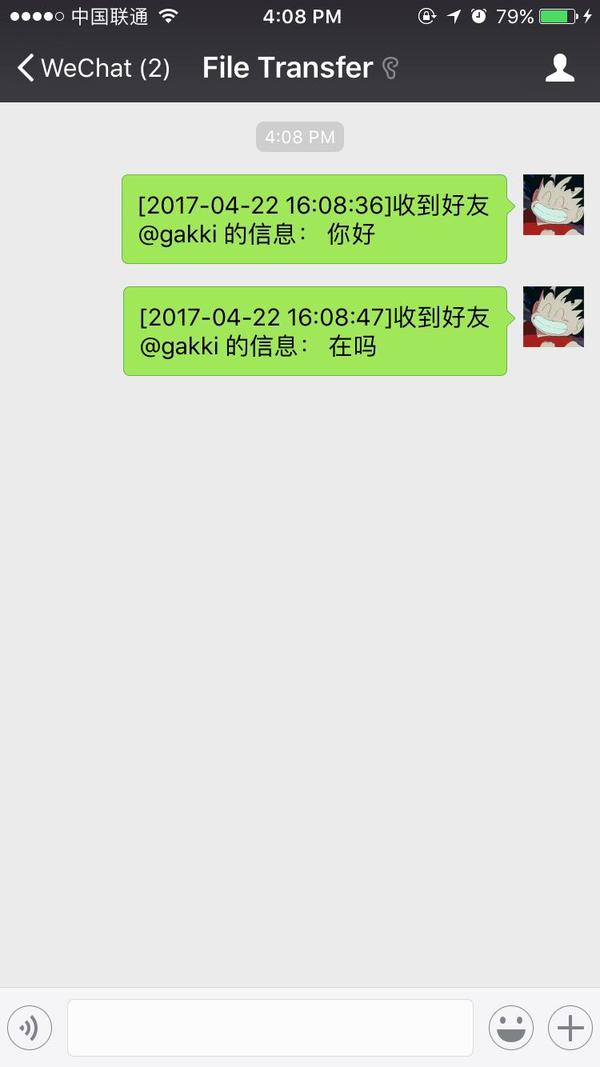
 当然,除了文字Text信息,还可以接收图片(表情包算图片),语音,名片,地理位置,分享和类型为Note的信息(就是有人提示类的消息,例如撤回消息),把装饰器写成下面形式即可接受,大家可以试试
@itchat.msg_register(['Map', 'Card', 'Note', 'Sharing', 'Picture'])
学习过程中遇到什么问题或者想获取学习资源的话,欢迎加入学习交流群
626062078,我们一起学Python!
