

显卡驱动安装部署
显卡驱动安装(ubuntu22.04)
一、准备必要的驱动文件
NVIDIA-Linux-x86_64-565.57.01.run
cuda_12.6.0_560.28.03_linux.run
cudnn-linux-x86_64-8.9.7.29_cuda12-archive.tar.xz
注意:显卡驱动与cuda与cudnn都有对应的版本要求不能随意下载安装包
二、准备环境
注意:高版本的系统需要升级gcc,g++,cc为12或者更高的版本和make,目前该系统适用12版本。

删除本机/usr/bin下的gcc,g++,cc软连接新增的gcc-12,g++-12到该目录
ln -s /usr/bin/gcc-12 /usr/bin/gcc
ln -s /usr/bin/gcc-12 /usr/bin/cc
ln -s /usr/bin/g++-12 /usr/bin/gcc


禁用开源的显卡驱动
vim /etc/modprobe.d/blacklist-nouveau.conf
blacklist nouveau
options nouveau modeset=0
保存配置
sudo update-initramfs -u
随后重启服务器reboot,有些服务器需要关掉桌面服务service lightdm stop
三、安装驱动
sudo ./NVIDIA-Linux-x86_64-565.57.01.run
每次安装都会出现如下提示,实际上pre-install固定会失败的,目的就是为了让你知道你自己在干嘛,选择Continue installation
The distribution-provided pre-install script failed! Are you sure you want to continue?

如下提示是否需要32位兼容,不需要,no即可
Install NVIDIA's 32-bit compatibility libraries?
或者有时会出现如下提示,直接ok忽略即可,32位兼容的问题
Unable to find a suitable destination to install 32-bit compatibility libraries. Your system may not be set up for 32-bit compatibility. 32-bit compatibility files will not be installed; if you wish to install them, re-run the installation and set a valid directory with the --compat32-libdir option.
DKMS注册内核模块,直接no不需要
Would you like to register the kernel module sources with DKMS? This will allow DKMS to automatically build a new module, if you install a different kernel later

然后会有如下过程提示

是否运行Nvidia-xconfig来配置X configuration文件,选择yes
Would you like to run the nvidia-xconfig utility to automatically update your X configuration file so that the
NVIDIA X driver will be used when you restart X? Any pre-existing X configuration file will be backed up.

Tips: 如果提示这个Error,说明Xserver还没关,重新执行上面的第5步关闭Xserver
ERROR: You appear to be running an X server; please exit X before installing. For further
details, please see the section INSTALLING THE NVIDIA DRIVER in the README available on
the Linux driver download page at www.nvidia.com.+


安装cuda
./cuda_12.6.0_560.28.03_linux.run
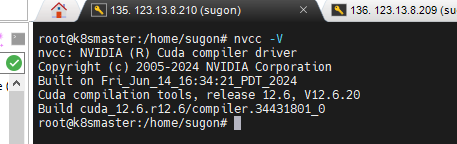
去掉前两个选项不选择安装显卡驱动,输入accept执行下一步。随后去/usr/local/cuda查看安装的服务的文件bin目录下执行nvcc -V查看办版本。
安装cudnn
Tar -xf cudnn-linux-x86_64-8.9.7.29_cuda12-archive.tar.xz解压出文件
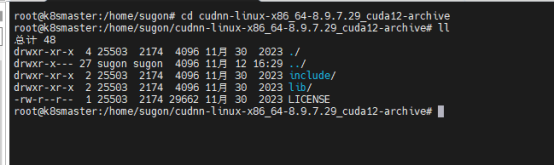
拷贝文件include,lib内的文件到/usr/local/cuda目录下对应的include,lib内。部署完成。
四、部署Miniconda3
./Miniconda3-latest-Linux-x86_64.sh 一直下一步就完事儿

 浙公网安备 33010602011771号