
SpingCloud:Gateway+Nginx+Stomp+Minio构建聊天室并进行文件传输
注:本人使用阿里云服务器(安装mino)+本地虚拟机(安装nginx)进行,理论上完全在本地进行也可以。
1、前期准备:
1、将本地虚拟机设置为静态ip且能ping通外网,参考网址:https://www.cnblogs.com/wsongl/p/14534170.html(完全照做就行)
2、安装nginx:
#创建文件夹
mkdir -p /mydata/nginx

#下载并启动
docker run -p 80:80 --name nginx -d nginx:1.10

#将容器内的配置文件拷贝到当前nginx目录(注意此时我们的位置在mydata文件夹下,不要忘了后面有个点)
docker container cp nginx:/etc/nginx .

#停止nginx容器并删除nginx镜像
docker stop nginx
docker rm nginx

#重命名nginx为conf
mv nginx conf

#再次创建nginx文件夹
mkdir nginx

#将conf移动到nginx
mv conf nginx/

#创建实例
docker run -p 80:80 --name nginx \
-v /mydata/nginx/html:/usr/share/nginx/html \
-v /mydata/nginx/logs:/var/log/nginx \
-v /mydata/nginx/conf:/etc/nginx \
-d nginx:1.10
3、安装minio:
docker run -it -p 9000:9000 -p 9001:9001
--name minio \
-d --restart=always \
-e "MINIO_ROOT_USER=admin" \
-e "MINIO_ROOT_PASSWORD=123456" \
-v /mydata/minio/data:/data \
-v /mydata/minio/config:/root/.minio \
minio/minio server /data \
--console-address ":9001"

MINIO_ROOT_USER:登录账号
MINIO_ROOT_PASSWORD:登陆密码
2、Nginx反向代理配置:
2.1:官方文档参考:
1、minio官方文档:https://docs.min.io/(不要看中文文档,方法已经过期了)
2、gateway官方文档:https://spring.io/projects/spring-cloud-gateway
2.2:引入包:
gateway网关服务的pom.xml
<?xml version="1.0" encoding="UTF-8"?>
<project xmlns="http://maven.apache.org/POM/4.0.0" xmlns:xsi="http://www.w3.org/2001/XMLSchema-instance"
         xsi:schemaLocation="http://maven.apache.org/POM/4.0.0 https://maven.apache.org/xsd/maven-4.0.0.xsd">
    <modelVersion>4.0.0</modelVersion>
    <parent>
        <groupId>org.springframework.boot</groupId>
        <artifactId>spring-boot-starter-parent</artifactId>
        <version>2.5.4</version>
        <relativePath/> <!-- lookup parent from repository -->
    </parent>
    <groupId>com.social</groupId>
    <artifactId>whales-gateway</artifactId>
    <version>0.0.1-SNAPSHOT</version>
    <name>whales-gateway</name>
    <description>Demo project for Spring Boot</description>
    <properties>
        <java.version>1.8</java.version>
        <spring-cloud.version>2020.0.3</spring-cloud.version>
    </properties>
    <dependencies>
        <dependency>
            <groupId>com.alibaba.cloud</groupId>
            <artifactId>spring-cloud-starter-alibaba-nacos-discovery</artifactId>
            <version>2.2.1.RELEASE</version>
            <!-- 使用spring loadbalancer,弃用ribbon -->
            <exclusions>
                <exclusion>
                    <groupId>org.springframework.cloud</groupId>
                    <artifactId>spring-cloud-starter-netflix-ribbon</artifactId>
                </exclusion>
            </exclusions>
        </dependency>
        <dependency>
            <groupId>com.alibaba.cloud</groupId>
            <artifactId>spring-cloud-starter-alibaba-nacos-config</artifactId>
            <version>2.2.1.RELEASE</version>
        </dependency>
        <dependency>
            <groupId>org.springframework.cloud</groupId>
            <artifactId>spring-cloud-loadbalancer</artifactId>
        </dependency>

        <dependency>
            <groupId>org.springframework.boot</groupId>
            <artifactId>spring-boot-starter-webflux</artifactId>
        </dependency>
        <dependency>
            <groupId>org.springframework.cloud</groupId>
            <artifactId>spring-cloud-starter-gateway</artifactId>
        </dependency>
        <dependency>
            <groupId>org.springframework.cloud</groupId>
            <artifactId>spring-cloud-starter-openfeign</artifactId>
        </dependency>

        <dependency>
            <groupId>org.springframework.boot</groupId>
            <artifactId>spring-boot-starter-test</artifactId>
            <scope>test</scope>
        </dependency>
        <dependency>
            <groupId>io.projectreactor</groupId>
            <artifactId>reactor-test</artifactId>
            <scope>test</scope>
        </dependency>
    </dependencies>
    <dependencyManagement>
        <dependencies>
            <dependency>
                <groupId>org.springframework.cloud</groupId>
                <artifactId>spring-cloud-dependencies</artifactId>
                <version>${spring-cloud.version}</version>
                <type>pom</type>
                <scope>import</scope>
            </dependency>
        </dependencies>
    </dependencyManagement>

    <build>
        <plugins>
            <plugin>
                <groupId>org.springframework.boot</groupId>
                <artifactId>spring-boot-maven-plugin</artifactId>
            </plugin>
        </plugins>
    </build>

</project>
gateway的application.yml部分配置:
spring:
  cloud:
    gateway:
      routes:
        - id: community_host_route
          uri: lb://whales-community
          predicates:
            - Host=community.whales.com
本人使用nacos为服务注册中心,在gateway的application.properties文件中配置:
spring.cloud.nacos.discovery.server-addr=119.xx.xx.xx:8848   #nacos安装的地址
spring.application.name= whales-gateway
server.port=88
2.3:nginx配置:
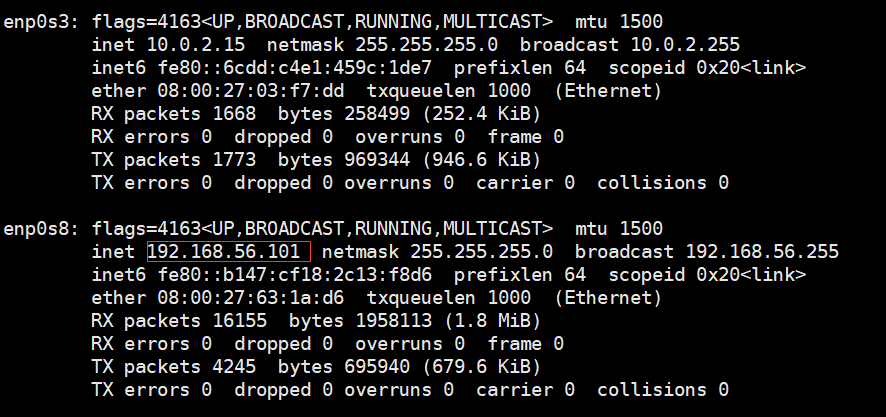
在linux上使用ifconfig检测其IP地址:
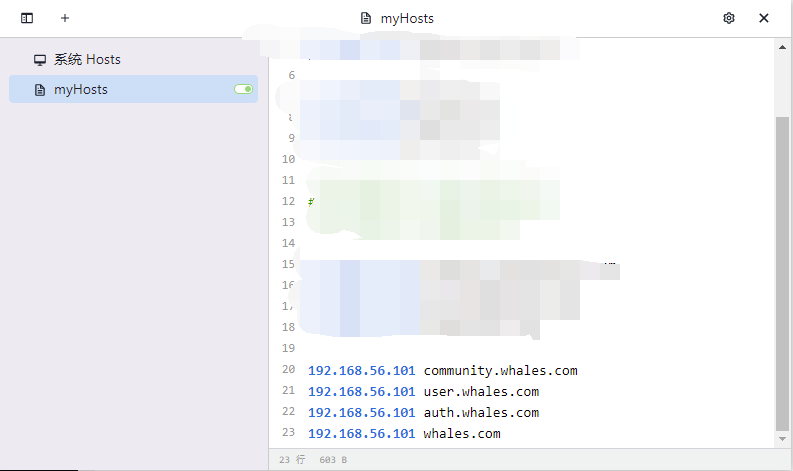
我们选取先前配置好的静态IP地址,在win10的hosts上配置相关域名,本人使用SwitchHosts软件直接进行配置:
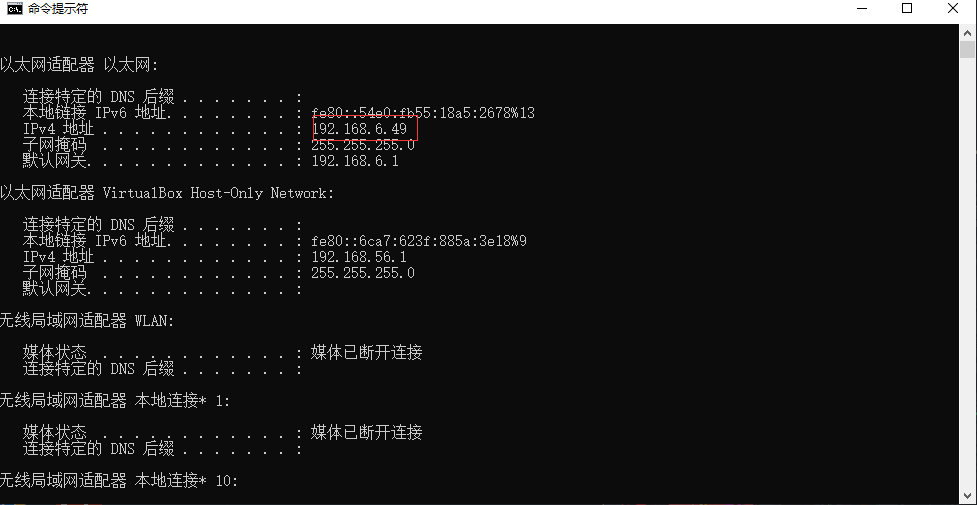
随后在win上检查ip:
在linux上打开nginx.config进行配置,whales是可以替换成其他自己喜欢的命名,但必须与之后conf.d配置文件内容里的proxy_pass后的名字相同:
#进入nginx配置文件夹,打开nginx.config
cd /mydata/nginx/conf/
vi nginx.conf

#编辑文件内容:添加黄色部分字体
user  nginx;
worker_processes  1;

error_log  /var/log/nginx/error.log warn;
pid        /var/run/nginx.pid;

events {
    worker_connections  1024;
}

http {
    include       /etc/nginx/mime.types;
    default_type  application/octet-stream;

    log_format  main  '$remote_addr - $remote_user [$time_local] "$request" '
                      '$status $body_bytes_sent "$http_referer" '
                      '"$http_user_agent" "$http_x_forwarded_for"';

    access_log  /var/log/nginx/access.log  main;

    sendfile        on;
    #tcp_nopush     on;

    keepalive_timeout  65;

    #gzip  on;
    upstream whales{
      server 192.168.6.49:88;
    }
    include /etc/nginx/conf.d/*.conf;
}
配置conf.d下的配置文件:
#进入conf.d文件下
cd /mydata/nginx/conf/conf.d/

#复制一份default.conf并进行编辑
cp default.conf whales.conf
vi whales.conf

#编辑文件内容:加量部分
server {
    listen       80;
    server_name  whales.com  *.whales.com;

    #charset koi8-r;
    #access_log  /var/log/nginx/log/host.access.log  main;

    location / {
        proxy_set_header Host $host;
        proxy_pass http://whales;
    }

    #error_page  404              /404.html;

    # redirect server error pages to the static page /50x.html
    #
    error_page   500 502 503 504  /50x.html;
    location = /50x.html {
        root   /usr/share/nginx/html;
    }

    # proxy the PHP scripts to Apache listening on 127.0.0.1:80
    #
    #location ~ \.php$ {
    #    proxy_pass   http://127.0.0.1;
    #}

    # pass the PHP scripts to FastCGI server listening on 127.0.0.1:9000
    #
    #location ~ \.php$ {
    #    root           html;
    #    fastcgi_pass   127.0.0.1:9000;
    #    fastcgi_index  index.php;
    #    fastcgi_param  SCRIPT_FILENAME  /scripts$fastcgi_script_name;
    #    include        fastcgi_params;
    #}
截止目前nginx+gateway的反向代理完成。
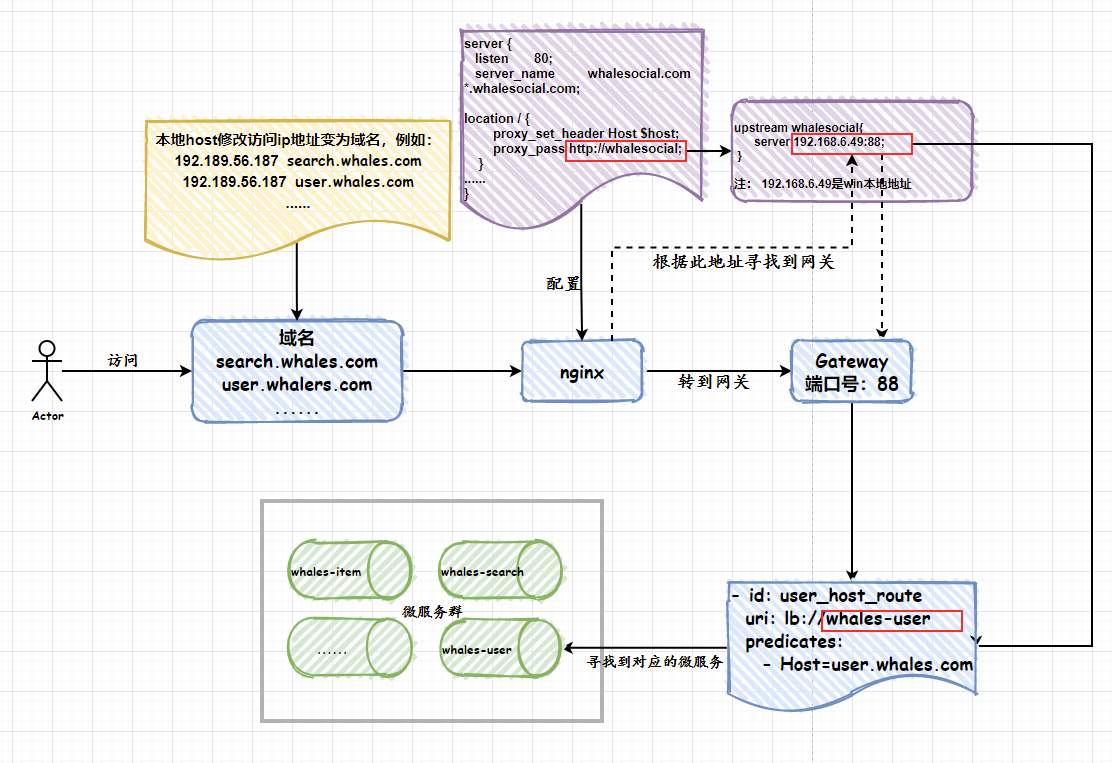
2.4:nginx反向代理原理图:
3、minio配置实现
3.1:MinioConfig配置类
@Data
@Component
@ConfigurationProperties(prefix = "minio")
public class MinioConfig {

    private String endpoint;

    private String accessKey;

    private String secretKey;

    private String bucketName;

    @Bean
    public MinioClient minioClient(){
        MinioClient minioClient =
                MinioClient.builder()
                        .endpoint(endpoint)
                        .credentials(accessKey, secretKey)
                        .build();
        return minioClient;
    }
}
进入Minio控制台生成密钥:

生成存储桶:

3.2:编写Minio工具类
/**
 * 实体类
 * 爪哇笔记:https://blog.52itstyle.vip
 */
@Data
@Configuration
@ConfigurationProperties(prefix = "min.io")
public class MinIoComponent{

    private String endpoint;
    private String accessKey;
    private String secretKey;

    @Bean
    public MinioClient minClient(){
        // 使用MinIO服务的URL,端口,Access key和Secret key创建一个MinioClient对象
        MinioClient minioClient = new MinioClient.Builder().endpoint(endpoint).credentials(accessKey, secretKey).build();
        return minioClient;
    }
}
工具类中的方法可以在官方文档中找到然后进行实际应用的修改
@Component
public class MinioUtils {
    @Autowired
    MinioClient minioClient;

    @SneakyThrows
    public void putObject(MultipartFile file, String bucket, String pathObject) {
        InputStream stream = file.getInputStream();
        String type = file.getContentType();
        //System.out.println(type);
        minioClient.putObject(
                PutObjectArgs.builder().bucket(bucket).object(pathObject).stream(
                        stream, file.getSize(), -1)
                        .contentType(type)
                        .build());
    }

    @SneakyThrows
    public void putObject(File file, String bucket, String pathObject) {
        InputStream stream = new FileInputStream(file);
        String type = file.getName().split("\\.")[1];
        System.out.println(type);
        minioClient.putObject(
                PutObjectArgs.builder().bucket(bucket).object(pathObject).stream(
                        stream, file.length(), -1)
                        .contentType(type)
                        .build());
    }
}
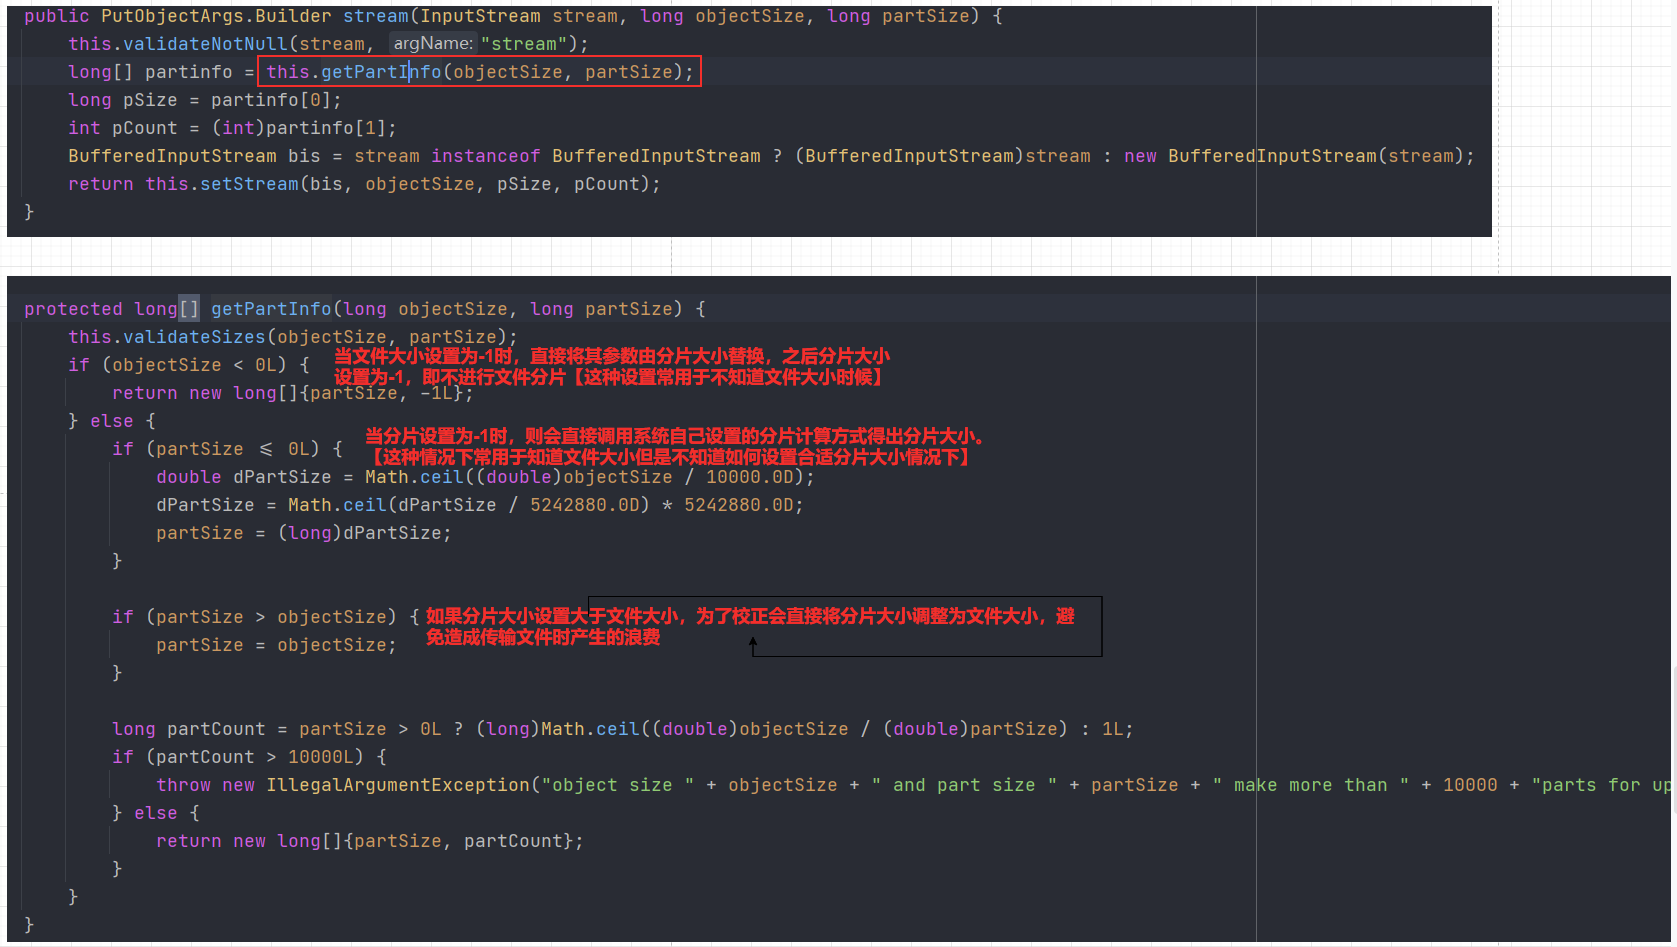
这里着重讲解下stream中的意义,有文件流、文件大小、分块大小。由于minio在传输中是将文件分块传输,所以有分块大小设置:
application.properties进行参数配置:
min.io.endpoint = http://119.23.57.189:9000
#生成密钥
min.io.accessKey =3B-----------------61
min.io.secretKey =+ANgi6S+----------------------2pqff3gS
#生成存储桶
min.io.bucket = whales-picture
3.3:实际代码
@Override
    public void sendPhotoToGroup(String groupId, String userId, MultipartFile file) throws ExecutionException, InterruptedException {
        //设置组与当日时间:文件夹命名方式:groupxxxxxxx/yyyyMMdd
        SimpleDateFormat s = new SimpleDateFormat("yyyyMMdd");//设置日期格式
        String name = file.getOriginalFilename();
        String type = file.getContentType();
        String format = s.format(new Date());
        //设置存储在minio的文件路径
        String pathObject = "/Group" + groupId + "/" + format + "/" + name;
        minioUtils.putObject(file, MINIO_BUCKET, pathObject);
  }
4、基于Stomp协议搭建Websocket聊天室:
4.1:WebSocketStompConfig配置
@Configuration
@EnableWebSocketMessageBroker
public class WebSocketStompConfig implements WebSocketMessageBrokerConfigurer {
    // 这个方法的作用是添加一个服务端点,来接收客户端的连接。
    @Override
    public void registerStompEndpoints(StompEndpointRegistry registry){
        registry.addEndpoint("/whaleSocial").withSockJS();
    }
    @Override
    // 这个方法的作用是定义消息代理,通俗一点讲就是设置消息连接请求的各种规范信息。
    public void configureMessageBroker(MessageBrokerRegistry registry){
        //服务端给客户端发消息的地址的前缀信息
        //@SenTo/subscribe
        registry.enableSimpleBroker("/member");
        //客户端给服务端发消息的地址的前缀
        //@SubscribeMapping/subscribe只接收此前缀的消息
        //@MessageMapping/send
        registry.setApplicationDestinationPrefixes("/group");
    }
}
4.2:Controller类
@Controller
/*@RequestMapping("/")*/
public class CommunityController {
    @ResponseBody
    @PostMapping("/photos/{groupId}/{userId}")
    public GraceJSONResult sendPhoto(@PathVariable String groupId, @PathVariable String userId, MultipartFile file) throws ExecutionException, InterruptedException{
        sendMessageService.sendPhotoToGroup(groupId, userId, file);
        return GraceJSONResult.ok();
    }
}
4.3:Service类
@Service
public class CommunitySendMessageServiceServiceImpl implements CommunitySendMessageService {

    private final static String REDIS_MESSAGE_USER = "redis_message_user";
    private final static String GROUP_MEMBER = "redis_group_member";
    private final static String GROUP_MESSAGES = "redis_messages";
    private final static String MINIO_BUCKET = "whales-picture";

    @Resource
    private SimpMessagingTemplate simpMessagingTemplate;

    @Autowired
    private StringRedisTemplate redisTemplate;

    @Resource
    private GroupMembersMapper groupMembersMapper;

    @Autowired
    MinioUtils minioUtils;

    @Autowired
    ThreadPoolExecutor executor;

    @Override
    public void sendPhotoToGroup(String groupId, String userId, MultipartFile file) throws ExecutionException, InterruptedException {
        //设置组与当日时间:文件夹命名方式:groupxxxxxxx/yyyyMMdd
        SimpleDateFormat s = new SimpleDateFormat("yyyyMMdd");//设置日期格式
        String name = file.getOriginalFilename();
        String type = file.getContentType();
        String format = s.format(new Date());
        //设置存储在minio的文件路径
        String pathObject = "/Group" + groupId + "/" + format + "/" + name;
        minioUtils.putObject(file, MINIO_BUCKET, pathObject);
        //获取可访问的url文件路径
        //TODO 将地址更换为域名,photosUrl是将回显地址给传前端
        String photosUrl = "http://119.xx.xx.189:9000/" + MINIO_BUCKET + pathObject;
        simpMessagingTemplate.convertAndSend("/member/photos/" + groupId, photosUrl);
    }
}
4.4:前端测试页面:
<!DOCTYPE html>
<html xmlns:th="http://www.thymeleaf.org">
<head>
    <meta charset="UTF-8" />
    <title>Spring Boot+WebSocket+广播式</title>
    <script src="https://cdn.bootcdn.net/ajax/libs/sockjs-client/1.5.1/sockjs.min.js"></script>
    <script src="https://cdn.bootcdn.net/ajax/libs/stomp.js/2.3.3/stomp.min.js"></script>
    <script src="https://ajax.aspnetcdn.com/ajax/jQuery/jquery-3.5.1.min.js"></script>
</head>
<body onload="disconnect()">
<noscript><h2 style="color: #ff0000">貌似你的浏览器不支持websocket</h2></noscript>
<div>
<!--    <div>
        <button id="enter" onclick="enter();">进入群聊</button>
        <button id="esc" disabled="disabled" onclick="disconnect();">退出群聊</button>
    </div>-->
    <div>
        <button id="connect" onclick="connect();">进入群聊</button>
        <button id="disconnect" disabled="disabled" onclick="disconnect();">退出群聊</button>
    </div>
    <div id="conversationDiv">
        <form action="/photos/1148973713/18819776464" method="post" enctype="multipart/form-data" target="rfFrame">
            <input type="file" id="file" name="file">
            <input type="submit" value="提交" /><p>
        </form>
        <img id="photos"/>
    </div>
</div>
<script type="text/javascript">
    var stompClient = null;

    function setConnected(connected) {
        document.getElementById('connect').disabled = connected;
        document.getElementById('disconnect').disabled = !connected;
        document.getElementById('conversationDiv').style.visibility = connected ? 'visible' : 'hidden';
        $('#response').html();
    }

    function connect() {
        // 连接 SockJs 的 endpoint 名称为 "/whaleSocial"
        var socket = new SockJS('/whaleSocial',null,{timeout: 15000});
        // 使用 STOMP 子协议的 WebSocket 客户端
        stompClient = Stomp.over(socket);
        stompClient.connect({}, function(frame) {
            setConnected(true);
            console.log('Connected: ' + frame);// 通过 stompClient.subscribe 订阅
            stompClient.subscribe('/member/photos/1148973713', function(respnose){
                console.log("This is:"+respnose.body)
                showPhotosResponse(respnose.body);
            });
        });
    }function disconnect() {
        // 断开连接
        if (stompClient != null) {
            stompClient.disconnect();
        }
        setConnected(false);
        console.log("Disconnected");
    }function showPhotosResponse(message){
        $("#photos").attr("src",message)
    }
</script>
</body>
</html>
此时如果使用域名访问会报错:Incompatibile SockJS! Main site uses: "1.1.5", the iframe: "1.0.0",因为websoket必须要使用HTTP/1.1通信协议,所以要到nginx再新增配置:
server {
    listen       80;
    server_name  whales.com  *.whales.com;

    #charset koi8-r;
    #access_log  /var/log/nginx/log/host.access.log  main;

    location / {
        proxy_set_header Host $host;
        proxy_pass http://whalesocial;
    }
   #前缀whaleSocial必须与WebSocketConfig中Stomp服务端设置的节点名字相同
    location /whaleSocial/{
        proxy_pass http://192.168.6.49:11000;
        proxy_set_header Host $host;
        proxy_set_header   X-Real-IP        $remote_addr;
        proxy_set_header   X-Forwarded-For  $proxy_add_x_forwarded_for;
        proxy_http_version 1.1;
        proxy_set_header Upgrade $http_upgrade;
        proxy_set_header Connection "upgrade";
    }

    #error_page  404              /404.html;

    # redirect server error pages to the static page /50x.html
    #
    error_page   500 502 503 504  /50x.html;
    location = /50x.html {
        root   /usr/share/nginx/html;
    }
配置完后就能使用域名进入网页发送websocket消息,并将图片上传Minio并进行回显。

 浙公网安备 33010602011771号