[React] 09 - Tutorial: components
jsx变为js的过程:http://babeljs.io/repl/
Youtube: https://www.youtube.com/channel/UCA-Jkgr40A9kl5vsIqg-BIg/playlists
Raisl365: https://www.rails365.net/movies/you-ren-de-react-shi-pin-jiao-cheng-ji-chu-pian-1-jie-shao
该教程不错:尚硅谷react教程(2020-2021),提供代码和资料。
上一节讲了:通过代码的分离来展示client.js文件的进化过程。
关于基础,还需要继续夯实。
组件的生命周期
Ref: [React] 02 - Intro: why react and its design pattern - React 组件生命周期
Ref: 尚硅谷react教程(2020-2021)教程37-47
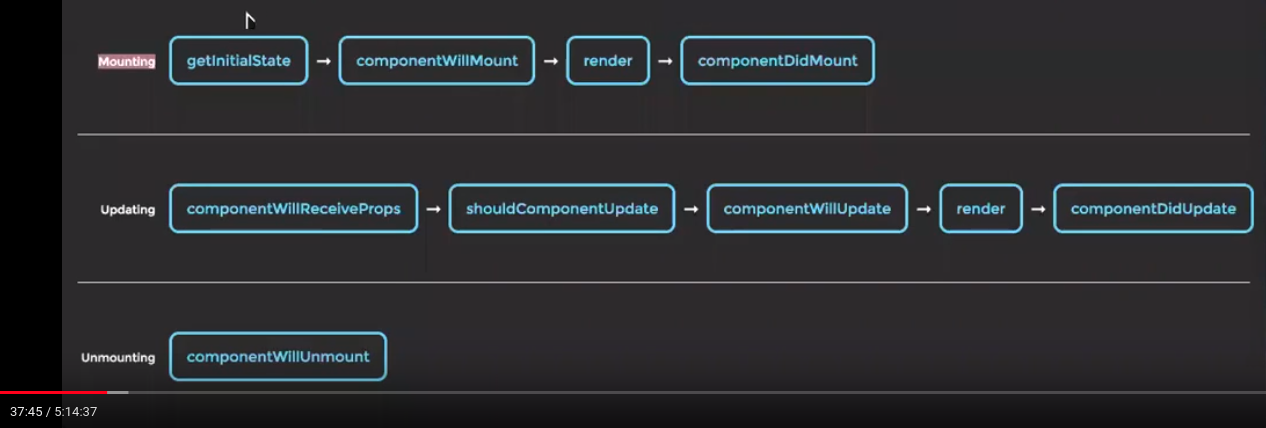
- Mounting :已插入真实 DOM 【挂载】
- Updating :正在被重新渲染 【更新】
- Unmounting:已移出真实 DOM 【卸载】
一个 Mounting 例子

生命周期的方法
七个默认方法 in React.Component:
-
-
componentWillMount 【挂载前 的操作】在渲染前调用,在客户端也在服务端。
-
componentDidMount 【挂载后 调用的操作】在第一次渲染后调用,只在客户端。之后组件已经生成了对应的DOM结构,可以通过this.getDOMNode()来进行访问。 如果你想和其他JavaScript框架一起使用,可以在这个方法中调用setTimeout, setInterval或者发送AJAX请求等操作(防止异部操作阻塞UI)。
-
componentWillReceiveProps 【接收prop后调用】在组件接收到一个新的 prop (更新后)时被调用。这个方法在初始化render时不会被调用。
-
shouldComponentUpdate 【帮助解决一些性能上的问题】返回一个布尔值。在组件接收到新的props或者state时被调用。在初始化时或者使用forceUpdate时不被调用。 可以在你确认不需要更新组件时使用。
-
componentWillUpdate 在组件接收到新的props或者state但还没有render时被调用。在初始化时不会被调用。
-
componentDidUpdate 在组件完成更新后立即调用。在初始化时不会被调用。
-
componentWillUnmount 【做一些清除的动作】在组件从 DOM 中移除的时候立刻被调用。
-
官方api文档:https://reactjs.org/docs/react-component.html
Goto: 生命周期流程图
经验之谈:
-
- componentDidMount常用。
- componentDidUpdate常用。
- 其他不太常用。
componentWillMount()、componentWillReceiveProps()、componentWillUpdate() 这三个函数,UNSAFE_componentWillMount()、UNSAFE_componentWillReceiveProps()、UNSAFE_componentWillUpdate()。
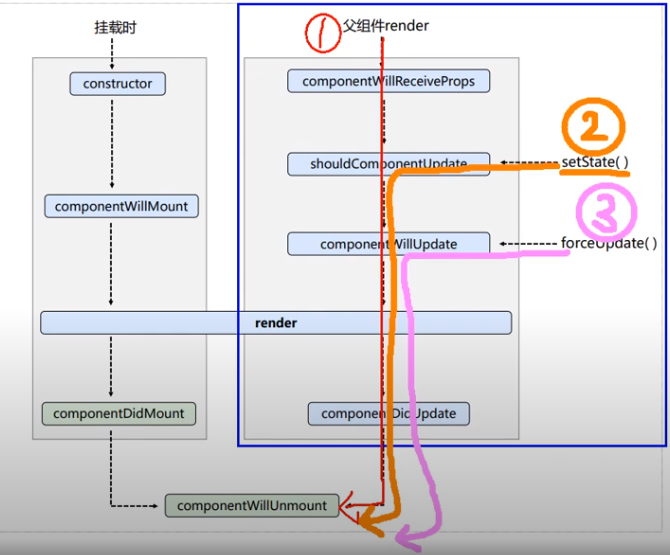
Updating 的例子
有三条路子如下图。基于React17的版本。
shouldComponentUpdate()是个”阀门“;若忽略阀门,则使用强制更新 forceUpdate(),例如不该state,就想让其更新一下。


<!DOCTYPE html>
<html lang="en">
<head>
    <meta charset="UTF-8">
    <title>2_react生命周期(旧)</title>
</head>
<body>
    <!-- 准备好一个“容器” -->
    <div id="test"></div>

    <!-- 引入react核心库 -->
    <script type="text/javascript" src="../js/react.development.js"></script>
    <!-- 引入react-dom,用于支持react操作DOM -->
    <script type="text/javascript" src="../js/react-dom.development.js"></script>
    <!-- 引入babel,用于将jsx转为js -->
    <script type="text/javascript" src="../js/babel.min.js"></script>

    <script type="text/babel">
        /*
                1. 初始化阶段: 由ReactDOM.render()触发---初次渲染
                                    1.    constructor()
                                    2.    componentWillMount()
                                    3.    render()
                                    4.    componentDidMount() =====> 常用
                                                    一般在这个钩子中做一些初始化的事,例如:开启定时器、发送网络请求、订阅消息
                2. 更新阶段: 由组件内部this.setSate()或父组件render触发
                                    1.    shouldComponentUpdate()
                                    2.    componentWillUpdate()
                                    3.    render() =====> 必须使用的一个
                                    4.    componentDidUpdate()
                3. 卸载组件: 由ReactDOM.unmountComponentAtNode()触发
                                    1.    componentWillUnmount()  =====> 常用
                                                    一般在这个钩子中做一些收尾的事,例如:关闭定时器、取消订阅消息
        */
        //创建组件
        class Count extends React.Component{

            //构造器
            constructor(props){
                console.log('Count---constructor');
                super(props)
                //初始化状态
                this.state = {count:0}
            }

            //加1按钮的回调
            add = ()=>{
                //获取原状态
                const {count} = this.state
                //更新状态
                this.setState({count:count+1})
            }

            //卸载组件按钮的回调
            death = ()=>{
                ReactDOM.unmountComponentAtNode(document.getElementById('test'))
            }

            //强制更新按钮的回调
            force = ()=>{
                this.forceUpdate()
            }

            //组件将要挂载的钩子
            componentWillMount(){
                console.log('Count---componentWillMount');
            }

            //组件挂载完毕的钩子
            componentDidMount(){
                console.log('Count---componentDidMount');
            }

            //组件将要卸载的钩子
            componentWillUnmount(){
                console.log('Count---componentWillUnmount');
            }

            //控制组件更新的“阀门”
            shouldComponentUpdate(){
                console.log('Count---shouldComponentUpdate');
                return true
            }

            //组件将要更新的钩子
            componentWillUpdate(){
                console.log('Count---componentWillUpdate');
            }

            //组件更新完毕的钩子
            componentDidUpdate(){
                console.log('Count---componentDidUpdate');
            }

            render(){
                console.log('Count---render');
                const {count} = this.state
                return(
                    <div>
                        <h2>当前求和为:{count}</h2>
                        <button onClick={this.add}>点我+1</button>
                        <button onClick={this.death}>卸载组件</button>
                        <button onClick={this.force}>不更改任何状态中的数据,强制更新一下</button>
                    </div>
                )
            }
        }

        //父组件A
        class A extends React.Component{
            //初始化状态
            state = {carName:'奔驰'}

            changeCar = ()=>{
                this.setState({carName:'奥拓'})
            }

            render(){
                return(
                    <div>
                        <div>我是A组件</div>
                        <button onClick={this.changeCar}>换车</button>
                        <B carName={this.state.carName}/>
                    </div>
                )
            }
        }

        //子组件B
        class B extends React.Component{
            //组件将要接收新的props的钩子
            componentWillReceiveProps(props){
                console.log('B---componentWillReceiveProps',props);
            }

            //控制组件更新的“阀门”
            shouldComponentUpdate(){
                console.log('B---shouldComponentUpdate');
                return true
            }
            //组件将要更新的钩子
            componentWillUpdate(){
                console.log('B---componentWillUpdate');
            }

            //组件更新完毕的钩子
            componentDidUpdate(){
                console.log('B---componentDidUpdate');
            }

            render(){
                console.log('B---render');
                return(
                    <div>我是B组件,接收到的车是:{this.props.carName}</div>
                )
            }
        }

        //渲染组件
        ReactDOM.render(<Count/>,document.getElementById('test'))
    </script>
</body>
</html>
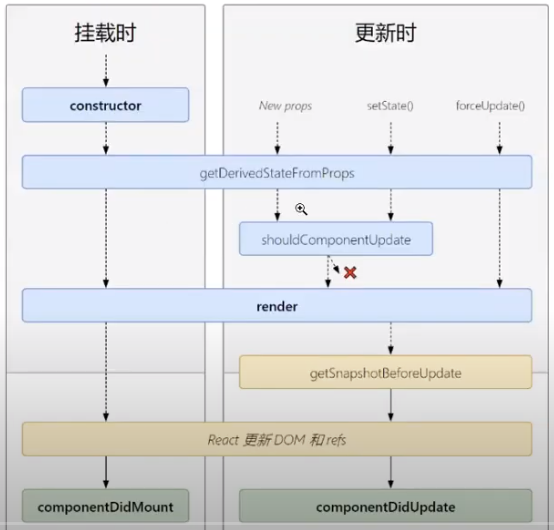
React 17 New Features
更新后的模式如下。
-
getSnapshotBeforeUpdate() 多少有点用
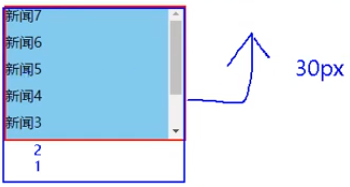
<head>
    <meta charset="UTF-8">
    <title>4_getSnapShotBeforeUpdate的使用场景</title>
    <style>
        .list{
            width: 200px;
            height: 150px;
            background-color: skyblue;
            overflow: auto;
        }
        .news{
            height: 30px;
        }
    </style>
</head>

// 以上定义了style;然后,在body中添加list。
我们这里,将用react的方式 "再实现" 这个功能。动态的items持续添加,但滚动条保持显示的内容不变。
    <script type="text/babel">
        class NewsList extends React.Component{

            state = {newsArr:[]}

            componentDidMount(){
                setInterval(() => {
                    // 获取原状态
                    const {newsArr} = this.state
                    // Get:模拟一条 “新闻标题”
                    const news = '新闻'+ (newsArr.length+1)

                    // 更新状态
                    this.setState({newsArr: [news, ...newsArr]})
                }, 1000);
            }

            getSnapshotBeforeUpdate(){        // <-------------- return 到了下面函数的第三个参数 height
                return this.refs.list.scrollHeight
            }

            componentDidUpdate(preProps,preState,height){
                this.refs.list.scrollTop+= this.refs.list.scrollHeight - height
            }

            render(){
                return(
                    <div className="list" ref="list">
                        {
                            this.state.newsArr.map((n, index)=>{
                                return <div key={index} className="news">{n}</div>
                            })
                        }
                    </div>
                )
            }
        }
        ReactDOM.render(<NewsList/>,document.getElementById('test'))
    </script>
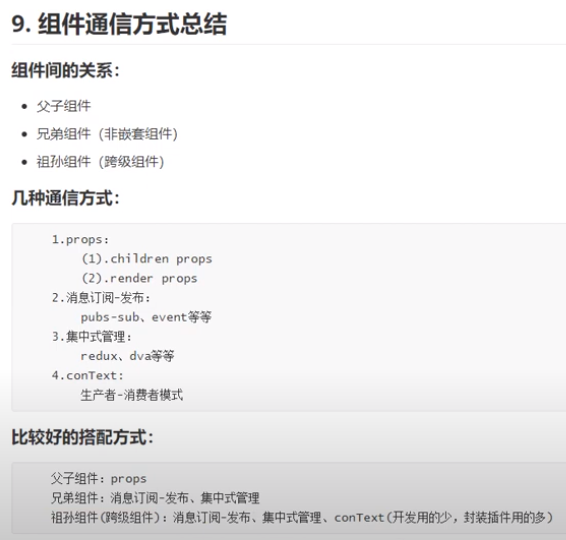
组件间通信方式
开发插件
安装react开发插件:React Developer Tools
代码:https://github.com/hfpp2012/hello-react

查看 "组件“ 的层次、各个组件的Props、States等信息,演示如下:
父子组件间de消息传递 ----> PropTypes
自定义控件,如何获得组件的“参数”和组件内部的“子组件”?
父组件

import React, { Component } from 'react';

import Header from './components/Header';
import Home   from './components/Home';

class App extends Component {
  render() {

    const user = {
      name   : "Anna",
      hobbies: ["Sports", "Reading"]
    }

    return (
      <div className="container">
        <div className="row">
          <div className="col-xs-1 col-xs-offset-11">
            <Header />
          </div>
        </div>
        <div className="row">
          <div className="col-xs-1 col-xs-offset-11">
            <h1>Hello !!</h1>
          </div>
        </div>
        <div className="row">
          <div className="col-xs-1 col-xs-offset-11">
            <Home name={"Max"} age={12} user={user}>  // <---- 向组件传入三个参数,通过prop作为媒婆
              <p>I am child</p>                       // <---- 这算是Home的Children节点
            </Home>
          </div>
        </div>
      </div>
    );
  }
}

export default App;
为了防止参数的自动类型转化,可以执行参数强制检查的策略。
例如,希望是数字,但可能传入子组件后,自动变成了字符串,搞得我们没有办法拿来做算术运算了呢。
子组件

import React, { Component } from 'react';

import PropTypes from 'prop-types';        // <---- 类型转化

export default class Home extends Component {
  render() {
    return (

      <div className="container">
        <div className="row">
          <div className="col-xs-1 col-xs-offset-11">
            <div>your name is {this.props.name}, your age is {this.props.age}</div>
            <div>
              <h4>hobbies</h4>
              <ul>
                {this.props.user.hobbies.map((hobby, i) => <li key={i}>{hobby}</li>)}
              </ul>
            </div>
            <div>{this.props.children}</div>  // <---- 此处获得了"I am child",得到了标签内的内容~
          </div>
        </div>
      </div>
    );
  }
}


/**
  * 在此定义参数的类型
  */
Home.propTypes = {
  name:     PropTypes.string,
  age:      PropTypes.number,
  user:     PropTypes.object,
  children: PropTypes.element.isRequired
};
子组件调用父组件的方法
import React, { Component } from 'react';

import Header from './components/Header';
import Home   from './components/Home';

class App extends Component {

  onGreet(age) {
    alert(age);
  }

  render() {
    const user = {
      name: "Anna",
      hobbies: ["Sports", "Reading"]
    }

    return (
      <div className="container">
        <div className="row">
          <div className="col-xs-1 col-xs-offset-11">
            <Header />
          </div>
        </div>
        <div className="row">
          <div className="col-xs-1 col-xs-offset-11">
            <h1>Hello !!</h1>
          </div>
        </div>
        <div className="row">
          <div className="col-xs-1 col-xs-offset-11">
            <Home name={"Max"} initialAge={12} user={user} greet={this.onGreet} />  // onGreet作为参数传递给子组件
          </div>
        </div>
      </div>
    );
  }
}

export default App;
如下:Home 子组件
Home.js,其中的Greet button触发了App组件中的函数,是怎么做到的?
  /**
    * 1. 点击 子组件的button, 点击后触发 该函数handleGreet
    * 2. 该函数其实是个父附件的函数指针
    * 如此,子组件通过父组件给他的一个接口从而改变了父组件自身
    */

  handleGreet() {
    this.props.greet(this.state.age)  // 其实就是父组件中的onGreet
  }
  render() {
    return (
      <div className="container">
        <div className="row">
          <div className="col-xs-1 col-xs-offset-11">
            <div>your name is {this.props.name}, your age is {this.state.age}</div>
            <p>Status: {this.state.status}</p>
            <button onClick={() => {this.onMakeOlder()}} className="btn btn-primary">Make me older</button>
            <hr />

            <button onClick={this.handleGreet.bind(this)} className="btn btn-primary">Greet</button>

          </div>
        </div>
      </div>
    );
  }
}

Home.propTypes = {
  name:  PropTypes.string,
  age:   PropTypes.number,
  user:  PropTypes.object,
  greet: PropTypes.func  // <---- 添加对应的参数检测
};
- 为何要bind(this)?
Ref: 为什么React事件处理函数必须使用Function.bind()绑定this?
经典考题
let obj = {
    tmp: 'Yes!',
    testLog: function(){
        console.log(this.tmp);
    }
};
obj.testLog();  # 正常显示‘yes!'
-------------------------------
let tmpLog = obj.testLog;
tmpLog();        # 过度了一下,然后testLog内部的this就变成了”全局this",在这里也就是window
思考:毕竟每一个对象都有自己的this,tmpLog虽然被设置成为了obj.testLog,但自己仍然保留了自己的this。
背后的原理
React跟原生JavaScript的事件绑定区别有两点,其中第二点就是:
在React(或者说JSX)中,传递的事件参数不是一个字符串,而是一个实实在在的函数:
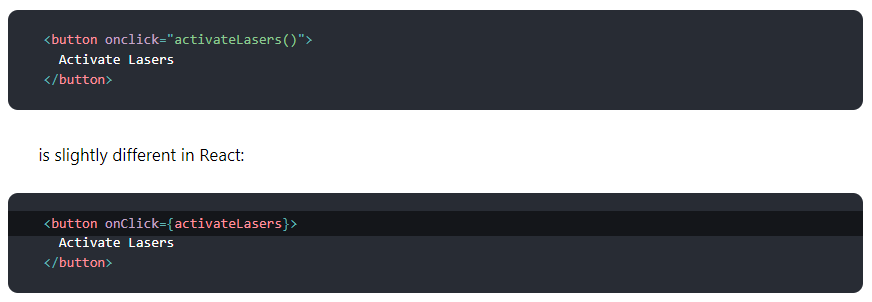
这样说,React中的事件名(上图中的onClick)就是我所举例子中的中间变量,React在事件发生时调用onClick,由于onClick只是中间变量,所以处理函数中的this指向会丢失;
为了解决这个问题,我们需要在实例化对象的时候,需要在构造函数中绑定this,使得无论事件处理函数如何传递,它的this的指向都是固定的,固定指向我们所实例化的对象。
子组件之间的传值
子组件 Home 与 header 间的通信,该怎么搞? ---- 当然是通过父组件”搭桥“。
- 父组件App.js
import React, { Component } from 'react';

import Header from './components/Header';
import Home   from './components/Home';

class App extends Component {

  constructor() {
    super();
    this.state = {
      homeLink: "Home"
    }
  }

  onGreet(age) {
    alert(age);
  }

  onChangeLinkName(newName) {  // (5) 实际干活的地方,也就是改变了state
    this.setState({
      homeLink: newName
    })
  }

  render() {

    const user = {
      name: "Anna",
      hobbies: ["Sports", "Reading"]
    }

    return (
      <div className="container">
        <div className="row">
          <div className="col-xs-1 col-xs-offset-11">
            <Header homeLink={this.state.homeLink} />    // (6) 在这里,homelink对于Header子组件就是一个参数;参数被另一个子组件改变,之后,state改变,自然会触发这个子组件UI更新
          </div>
        </div>
        <div className="row">
          <div className="col-xs-1 col-xs-offset-11">
            <h1>Hello !!</h1>
          </div>
        </div>
        <div className="row">
          <div className="col-xs-1 col-xs-offset-11">
            <Home
              name      ={"Max"}
              initialAge={12}
              user      ={user}
              greet     ={this.onGreet}
              changeLink={this.onChangeLinkName.bind(this)}  // (4) app 给子组件传递个“函数指针“,改变的state其实是属于父组件的东西(state),homelink是属于父组件
            />
          </div>
        </div>
      </div>
    );
  }
}

export default App;
- 子组件Header.js
Jeff: 作为父组件的一个子部分,看似return出html就好了,没用到render。
只需要显示,所以就搞成”无状态组件“就好啦,不需要render。
import React from 'react';

const Header = (props) => {
  return (
    <div className="container">
      <div className="row">
        <div className="col-xs-1 col-xs-offset-11">
          <h1>{props.homeLink}</h1>
        </div>
      </div>
    </div>
  );
};

export default Header;
- 子组件Home.js
Jeff: 有交互,所以需要render。
import React, { Component } from 'react';

import PropTypes from 'prop-types';

export default class Home extends Component {
  constructor(props) {
    super(props);
    this.state = {
      age:       props.initialAge,
      status:    0,
      homeLink:  "Changed Link"    // (3) 兄弟子组件获得的改变值,也就是父组件为他俩搭的桥
    }
    setTimeout(() => {
      this.setState({
        status: 1
      })
    }, 3000)
  }

  onMakeOlder() {
    this.setState({
      age: this.state.age + 3
    })
  }

  handleGreet() {
    this.props.greet(this.state.age)
  }

  onChangeLink() {
    this.props.changeLink(this.state.homeLink);  // (2) 执行了“指针函数” from 父组件;注意参数,子组件会将input的值拿来作为这里的value。
  }

  render() {
    return (
      <div className="container">
        <div className="row">
          <div className="col-xs-1 col-xs-offset-11">
            <div>your name is {this.props.name}, your age is {this.state.age}</div>
            <p>Status: {this.state.status}</p>
            <button onClick={() => {this.onMakeOlder()}} className="btn btn-primary">Make me older</button>
            <hr />
            <button onClick={this.handleGreet.bind(this)} className="btn btn-primary">Greet</button>
            <hr />
            <button onClick={this.onChangeLink.bind(this)} class="btn btn-primary">Change Header Link</button>  // (1) 点击触发
          </div>
        </div>
      </div>
    );
  }
}

Home.propTypes = {
  name:  PropTypes.string,
  age:   PropTypes.number,
  user:  PropTypes.object,
  greet: PropTypes.func
};
双向数据绑定
在以上的基础上,加了input框;
这里会读入“输入框”的内容,然后再改写Header的内容。

<input
  type        ="text"
  defaultValue={this.props.initialName}
  value       ={this.state.initialName}
  onChange    ={(event) => this.onHandleChange(event)}  // (1) 只是改变了子组件home内部的一个state;奇怪,这里的event代表了什么?
/>
<button onClick={this.onChangeLink.bind(this)} className="btn btn-primary">Change Header Link</button>   // (2) 点击后,读出这个home内部的state,然后改写父组件的state
event 代表了什么?event.target可获得事件涉及组件的属性。
  onHandleChange(event) {
    this.setState({
      homeLink: event.target.value
    })
  }
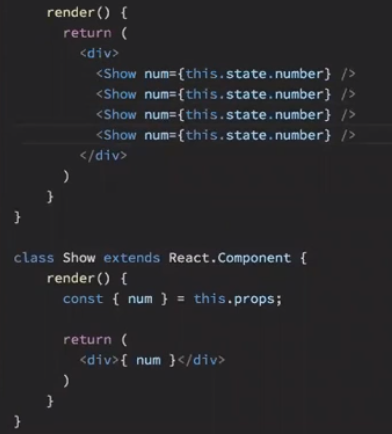
组件的代码复用
class Show中没有state,所以课省略掉constructor,系统会自动采用默认的。
下图也展示了组件的可复制性,方便代码复用。

 浙公网安备 33010602011771号