
Data-Free Quantization,我踩的那些坑
(本文首发于公众号,没事来逛逛)
上一篇文章介绍了高通 Data-Free Quantization 的基本思想,但我在代码实现的时候发现有个问题没有解决,因此这篇文章对前文打个补丁 (果然没有落实到代码层面都不能说自己看懂了论文)。
Depthwise Conv如何equalize
在前面的文章中,我给出了 weight equalize 的简单实现:
def equalize(weight1, bias1, weight2):
	# 重排列
	weight2 = weight2.permute(1, 0, 2, 3)
	out_channel = weight1.shape[0]
	for i in range(out_channel):
		r1 = compute_range(weight1, i)  # 计算kernel数值范围
		r2 = compute_range(weight2, i)
		s =  r1 / sqrt(r1 * r2)
		weight1[i] = weight1[i] * (1. / s)
		weight2[i] = weight2[i] * s
                bias1[i] = bias1[i] * (1. / s)
        # 调整回之前的数据排布
	weight2 = weight2.permute(1, 0, 2, 3)
	return weight1, bias1, weight2
仔细读了代码的读者可能会发现:这段 equalize 的代码对可分离卷积 (depthwise conv) 好像不适用。
确实是这样的,上面这段代码只适用于普通的卷积。如果第二个 conv 是可分离卷积的话,由于它的 input channel 是 1,因此在循环里面,weight2 是会越界的。
高通在论文里面避开了这个问题,但其实可分离卷积才是需要 weight equalize 的地方。(太鸡贼了)
不过,好在高通自家的 AIMet 工具中已经落地了这套算法,所以在代码中可以了解到实际情况是怎么处理的。
首先,在 AIMet 中有这样一段代码 (https://github.com/quic/aimet/blob/develop/TrainingExtensions/torch/src/python/aimet_torch/cross_layer_equalization.py#L157 ,这个链接随着代码更新可能会变化)
@staticmethod
def convert_layer_group_to_cls_sets(layer_group):
    """
        Helper function to convert a layer group to a list of cls sets
        :param layer_group: Given layer group to conver
        :return: List of cls sets
        """
    cls_sets = []

    prev_layer_to_scale = layer_group.pop(0)
    while layer_group:
        next_layer_to_scale = layer_group.pop(0)

        if next_layer_to_scale.groups > 1:

            if layer_group:  # 如果第二个卷积是depthwise conv,则会继续找到下一个conv,三个为一组
                next_non_depthwise_conv_layer = layer_group.pop(0)
                cls_sets.append((prev_layer_to_scale, next_layer_to_scale, next_non_depthwise_conv_layer))
                prev_layer_to_scale = next_non_depthwise_conv_layer

        else:
             cls_sets.append((prev_layer_to_scale, next_layer_to_scale))
             prev_layer_to_scale = next_layer_to_scale

    return cls_sets
这段代码会找到相邻的 conv,将他们组成一组后再做 weight equalize。如果是普通的卷积,则把相邻的两个 conv 作为一组进行 equalize,而如果第二个 conv 是 depthwise conv,则需要继续找到下一个相邻的卷积,然后三个一组 (conv, depthwise conv, conv),一起 equalize。
从代码中变量名的命名,以及之后 equalize 的代码也可以看到,高通默认这里面的卷积不包括分组卷积 (所以要么 group = 1,要么就是彻底的 depthwise conv),同时,高通也默认,如果遇到 depthwise conv,那紧跟在它后面的卷积一定是个普通的卷积 (即 group=1),否则之后做 equalize 时就会报错。(私以为,这跟 weight equalize 在数学上的优化过程有关,如果没有满足这些条件,可能求解不出合适的缩放因子)。
找到这一组一组的卷积对后,就要开始做 weight equalize 了。这里也分两种情况,如果是两个普通的卷积为一组,那代码和前面的截图是一样的。而如果是三个卷积一组,根据官方给出的代码,可以总结为下面这张图:
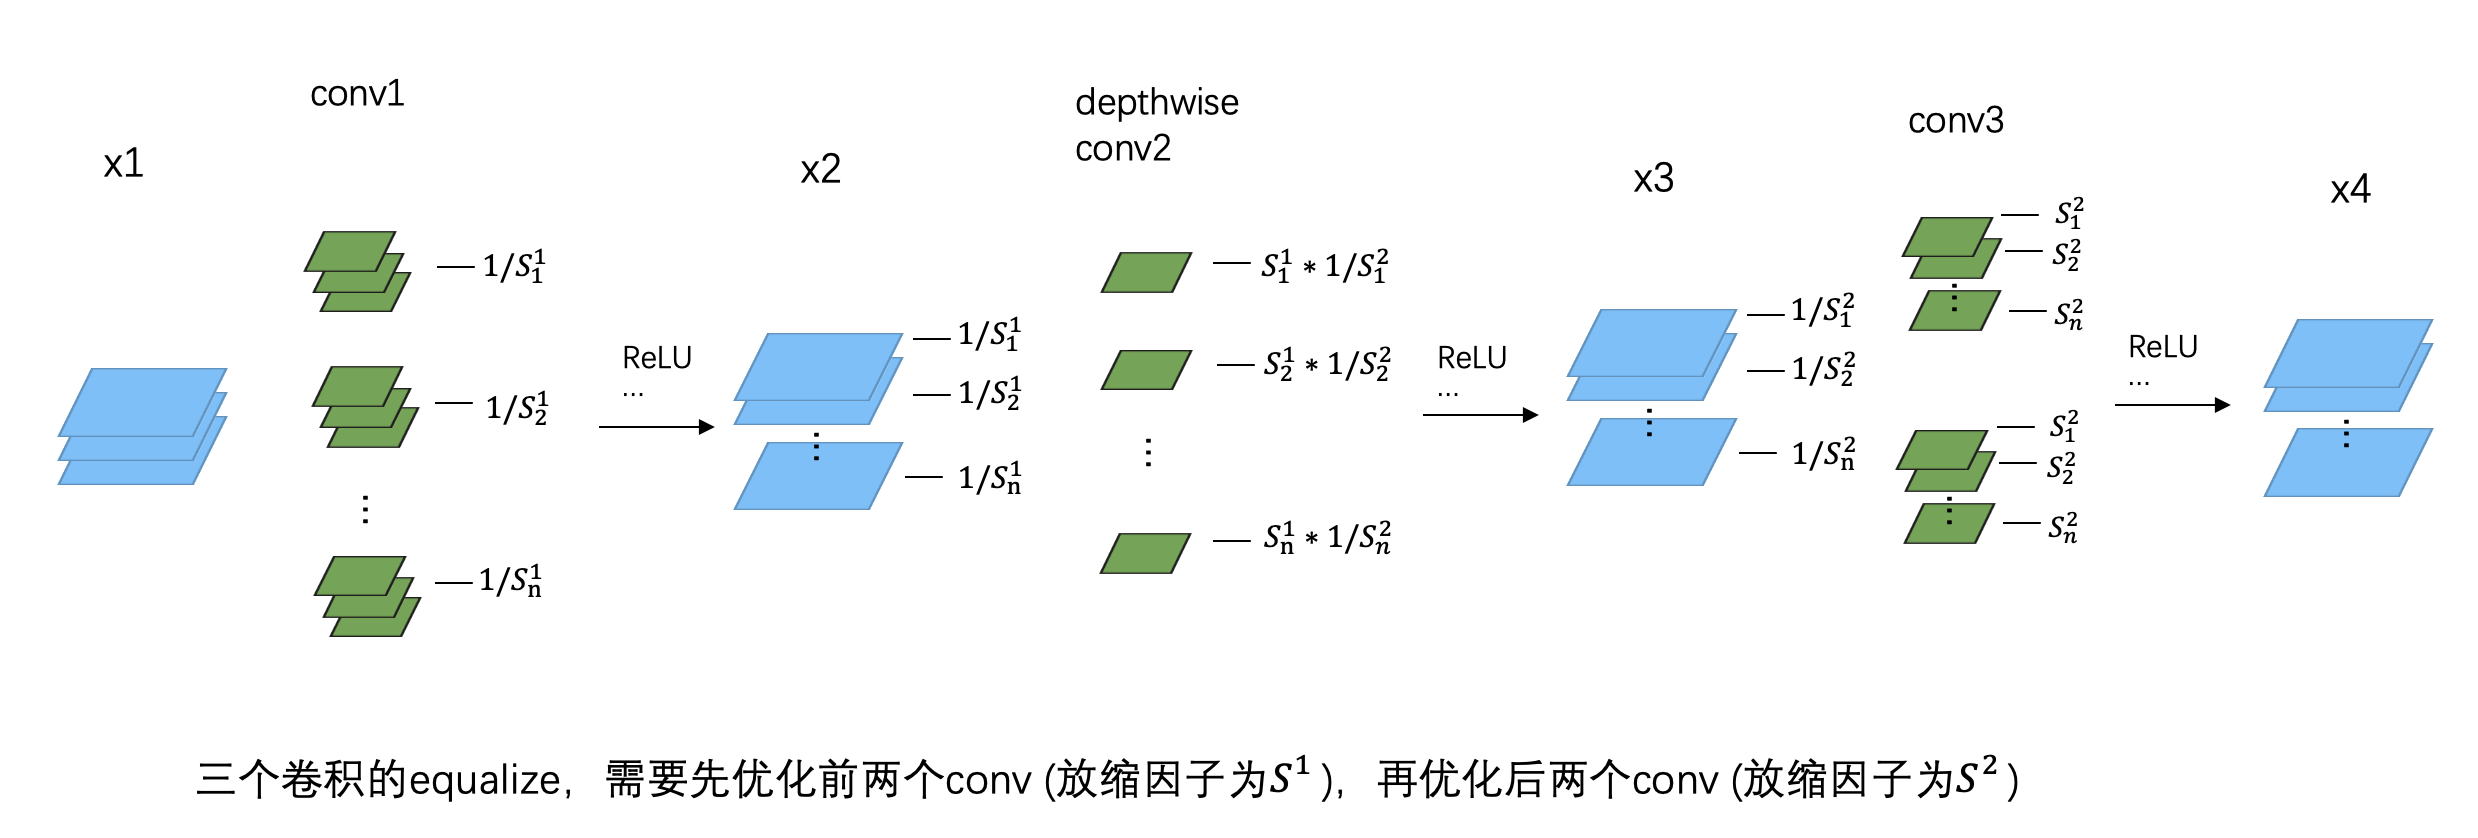
跟之前 equalize 的区别是,这里有两个缩放因子 \(S^1\) 和 \(S^2\)。需要先用 \(S^1\) 对前两个 conv 进行 equalize,然后再用 \(S^2\) 对后两个 conv 进行 equalize。而且由于中间 depthwise conv 的特殊性,在 equalize 的时候不需要对它的 weight 进行重排 (关于重排,请参考上一篇文章),只需要在后面的 equalize 中对第三个 conv 进行重排即可。
这两个缩放因子的计算方法和论文里介绍的没有本质区别,这里就不纠结数学上的细节了,直接给出答案:
其中,\(r_i^1\)、\(r_i^2\)、\(r_i^3\) 分别是三个卷积 weight 中第 \(i\) 个 kernel 的数值范围大小 (第三个卷积的 weight 需要重排)。
Talk is cheap,show you the code:
def equalize(weight1, bias1, weight2, bias2, weight3):
	# 重排列
	weight3 = weight3.permute(1, 0, 2, 3)
	out_channel = weight1.shape[0]
	S1, S2 = [], []
	# 计算放缩系数
	for i in range(out_channel):
		r1 = compute_range(weight1, i)  # 计算kernel数值范围
		r2 = compute_range(weight2, i)
		r3 = compute_range(weight3, i)
		s = r1 / pow(r1 * r2 * r3, 1. / 3)
		S1.append(s)
		s = pow(r1 * r2 * r3, 1. / 3) / r3
        S2.append(s)

	# 对前两个conv进行equalize
	for i in range(out_channel):
		weight1[i] = weight1[i] * (1. / S1[i])
		bias1[i] = bias1[i] * (1. / S1[i])
		weight2[i] = weight2[i] * S1[i]

	# 对后两个conv进行equalize
	for i in range(out_channel):
		weight2[i] = weight2[i] * (1. / S2[i])
		bias2[i] = bias2[i] * (1. / S2[i])
		weight3[i] = weight3[i] * S2[i]

    # 调整回之前的数据排布
	weight3 = weight3.permute(1, 0, 2, 3)
	return weight1, bias1, weight2, bias2, weight3
顺便,我们看看高通官方 AIMet 的代码是怎么做的 (下一篇文章我会尝试用 pytorch fx 实现一下)。
在 AIMet 中,会先在 python 层面收集网络中的卷积,把它们组成一对一对,再通过 pybind 把卷积的 weight 和 bias 传递到 C++ 中进行 equalize。这篇文章主要看看 C++ 里面是如何实现我上面这段 equalize 代码的。
下面这段代码摘自 AIMet (https://github.com/quic/aimet/blob/develop/ModelOptimizations/DlEqualization/src/CrossLayerScaling.cpp#L93)
AimetEqualization::CrossLayerScaling::RescalingParamsVectors
CrossLayerScaling::scaleDepthWiseSeparableLayer(AimetEqualization::EqualizationParams& prevLayer, AimetEqualization::EqualizationParams& currLayer, AimetEqualization::EqualizationParams& nextLayer) {
    const int ndims = 4;
    int N = prevLayer.weightShape[0];   // output channels

    // 获取三个卷积的weight和bias数据
    cv::Mat weightTensor1 = cv::Mat(ndims, (int*) &prevLayer.weightShape[0], CV_32F, prevLayer.weight);
    cv::Mat biasTensor1;
    if (!prevLayer.isBiasNone)
        biasTensor1 = cv::Mat(N, 1, CV_32F, (float*) &prevLayer.bias[0]);

    cv::Mat weightTensor2 = cv::Mat(ndims, (int*) &currLayer.weightShape[0], CV_32F, currLayer.weight);

    cv::Mat biasTensor2;
    if (!currLayer.isBiasNone)
        biasTensor2 = cv::Mat(N, 1, CV_32F, (float*) &currLayer.bias[0]);

    cv::Mat weightTensor3 = cv::Mat(ndims, (int*) &nextLayer.weightShape[0], CV_32F, nextLayer.weight);
    // 第三个卷积kernel重排
    cv::Mat flippedWeightTensor3 = TensorOperations::swapFirstTwoAxisIn4dMat(weightTensor3);

    // 计算缩放因子
    RescalingParams* pReScalingMats = ScaleFactorCalculator::ForDepthWiseSeparableLayer(weightTensor1, weightTensor2, flippedWeightTensor3);

    // 对前两个conv进行equalize
    for (size_t s = 0; s < pReScalingMats->scalingMatrix12.total(); ++s) {
        // Scaling Weight Matrix of prev layer with S12
        cv::Mat w1PerChannel = TensorOperations::getDataPerChannelIn4dMat(weightTensor1, s, AXIS_0);
        w1PerChannel = w1PerChannel * (1.0f / pReScalingMats->scalingMatrix12.at<float>(s));

        // Scaling the bias of prev layer with S12
        if (!prevLayer.isBiasNone)
            biasTensor1.at<float>(s) = biasTensor1.at<float>(s) * (1.0f / pReScalingMats->scalingMatrix12.at<float>(s));

        // Scaling Weight Matrix of curr layer with S12
        cv::Mat w2PerChannel = TensorOperations::getDataPerChannelIn4dMat(weightTensor2, s, AXIS_0);
        w2PerChannel = w2PerChannel * pReScalingMats->scalingMatrix12.at<float>(s);
    }

    // 对后两个conv进行equalize
    for (size_t s = 0; s < pReScalingMats->scalingMatrix23.total(); ++s) {
        // Scaling Weight Matrix of prev layer with S23
        cv::Mat w2PerChannel = TensorOperations::getDataPerChannelIn4dMat(weightTensor2, s, AXIS_0);
        w2PerChannel = w2PerChannel * (1.0f / pReScalingMats->scalingMatrix23.at<float>(s));

        // Scaling the bias of curr layer with S23
        if (!currLayer.isBiasNone)
            biasTensor2.at<float>(s) = biasTensor2.at<float>(s) * (1.0f / pReScalingMats->scalingMatrix23.at<float>(s));

        // Scaling Weight Matrix of curr layer with S23
        cv::Mat w3PerChannel = TensorOperations::getDataPerChannelIn4dMat(flippedWeightTensor3, s, AXIS_0);
        w3PerChannel = w3PerChannel * pReScalingMats->scalingMatrix23.at<float>(s);
    }

    // 调整回之前的数据排布
    cv::Mat(TensorOperations::swapFirstTwoAxisIn4dMat(flippedWeightTensor3)).copyTo(weightTensor3);

    // return pReScalingMats as vectors
    CrossLayerScaling::RescalingParamsVectors scalingVectors;

    scalingVectors.scalingMatrix12.assign(pReScalingMats->scalingMatrix12.begin<float>(),
                                          pReScalingMats->scalingMatrix12.end<float>());

    scalingVectors.scalingMatrix23.assign(pReScalingMats->scalingMatrix23.begin<float>(),
                                          pReScalingMats->scalingMatrix23.end<float>());

    return scalingVectors;
}
上面关键步骤我加了注释,可以看到和我前面给出的代码基本是一样的流程。
然后是具体计算缩放因子的代码 (https://github.com/quic/aimet/blob/develop/ModelOptimizations/DlEqualization/src/ScaleFactorCalculator.cpp#L90)
AimetEqualization::RescalingParams* ScaleFactorCalculator::ForDepthWiseSeparableLayer(const cv::Mat& weightTensor1, const cv::Mat& weightTensor2, const cv::Mat& weightTensor3)
{
    AimetEqualization::RescalingParams* reScalingMats = new RescalingParams;

    // 省略若干代码....

    // 分别计算三组weight里面每个kernel的数值范围
    cv::Mat rangeVec1 = TensorOperations::computeRangeAlongFirstAxis(weightTensor1);
    cv::Mat rangeVec2 = TensorOperations::computeRangeAlongFirstAxis(weightTensor2);
    cv::Mat rangeVec3 = TensorOperations::computeRangeAlongFirstAxis(weightTensor3);


    // 三次开方计算缩放系数
    cv::Mat cubeRootMat;
    // perform element-wise multiplication on range vectors and find sqrt
    cv::pow((rangeVec1.mul(rangeVec2).mul(rangeVec3)), 1.0f / 3, cubeRootMat);

    reScalingMats->scalingMatrix12 = cv::Mat::ones(1, rangeVec1.total(), FLOAT_32_TYPE);
    reScalingMats->scalingMatrix23 = cv::Mat::ones(1, rangeVec2.total(), FLOAT_32_TYPE);

    // 计算第一个缩放因子
    for (size_t s = 0; s < rangeVec1.total(); ++s) {
        if ((rangeVec1.at<float>(s) != 0) && (rangeVec2.at<float>(s) != 0) && (rangeVec3.at<float>(s) != 0)) {
            reScalingMats->scalingMatrix12.at<float>(s) = (rangeVec1.at<float>(s)) * (1.0f / cubeRootMat.at<float>(s));
        }
    }
    // 计算第二个缩放因子
    for (size_t s = 0; s < rangeVec2.total(); ++s) {
        if ((rangeVec1.at<float>(s) != 0) && (rangeVec2.at<float>(s) != 0) && (rangeVec3.at<float>(s) != 0)) {
            reScalingMats->scalingMatrix23.at<float>(s) = (cubeRootMat.at<float>(s)) * (1.0f / rangeVec3.at<float>(s));
        }
    }

    return reScalingMats;
}
总结
这篇文章介绍了 Data-Free quantization 如何对 depthwise conv 进行 weight equalize,算是对前文的补充介绍,并简单介绍了官方的代码实现。下篇文章中我会自己用 pytorch 实现一遍 weight equalize,顺便也看看 bias correction 的实现。
参考
欢迎关注我的公众号:大白话AI,立志用大白话讲懂AI。

 浙公网安备 33010602011771号