Java自学-图形界面 面板
Swing 四种常见面板
示例 1 : 基本面板
JPanel即为基本面板
面板和JFrame一样都是容器,不过面板一般用来充当中间容器,把组件放在面板上,然后再把面板放在窗体上。
一旦移动一个面板,其上面的组件,就会全部统一跟着移动,采用这种方式,便于进行整体界面的设计

package gui;
import java.awt.Color;
import java.awt.FlowLayout;
import javax.swing.JButton;
import javax.swing.JFrame;
import javax.swing.JPanel;
public class TestGUI {
public static void main(String[] args) {
JFrame f = new JFrame("LoL");
f.setSize(400, 300);
f.setLocation(200, 200);
f.setLayout(null);
JPanel p1 = new JPanel();
// 设置面板大小
p1.setBounds(50, 50, 300, 60);
// 设置面板背景颜色
p1.setBackground(Color.RED);
// 这一句可以没有,因为JPanel默认就是采用的FlowLayout
p1.setLayout(new FlowLayout());
JButton b1 = new JButton("英雄1");
JButton b2 = new JButton("英雄2");
JButton b3 = new JButton("英雄3");
// 把按钮加入面板
p1.add(b1);
p1.add(b2);
p1.add(b3);
JPanel p2 = new JPanel();
JButton b4 = new JButton("英雄4");
JButton b5 = new JButton("英雄5");
JButton b6 = new JButton("英雄6");
p2.add(b4);
p2.add(b5);
p2.add(b6);
p2.setBackground(Color.BLUE);
p2.setBounds(10, 150, 300, 60);
// 把面板加入窗口
f.add(p1);
f.add(p2);
f.setDefaultCloseOperation(JFrame.EXIT_ON_CLOSE);
f.setVisible(true);
}
}
示例 2 : ContentPane
JFrame上有一层面板,叫做ContentPane
平时通过f.add()向JFrame增加组件,其实是向JFrame上的 ContentPane加东西
package gui;
import javax.swing.JButton;
import javax.swing.JFrame;
public class TestGUI {
public static void main(String[] args) {
JFrame f = new JFrame("LoL");
f.setSize(400, 300);
f.setLocation(200, 200);
f.setLayout(null);
JButton b = new JButton("一键秒对方基地挂");
b.setBounds(50, 50, 280, 30);
f.add(b);
// JFrame上有一层面板,叫做ContentPane
// 平时通过f.add()向JFrame增加组件,其实是向JFrame上的 ContentPane加东西
// f.add等同于f.getContentPane().add(b);
f.getContentPane().add(b);
// b.getParent()获取按钮b所处于的容器
// 打印出来可以看到,实际上是ContentPane而非JFrame
System.out.println(b.getParent());
f.setDefaultCloseOperation(JFrame.EXIT_ON_CLOSE);
f.setVisible(true);
}
}
示例 3 : SplitPanel
创建一个水平JSplitPane,左边是pLeft,右边是pRight

package gui;
import java.awt.Color;
import java.awt.FlowLayout;
import javax.swing.JButton;
import javax.swing.JFrame;
import javax.swing.JPanel;
import javax.swing.JSplitPane;
public class TestGUI {
public static void main(String[] args) {
JFrame f = new JFrame("LoL");
f.setSize(400, 300);
f.setLocation(200, 200);
f.setLayout(null);
JPanel pLeft = new JPanel();
pLeft.setBounds(50, 50, 300, 60);
pLeft.setBackground(Color.RED);
pLeft.setLayout(new FlowLayout());
JButton b1 = new JButton("盖伦");
JButton b2 = new JButton("提莫");
JButton b3 = new JButton("安妮");
pLeft.add(b1);
pLeft.add(b2);
pLeft.add(b3);
JPanel pRight = new JPanel();
JButton b4 = new JButton("英雄4");
JButton b5 = new JButton("英雄5");
JButton b6 = new JButton("英雄6");
pRight.add(b4);
pRight.add(b5);
pRight.add(b6);
pRight.setBackground(Color.BLUE);
pRight.setBounds(10, 150, 300, 60);
// 创建一个水平JSplitPane,左边是p1,右边是p2
JSplitPane sp = new JSplitPane(JSplitPane.HORIZONTAL_SPLIT, pLeft, pRight);
// 设置分割条的位置
sp.setDividerLocation(80);
// 把sp当作ContentPane
f.setContentPane(sp);
f.setDefaultCloseOperation(JFrame.EXIT_ON_CLOSE);
f.setVisible(true);
}
}
示例 4 : JScrollPanel
使用带滚动条的面板有两种方式
-
在创建JScrollPane,把组件作为参数传进去
JScrollPane sp = new JScrollPane(ta); -
希望带滚动条的面板显示其他组件的时候,调用setViewportView
sp.setViewportView(ta);

package gui;
import javax.swing.JFrame;
import javax.swing.JScrollPane;
import javax.swing.JTextArea;
public class TestGUI {
public static void main(String[] args) {
JFrame f = new JFrame("LoL");
f.setSize(400, 300);
f.setLocation(200, 200);
f.setLayout(null);
//准备一个文本域,在里面放很多数据
JTextArea ta = new JTextArea();
for (int i = 0; i < 1000; i++) {
ta.append(String.valueOf(i));
}
//自动换行
ta.setLineWrap(true);
JScrollPane sp = new JScrollPane(ta);
f.setContentPane(sp);
f.setDefaultCloseOperation(JFrame.EXIT_ON_CLOSE);
f.setVisible(true);
}
}
示例 5 : TabbedPanel

package gui;
import java.awt.Color;
import java.awt.FlowLayout;
import javax.swing.ImageIcon;
import javax.swing.JButton;
import javax.swing.JFrame;
import javax.swing.JPanel;
import javax.swing.JTabbedPane;
public class TestGUI {
public static void main(String[] args) {
JFrame f = new JFrame("LoL");
f.setSize(400, 300);
f.setLocation(200, 200);
f.setLayout(null);
JPanel p1 = new JPanel();
p1.setBounds(50, 50, 300, 60);
p1.setBackground(Color.RED);
p1.setLayout(new FlowLayout());
JButton b1 = new JButton("英雄1");
JButton b2 = new JButton("英雄2");
JButton b3 = new JButton("英雄3");
p1.add(b1);
p1.add(b2);
p1.add(b3);
JPanel p2 = new JPanel();
JButton b4 = new JButton("英雄4");
JButton b5 = new JButton("英雄5");
JButton b6 = new JButton("英雄6");
p2.add(b4);
p2.add(b5);
p2.add(b6);
p2.setBackground(Color.BLUE);
p2.setBounds(10, 150, 300, 60);
JTabbedPane tp = new JTabbedPane();
tp.add(p1);
tp.add(p2);
// 设置tab的标题
tp.setTitleAt(0, "红色tab");
tp.setTitleAt(1, "蓝色tab");
ImageIcon i = new ImageIcon("e:/project/j2se/j.png");
tp.setIconAt(0,i );
tp.setIconAt(1,i );
f.setContentPane(tp);
f.setDefaultCloseOperation(JFrame.EXIT_ON_CLOSE);
f.setVisible(true);
}
}
示例 6 : CardLayerout
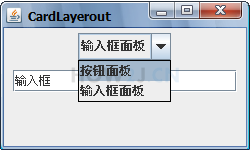
CardLayerout 布局器 很像TabbedPanel ,在本例里面上面是一个下拉框,下面是一个CardLayerout 的JPanel
这个JPanel里有两个面板,可以通过CardLayerout方便的切换
package gui;
import java.awt.BorderLayout;
import java.awt.CardLayout;
import java.awt.event.ItemEvent;
import java.awt.event.ItemListener;
import javax.swing.JButton;
import javax.swing.JComboBox;
import javax.swing.JFrame;
import javax.swing.JPanel;
import javax.swing.JTextField;
public class TestGUI {
public static void main(String[] args) {
JFrame f = new JFrame("CardLayerout");
JPanel comboBoxPane = new JPanel();
String buttonPanel = "按钮面板";
String inputPanel = "输入框面板";
String comboBoxItems[] = { buttonPanel, inputPanel };
JComboBox
comboBoxPane.add(cb);
// 两个Panel充当卡片
JPanel card1 = new JPanel();
card1.add(new JButton("按钮 1"));
card1.add(new JButton("按钮 2"));
card1.add(new JButton("按钮 3"));
JPanel card2 = new JPanel();
card2.add(new JTextField("输入框", 20));
JPanel cards; // a panel that uses CardLayout
cards = new JPanel(new CardLayout());
cards.add(card1, buttonPanel);
cards.add(card2, inputPanel);
f.add(comboBoxPane, BorderLayout.NORTH);
f.add(cards, BorderLayout.CENTER);
f.setDefaultCloseOperation(JFrame.EXIT_ON_CLOSE);
f.setSize(250, 150);
f.setLocationRelativeTo(null);
f.setVisible(true);
cb.addItemListener(new ItemListener() {
@Override
public void itemStateChanged(ItemEvent evt) {
CardLayout cl = (CardLayout) (cards.getLayout());
cl.show(cards, (String) evt.getItem());
}
});
}
}
更多内容,点击了解: Swing 四种常见面板


 浙公网安备 33010602011771号