在anaconda环境下安装旧版本TensorFlow1.8
参考链接:
看了吴恩达老师的深度学习视频,看到使用TensorFlow,就试着安装写代码。我用的是anaconda3,一次就安装成功,还是挺幸运的。具体步骤如下:
1.检测anaconda环境
2. 创建TensorFlow环境
3. 安装TensorFlow1.8
4. 测试TensorFlow
5. 在jupyter notebook上运行
1. 检测anaconda环境
conda info --envs
运行过程:
(之前安装了两个版本的python)
C:\Users\de'l'l>conda info --envs
WARNING: The conda.compat module is deprecated and will be removed in a future release.
# conda environments:
#
base                  *  D:\Anaconda3
labelme                  D:\Anaconda3\envs\labelme
python35                 D:\Anaconda3\envs\python35
python37                 D:\Anaconda3\envs\python37
2. 创建TensorFlow环境
首先创建环境,主要是为了保证anaconda的源环境,建立了一个新环境来放TensorFlow。python版本太高可能TensorFlow1.8不兼容。
conda create -n tensorflow pip python=3.6
安装好后,激活TensorFlow环境
conda activate tensorflow 或 activate tensorflow
我的运行过程:
C:\Users\de'l'l>conda create -n tensorflow pip python=3.6
C:\Users\de'l'l>activate tensorflow
3. 安装TensorFlow1.8
先把依赖包安装了(这些依赖包有些tensorflow 1.8 不会自动去下载安装,但是会以红字提示,为了一次性安装好无问题,最好先把依赖包先安装了):
 python -m pip install html5lib bleach ipykernel
 python -m pip install --ignore-installed --upgrade pip setuptools
我安装完也没出错,有一些waring,问题不大。
然后就是安装TensorFlow了,我稍微修改了一下,参考了其他资源,这里要加版本号,不加可能就是最新的版本了。
python -m pip install -i https://pypi.tuna.tsinghua.edu.cn/simple tensorflow==1.8
安装结束。后面还有个小问题,继续往下看嗷
4. 测试TensorFlow
这里测试一下是否有问题。
还是在TensorFlow环境下,编写个简单的python。首先切换到python下。可以使用python,或者ipython输入。
(tensorflow) C:\Users\de'l'l>python
运行过程:
(tensorflow) C:\Users\de'l'l>python
Python 3.6.10 |Anaconda, Inc.| (default, May  7 2020, 19:46:08) [MSC v.1916 64 bit (AMD64)] on win32
Type "help", "copyright", "credits" or "license" for more information.
下面导入TensorFlow出问题了。
>>> import tensorflow as tf
运行过程:
>>> import tensorflow as tf
D:\Anaconda3\envs\tensorflow\lib\site-packages\tensorflow\python\framework\dtypes.py:519: FutureWarning: Passing (type, 1) or '1type' as a synonym of type is deprecated; in a future version of numpy, it will be understood as (type, (1,)) / '(1,)type'.
  _np_qint8 = np.dtype([("qint8", np.int8, 1)])
D:\Anaconda3\envs\tensorflow\lib\site-packages\tensorflow\python\framework\dtypes.py:520: FutureWarning: Passing (type, 1) or '1type' as a synonym of type is deprecated; in a future version of numpy, it will be understood as (type, (1,)) / '(1,)type'.
  _np_quint8 = np.dtype([("quint8", np.uint8, 1)])
D:\Anaconda3\envs\tensorflow\lib\site-packages\tensorflow\python\framework\dtypes.py:521: FutureWarning: Passing (type, 1) or '1type' as a synonym of type is deprecated; in a future version of numpy, it will be understood as (type, (1,)) / '(1,)type'.
  _np_qint16 = np.dtype([("qint16", np.int16, 1)])
D:\Anaconda3\envs\tensorflow\lib\site-packages\tensorflow\python\framework\dtypes.py:522: FutureWarning: Passing (type, 1) or '1type' as a synonym of type is deprecated; in a future version of numpy, it will be understood as (type, (1,)) / '(1,)type'.
  _np_quint16 = np.dtype([("quint16", np.uint16, 1)])
D:\Anaconda3\envs\tensorflow\lib\site-packages\tensorflow\python\framework\dtypes.py:523: FutureWarning: Passing (type, 1) or '1type' as a synonym of type is deprecated; in a future version of numpy, it will be understood as (type, (1,)) / '(1,)type'.
  _np_qint32 = np.dtype([("qint32", np.int32, 1)])
D:\Anaconda3\envs\tensorflow\lib\site-packages\tensorflow\python\framework\dtypes.py:528: FutureWarning: Passing (type, 1) or '1type' as a synonym of type is deprecated; in a future version of numpy, it will be understood as (type, (1,)) / '(1,)type'.
  np_resource = np.dtype([("resource", np.ubyte, 1)])
这里参考了1.ubuntu安装anaconda和tensorflow
2.anaconda3/envs/tensorflow/lib/python3.5/site-packages/tensorflow/python/framework/dtypes
解决方法如下:
找到D:\Anaconda3\envs\tensorflow\lib\site-packages\tensorflow\python\framework\dtypes.py,这里的前缀是你的anaconda安装地址,运行结果里也会显示。出错的行数也可能不同,具体看你的运行过程了。我测试后发现需要将报错的几个都修改一下,就不会再出现了。
将我的520行的_np_quint8 = np.dtype([(“quint8”, np.uint8, 1)])改为
_np_quint8 = np.dtype([("quint8", np.uint8, (1,))])
其他的也是类似的,改成(1,)
原版:
_np_qint8 = np.dtype([("qint8", np.int8, 1)])
_np_quint8 = np.dtype([("quint8", np.uint8, 1)])
_np_qint16 = np.dtype([("qint16", np.int16, 1)])
_np_quint16 = np.dtype([("quint16", np.uint16, 1)])
_np_qint32 = np.dtype([("qint32", np.int32, 1)])
修改后
_np_qint8 = np.dtype([("qint8", np.int8, (1,))])
_np_quint8 = np.dtype([("quint8", np.uint8, (1,))])
_np_qint16 = np.dtype([("qint16", np.int16, (1,))])
_np_quint16 = np.dtype([("quint16", np.uint16, (1,))])
_np_qint32 = np.dtype([("qint32", np.int32, (1,))])
后面还有一句:
#np_resource = np.dtype([("resource", np.ubyte, 1)])
np_resource = np.dtype([("resource", np.ubyte, (1,))])
记得保存,再次运行
   import tensorflow as tf
   c=tf.constant("helloworld")
   s=tf.Session()
   s.run(c)
中间出现了
2020-06-11 20:36:35.334491: I T:\src\github\tensorflow\tensorflow\core\platform\cpu_feature_guard.cc:140] Your CPU supports instructions that this TensorFlow binary was not compiled to use: AVX2
好像是说我的cpu不太行,问题不大。
最后结果
>>> s.run(c)
b'helloworld'
安装TensorFlow成功了。
5. 在jupyter notebook上运行
当我们用Anaconda自带的iPython和Spyder以及jupyter notebook中输入import tensorflow as tf的时候会失败,显示如下No module named 'tensorflow‘,原因是我们没有在TensorFlow的环境下打开它们。
需要在TensorFlow环境下安装插件,就以jupyter notebook为例。
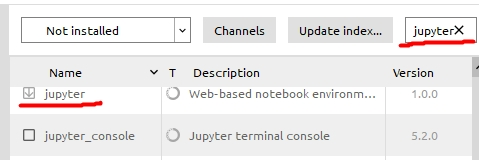
- 打开Anaconda Navigator—>Environments—>tensorflow,选择Not installed,找到iPython和Spyder以及jupyter并安装,点击下面的apply。
![在这里插入图片描述]()
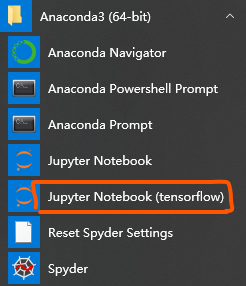
- 安装好后,可以通过命令行activate tensorflow来启动tensorflow,也可以直接去菜单找到下面框选的,选用就行了
![在这里插入图片描述]()
下面运行一下吴恩达老师教滴,
import numpy as np
import tensorflow as tf
w = tf.Variable(0,dtype=tf.float32)
cost = w**2-10*w+25
train = tf.train.GradientDescentOptimizer(0.01).minimize(cost)
init = tf.global_variables_initializer()
session = tf.Session()
session.run(init)
print(session.run(w))

session.run(train)
print(session.run(w))

for i in range(1000):
    session.run(train)
print(session.run(w))
运行过程:

如果有不太对的地方,大家可以指出来,看了网上教程,各种方法都有,五花八门的,希望可以帮到大家。随着版本更新,有些指令可能会变化,大家可以在下面留言,互相学习。

 浙公网安备 33010602011771号