SpringAOP使用及源码分析(SpringBoot下)
一、SpringAOP应用
- 先搭建一个SpringBoot项目
<?xml version="1.0" encoding="UTF-8"?>
<project xmlns="http://maven.apache.org/POM/4.0.0" xmlns:xsi="http://www.w3.org/2001/XMLSchema-instance"
	xsi:schemaLocation="http://maven.apache.org/POM/4.0.0 https://maven.apache.org/xsd/maven-4.0.0.xsd">
	<modelVersion>4.0.0</modelVersion>
	<parent>
		<groupId>org.springframework.boot</groupId>
		<artifactId>spring-boot-starter-parent</artifactId>
		<version>2.1.7.RELEASE</version>
		<relativePath/> <!-- lookup parent from repository -->
	</parent>
	<groupId>com.mmc</groupId>
	<artifactId>springboot-study</artifactId>
	<version>0.0.1-SNAPSHOT</version>
	<name>springboot-study</name>
	<description>Demo project for Spring Boot</description>

	<properties>
		<java.version>1.8</java.version>
	</properties>

	<dependencies>
		<dependency>
			<groupId>org.springframework.boot</groupId>
			<artifactId>spring-boot-starter-web</artifactId>
		</dependency>

	</dependencies>

	<build>
		<plugins>
			<plugin>
				<groupId>org.springframework.boot</groupId>
				<artifactId>spring-boot-maven-plugin</artifactId>
			</plugin>
		</plugins>
	</build>

</project>
- 定义一个业务逻辑类,作为切面
public interface CalculationService {

    /**
     * 加法运算
     * @param x
     * @param y
     * @return
     */
    public Integer add(Integer x,Integer y);
}

/**
 * @description:
 * @author: mmc
 * @create: 2020-06-01 14:22
 **/
@Service
public class CalculationServiceImpl implements CalculationService {

    @Override
    public Integer add(Integer x, Integer y) {
        if(x==null||y==null){
            throw  new NullPointerException("参数不能为空");
        }
        return x+y;
    }
}
- 定义一个切面类,添加通知方法
- 前置通知(@Before):logStart:在目标方法(div)运行之前运行
- 后置通知(@After):logEnd:在目标方法(add)运行结束之后运行(无论方法正常结束还是异常结束)
- 返回通知(@AfterReturning):logReturn:在目标方法(add)正常返回之后运行
- 异常通知(@AfterThrowing):logException:在目标方法(add)出现异常以后运行
- 环绕通知(@Around):动态代理,手动推进目标方法运行(joinPoint.procced())
/**
 * @description:  切面类
 * @author: mmc
 * @create: 2020-06-01 14:24
 **/
@Aspect
@Component
public class LogAspects {

    //抽取公共的切入点表达式
    //1、本类引用
    //2、其他的切面引用
    @Pointcut("execution(public Integer com.mmc.springbootstudy.service.CalculationService.*(..))")
    public void pointCut(){};

    @Before("pointCut()")
    public void logStart(JoinPoint joinPoint){
        Object[] args = joinPoint.getArgs();
        System.out.println(""+joinPoint.getSignature().getName()+"运行。。。@Before:参数列表是:{"+Arrays.asList(args)+"}");
    }

    @After("pointCut()")
    public void logEnd(JoinPoint joinPoint){
        System.out.println(""+joinPoint.getSignature().getName()+"结束。。。@After");
    }


    //JoinPoint一定要出现在参数表的第一位
    @AfterReturning(value="pointCut()",returning="result")
    public void logReturn(JoinPoint joinPoint,Object result){
        System.out.println(""+joinPoint.getSignature().getName()+"正常返回。。。@AfterReturning:运行结果:{"+result+"}");
    }

    @AfterThrowing(value="pointCut()",throwing="exception")
    public void logException(JoinPoint joinPoint,Exception exception){
        System.out.println(""+joinPoint.getSignature().getName()+"异常。。。异常信息:{"+exception+"}");
    }
}
- 写一个controller测试
@RequestMapping("/testaop")
   @ResponseBody
    public Integer testaop(Integer x,Integer y){
       Integer result = calculationService.add(x, y);
       return result;
   }
- 测试
add运行。。。@Before:参数列表是:{[2, 3]}
add结束。。。@After
add正常返回。。。@AfterReturning:运行结果:
二、源码分析
主线流程图:
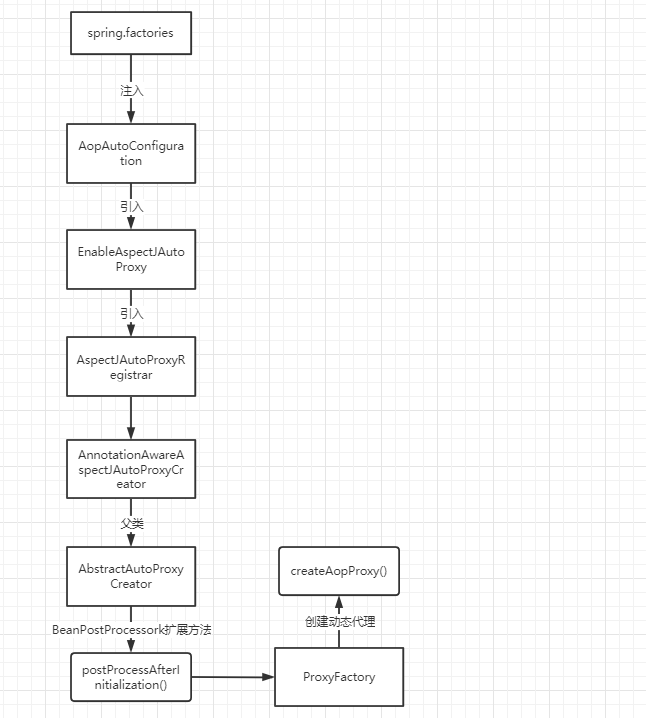
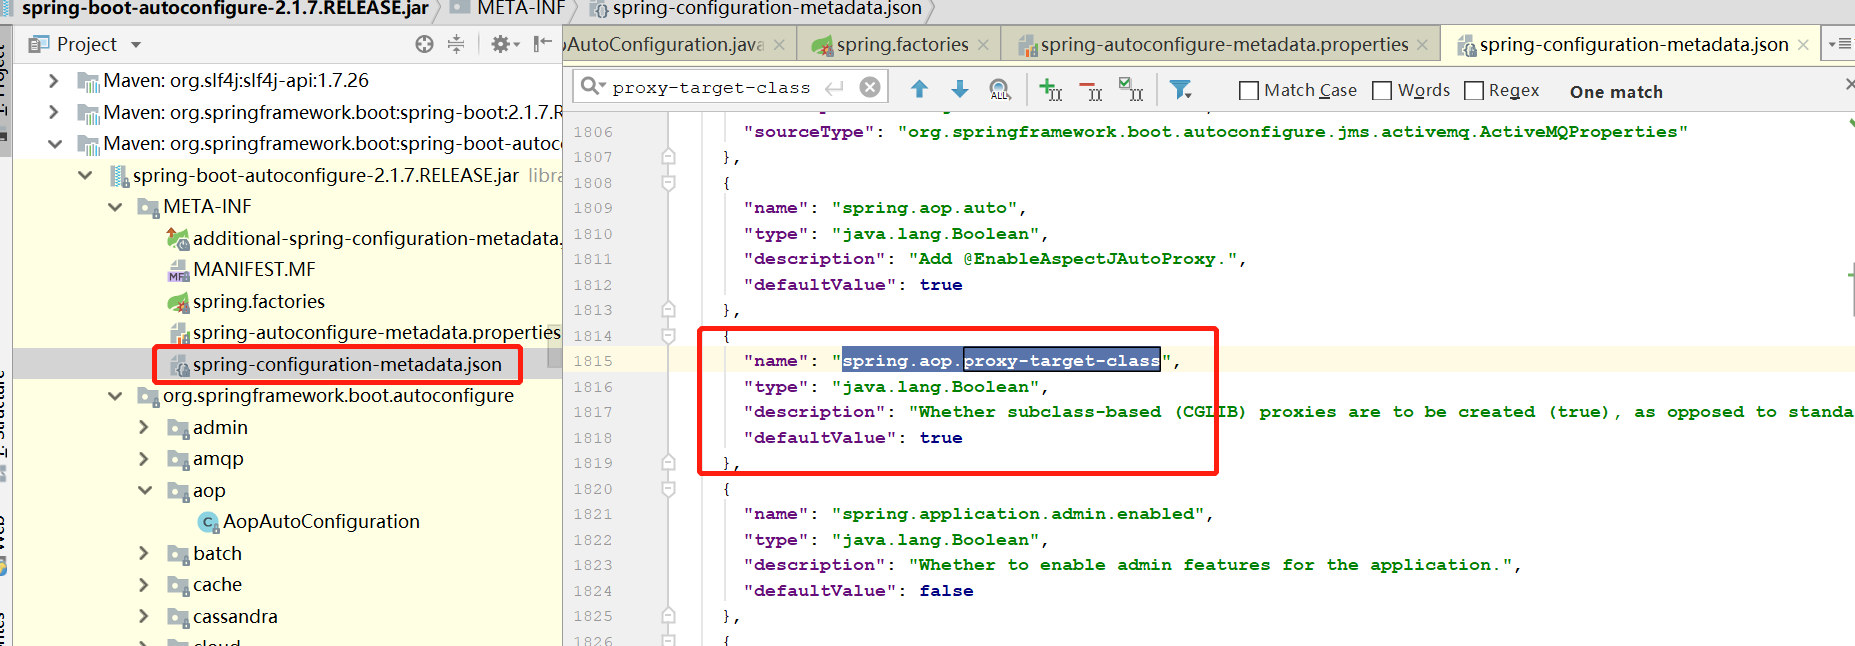
- spring.factories文件里引入了AopAutoConfiguration类
@Configuration
@ConditionalOnClass({ EnableAspectJAutoProxy.class, Aspect.class, Advice.class, AnnotatedElement.class })
@ConditionalOnProperty(prefix = "spring.aop", name = "auto", havingValue = "true", matchIfMissing = true)
public class AopAutoConfiguration {

	@Configuration
	@EnableAspectJAutoProxy(proxyTargetClass = false)
	//看配置文件,如果配置的spring.aop.proxy-target-class为false则引入JdkDynamicAutoProxyConfiguration
	@ConditionalOnProperty(prefix = "spring.aop", name = "proxy-target-class", havingValue = "false",
			matchIfMissing = false)
	public static class JdkDynamicAutoProxyConfiguration {

	}

	@Configuration
	//开启AspectJAutoProxy
	@EnableAspectJAutoProxy(proxyTargetClass = true)
	//看配置文件,如果配置的spring.aop.proxy-target-class为true则引入CglibAutoProxyConfiguration
	@ConditionalOnProperty(prefix = "spring.aop", name = "proxy-target-class", havingValue = "true",
			matchIfMissing = true)
	public static class CglibAutoProxyConfiguration {

	}

}
在包目录下找到配置文件,并且发现他的值为true
在上面的方法上有EnableAspectJAutoProxy注解,并传入了proxyTargetClass=true
- 进入@EnableAspectJAutoProxy注解
@Target({ElementType.TYPE})
@Retention(RetentionPolicy.RUNTIME)
@Documented
//引入了AspectJAutoProxyRegistrar
@Import({AspectJAutoProxyRegistrar.class})
public @interface EnableAspectJAutoProxy {
    boolean proxyTargetClass() default false;

    boolean exposeProxy() default false;
}
- 进入AspectJAutoProxyRegistrar类
class AspectJAutoProxyRegistrar implements ImportBeanDefinitionRegistrar {
    AspectJAutoProxyRegistrar() {
    }

    public void registerBeanDefinitions(AnnotationMetadata importingClassMetadata, BeanDefinitionRegistry registry) {
        //注册了自动自动代理类
        AopConfigUtils.registerAspectJAnnotationAutoProxyCreatorIfNecessary(registry);
        AnnotationAttributes enableAspectJAutoProxy = AnnotationConfigUtils.attributesFor(importingClassMetadata, EnableAspectJAutoProxy.class);
        if (enableAspectJAutoProxy != null) {
            if (enableAspectJAutoProxy.getBoolean("proxyTargetClass")) {
                AopConfigUtils.forceAutoProxyCreatorToUseClassProxying(registry);
            }

            if (enableAspectJAutoProxy.getBoolean("exposeProxy")) {
                AopConfigUtils.forceAutoProxyCreatorToExposeProxy(registry);
            }
        }

    }
}
- 进入registerAspectJAnnotationAutoProxyCreatorIfNecessary方法里面
 public static BeanDefinition registerAspectJAnnotationAutoProxyCreatorIfNecessary(BeanDefinitionRegistry registry, @Nullable Object source) {
        return registerOrEscalateApcAsRequired(AnnotationAwareAspectJAutoProxyCreator.class, registry, source);
    }
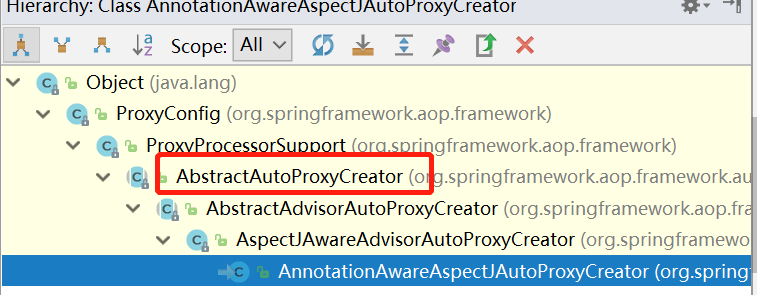
可以看到返回了一个BeanDefinition,里面的BeanClass类型是AnnotationAwareAspectJAutoProxyCreator,这个类看名字是一个AOP的动态代理创建类,里面没有啥可疑的方法。在IDEA里按Ctrl+H看他的继承结构。有一个父类AbstractAutoProxyCreator,这个类实现了BeanPostProcessor接口。这个接口是Bean的扩展接口,在bean初始化完成后会调用到他的postProcessAfterInitialization(Object bean, String beanName)方法。
- 方法内容如下
 public Object postProcessAfterInitialization(@Nullable Object bean, String beanName) {
        if (bean != null) {
            Object cacheKey = this.getCacheKey(bean.getClass(), beanName);
            if (this.earlyProxyReferences.remove(cacheKey) != bean) {
                //如果有必要,进行包装
                return this.wrapIfNecessary(bean, beanName, cacheKey);
            }
        }

        return bean;
    }

    protected Object wrapIfNecessary(Object bean, String beanName, Object cacheKey) {
        if (StringUtils.hasLength(beanName) && this.targetSourcedBeans.contains(beanName)) {
            return bean;
        } else if (Boolean.FALSE.equals(this.advisedBeans.get(cacheKey))) {
            return bean;
        } else if (!this.isInfrastructureClass(bean.getClass()) && !this.shouldSkip(bean.getClass(), beanName)) {
        //获取切面的方法,第9点那里展开讨论
            Object[] specificInterceptors = this.getAdvicesAndAdvisorsForBean(bean.getClass(), beanName, (TargetSource)null);
            if (specificInterceptors != DO_NOT_PROXY) {
                this.advisedBeans.put(cacheKey, Boolean.TRUE);
                //创建动态代理
                Object proxy = this.createProxy(bean.getClass(), beanName, specificInterceptors, new SingletonTargetSource(bean));
                this.proxyTypes.put(cacheKey, proxy.getClass());
                return proxy;
            } else {
                this.advisedBeans.put(cacheKey, Boolean.FALSE);
                return bean;
            }
        } else {
            this.advisedBeans.put(cacheKey, Boolean.FALSE);
            return bean;
        }
    }
- 可以看出这里已经在开始创建动态代理了
  protected Object createProxy(Class<?> beanClass, @Nullable String beanName, @Nullable Object[] specificInterceptors, TargetSource targetSource) {
        if (this.beanFactory instanceof ConfigurableListableBeanFactory) {
            AutoProxyUtils.exposeTargetClass((ConfigurableListableBeanFactory)this.beanFactory, beanName, beanClass);
        }
        //动态代理工厂
        ProxyFactory proxyFactory = new ProxyFactory();
        proxyFactory.copyFrom(this);
        if (!proxyFactory.isProxyTargetClass()) {
            if (this.shouldProxyTargetClass(beanClass, beanName)) {
                proxyFactory.setProxyTargetClass(true);
            } else {
                this.evaluateProxyInterfaces(beanClass, proxyFactory);
            }
        }

        Advisor[] advisors = this.buildAdvisors(beanName, specificInterceptors);
        //切面那里的方法
        proxyFactory.addAdvisors(advisors);
        proxyFactory.setTargetSource(targetSource);
        this.customizeProxyFactory(proxyFactory);
        proxyFactory.setFrozen(this.freezeProxy);
        if (this.advisorsPreFiltered()) {
            proxyFactory.setPreFiltered(true);
        }
        //获取动态代理类
        return proxyFactory.getProxy(this.getProxyClassLoader());
    }
- 学过AOP的人都知道动态代理的方式有两种,一种JDK代理,一种CGLIB动态代理。那么Spring里面是怎么选择的呢?答案就在这里:
 public AopProxy createAopProxy(AdvisedSupport config) throws AopConfigException {
   // 1.config.isOptimize()是否使用优化的代理策略,目前使用与CGLIB
        // config.isProxyTargetClass() 是否目标类本身被代理而不是目标类的接口
        // hasNoUserSuppliedProxyInterfaces()是否存在代理接口

        if (!config.isOptimize() && !config.isProxyTargetClass() && !this.hasNoUserSuppliedProxyInterfaces(config)) {
            return new JdkDynamicAopProxy(config);
        } else {
            Class<?> targetClass = config.getTargetClass();
            if (targetClass == null) {
                throw new AopConfigException("TargetSource cannot determine target class: Either an interface or a target is required for proxy creation.");
            } else {
                //目标类不是接口或不是代理类就使用cglib代理
                return (AopProxy)(!targetClass.isInterface() && !Proxy.isProxyClass(targetClass) ? new ObjenesisCglibAopProxy(config) : new JdkDynamicAopProxy(config));
            }
        }
    }
- Cglib的代理类是CglibAopProxy、ObjenesisCglibAopProxy,JDK的代理类是JdkDynamicAopProxy。在这些类里面对目标类进行了代理,在执行方法的时候就是执行的代理类的方法,而实现了切面编程的效果。
- 主线流程就是这些了,还有一个没说的就是我们如何获取的切面方法,@Before("pointCut()")这些注解又是如何生效的?再回到AbstractAutoProxyCreator的wrapIfNecessary()方法
里面有这句代码:
 Object[] specificInterceptors = this.getAdvicesAndAdvisorsForBean(bean.getClass(), beanName, (TargetSource)null);


  @Nullable
    protected Object[] getAdvicesAndAdvisorsForBean(Class<?> beanClass, String beanName, @Nullable TargetSource targetSource) {
        List<Advisor> advisors = this.findEligibleAdvisors(beanClass, beanName);
        return advisors.isEmpty() ? DO_NOT_PROXY : advisors.toArray();
    }

    protected List<Advisor> findEligibleAdvisors(Class<?> beanClass, String beanName) {
        //查找候选的要切面附加的方法,这里加进去的
        List<Advisor> candidateAdvisors = this.findCandidateAdvisors();
        List<Advisor> eligibleAdvisors = this.findAdvisorsThatCanApply(candidateAdvisors, beanClass, beanName);
        this.extendAdvisors(eligibleAdvisors);
        if (!eligibleAdvisors.isEmpty()) {
            eligibleAdvisors = this.sortAdvisors(eligibleAdvisors);
        }

        return eligibleAdvisors;
    }
- 他会找到Aspect类,然后遍历里面的方法,并获取Pointcut,然后构造出Advisor,加入到集合List
advisors里,供动态代理时使用
书山有路勤为径,学海无涯苦作舟

 浙公网安备 33010602011771号