Nacos Config配置中心
近期,梳理公司项目发现,目前公司各个服务之间的配置比较散乱,每个项目中管理多个配置文件,并且不同的项目,不同的环境下配置文件反复修改,容易出错,所以准备将各个服务之间的配置全部拿取出来,采用nacos做一个配置中心来管理这些零散配置,并且使用Nacos Config的好处:配置的生效是实时的,不需要重启或刷新
一、配置中心对比
在微服务盛行的今天,随着程序功能的日益复杂,程序的配置日益增多(各种功能的开关、参数的配置、服务器的地址...)以及对程序配置的期望值也越来越高(配置修改后实时生效,分环境、分集群管理配置,代码安全、审核机制)等等一系列因素,导致传统的通过配置文件、数据库等方式已经越来越无法满足开发人员对配置管理的需求,这种情况下配置中心应运而生。
目前市场上主流的配置中心有三种:nacos、spring cloud config以及Apollo,以下是我梳理的他们的区别
| 功能点 | nacos | spring cloud config | Apollo |
|---|---|---|---|
| 开源时间 | 2018.6 | 2014.9 | 2016.5 |
| 配置实时推送 | 支持(HTTP长轮询1S内) | 支持(Spring Cloud Bus) | 支持(HTTP长轮询1S内) |
| 版本管理 | 支持 | 支持(GIT) | 支持 |
| 配置回滚 | 支持 | 支持(GIT) | 支持 |
| 灰度发布 | 待支持 | 支持 | 支持 |
| 权限管理 | 待支持 | 支持 | 支持 |
| 多集群 | 支持 | 支持 | 支持 |
| 多环境 | 支持 | 支持 | 支持 |
| 监听查询 | 支持 | 支持 | 支持 |
| 多语言 | Python,java,node.js,openAPI | 只支持java | Go、C++、java、Python、PHP、net、openAPI |
| 单机部署 | Nacos单节点 | Config-server+GIT+Spring Cloud Bus(支持配置实时推送) | Apollo-quikstart+Mysql |
| 分布式部署 | Nacos+Mysql(部署简单) | Config-server+GIT+MQ(部署比较复杂) | Config+admin+Portal+Mysql(部署复杂) |
| 配置格式检验 | 支持 | 不支持 | 支持 |
| 通信协议 | HTTP | HTTP和AMQP | HTTP |
| 数据一致性 | HTTP异步通知 | git保证数据一致性,config-servercop 呢git读数据 | 数据库模拟消息队列,Apollo定时读消息 |
| 单机读 | 15000 | 7(限流) | 9000 |
| 单机写 | 1800 | 5(限流) | 1100 |
| 3节点读 | 45000 | 21(限流) | 27000 |
| 3节点写 | 5600 | 5(限流) | 3300 |
| 文档 | 目前只有java开发相关 | 详细 | 详细 |
上面的文档就是比较详细的对比了,从差异中我们可以看出,config部署复杂,并且基于git,所以不考虑采用,而nacos与Apollo对比来说,其实Apollo更适合做配置中心,但由于我们现有的产品不需要使用这么复杂的功能,并且nacos还可以作为注册中心,可以有效的降低中间价数量,所以本次我们会采用nacos来作为我们的配置中心来使用
二、实现nacos配置中心研发
nacos单机部署我这边就不讲了,有兴趣的同学可以自己玩玩,可以参考博文Nacos 本地单机版部署步骤和使用,下面我直接讲我的研发步骤
1、maven配置
 <!-- 在微服务中引入nacos的依赖-->
        <dependency>
            <groupId>com.alibaba.cloud</groupId>
            <artifactId>spring-cloud-starter-alibaba-nacos-config</artifactId>
            <version>2.2.7.RELEASE</version>
        </dependency>
2、在nacos中导入配置
nacos中迁入配置
本次讲解中采用研发环境来举例
- 在nacos界面添加研发环境命名空间
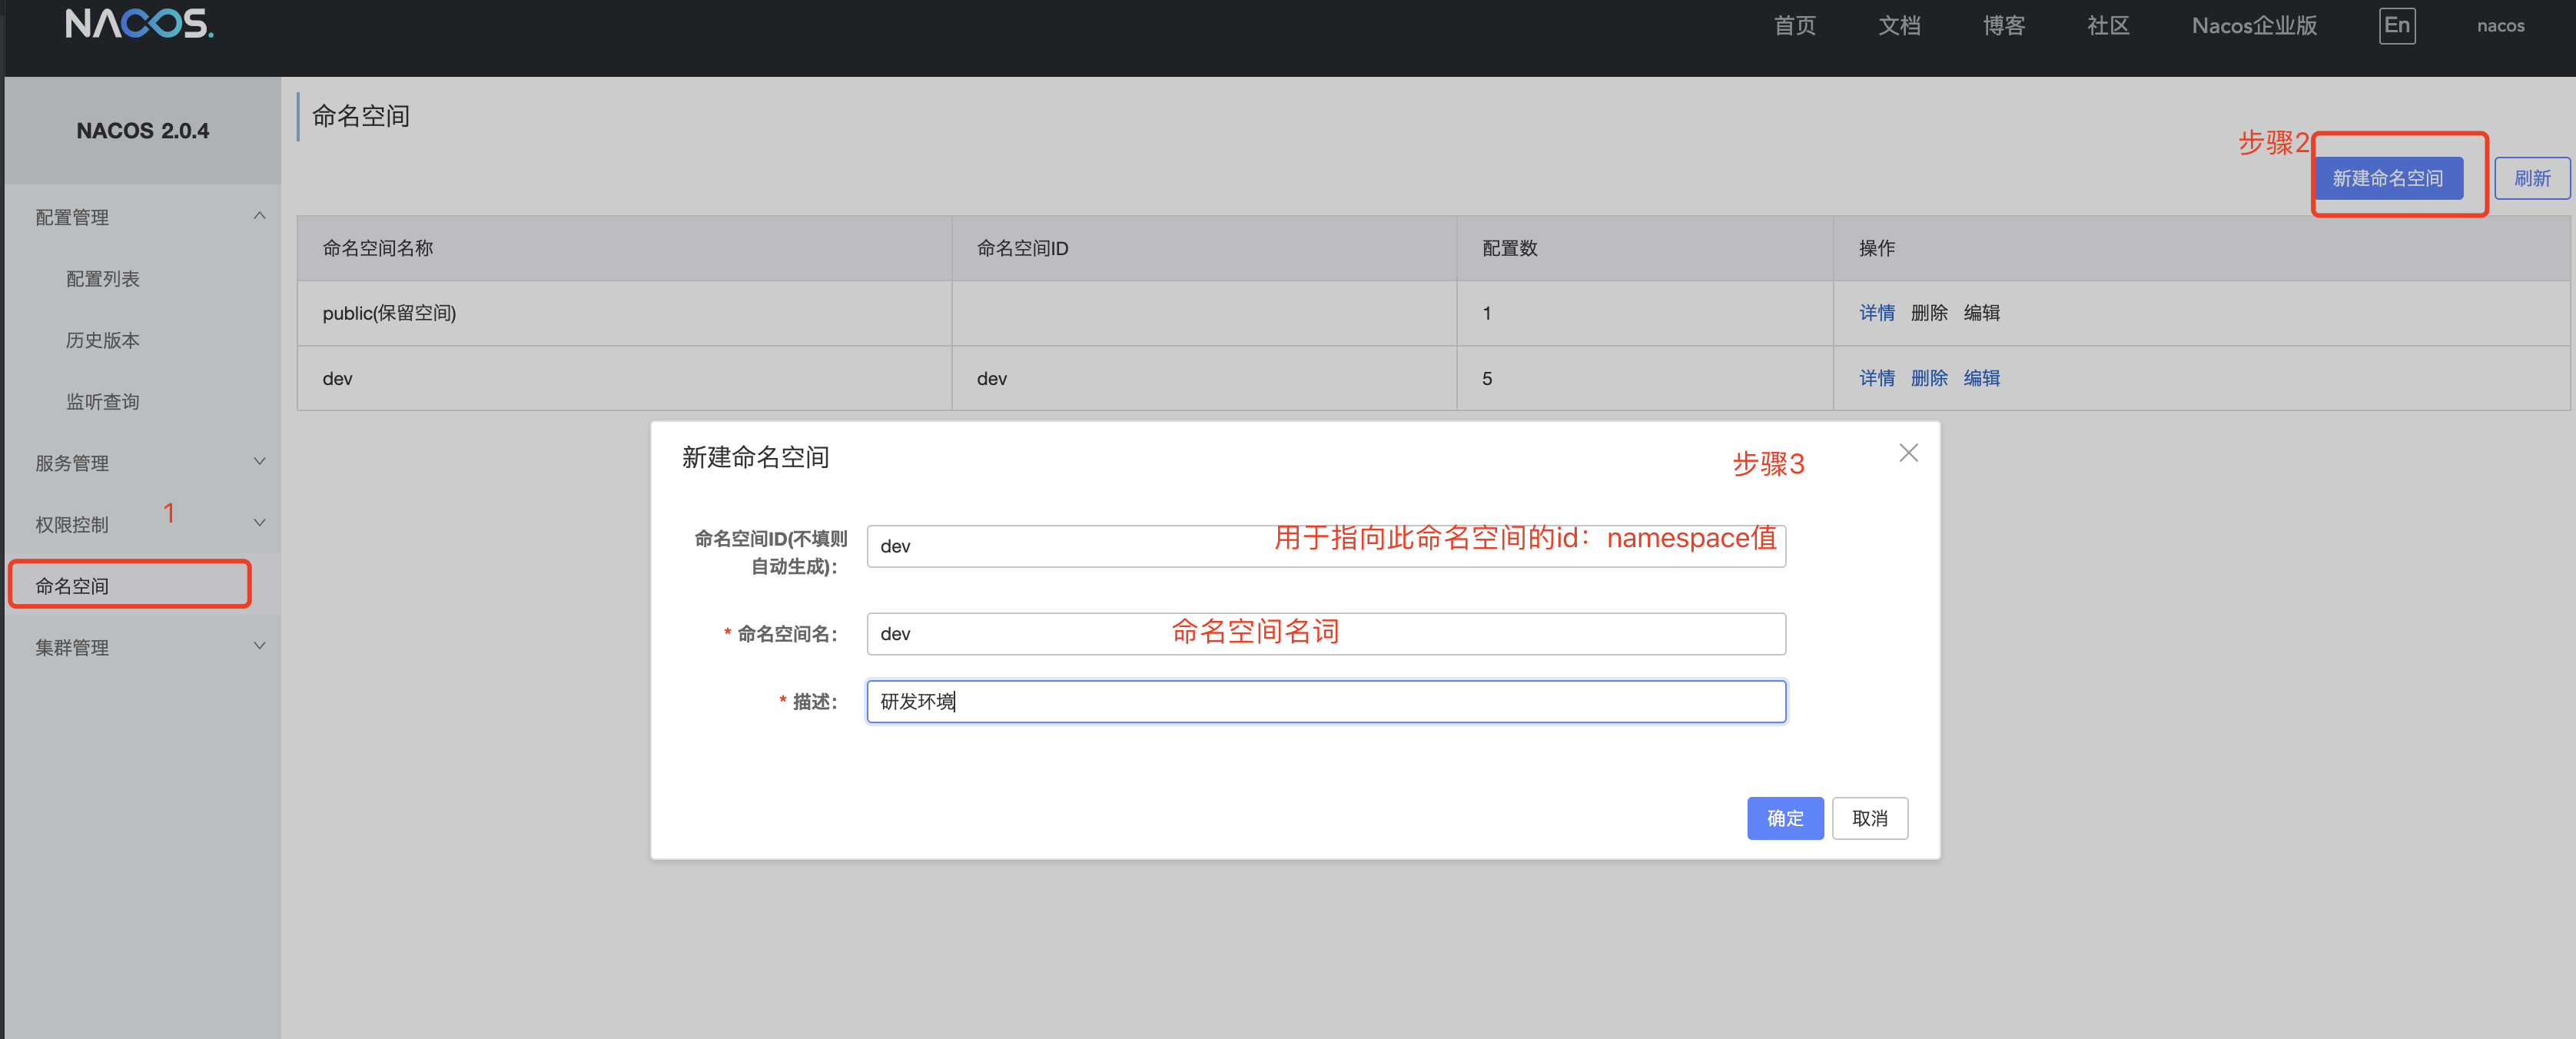
-
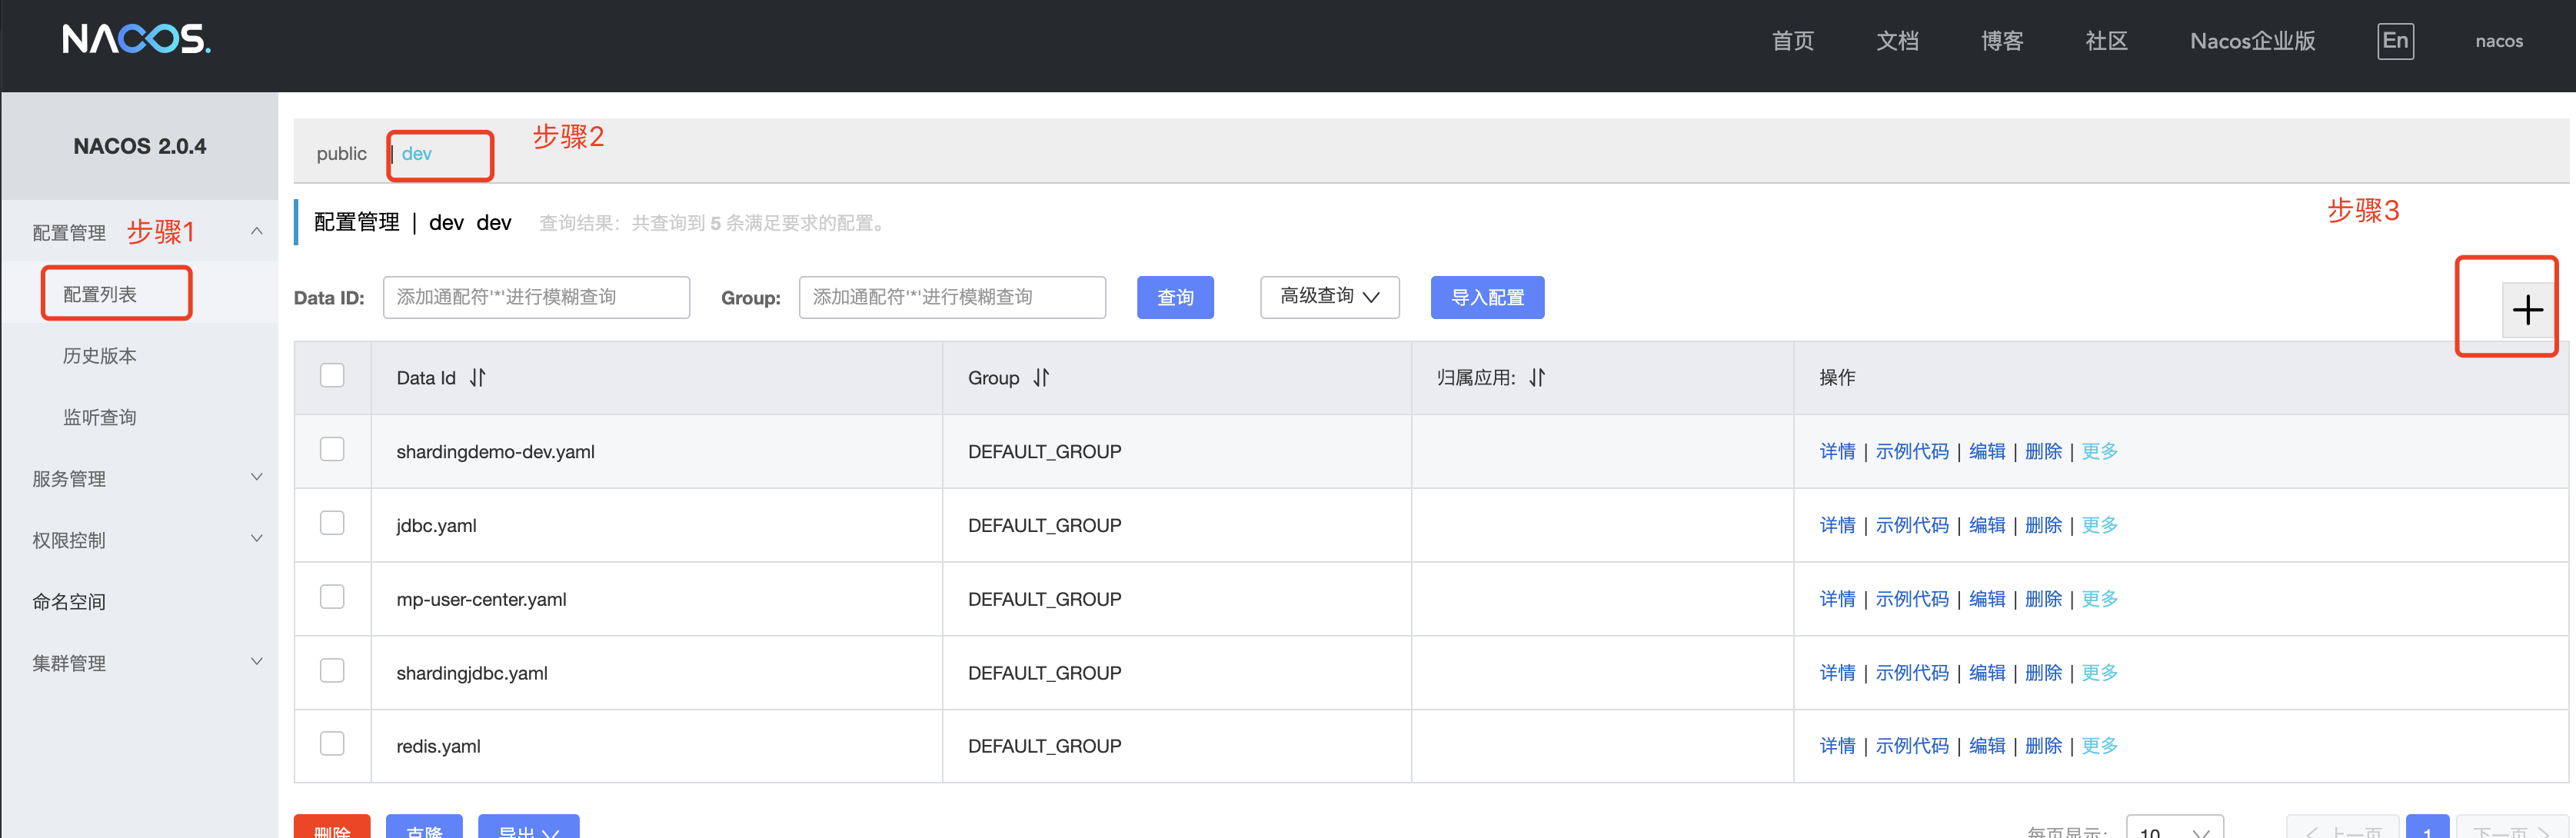
建立公用配置文件
将一些公用的配置文件提取出来,来进行项目复用,降低配置数量,便于后期维护
-
读写数据库源
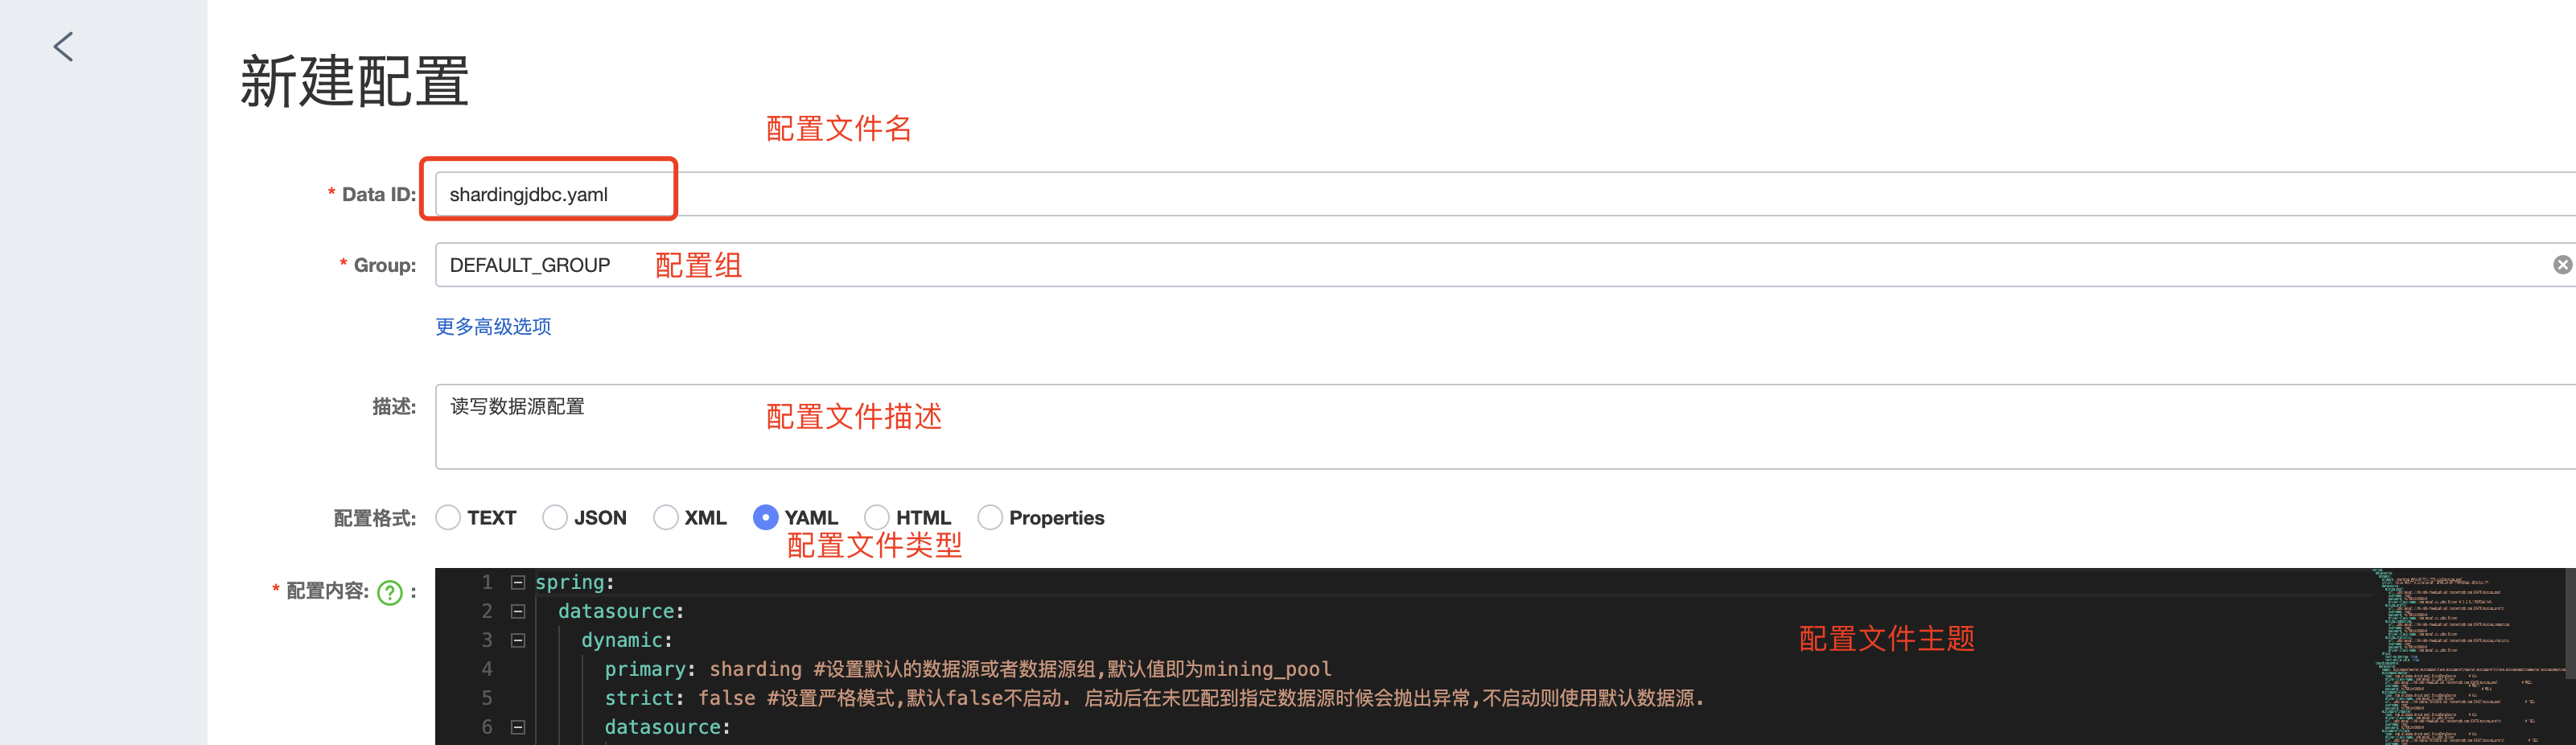
- 新建数据库配置文件
![]()
![]()
-
详细配置
spring:
  datasource:
    dynamic:
      primary: sharding #设置默认的数据源或者数据源组,默认值即为mining_pool
      strict: false #设置严格模式,默认false不启动. 启动后在未匹配到指定数据源时候会抛出异常,不启动则使用默认数据源.
      datasource:
        mining_pool:
          url: jdbc:mysql://IP:port/mining_pool
          username: root
          password: root
          driver-class-name: com.mysql.cj.jdbc.Driver # 3.2.0开始支持SPI可省略此配置
        mining_profit:
          url: jdbc:mysql://IP:port/mining_profit
          username: root
          password: root
          driver-class-name: com.mysql.cj.jdbc.Driver
        mining_computing:
          url: jdbc:mysql://IP:port/mining_computing
          username: root
          password: root
          driver-class-name: com.mysql.cj.jdbc.Driver
        mining_statistic:
          url: jdbc:mysql://IP:port/mining_statistic
          username: root
          password: root
          driver-class-name: com.mysql.cj.jdbc.Driver
      druid:
        test-on-borrow: true
        test-while-idle: true
  shardingsphere:
    datasource:
      names: miningpoolmaster,miningpoolslave,miningprofitmaster,miningprofitslave,miningcomputingmaster,miningcomputingslave,miningstatisticmaster,miningstatisticslave                                 # 数据源名字
      miningpoolmaster:
        type: com.alibaba.druid.pool.DruidDataSource        # 连接池
        driver-class-name: com.mysql.cj.jdbc.Driver
        url: jdbc:mysql://IP:port/mining_pool               # 主库地址
        username: root                                      # 主库用户名
        password: root                                    # 主库密码
      miningpoolslave:
        type: com.alibaba.druid.pool.DruidDataSource        # 连接池
        driver-class-name: com.mysql.cj.jdbc.Driver
        url: jdbc:mysql://从库IP:从库Port/mining_pool               # 从库地址
        username: root
        password: root
      miningprofitmaster:
        type: com.alibaba.druid.pool.DruidDataSource        # 连接池
        driver-class-name: com.mysql.cj.jdbc.Driver
        url: jdbc:mysql://IP:port/mining_profit               # 从库地址
        username: root
        password: root
      miningprofitslave:
        type: com.alibaba.druid.pool.DruidDataSource        # 连接池
        driver-class-name: com.mysql.cj.jdbc.Driver
        url: jdbc:mysql://从库IP:从库Port/mining_profit               # 从库地址
        username: root
        password: root
      miningcomputingmaster:
        type: com.alibaba.druid.pool.DruidDataSource        # 连接池
        driver-class-name: com.mysql.cj.jdbc.Driver
        url: jdbc:mysql://IP:port/mining_computing               # 从库地址
        username: root
        password: root
      miningcomputingslave:
        type: com.alibaba.druid.pool.DruidDataSource        # 连接池
        driver-class-name: com.mysql.cj.jdbc.Driver
        url: jdbc:mysql://从库IP:从库Port/mining_computing               # 从库地址
        username: root
        password: root
      miningstatisticmaster:
        type: com.alibaba.druid.pool.DruidDataSource        # 连接池
        driver-class-name: com.mysql.cj.jdbc.Driver
        url: jdbc:mysql://IP:port/mining_statistic               # 从库地址
        username: root
        password: root
      miningstatisticslave:
        type: com.alibaba.druid.pool.DruidDataSource        # 连接池
        driver-class-name: com.mysql.cj.jdbc.Driver
        url: jdbc:mysql://从库IP:从库Port/mining_statistic               # 从库地址
        username: root
        password: root
    sharding:
      #配置数据源的读写分离,但是数据库一定要做主从复制
      master-slave-rules:
        # 配置主从名称,可以任意取名字
        miningpool:
          master-data-source-name: miningpoolmaster
          slave-data-source-names: miningpoolslave
          load-balance-algorithm-type: round_robin
        miningprofit:
          master-data-source-name: miningprofitmaster
          slave-data-source-names: miningprofitslave
          load-balance-algorithm-type: round_robin
        miningcomputing:
          master-data-source-name: miningcomputingmaster
          slave-data-source-names: miningcomputingslave
          load-balance-algorithm-type: round_robin
        miningstatistic:
          master-data-source-name: miningstatisticmaster
          slave-data-source-names: miningstatisticslave
          load-balance-algorithm-type: round_robin
      default-data-source-name: miningpool
      tables:
        mp_home_history_pool:
          actual-data-nodes: miningcomputing.mp_home_history_pool
        mp_home_mining:
          actual-data-nodes: miningcomputing.mp_home_mining
        mp_sub_force:
          actual-data-nodes: miningcomputing.mp_sub_force
        mp_child_bill:
          actual-data-nodes: miningprofit.mp_child_bill
        mp_income_history:
          actual-data-nodes: miningprofit.mp_income_history
        mp_parent_bill:
          actual-data-nodes: miningprofit.mp_parent_bill
        mp_sub_profit:
          actual-data-nodes: miningprofit.mp_sub_profit
        mp_sub_profit_history:
          actual-data-nodes: miningprofit.mp_sub_profit_history
        mp_active_miners_chat:
          actual-data-nodes: miningstatistic.mp_active_miners_chat
        mp_active_miners_force_chat:
          actual-data-nodes: miningstatistic.mp_active_miners_force_chat
        mp_area_summary:
          actual-data-nodes: miningstatistic.mp_area_summary
        mp_miner_worker_chat:
          actual-data-nodes: miningstatistic.mp_miner_worker_chat
        mp_miner_worker_list:
          actual-data-nodes: miningstatistic.mp_miner_worker_list
        mp_sub_force_chat:
          actual-data-nodes: miningstatistic.mp_sub_force_chat
        mp_sub_miner_group_info:
          actual-data-nodes: miningstatistic.mp_sub_miner_group_info
        mp_sub_miner_info:
          actual-data-nodes: miningstatistic.mp_sub_miner_info
    props:
      sql:
        show: true
-
redis配置
spring:
  redis:
    host: ip
    database: 0
    port: port
    pool:
      max-active: 30
      max-wait: -1
      max-idle: 20
      min-idle: 0
    cluster:
      refresh:
        adaptive: true
        period: 20
-
-
建立服务个性化配置
-
建立个性化配置时,注意配置文件取名规则:服务名称-开发环境.后缀名,由于我们用命名空间区分了开发环境,所以我们取名时:服务名称.后缀名
-
mp-user-center.yaml
spring:
  port: 8093
  application:
    name: mp-user-center
  cloud:
    nacos:
      discovery:
        ephemeral: true
        server-addr: 127.0.0.1:8848  #服务注册地址
-
到这里,我们的配置就建完了,接下来,我们开始编写代码来获取配置
集成spring boot配置
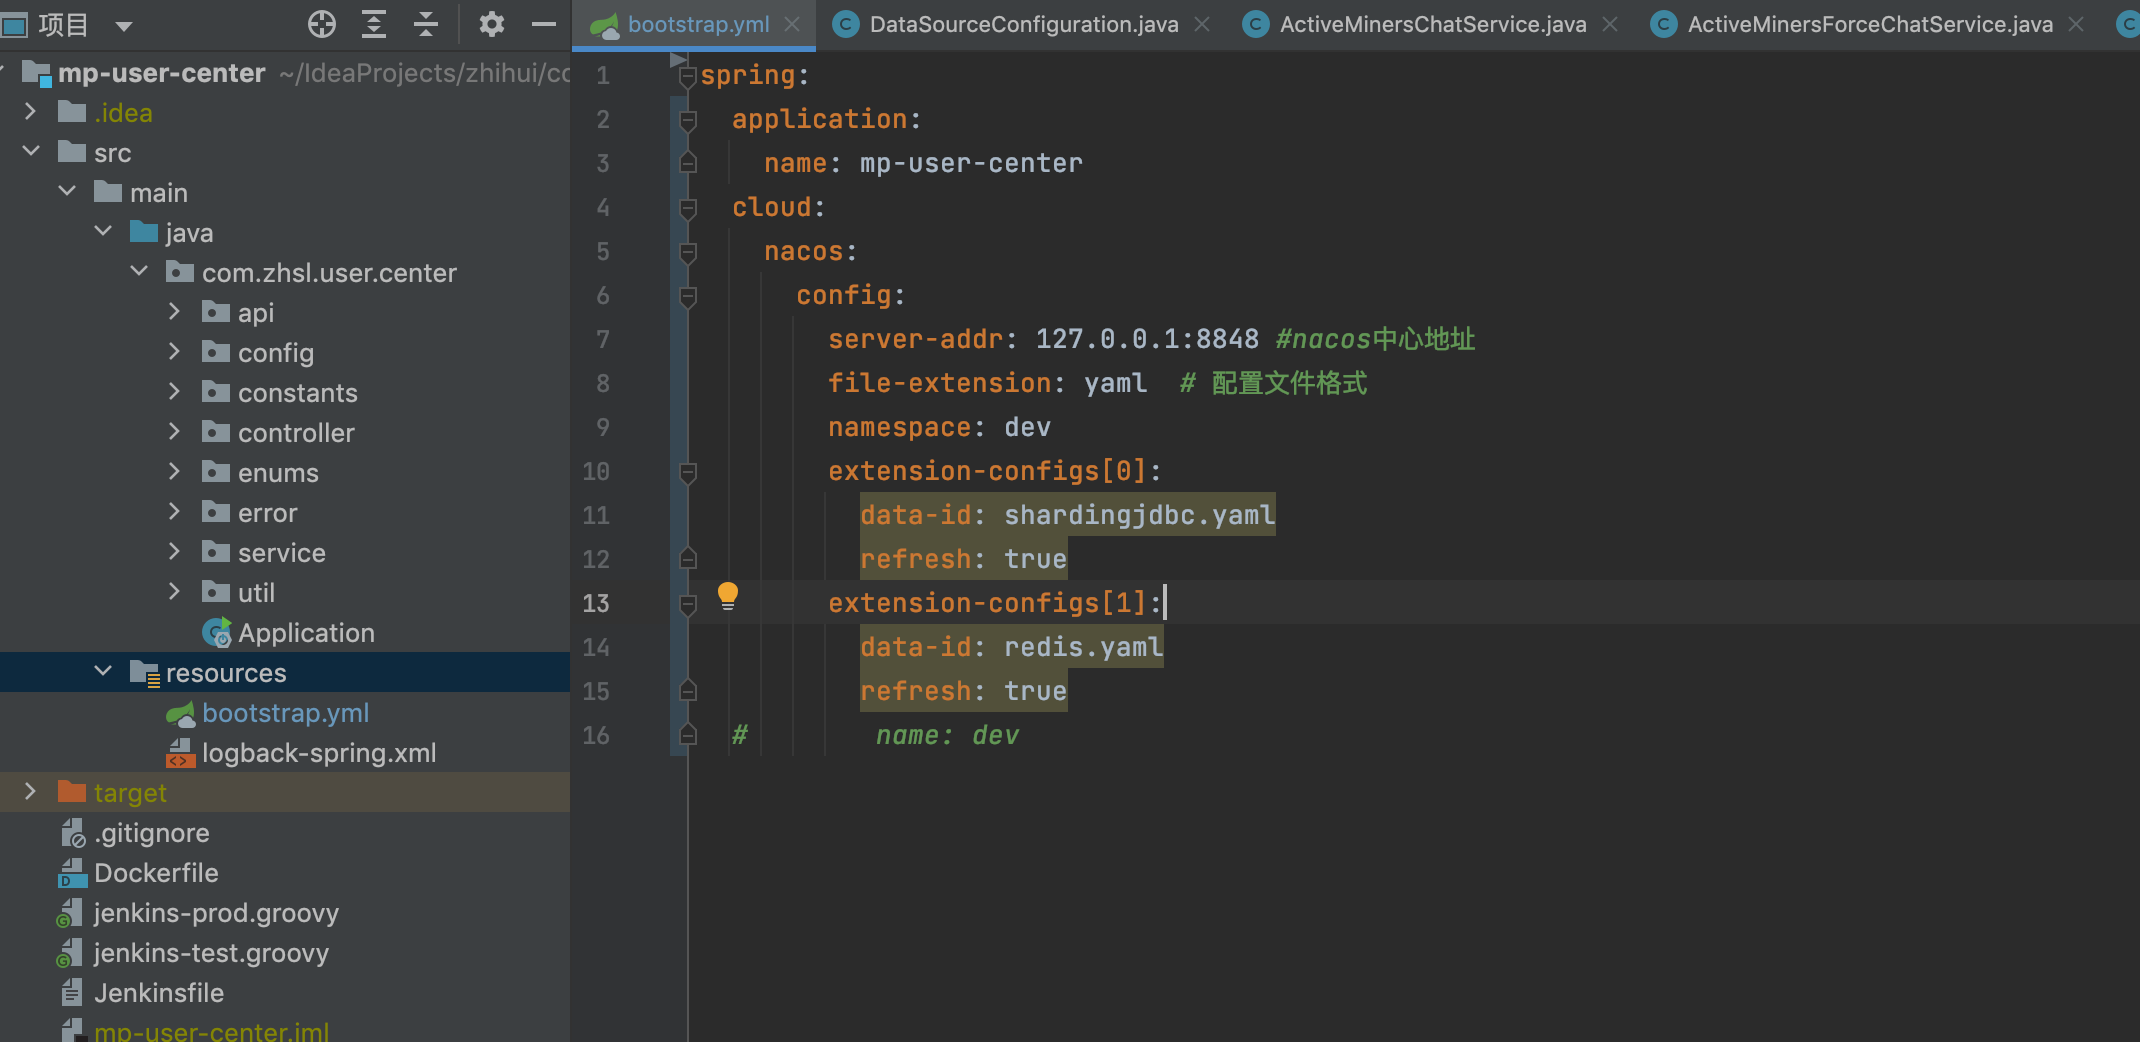
注意:不能使用原来的application.yml作为配置文件,而是新建一个bootstrap.yml作为配置文件
配置文件优先级(由高到低):
bootstrap.properties -> bootstrap.yml -> application.properties -> application.yml
bootstrap.yml文件内容
spring:
  application:
    name: mp-user-center #服务名
  cloud:
    nacos:
      config:
        server-addr: 127.0.0.1:8848 #nacos中心地址
        file-extension: yaml  # 配置文件格式
        namespace: dev  #命名空间
        extension-configs[0]: #公用配置文件
          data-id: shardingjdbc.yaml
          refresh: true
        extension-configs[1]:
          data-id: redis.yaml
          refresh: true
  #        name: dev
读取普通配置
除了一些框架所需配置,还有一些普通配置怎么拿取,nacos采用了集成spring boot的配置读取方式读取,和以前获取值方式一样:
@Value("${coin.rpc}")
String uri;
结果对比
- 选择我们需要改造的项目,如下图是改造前的项目目录
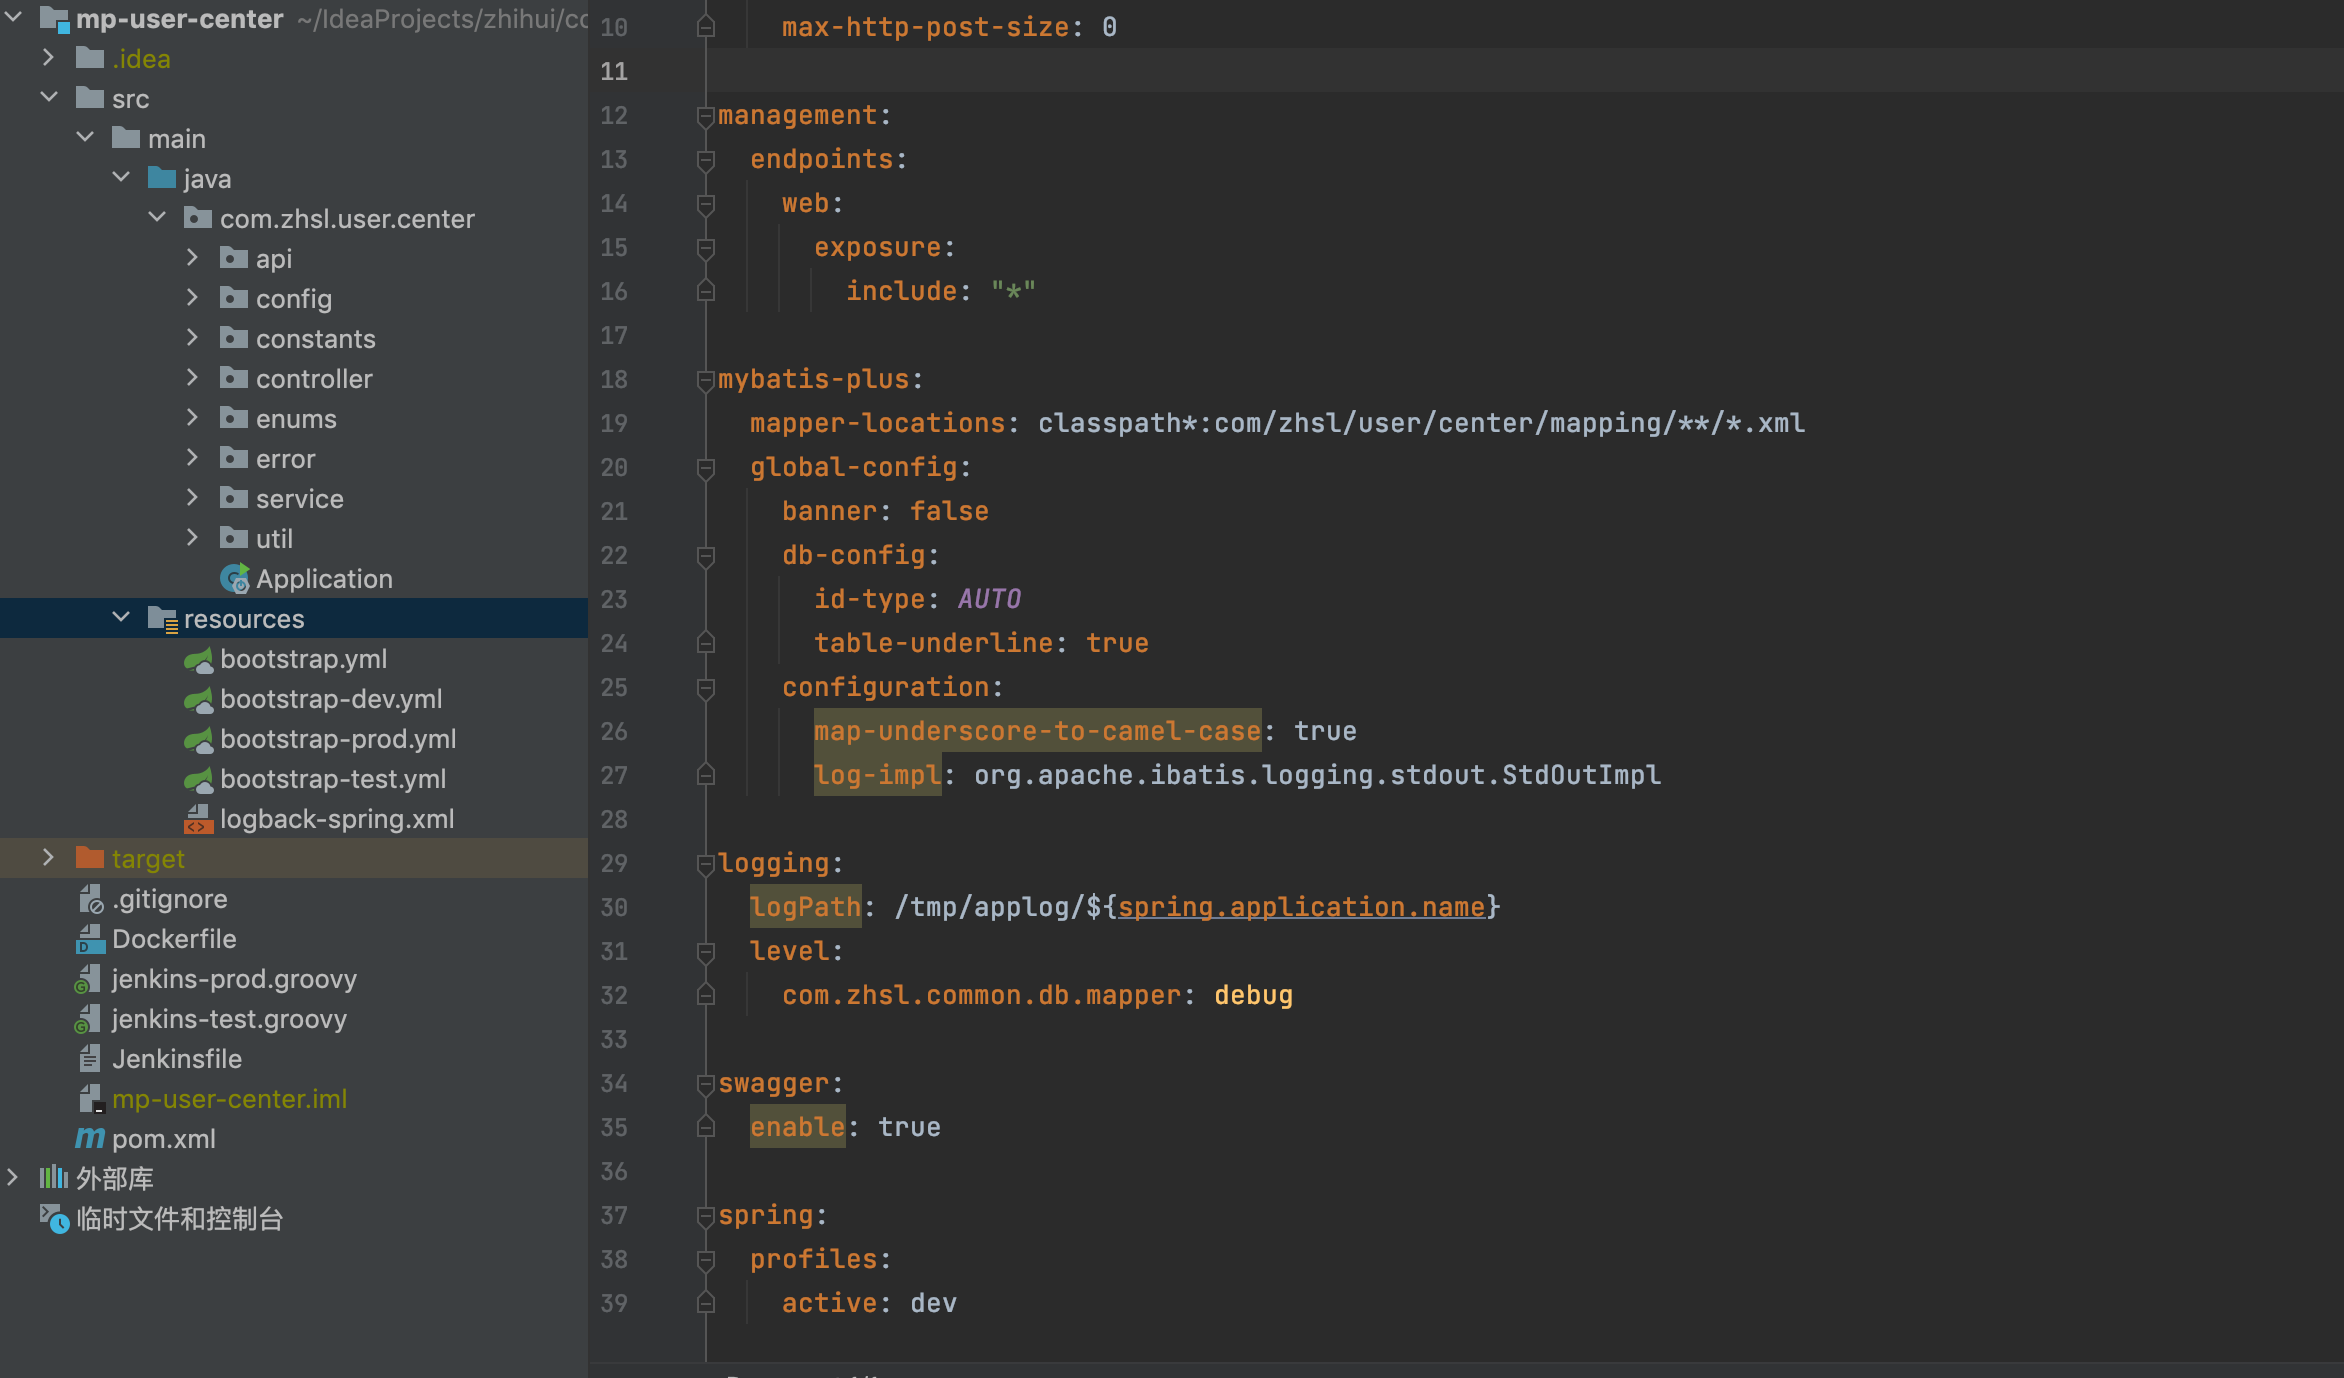
- 改造后效果对比
很明细,配置文件瘦身很多,并且只需要指配置中心地址即可
3、过程中遇到的坑
ClassNotFoundException
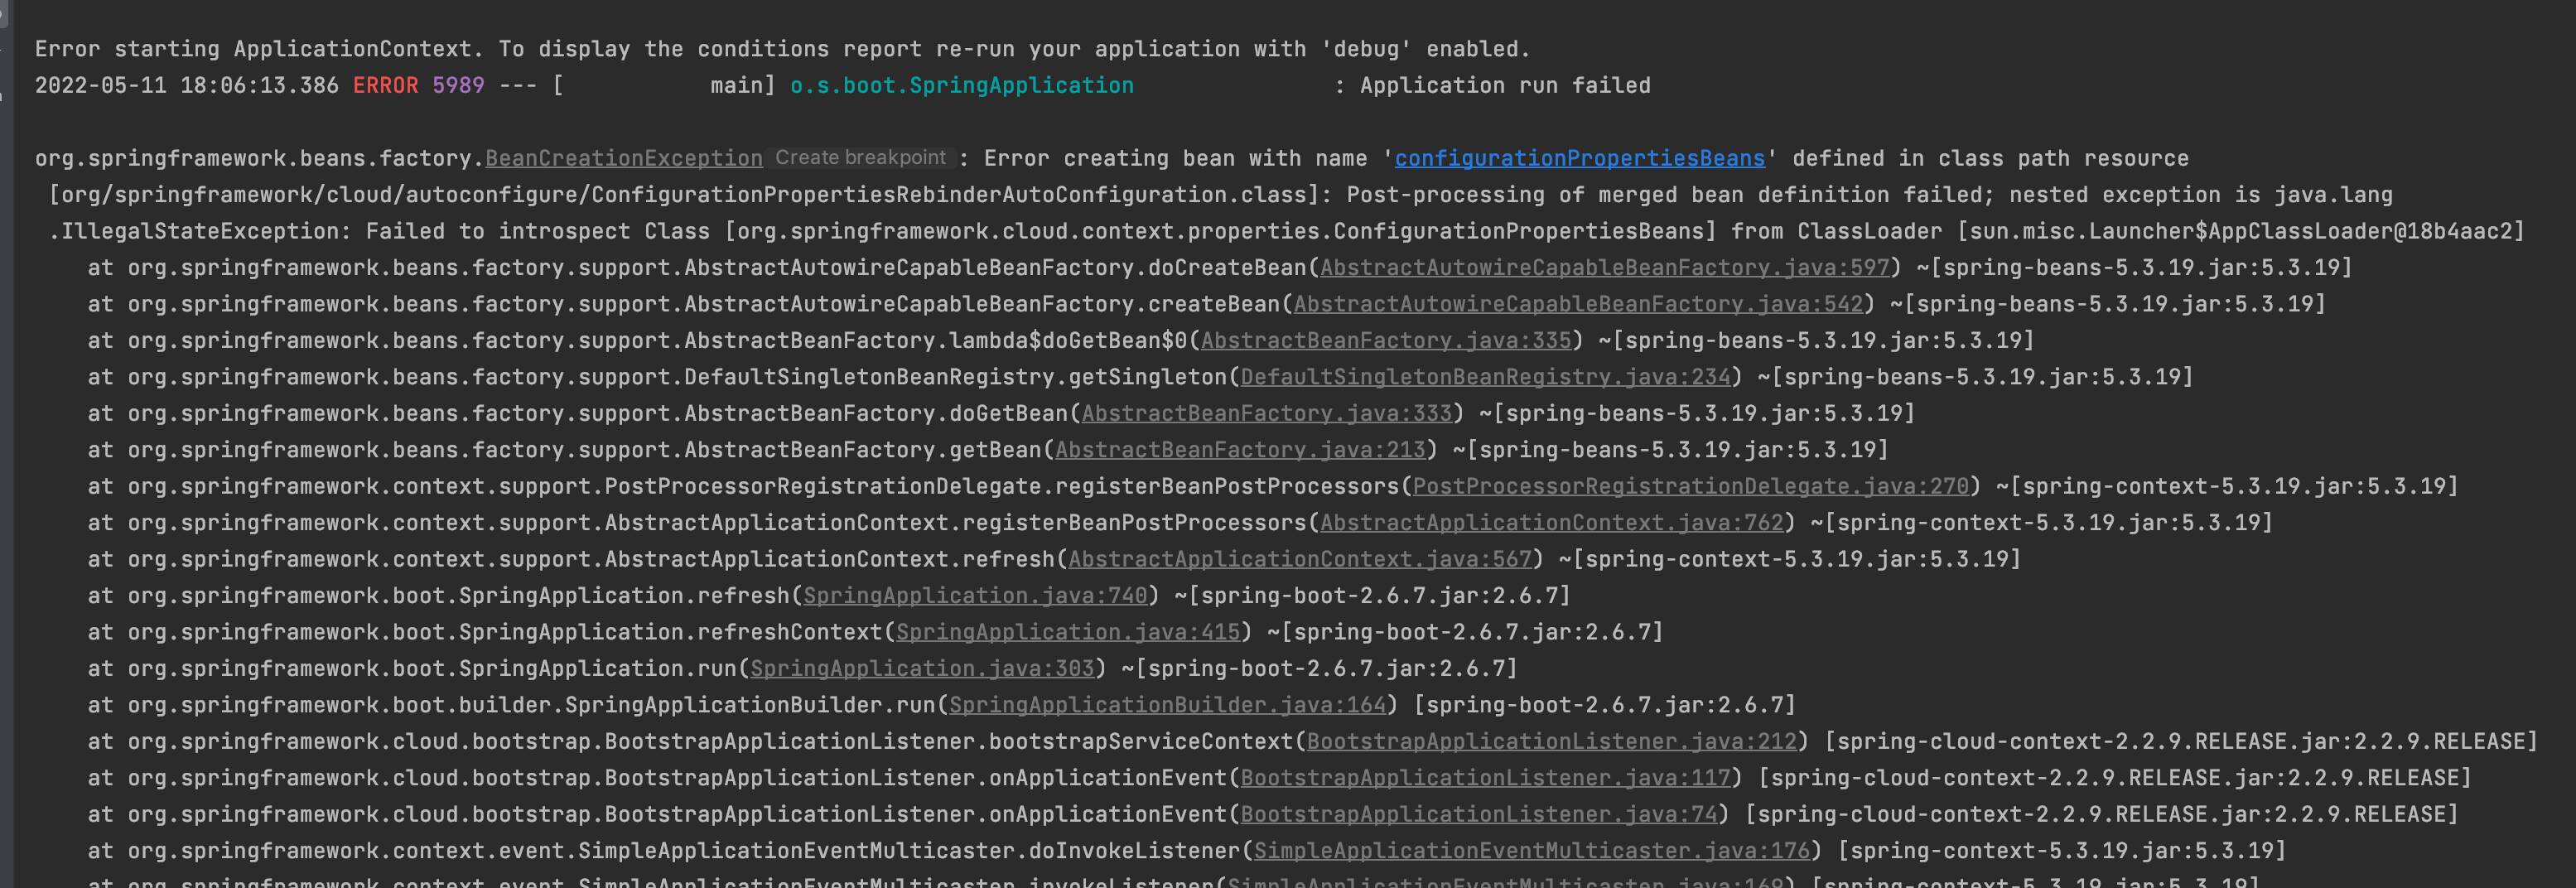
这个bug的原因就是版本问题,困扰我半天,还以为哪里搞错了,直到看到后面的异常:ClassNotFoundException ConfigurationBeanFactoryMetadata,原来spring-boot-starter-parent 2.4.0版本以后去掉了ConfigurationBeanFactoryMetadata类,spring-cloud-starter-alibaba-nacos最新版本还是2.2.6.RELEASE,对应的spring-cloud-context版本是2.2.6.RELEASE,因此如果使用了spring-boot-starter-parent2.4.0以上的版本就会出现这个异常
解决方案:
- 在现有项目中自己搞一个这个类

/*
 * Copyright 2012-2021 the original author or authors.
 *
 * Licensed under the Apache License, Version 2.0 (the "License");
 * you may not use this file except in compliance with the License.
 * You may obtain a copy of the License at
 *
 *      https://www.apache.org/licenses/LICENSE-2.0
 *
 * Unless required by applicable law or agreed to in writing, software
 * distributed under the License is distributed on an "AS IS" BASIS,
 * WITHOUT WARRANTIES OR CONDITIONS OF ANY KIND, either express or implied.
 * See the License for the specific language governing permissions and
 * limitations under the License.
 */

package org.springframework.boot.context.properties;

import org.springframework.beans.BeansException;
import org.springframework.beans.factory.config.BeanDefinition;
import org.springframework.beans.factory.config.ConfigurableListableBeanFactory;
import org.springframework.beans.factory.support.BeanDefinitionRegistry;
import org.springframework.beans.factory.support.GenericBeanDefinition;
import org.springframework.beans.factory.support.RootBeanDefinition;
import org.springframework.context.ApplicationContext;
import org.springframework.context.ApplicationContextAware;
import org.springframework.context.ConfigurableApplicationContext;
import org.springframework.core.annotation.AnnotationUtils;

import java.lang.annotation.Annotation;
import java.lang.reflect.Method;
import java.util.HashMap;
import java.util.Map;

/**
 * Utility class to memorize {@code @Bean} definition metadata during initialization of
 * the bean factory.
 *
 * @author Dave Syer
 * @since 1.1.0
 * @deprecated since 2.2.0 for removal in 2.4.0 in favor of
 * {@link ConfigurationPropertiesBean}
 */
@Deprecated
public class ConfigurationBeanFactoryMetadata implements ApplicationContextAware {

	/**
	 * The bean name that this class is registered with.
	 */
	public static final String BEAN_NAME = ConfigurationBeanFactoryMetadata.class.getName();

	private ConfigurableApplicationContext applicationContext;

	public <A extends Annotation> Map<String, Object> getBeansWithFactoryAnnotation(Class<A> type) {
		Map<String, Object> result = new HashMap<>();
		for (String name : this.applicationContext.getBeanFactory().getBeanDefinitionNames()) {
			if (findFactoryAnnotation(name, type) != null) {
				result.put(name, this.applicationContext.getBean(name));
			}
		}
		return result;
	}

	public <A extends Annotation> A findFactoryAnnotation(String beanName, Class<A> type) {
		Method method = findFactoryMethod(beanName);
		return (method != null) ? AnnotationUtils.findAnnotation(method, type) : null;
	}

	public Method findFactoryMethod(String beanName) {
		ConfigurableListableBeanFactory beanFactory = this.applicationContext.getBeanFactory();
		if (beanFactory.containsBeanDefinition(beanName)) {
			BeanDefinition beanDefinition = beanFactory.getMergedBeanDefinition(beanName);
			if (beanDefinition instanceof RootBeanDefinition) {
				return ((RootBeanDefinition) beanDefinition).getResolvedFactoryMethod();
			}
		}
		return null;
	}

	@Override
	public void setApplicationContext(ApplicationContext applicationContext) throws BeansException {
		this.applicationContext = (ConfigurableApplicationContext) applicationContext;
	}

	static void register(BeanDefinitionRegistry registry) {
		if (!registry.containsBeanDefinition(BEAN_NAME)) {
			GenericBeanDefinition definition = new GenericBeanDefinition();
			definition.setBeanClass(ConfigurationBeanFactoryMetadata.class);
			definition.setRole(BeanDefinition.ROLE_INFRASTRUCTURE);
			registry.registerBeanDefinition(ConfigurationBeanFactoryMetadata.BEAN_NAME, definition);
		}
	}

}
-
spring boot版本降下去
<parent>
        <groupId>org.springframework.boot</groupId>
        <artifactId>spring-boot-starter-parent</artifactId>
        <version>2.3.12.RELEASE</version>
        <relativePath/> <!-- lookup parent from repository -->
    </parent>
NoSuchMethodError
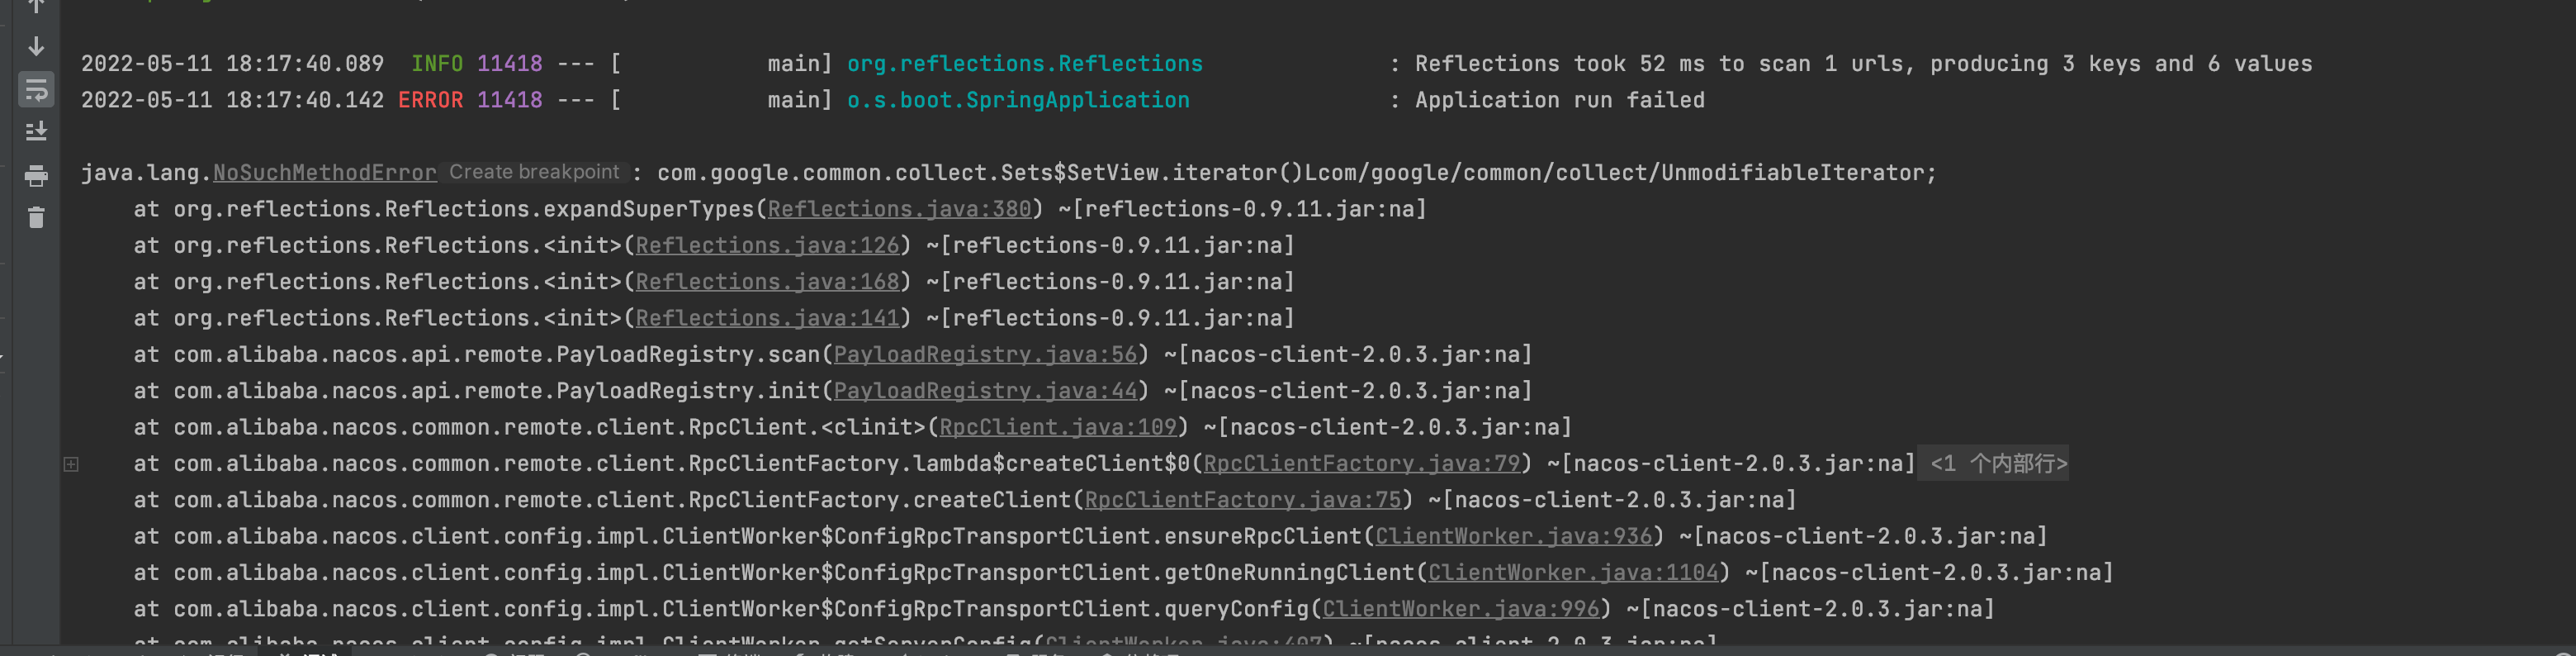
这个错误遇到好多次,有经验了,肯定是google的公用包冲突了,果然查看maven中有好几个版本,又一个18的版本导致了这个错误
解决方案:
在maven中指定google的包:
<!--shardingsphere版本配置 -->
        <dependency>
            <groupId>org.apache.shardingsphere</groupId>
            <artifactId>sharding-jdbc-spring-boot-starter</artifactId>
            <version>4.1.1</version>
          <!-- 去掉18版本的包-->
            <exclusions>
                <exclusion>
                    <groupId>com.google.guava</groupId>
                    <artifactId>guava</artifactId>
                </exclusion>
            </exclusions>
        </dependency>
			<!-- 指定20以上的版本-->
				<dependency>
            <groupId>com.google.guava</groupId>
            <artifactId>guava</artifactId>
            <version>20.0</version>
        </dependency>
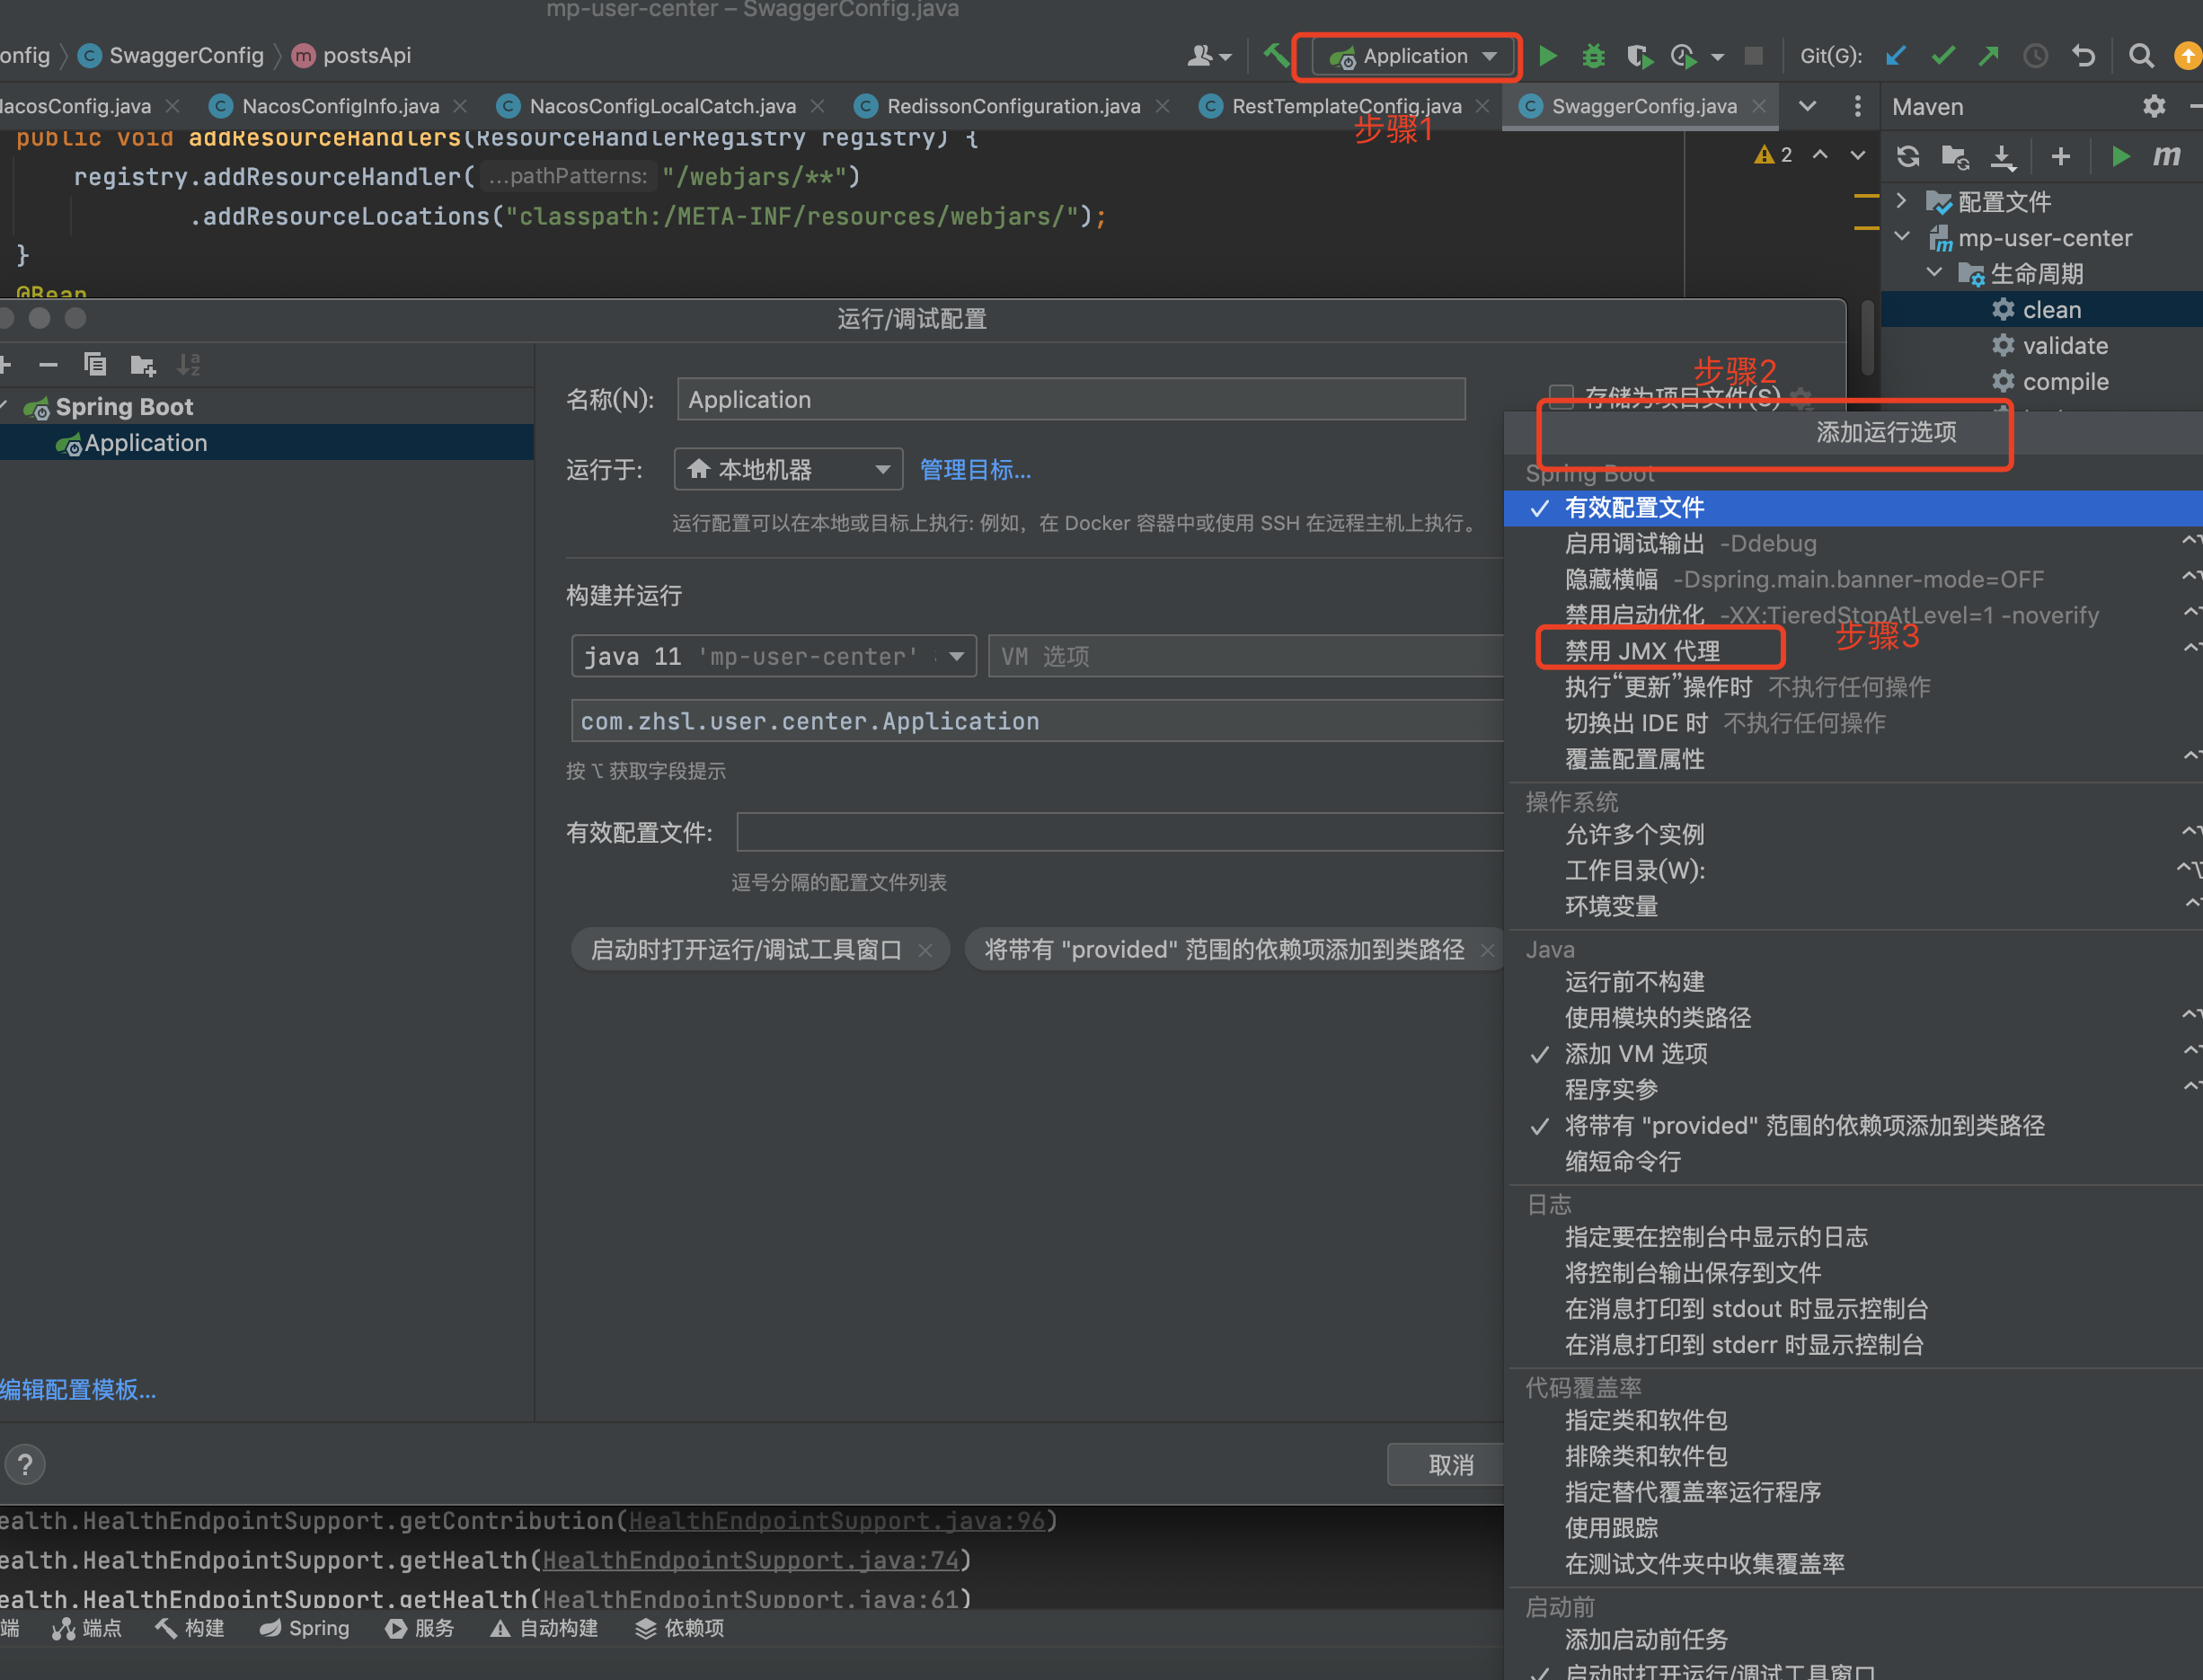
SQLFeatureNotSupportedException
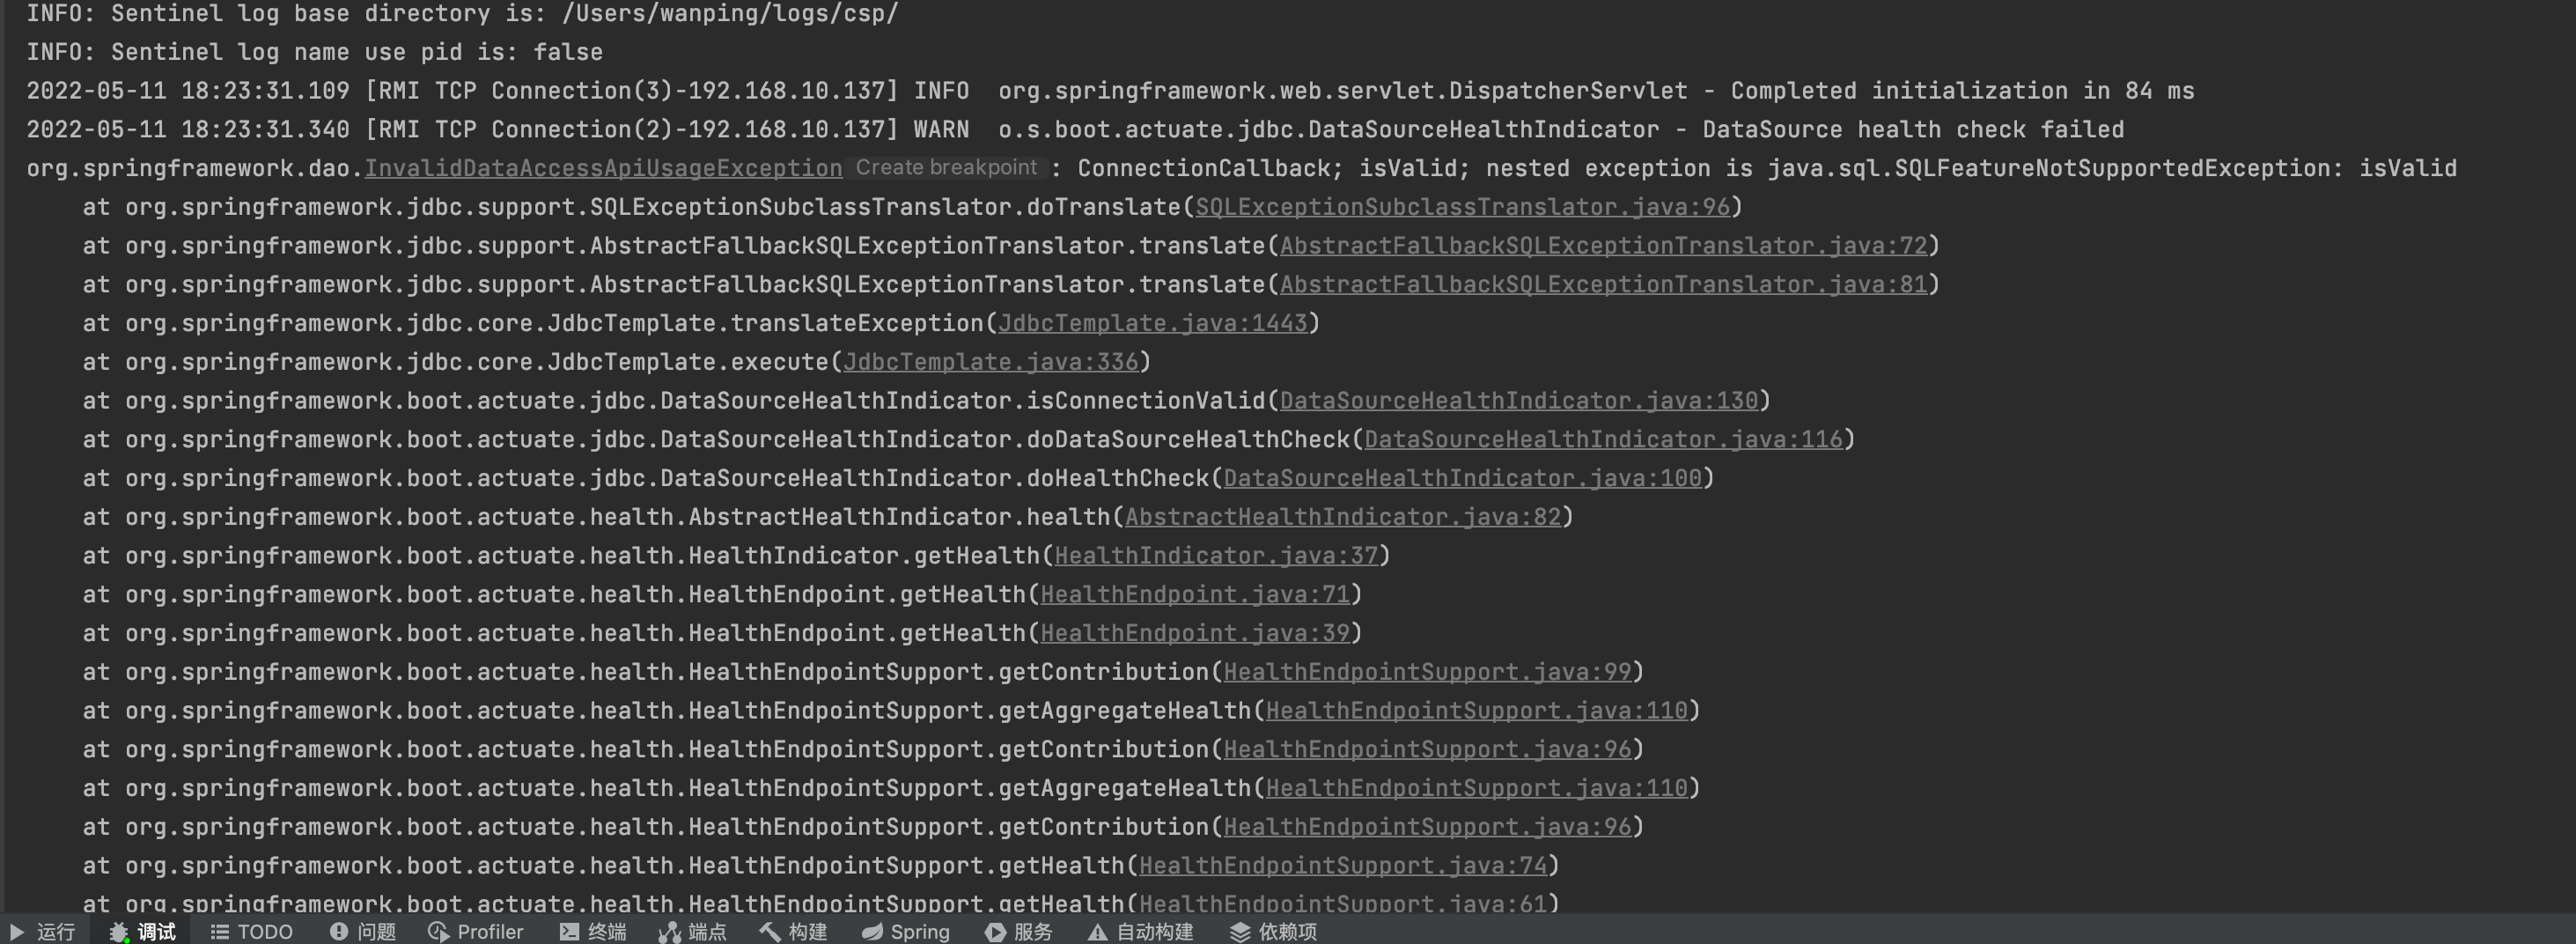
这个问题真的坑,找了半天没找到问题, 没想到是idea本地spring boot导致的问题
解决方案:

 浙公网安备 33010602011771号