spring-boot-learning-Web开发知识
1)、创建SpringBoot应用,选中我们需要的模块;
2)、SpringBoot已经默认将这些场景配置好了,只需要在配置文件中指定少量配置就可以运行起来
xxxxAutoConfiguration:帮我们给容器中自动配置组件;
xxxxProperties:配置类来封装配置文件的内容;
@ConfigurationProperties(prefix = "spring.resources", ignoreUnknownFields = false)
public class ResourceProperties implements ResourceLoaderAware {
  //可以设置和静态资源有关的参数,缓存时间等
自动配置类里面所规定的一些映射:

WebMvcAuotConfiguration:
        @Override
        public void addResourceHandlers(ResourceHandlerRegistry registry) {
            if (!this.resourceProperties.isAddMappings()) {
                logger.debug("Default resource handling disabled");
                return;
            }
            Integer cachePeriod = this.resourceProperties.getCachePeriod();
            if (!registry.hasMappingForPattern("/webjars/**")) {
                customizeResourceHandlerRegistration(
                        registry.addResourceHandler("/webjars/**")
                                .addResourceLocations(
                                        "classpath:/META-INF/resources/webjars/")
                        .setCachePeriod(cachePeriod));
            }
            String staticPathPattern = this.mvcProperties.getStaticPathPattern();
              //静态资源文件夹映射
            if (!registry.hasMappingForPattern(staticPathPattern)) {
                customizeResourceHandlerRegistration(
                        registry.addResourceHandler(staticPathPattern)
                                .addResourceLocations(
                                        this.resourceProperties.getStaticLocations())
                        .setCachePeriod(cachePeriod));
            }
        }

        //配置欢迎页映射
        @Bean
        public WelcomePageHandlerMapping welcomePageHandlerMapping(
                ResourceProperties resourceProperties) {
            return new WelcomePageHandlerMapping(resourceProperties.getWelcomePage(),
                    this.mvcProperties.getStaticPathPattern());
        }

       //配置喜欢的图标
        @Configuration
        @ConditionalOnProperty(value = "spring.mvc.favicon.enabled", matchIfMissing = true)
        public static class FaviconConfiguration {

            private final ResourceProperties resourceProperties;

            public FaviconConfiguration(ResourceProperties resourceProperties) {
                this.resourceProperties = resourceProperties;
            }

            @Bean
            public SimpleUrlHandlerMapping faviconHandlerMapping() {
                SimpleUrlHandlerMapping mapping = new SimpleUrlHandlerMapping();
                mapping.setOrder(Ordered.HIGHEST_PRECEDENCE + 1);
                  //所有  **/favicon.ico
                mapping.setUrlMap(Collections.singletonMap("**/favicon.ico",
                        faviconRequestHandler()));
                return mapping;
            }

            @Bean
            public ResourceHttpRequestHandler faviconRequestHandler() {
                ResourceHttpRequestHandler requestHandler = new ResourceHttpRequestHandler();
                requestHandler
                        .setLocations(this.resourceProperties.getFaviconLocations());
                return requestHandler;
            }

        }
所有 /webjars/** ,都去 classpath:/META-INF/resources/webjars/ 找资源;==
webjars:以jar包的方式引入静态资源;

、"/**" 访问当前项目的任何资源,都去(静态资源的文件夹)找映射==
"classpath:/META-INF/resources/",
"classpath:/resources/",
"classpath:/static/",
"classpath:/public/"
"/":当前项目的根路径
localhost:8080/abc === 去静态资源文件夹里面找abc
localhost:8080/ 找index页面
所有的 **/favicon.ico 都是在静态资源文件下找;==
这个favicon.ico,就是我们访问网站的小标志

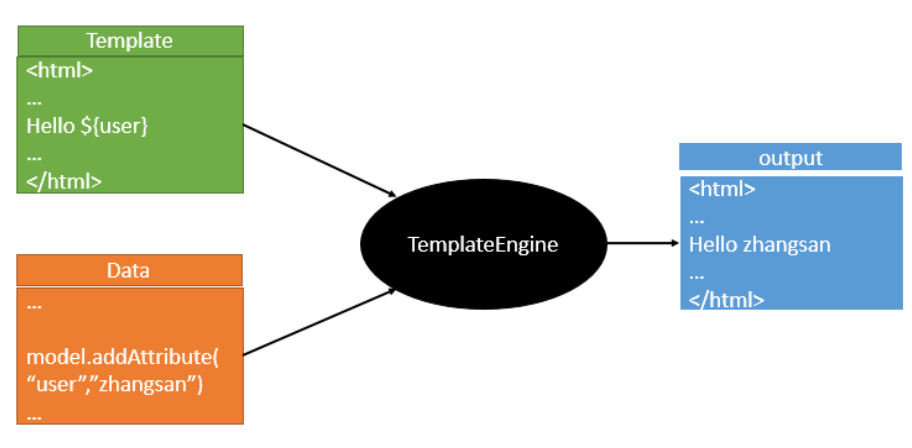
将数据库的内容和静态文件的变量都由模板引擎去解决对应的变量问题
最后模板引擎呈现给大家的最终的画面
SpringBoot推荐的Thymeleaf;
语法更简单,功能更强大;
引入thymeleaf 依赖:
        <dependency>
            <groupId>org.springframework.boot</groupId>
            <artifactId>spring-boot-starter-thymeleaf</artifactId>
        </dependency>
因为我们没有设置版本,所以默认spring-boot里面的版本是2.多
<properties>
        <thymeleaf.version>3.0.9.RELEASE</thymeleaf.version>
        <!-- 布局功能的支持程序  thymeleaf3主程序  layout2以上版本 -->
        <!-- thymeleaf2   layout1-->
        <thymeleaf-layout-dialect.version>2.2.2</thymeleaf-layout-dialect.version>
  </properties>
spring-boot 2.0之前是使用2.1.1版本的,但是我查看后发现2.0以后使用了高本吧:
查看步骤:pom.xml文件--spring-boot-starter-parent
--spring-boot-dependencies
---搜索thymeleaf就行

所以使用spring-boot不需要切换版本
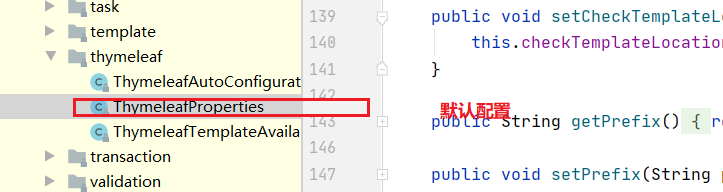
@ConfigurationProperties(prefix = "spring.thymeleaf")
public class ThymeleafProperties {

    private static final Charset DEFAULT_ENCODING = Charset.forName("UTF-8");

    private static final MimeType DEFAULT_CONTENT_TYPE = MimeType.valueOf("text/html");

    public static final String DEFAULT_PREFIX = "classpath:/templates/";

    public static final String DEFAULT_SUFFIX = ".html";
      //
只要我们把HTML页面放在classpath:/templates/,thymeleaf就能自动渲染;
<html lang="en" xmlns:th="http://www.thymeleaf.org">
简单使用:
<!DOCTYPE html>
<html lang="en" xmlns:th="http://www.thymeleaf.org">
<head>
    <meta charset="UTF-8">
    <title>Title</title>
</head>
<body>
    <h1>成功!</h1>
    <!--th:text 将div里面的文本内容设置为 -->
    <div th:text="${hello}">这是显示欢迎信息</div>
</body>
</html>
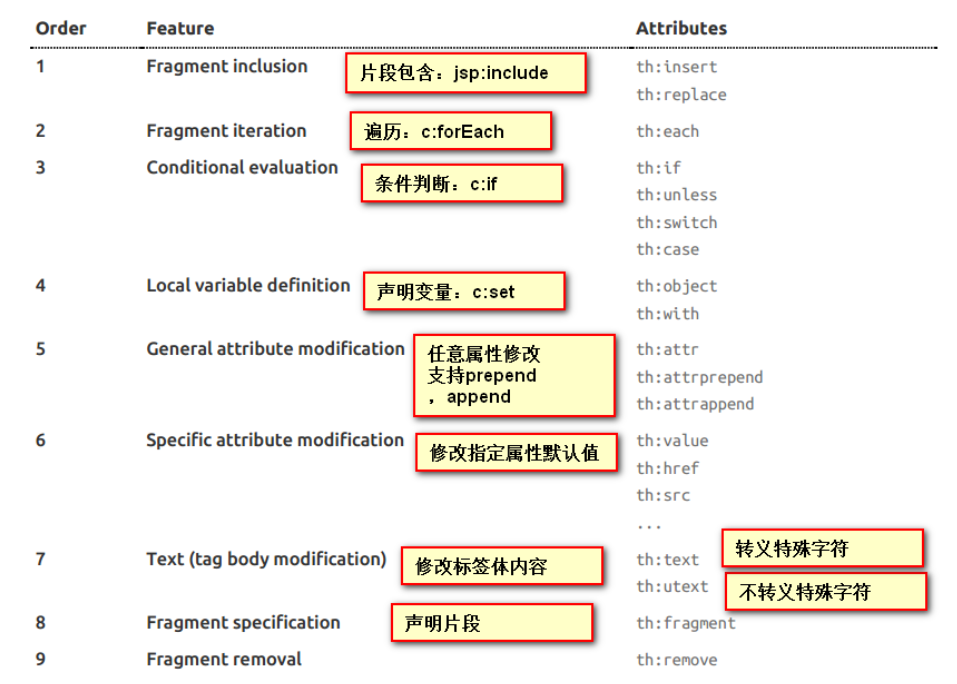
1)、th:text;改变当前元素里面的文本内容;
th:任意html属性;来替换原生属性的值
2)、表达式
Simple expressions:(表达式语法)
    Variable Expressions: ${...}:获取变量值;OGNL;
            1)、获取对象的属性、调用方法
            2)、使用内置的基本对象:
                #ctx : the context object.
                #vars: the context variables.
                #locale : the context locale.
                #request : (only in Web Contexts) the HttpServletRequest object.
                #response : (only in Web Contexts) the HttpServletResponse object.
                #session : (only in Web Contexts) the HttpSession object.
                #servletContext : (only in Web Contexts) the ServletContext object.

                ${session.foo}
            3)、内置的一些工具对象:
#execInfo : information about the template being processed.
#messages : methods for obtaining externalized messages inside variables expressions, in the same way as they would be obtained using #{…} syntax.
#uris : methods for escaping parts of URLs/URIs
#conversions : methods for executing the configured conversion service (if any).
#dates : methods for java.util.Date objects: formatting, component extraction, etc.
#calendars : analogous to #dates , but for java.util.Calendar objects.
#numbers : methods for formatting numeric objects.
#strings : methods for String objects: contains, startsWith, prepending/appending, etc.
#objects : methods for objects in general.
#bools : methods for boolean evaluation.
#arrays : methods for arrays.
#lists : methods for lists.
#sets : methods for sets.
#maps : methods for maps.
#aggregates : methods for creating aggregates on arrays or collections.
#ids : methods for dealing with id attributes that might be repeated (for example, as a result of an iteration).

    Selection Variable Expressions: *{...}:选择表达式:和${}在功能上是一样;
        补充:配合 th:object="${session.user}:
   <div th:object="${session.user}">
    <p>Name: <span th:text="*{firstName}">Sebastian</span>.</p>
    <p>Surname: <span th:text="*{lastName}">Pepper</span>.</p>
    <p>Nationality: <span th:text="*{nationality}">Saturn</span>.</p>
    </div>

    Message Expressions: #{...}:获取国际化内容
    Link URL Expressions: @{...}:定义URL;
            @{/order/process(execId=${execId},execType='FAST')}
    Fragment Expressions: ~{...}:片段引用表达式
            <div th:insert="~{commons :: main}">...</div>

Literals(字面量)
      Text literals: 'one text' , 'Another one!' ,…
      Number literals: 0 , 34 , 3.0 , 12.3 ,…
      Boolean literals: true , false
      Null literal: null
      Literal tokens: one , sometext , main ,…
Text operations:(文本操作)
    String concatenation: +
    Literal substitutions: |The name is ${name}|
Arithmetic operations:(数学运算)
    Binary operators: + , - , * , / , %
    Minus sign (unary operator): -
Boolean operations:(布尔运算)
    Binary operators: and , or
    Boolean negation (unary operator): ! , not
Comparisons and equality:(比较运算)
    Comparators: > , < , >= , <= ( gt , lt , ge , le )
    Equality operators: == , != ( eq , ne )
Conditional operators:条件运算(三元运算符)
    If-then: (if) ? (then)
    If-then-else: (if) ? (then) : (else)
    Default: (value) ?: (defaultvalue)
Special tokens:
    No-Operation: _
@Controller
public class HelloController {
// @ResponseBody
@RequestMapping("/hello")
public String hello(){
return "hello";
}
@RequestMapping("/success")
public String success(Map<String,Object> map){
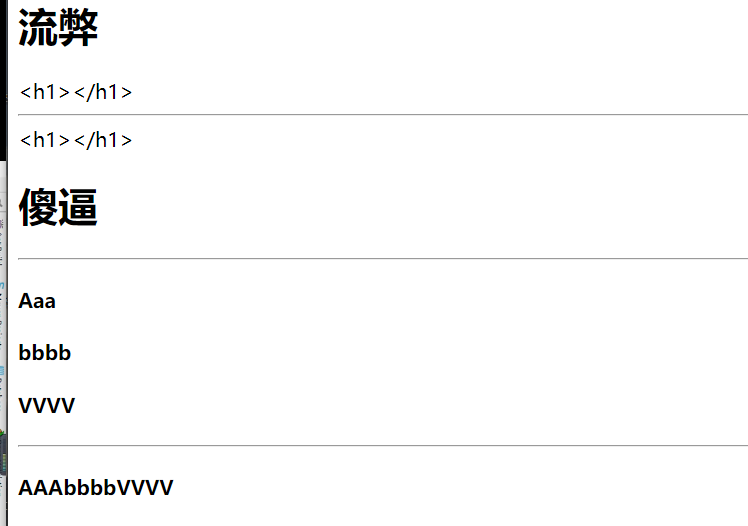
map.put("hello","<h1>傻逼</h1>");
map.put("users", Arrays.asList("AAA","bbbb","VVVV"));
return "success";
}
}
html
<!DOCTYPE html>
<html lang="en" xmlns:th="http://www.thymeleaf.org">
<head>
    <meta charset="UTF-8">
    <title>Title</title>
</head>
<body>
    <h1>流弊</h1>
    <div th:text="${hello}"></div>
    <hr/>
    <div th:text="${hello}"></div>

    <div th:utext="${hello}"></div>
    <hr/>

    <h4 th:text="${user}" th:each="user:${users}"></h4>
    <hr/>

    <h4>
        <span th:each="user:${users}">[[${user}]]</span>
    </h4>

</body>
</html>
‘
SpringMVC自动配置原理:
springboot自动配置好了SpringMVC
下面是springboot默认配mVC:
111111Inclusion of `ContentNegotiatingViewResolver` and `BeanNameViewResolver` beans.
  自动配置了ViewResolver(视图解析器:根据方法的返回值得到视图对象(View),视图对象决定如何
  渲染(转发?重定向?))

  ContentNegotiatingViewResolver:组合所有的视图解析器;他是通过加载所有的解析器的
    所以我们定制的时候,只需要编写视图解析器并加载到容器当中就行了,
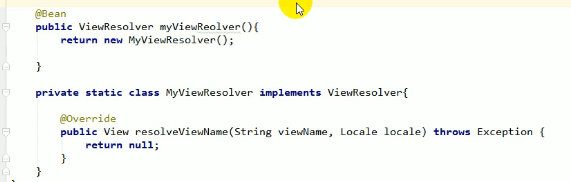
注意:其他的也类似
- Support for serving static resources, including support for WebJars (see below
  .静态资源文件夹路径,webjars
- Static `index.html` support. 静态首页访问
- Custom `Favicon` support (see below).  favicon.ico
自动注册了 of `Converter`, `GenericConverter`, `Formatter` beans.
- Converter:转换器;  public String hello(User user):类型转换使用Converter
- `Formatter`  格式化器;  2017.12.17===Date;
Support for `HttpMessageConverters` (see below).

- HttpMessageConverter:SpringMVC用来转换Http请求和响应的;User---Json;

- `HttpMessageConverters` 是从容器中确定;获取所有的HttpMessageConverter;

  ==自己给容器中添加HttpMessageConverter,只需要将自己的组件注册容器中(@Bean,@Component)==
Automatic registration of `MessageCodesResolver` (see below).定义错误代码生成规则
Automatic use of a `ConfigurableWebBindingInitializer` bean (see below).

==我们可以配置一个ConfigurableWebBindingInitializer来替换默认的;(添加到容器)==
初始化WebDataBinder;
请求数据=====JavaBean;
这里有所有场景的自动配置类:org.springframework.boot.autoconfigure.web
如何修改Springboot默认配置:
模式:
1111Springboot在自动配置很多组件的时候,先看容器中有没有用户自己配置的(@Bean,@Component),
如果有就用用户配置的,如果没有,才自动配置。
如果有些组件可以有多个(例如ViewResolver)将用户配置的和自己买咯人的组合起来
2222在SpringBoot中会有非常多的xxxConfigurer帮助我们进行扩展配置
3333在SpringBoot中会有很多的xxxCustomizer帮助我们进行定制配置
如果仅仅靠springboot的默认配置是不能满足的
例如:
我们之前配置springMVC的配置文件:
<?xml version="1.0" encoding="UTF-8"?>
<beans xmlns="http://www.springframework.org/schema/beans"
       xmlns:xsi="http://www.w3.org/2001/XMLSchema-instance" xmlns:mvc="http://www.springframework.org/schema/mvc"
       xsi:schemaLocation="http://www.springframework.org/schema/beans http://www.springframework.org/schema/beans/spring-beans.xsd http://www.springframework.org/schema/mvc https://www.springframework.org/schema/mvc/spring-mvc.xsd">
    <mvc:view-controller path="/hello" view-name="success"/>
    <mvc:interceptors>
        <mvc:interceptor>
            <mvc:mapping path="/hello"/>
            <bean></bean>
        </mvc:interceptor>
    </mvc:interceptors>
</beans>
编写一个配置类(@Configuration),是一个 WebMvcConfigurerAdapter类型的类,且不能标注 @EnableWebMvc

public class MyMvcConfig implements WebMvcConfigurer {
    @Override
    public void addViewControllers(ViewControllerRegistry registry) {
        registry.addViewController("/hello").setViewName("success");
    }
}
原理:
1111WebMvcAutoConfiguration是springMVC的自动配置类
222会导入@Import({WebMvcAutoConfiguration.EnableWebMvcConfiguration.class})
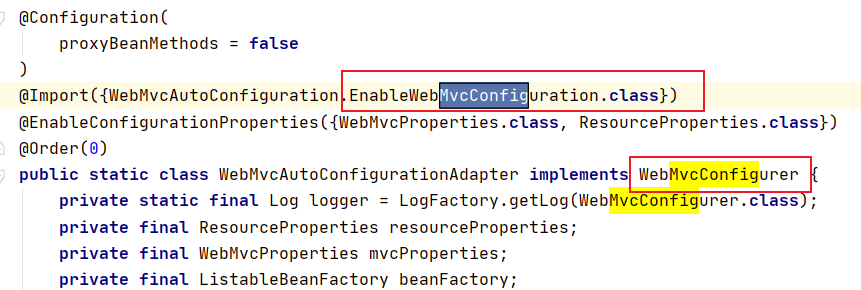
EnableWebMvcConfiguration这个类:
    @Configuration(
        proxyBeanMethods = false
    )
    public static class EnableWebMvcConfiguration extends DelegatingWebMvcConfiguration implements ResourceLoaderAware {
继承的类中:
    @Autowired(
        required = false
    )
    public void setConfigurers(List<WebMvcConfigurer> configurers) {
        if (!CollectionUtils.isEmpty(configurers)) {
            this.configurers.addWebMvcConfigurers(configurers);
        }

    }
从容器中获取所有的webmvcConfigurer。
333容器中所有的WebMvcConfigurer都会一起起作用
444我们的配置类也会被调用
效果:springmvc自动配置和我们的扩展配置都会起作用
全面接管SpringMVC:
springboot对springMVC的自动配置不需要了,所有都是我们自己配置,所有的web场景自动配置都失效了


原理:
111核心内容
@Retention(RetentionPolicy.RUNTIME)
@Target({ElementType.TYPE})
@Documented
@Import({DelegatingWebMvcConfiguration.class})
public @interface EnableWebMvc {
}
222加载的类
@Configuration(
    proxyBeanMethods = false
)
public class DelegatingWebMvcConfiguration extends WebMvcConfigurationSupport {
333回头看看自动配置类
@Configuration(
    proxyBeanMethods = false
)
@ConditionalOnWebApplication(
    type = Type.SERVLET
)
@ConditionalOnClass({Servlet.class, DispatcherServlet.class, WebMvcConfigurer.class})
@ConditionalOnMissingBean({WebMvcConfigurationSupport.class})
@AutoConfigureOrder(-2147483638)
@AutoConfigureAfter({DispatcherServletAutoConfiguration.class, TaskExecutionAutoConfiguration.class, ValidationAutoConfiguration.class})
public class WebMvcAutoConfiguration {
带颜色部分,只有容器中没有这个组件的时候,自动配置类才生效
444因为@EnableWebMvc将DelegatingWebMvcConfiguration extends WebMvcConfigurationSupport导入进来了
555导入进来的 WebMvcConfigurationSupport只是springMVC最基本的功能

 浙公网安备 33010602011771号