spring-boot-learning-配置文件相关
<!-- https://mvnrepository.com/artifact/org.springframework.boot/spring-boot-configuration-processor -->
<dependency>
    <groupId>org.springframework.boot</groupId>
    <artifactId>spring-boot-configuration-processor</artifactId>
    <version>2.3.2.RELEASE</version>
</dependency>
•application.yml
配置文件的作用:修改SpringBoot自动配置的默认值;SpringBoot在底层都给我们自动配置好;
YML文件的语法:
server:
   port: 8081
<server>
<port>8081</port>
</server>
yaml基本的语法:
k:(空格)v:表示一对键值对(空格必须有);
以空格的缩进来控制层级关系;
只要是左对齐的一列数据,都是同一个层级的
注意:属性和值也是大小写敏感;
server:
  port: 8080
  error:
    path: /error
值的写法:
字面量:普通的数,布尔值,字符串字面直接来写; 字符串默认不用加上单引号或者双引号; "":双引号===不会转义字符串里面的特殊字符; 特殊字符会作为本身想表示的意思 name: "zhangsan \n lisi" 输出;zhangsan 换行 lisi '':单引号===会转义特殊字符,特殊字符最终只是一个普通的字符串数据 name: ‘zhangsan \n lisi’ 输出;zhangsan \n lisi
user:
  name: quan
  age: 20
就是user.name = quan
user.age = 20
注意:在下一行来写对象的属性和值的关系;注意缩进
用-来表示数组或者集合的元素:
names:
  - quan
  - zhi
  - qiang
上面表达的就是
names[quan,zhi,qiang]
配置文件的注入方式
@ConfigurationProperties 定义类中的属性和配置文件的那些配置相关prefix指定前缀
@Component 将组建加入都容器当中
/**
 * 将配置文件中配置的每一个属性的值,映射到这个组件中
 * @ConfigurationProperties:告诉SpringBoot将本类中的所有属性和配置文件中相关的配置进行绑定;
  默认在全局配置文件中获取值的
 *      prefix = "person":配置文件中哪个下面的所有属性进行一一映射
 *
 * 只有这个组件是容器中的组件,才能容器提供的@ConfigurationProperties功能;
@Component
* */
配置文件内容:

person:
    lastName: hello
    age: 18
    boss: false
    birth: 2017/12/12
    maps: {k1: v1,k2: 12}
    lists:
      - lisi
      - zhaoliu
映射:
@Component
@ConfigurationProperties(prefix = "person")
public class QuanTestConfig {
        private String lastName;
        private Integer age;
        private Boolean boss;
        private Date birth;

        private Map<String, Object> maps;
        private List<Object> lists;

    public String getLastName() {
        return lastName;
    }

    public void setLastName(String lastName) {
        this.lastName = lastName;
    }

    public Integer getAge() {
        return age;
    }

    public void setAge(Integer age) {
        this.age = age;
    }

    public Boolean getBoss() {
        return boss;
    }

    public void setBoss(Boolean boss) {
        this.boss = boss;
    }

    public Date getBirth() {
        return birth;
    }

    public void setBirth(Date birth) {
        this.birth = birth;
    }

    public Map<String, Object> getMaps() {
        return maps;
    }

    public void setMaps(Map<String, Object> maps) {
        this.maps = maps;
    }

    public List<Object> getLists() {
        return lists;
    }

    public void setLists(List<Object> lists) {
        this.lists = lists;
    }

    @Override
    public String toString() {
        return "QuanTestConfig{" +
                "lastName='" + lastName + '\'' +
                ", age=" + age +
                ", boss=" + boss +
                ", birth=" + birth +
                ", maps=" + maps +
                ", lists=" + lists +
                '}';
    }
}
这里类的属性名字需要和配置文件里面的变量名字一样
test:
@SpringBootTest
class HuolalaApplicationTests {
    @Autowired
    QuanTestConfig quanTestConfig;

    @Test
    public void setQua(){
        System.out.println(quanTestConfig);
    }
}
结果:
QuanTestConfig{lastName='hello', age=18, boss=false, birth=Tue Dec 12 00:00:00 CST 2017, maps={k1=v1, k2=12}, lists=[lisi, zhaoliu]}
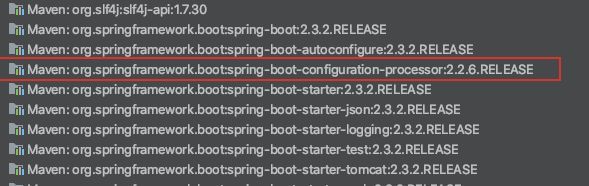
注意:可以导入配置文件处理器,以后编写配置就有提示了
<dependency>
    <groupId>org.springframework.boot</groupId>
    <artifactId>spring-boot-configuration-processor</artifactId>
    <version>2.2.6.RELEASE</version>
</dependency>
除了使用 @ConfigurationProperties进行配置值获取
之前使用bean标签添加到容器中的时候,对应现在的就是@Component
value标签对应的就是现在注解@Value
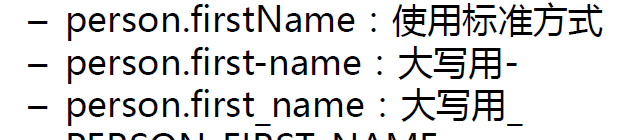
什么是松散语法:
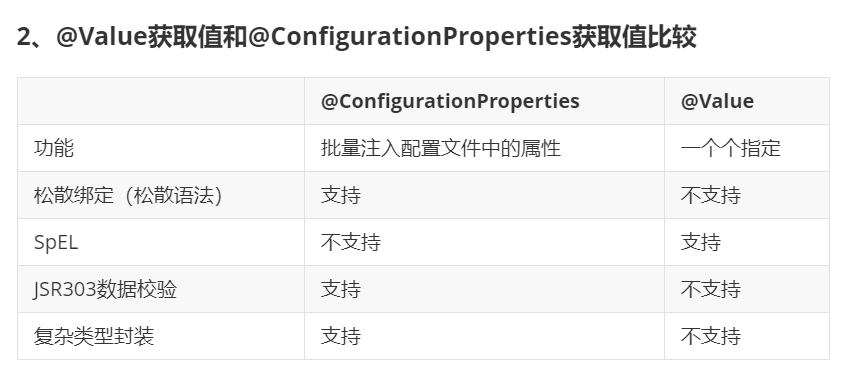
@Value 和@ConfigurationProperties的区别是什么
配置文件yml还是properties他们都能获取到值;

如果说,我们只是在某个业务逻辑中需要获取一下配置文件中的某项值,使用@Value;
如果说,我们专门编写了一个javaBean来和配置文件进行映射,我们就直接使用@ConfigurationProperties
@Component
@Validated//表示里面的value需要进行JSR303数据校验,就是下面的@Email
public class Person {

    /**
     * <bean class="Person">
     *      <property name="lastName" value="字面量/${key}从环境变量、配置文件中获取值/#{SpEL}"></property>
     * <bean/>
     */

   //lastName必须是邮箱格式
    @Email
    //@Value("${person.last-name}")
    private String lastName;
    //@Value("#{11*2}")
    private Integer age;
    //@Value("true")
    private Boolean boss;

    private Date birth;
    private Map<String,Object> maps;
    private List<Object> lists;
    private Dog dog;
上面就是配置文件注入的数据校验
关于数据校验:
什么是数据校验
数据校验就是在应用程序中,对输入进来得数据做语义分析判断,阻挡不符合规则得数据,放行符合规则得数据
一种是 Spring 自带的验证框架
一种是利用 JSR 实现。JSR 是一个规范,提供了完整得一套 API,通过标注给对象属性添加约束,例如Hibernate Validator
   <dependency>
            <groupId>org.hibernate.validator</groupId>
            <artifactId>hibernate-validator</artifactId>
            <version>6.1.0.Final</version>
        </dependency>
Hibernate Validator 定义的校验包括:
    注解                作用目标                                         检查规则
 @Length(min=, max=)     属性(String)                                    检查字符串长度是否符合范围
 @Max(value=)            属性(以 numeric 或者 string 类型来表示一个数字)     检查值是否小于或等于最大值
 @Min(value=)            属性(以 numeric 或者 string 类型来表示一个数字)     检查值是否大于或等于最小值
 @NotNull                属性                                              检查值是否非空(not null)
 @Future                 属性(date 或 calendar)                          检查日期是否是未来
 @Pattern(regex="regexp", flag=)     属性(string)                        检查属性是否与给定匹配标志的正则表达式相匹配
 @Range(min=, max=)      属性(以 numeric 或者 string 类型来表示一个数字)     检查值是否在最小和最大值之间(包括临界值)
 @Size(min=, max=)       属性(array,collection,map)                     检查元素大小是否在最小和最大值之间(包括临界值)
 @AssertFalse            属性                                             检查方法的演算结果是否为 false(对以代码方式而不是注解表示的约束很有用)
 @AssertTrue             属性                                             检查方法的演算结果是否为 true(对以代码方式而不是注解表示的约束很有用)
 @Valid                  属性(object)                                   对关联对象递归进行验证。如果对象是集合或数组,就递归地验证其元素;如果对象是 Map,则递归验证其值元素
 @Email                  属性(String)                                   检查字符串是否符合有效的 email 地址规范
 @Past                   属性(date 或 calendar)                         检查日期是否是过去
@PropertySource& @ImportResource& @Bean三个注解
当我们将所有配置都配置到一个文件application.properties,显然这个文件太多内容,所以我们
可能会使用新的属性文件,例如数据库的配置可以在jdbc.properties中,加入下面注解指定就行。
@PropertySource加载指定的配置文件;
例子:
@PropertySource(value = {"classpath:person.properties"})//classpath表示的是main路径下的,就是类路径下的。
@Component
@ConfigurationProperties(prefix = "person")
//@Validated
public class Person {
。。。。。。
@PropertySource(value = {"classpath:jdbc.properties"},ignoreResourceNotFound = true)
igoreResourceNotFound可以忽略找不到配置文件,不报错
@ImportResource:导入Spring的配置文件,让配置文件里面的内容生效;
Spring Boot里面没有Spring的配置文件,我们自己编写的配置文件,也不能自动识别;
想让Spring的配置文件生效,加载进来;@ImportResource标注在一个配置类上
@ImportResource(locations = {"classpath:beans.xml"})
导入Spring的配置文件让其生效
以前我们每加入一个bean则需要编写spring配置文件:即bean的配置文件
<?xml version="1.0" encoding="UTF-8"?>
<beans xmlns="http://www.springframework.org/schema/beans"
       xmlns:xsi="http://www.w3.org/2001/XMLSchema-instance"
       xsi:schemaLocation="http://www.springframework.org/schema/beans http://www.springframework.org/schema/beans/spring-beans.xsd">
    <bean id="helloService" class="com.atguigu.springboot.service.HelloService"></bean>
</beans>
现在:
SpringBoot推荐给容器中添加组件的方式;推荐使用全注解的方式
1、@Configuration放在配置类------>等同于我们之前的Spring配置文件
2、使用@Bean
/**
 * @Configuration:指明当前类是一个配置类;就是来替代之前的Spring配置文件
 *
 * 在配置文件中用<bean><bean/>标签添加组件
 *
 */
@Configuration
public class MyAppConfig {

    //将一个类的实例返回值添加到容器中;容器中这个组件默认的id就是方法名
//下面就是加入bean HelloService ,并且id为helloService02
    @Bean
    public HelloService helloService02(){
        System.out.println("配置类@Bean给容器中添加组件了...");
        return new HelloService();
    }
}
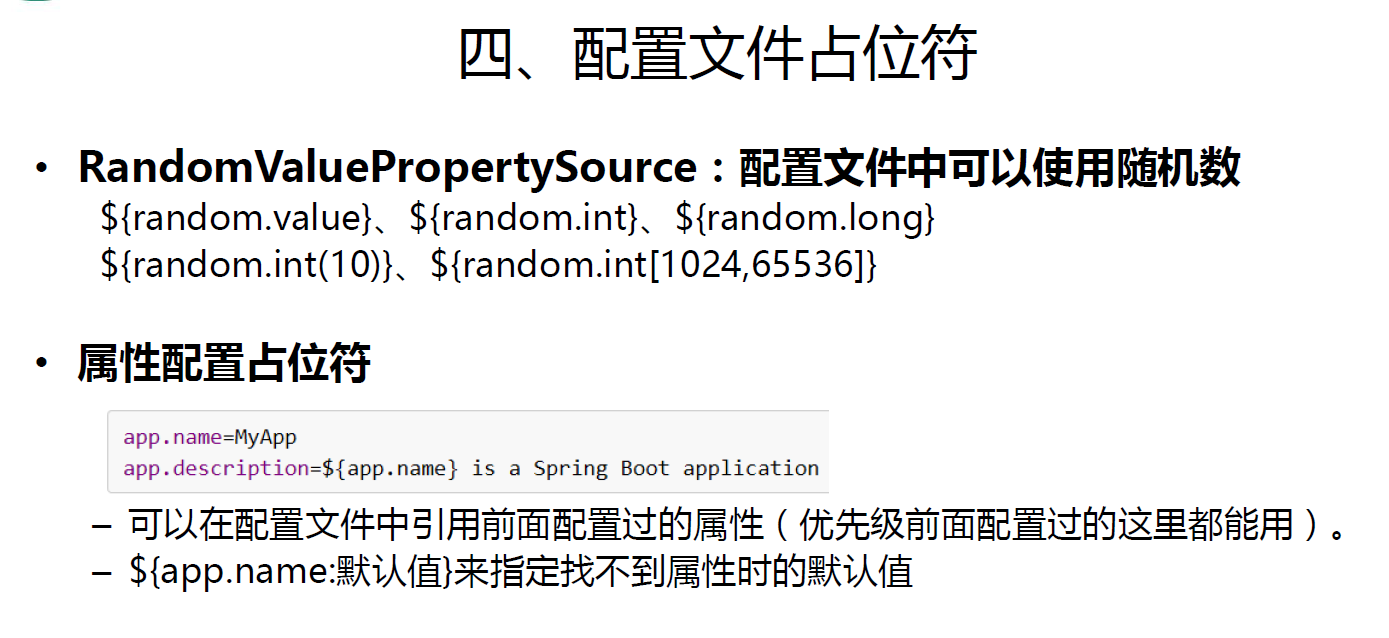
使用占位符的时候是可以设置好默认值的:如果没有可以是用:指定默认值
多Profile文件
我们在主配置文件编写的时候,文件名可以是 application-{profile}.properties/yml
默认使用application.properties的配置;
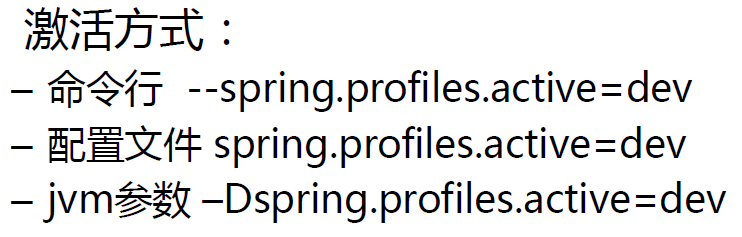
编写不同环境的配置文件:
application-dev.properties

在默认的全局配置文件当中
即application.properties中配置:
在配置文件中指定  spring.profiles.active=dev
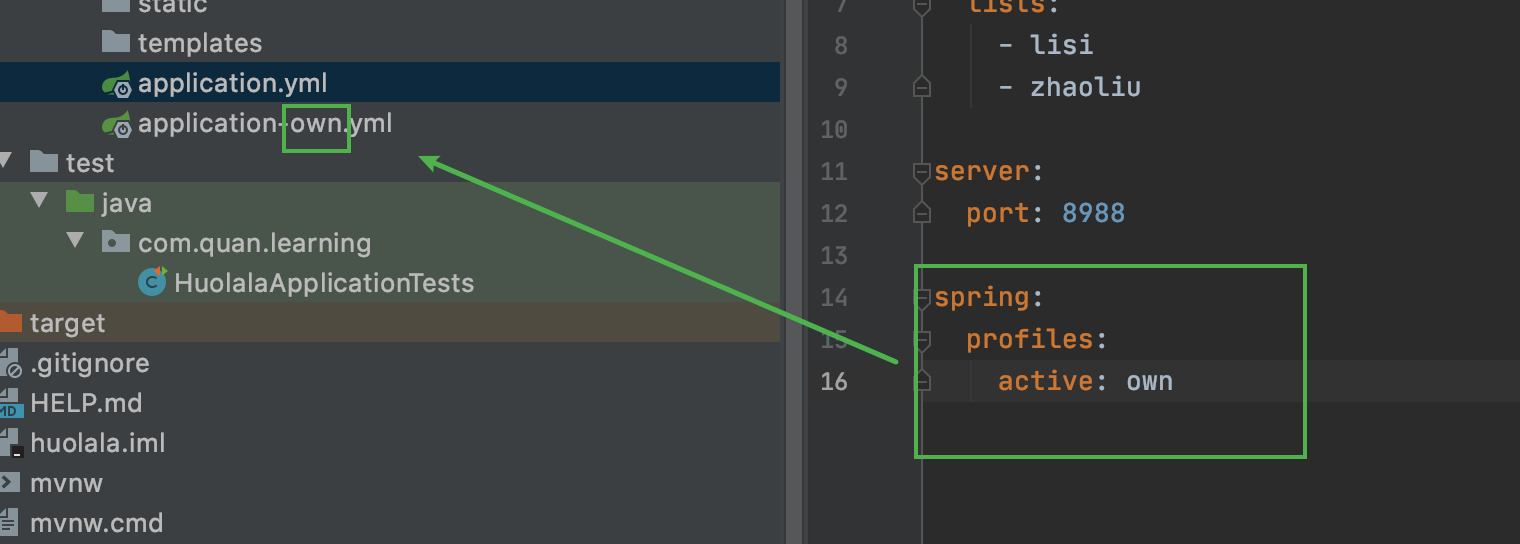
要在默认的配置文件中加入激活的配置文件才能进行知道。
也可以使用yml的多文档块模式,不用写多个配置文件
yml支持多文档块方式
server:
  port: 8081
spring:
  profiles:
    active: prod

---
server:
  port: 8083
spring:
  profiles: dev


---

server:
  port: 8084
spring:
  profiles: prod  #指定属于哪个环境
---三个横线就是代表不同的配置内容分块,active:就是要激活的配置块
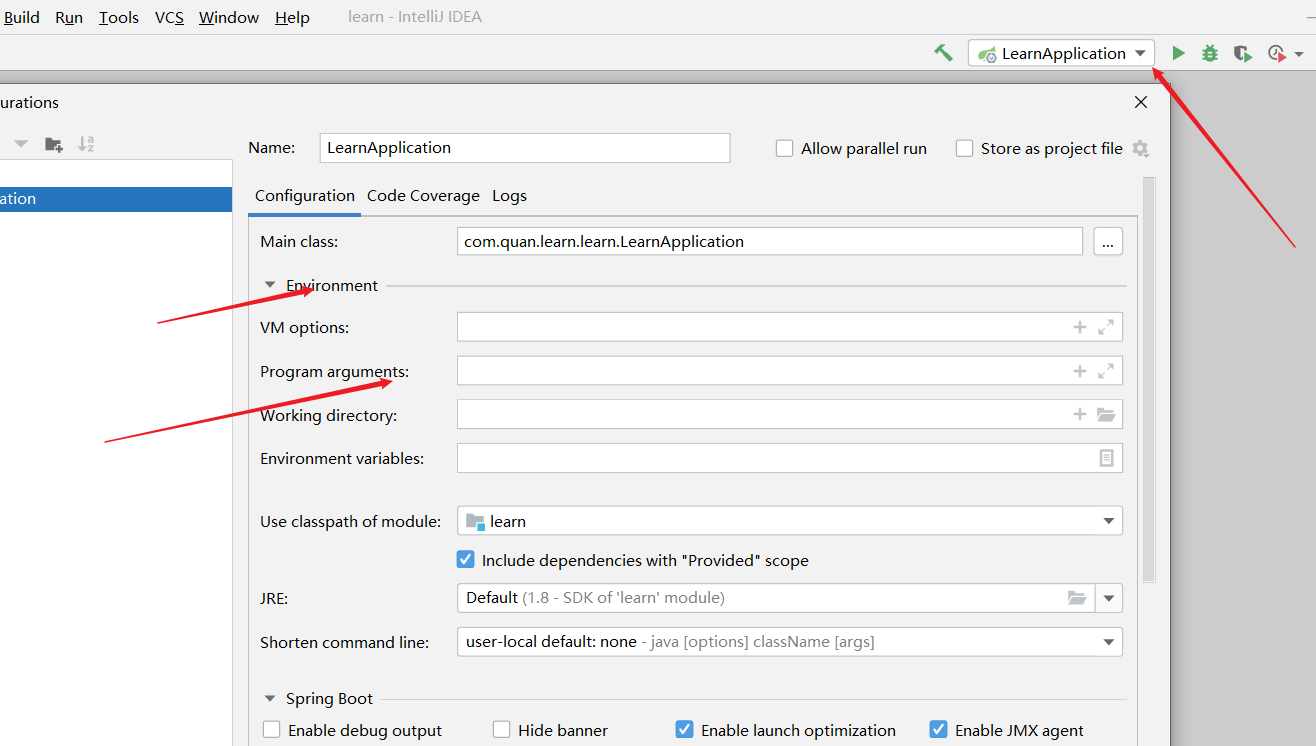
JVM参数的设置如下 VM options
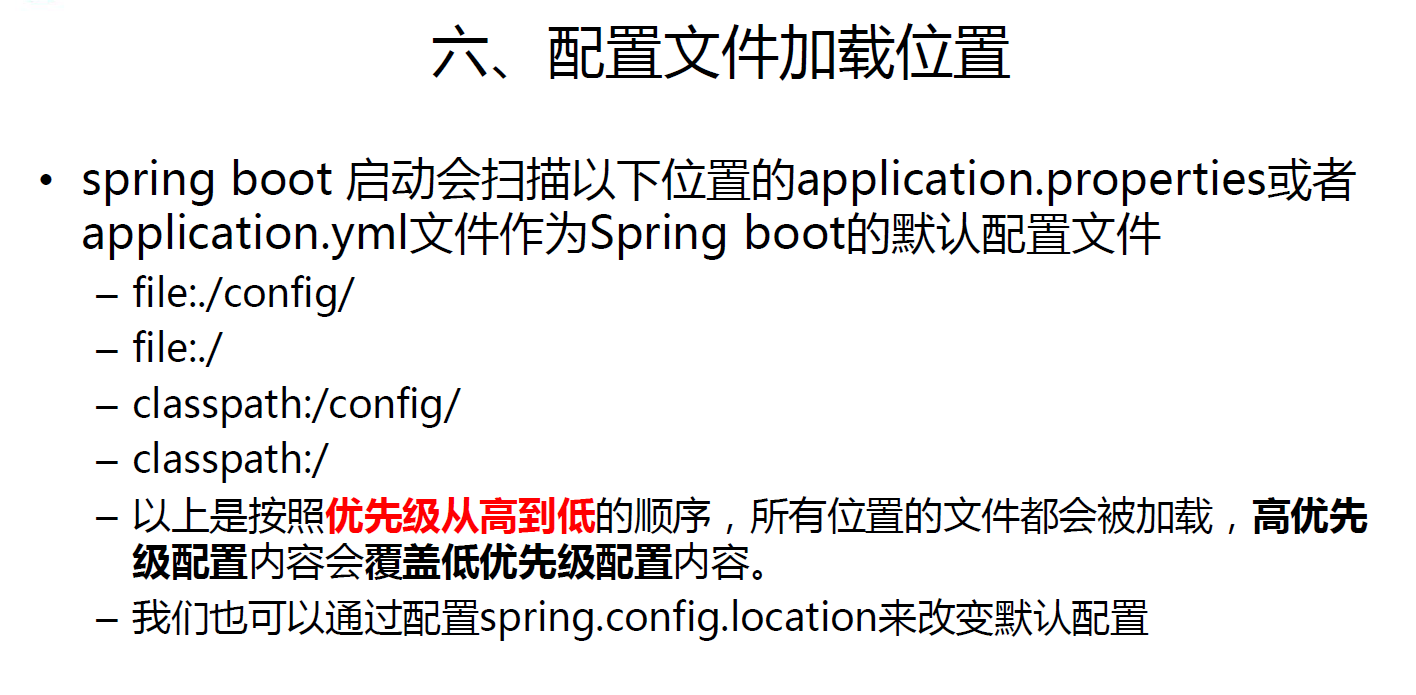
1、config/application.properties(项目根目录中config目录下)
2、config/application.yml
3、application.properties(项目根目录下)
4、application.yml
5、resources/config/application.properties(项目resources目录中config目录下)
6、resources/config/application.yml
7、resources/application.properties(项目的resources目录下)
8、resources/application.yml
配置文件的生效顺序,会对值进行覆盖
注意:
**项目打包好以后,我们可以使用命令行参数的形式,启动项目的时候来指定配置文件的新位置;
指定配置文件和默认加载的这些配置文件共同起作用形成互补配置;**

java -jar spring-boot-02-config-02-0.0.1-SNAPSHOT.jar
--spring.config.location=G:/application.properties

直接在命令行去配置端口
jar --jfijeifjie --server.port= 8089 命令行
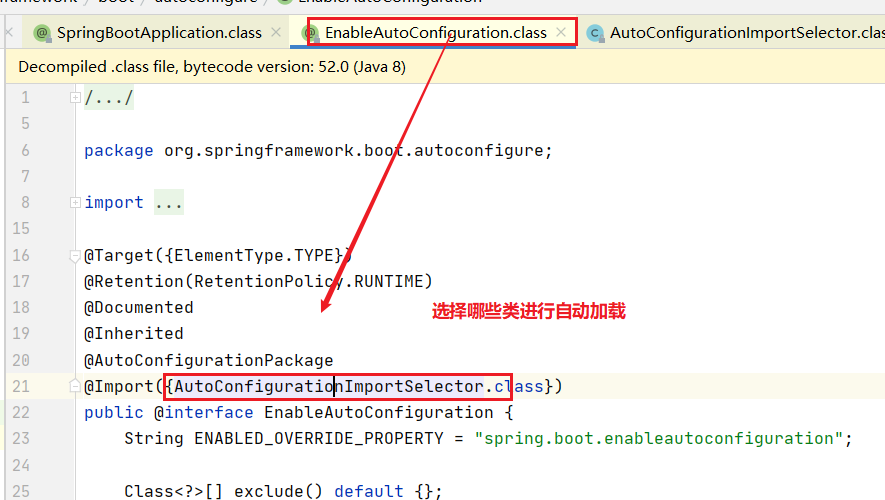
SpringBoot启动的时候加载主配置类,开启了自动配置功能 ==@EnableAutoConfiguration==
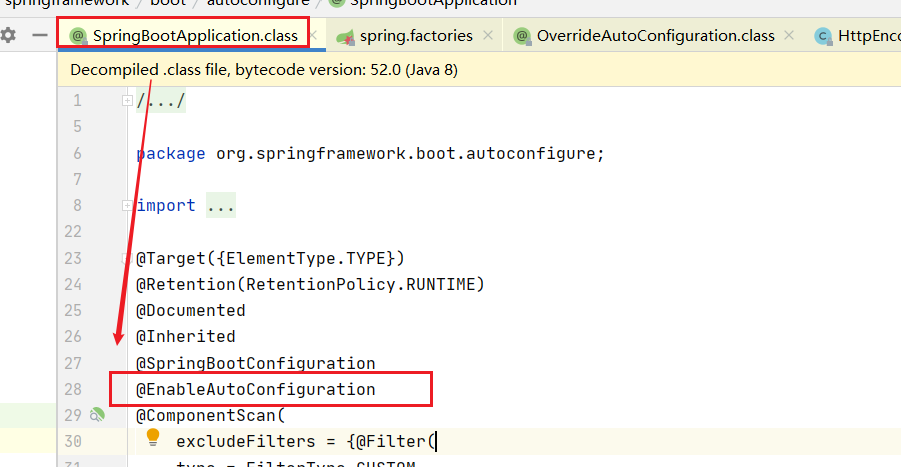
@EnableAutoConfiguration 作用:
导入的AutoConfigurationImportSelector的selectImports()方法通过SpringFactoriesLoader.loadFactoryNames()扫描所有具有META-INF/spring.factories的jar包
通过selectImport方法进行选择加载
public String[] selectImports(AnnotationMetadata annotationMetadata) {
    if (!this.isEnabled(annotationMetadata)) {
        return NO_IMPORTS;
    } else {
        AutoConfigurationImportSelector.AutoConfigurationEntry autoConfigurationEntry = this.getAutoConfigurationEntry(annotationMetadata);
        return StringUtils.toStringArray(autoConfigurationEntry.getConfigurations());
    }
}
    protected List<String> getCandidateConfigurations(AnnotationMetadata metadata, AnnotationAttributes attributes) {
        List<String> configurations = SpringFactoriesLoader.loadFactoryNames(this.getSpringFactoriesLoaderFactoryClass(), this.getBeanClassLoader());
        Assert.notEmpty(configurations, "No auto configuration classes found in META-INF/spring.factories. If you are using a custom packaging, make sure that file is correct.");
        return configurations;
    }
SpringFactoriesLoader.loadFactoryNames()
扫描所有jar包类路径下  META-INF/spring.factories
把扫描到的这些文件的内容包装成properties对象
从properties中获取到EnableAutoConfiguration.class类(类名)对应的值,然后把他们添加在容器中
==将 类路径下 META-INF/spring.factories 里面配置的所有EnableAutoConfiguration的值加入到了容器中;==

# PropertySource Loaders
org.springframework.boot.env.PropertySourceLoader=\
org.springframework.boot.env.PropertiesPropertySourceLoader,\
org.springframework.boot.env.YamlPropertySourceLoader

# Run Listeners
org.springframework.boot.SpringApplicationRunListener=\
org.springframework.boot.context.event.EventPublishingRunListener

# Error Reporters
org.springframework.boot.SpringBootExceptionReporter=\
org.springframework.boot.diagnostics.FailureAnalyzers

# Application Context Initializers
org.springframework.context.ApplicationContextInitializer=\
org.springframework.boot.context.ConfigurationWarningsApplicationContextInitializer,\
org.springframework.boot.context.ContextIdApplicationContextInitializer,\
org.springframework.boot.context.config.DelegatingApplicationContextInitializer,\
org.springframework.boot.rsocket.context.RSocketPortInfoApplicationContextInitializer,\
org.springframework.boot.web.context.ServerPortInfoApplicationContextInitializer

# Application Listeners
org.springframework.context.ApplicationListener=\
org.springframework.boot.ClearCachesApplicationListener,\
org.springframework.boot.builder.ParentContextCloserApplicationListener,\
org.springframework.boot.cloud.CloudFoundryVcapEnvironmentPostProcessor,\
org.springframework.boot.context.FileEncodingApplicationListener,\
org.springframework.boot.context.config.AnsiOutputApplicationListener,\
org.springframework.boot.context.config.ConfigFileApplicationListener,\
org.springframework.boot.context.config.DelegatingApplicationListener,\
org.springframework.boot.context.logging.ClasspathLoggingApplicationListener,\
org.springframework.boot.context.logging.LoggingApplicationListener,\
org.springframework.boot.liquibase.LiquibaseServiceLocatorApplicationListener

# Environment Post Processors
org.springframework.boot.env.EnvironmentPostProcessor=\
org.springframework.boot.cloud.CloudFoundryVcapEnvironmentPostProcessor,\
org.springframework.boot.env.SpringApplicationJsonEnvironmentPostProcessor,\
org.springframework.boot.env.SystemEnvironmentPropertySourceEnvironmentPostProcessor,\
org.springframework.boot.reactor.DebugAgentEnvironmentPostProcessor

# Failure Analyzers
org.springframework.boot.diagnostics.FailureAnalyzer=\
org.springframework.boot.diagnostics.analyzer.BeanCurrentlyInCreationFailureAnalyzer,\
org.springframework.boot.diagnostics.analyzer.BeanDefinitionOverrideFailureAnalyzer,\
org.springframework.boot.diagnostics.analyzer.BeanNotOfRequiredTypeFailureAnalyzer,\
org.springframework.boot.diagnostics.analyzer.BindFailureAnalyzer,\
org.springframework.boot.diagnostics.analyzer.BindValidationFailureAnalyzer,\
org.springframework.boot.diagnostics.analyzer.UnboundConfigurationPropertyFailureAnalyzer,\
org.springframework.boot.diagnostics.analyzer.ConnectorStartFailureAnalyzer,\
org.springframework.boot.diagnostics.analyzer.NoSuchMethodFailureAnalyzer,\
org.springframework.boot.diagnostics.analyzer.NoUniqueBeanDefinitionFailureAnalyzer,\
org.springframework.boot.diagnostics.analyzer.PortInUseFailureAnalyzer,\
org.springframework.boot.diagnostics.analyzer.ValidationExceptionFailureAnalyzer,\
org.springframework.boot.diagnostics.analyzer.InvalidConfigurationPropertyNameFailureAnalyzer,\
org.springframework.boot.diagnostics.analyzer.InvalidConfigurationPropertyValueFailureAnalyzer

# FailureAnalysisReporters
org.springframework.boot.diagnostics.FailureAnalysisReporter=\
org.springframework.boot.diagnostics.LoggingFailureAnalysisReporter
每一个这样的 xxxAutoConfiguration类都是容器中的一个组件,都加入到容器中;用他们来做自动配置;
#############################
每一个自动配置类进行自动配置功能;
//表示这是一个配置类,以前编写的配置文件一样,也可以给容器中添加组件
@Configuration(proxyBeanMethods = false)
     //启动指定类的ConfigurationProperties功能;将配置文件中对应的值和ServerProperties绑定起来;
   //并把ServerProperties加入到ioc容器中
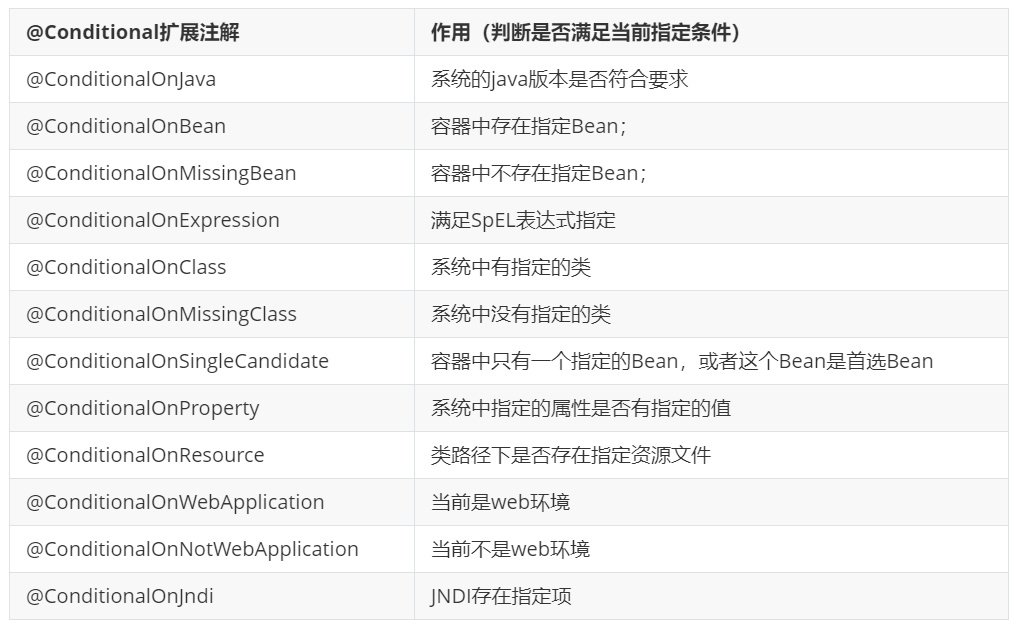
@EnableConfigurationProperties({ServerProperties.class})
    /Spring底层@Conditional注解(Spring注解版),根据不同的条件,如果满足指定的条件,整个配置类里面的配置
    就会生效;    判断当前应用是否是web应用,如果是,当前配置类生效
@ConditionalOnWebApplication(type = Type.SERVLET)
      //判断当前项目有没有这个类CharacterEncodingFilter;SpringMVC中进行乱码解决的过滤器;
@ConditionalOnClass({CharacterEncodingFilter.class})
    //判断配置文件中是否存在某个配置  spring.servlet.enabled;如果不存在,判断也是成立的
    //即使我们配置文件中不配置spring.servlet.encoding.enabled=true,也是默认生效的;
@ConditionalOnProperty(
    prefix = "server.servlet.encoding",
    value = {"enabled"},
    matchIfMissing = true
)
public class HttpEncodingAutoConfiguration {
      //他已经和SpringBoot的配置文件映射了
    private final Encoding properties;

      //只有一个有参构造器的情况下,参数的值就会从容器中拿
    public HttpEncodingAutoConfiguration(ServerProperties properties) {
        this.properties = properties.getServlet().getEncoding();
    }

    @Bean  //给容器中添加一个组件filter,这个组件的某些值需要从properties中获取
        //@ConditionnalOnMissingBean判断容器没有这个组件?
    @ConditionalOnMissingBean
    public CharacterEncodingFilter characterEncodingFilter() {
        CharacterEncodingFilter filter = new OrderedCharacterEncodingFilter();
        filter.setEncoding(this.properties.getCharset().name());
        filter.setForceRequestEncoding(this.properties.shouldForce(org.springframework.boot.web.servlet.server.Encoding.Type.REQUEST));
        filter.setForceResponseEncoding(this.properties.shouldForce(org.springframework.boot.web.servlet.server.Encoding.Type.RESPONSE));
        return filter;
    }
一但这个配置类生效;这个配置类就会给容器中添加各种组件;这些组件的属性是从对应的properties类中获取的,这些类里面的每一个属性又是和配置文件绑定的;
所有在配置文件中能配置的属性都是在xxxxProperties类中封装者‘;配置文件能配置什么就可以参照某个
功能对应的这个属性类
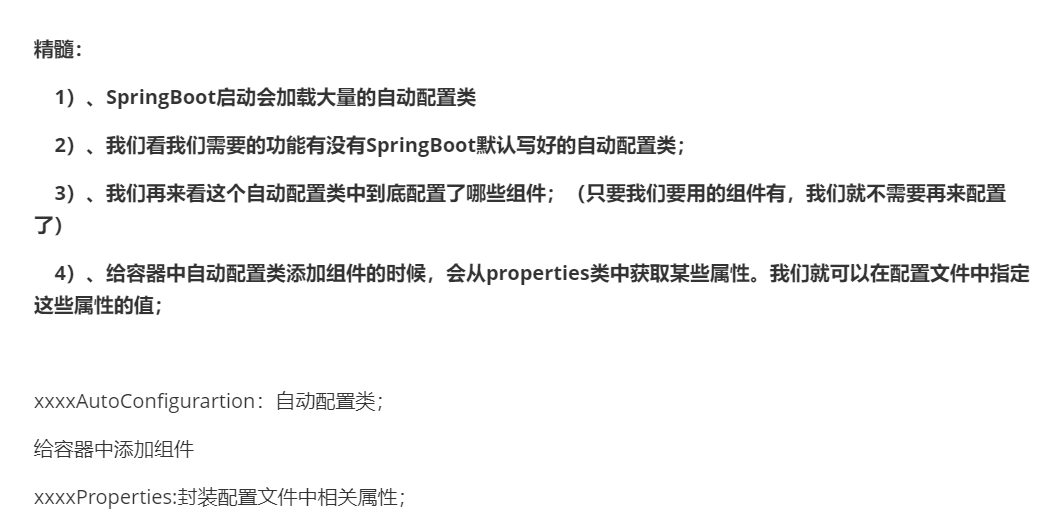
作用:必须是@Conditional指定的条件成立,才给容器中添加组件,配置配里面的所有内容才生效;
注意:自动配置类必须在一定的条件下才能生效;
怎么才能知道呢

============================
CONDITIONS EVALUATION REPORT
============================


Positive matches:   //自动加载启用的配置累
-----------------

   AopAutoConfiguration matched:
      - @ConditionalOnProperty (spring.aop.auto=true) matched (OnPropertyCondition)

   AopAutoConfiguration.ClassProxyingConfiguration matched:
      - @ConditionalOnMissingClass did not find unwanted class 'org.aspectj.weaver.Advice' (OnClassCondition)
      - @ConditionalOnProperty (spring.aop.proxy-target-class=true) matched (OnPropertyCondition)

   DispatcherServletAutoConfiguration matched:
      - @ConditionalOnClass found required class 'org.springframework.web
Negative matches:自动加载不启用,不满足condition条件的
-----------------

   ActiveMQAutoConfiguration:
      Did not match:
         - @ConditionalOnClass did not find required class 'javax.jms.ConnectionFactory' (OnClassCondition)

   AopAutoConfiguration.AspectJAutoProxyingConfiguration:
      Did not match:
         - @ConditionalOnClass did not find required class 'org.aspectj.weaver.Advice' (OnClassCondition)

 浙公网安备 33010602011771号