
1.1_springboot2.x与缓存原理介绍&使用缓存
一、springboot与缓存介绍&使用缓存
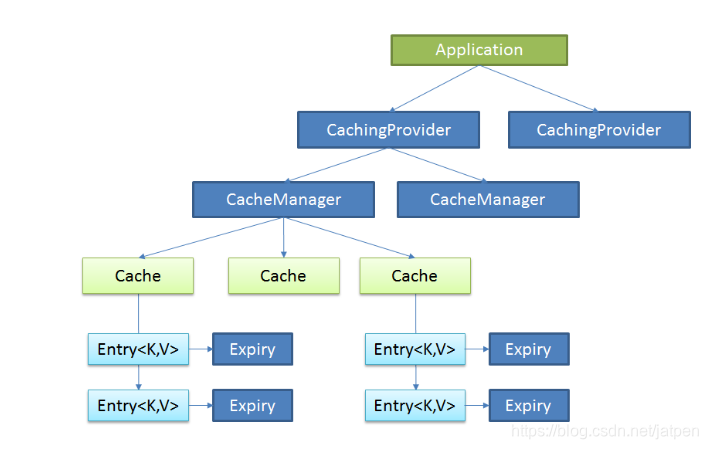
1、JSR107
JAVA Cahing定义了5个核心接口,分别是CachingProvider、CacheManager、Cache、Entry、Expiry。
CachingProvider:定义创建、配置、获取、管理、和控制多个CacheManager.一个应用在运行期间可以访问多个CacheManager;
CacheManager:定义了创建、配置、获取、管理、和控制多个唯一命名的Cache,这些Cache存在于CacheManager的上下文中,一个CacheManager仅被一个CachingProvider所拥有;
Cache:是一个类似Map的数据结构并临时存储以key为索引的值,一个Cache仅被一个CacheManager所拥有;
Entry:是一个存储在Cache中的key-value对;
Expiry:每一个存储在Cache中的条目有一个定义的有效期。一旦超过这个时间,条目为过期的状态,一旦过期,条目将不可访问,更新和删除。缓存有效期可以通过ExpriyPolicy设置;
由于整合系统是使用JSR107难度较大,因此spring提供了自己的缓存抽象、
2、Spring缓存抽象
Spring从3.1开始定义了org.springframework.cache.Cache| org.springframework.cache.CacheManager接口来统一不同的缓存技术;并支持使用JCache(JSR-107)注解简化我们开发.
-
Cache接口为缓存的组件规范定义,包含缓存的各种操作集合;
-
Cache接口下Spring提供了各种xxxCache的实现;如RedisCache,EhCacheCache , ConcurrentMapCache等;
-
每次调用需要缓存功能的方法时,Spring会检查检查指定参数的指定的目标方法是否已经被调用过;如果有就直接从缓存中获取方法调用后的结果,如果没有就调用方法并缓存结果后返回给用户。下次调用直接从缓存中获取;
-
使用Spring缓存抽象时我们需要关注以下两点
1、确定方法需要被缓存以及他们的缓存策略
2、从缓存中读取之前缓存存储的数据
3、几个重要概念&缓存注解
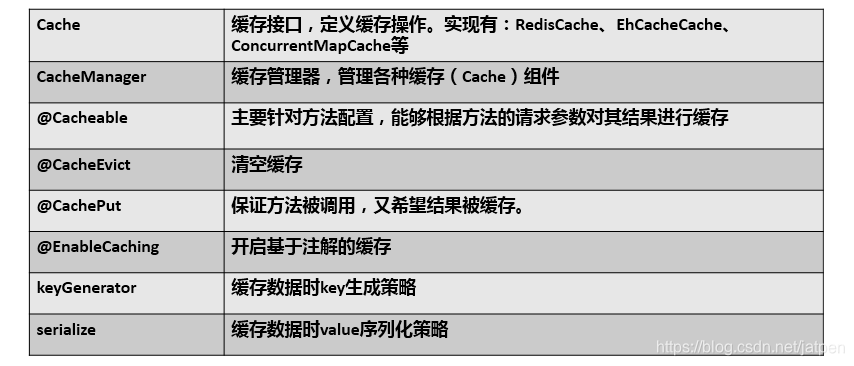
1、几个重要的注解
| Cache | 缓存接口,定义缓存操作。实现有:RedisCache、EhCacheCache、ConcurrentMapCache等 |
|---|---|
| CacheManager | 缓存管理器,管理各种缓存(Cache)组件 |
| @Cacheable | 主要针对方法配置,能够根据方法的请求参数对其结果进行缓存 |
| @CacheEvict | 清空缓存 |
| @CachePut | 保证方法被调用,又希望结果被缓存。 |
| @EnableCaching | 开启基于注解的缓存 |
| keyGenerator | 缓存数据时key生成策略 |
| serialize | 缓存数据时value序列化策略 |
2、@Cacheable/@CachePut/@CacheEvict主要的参数
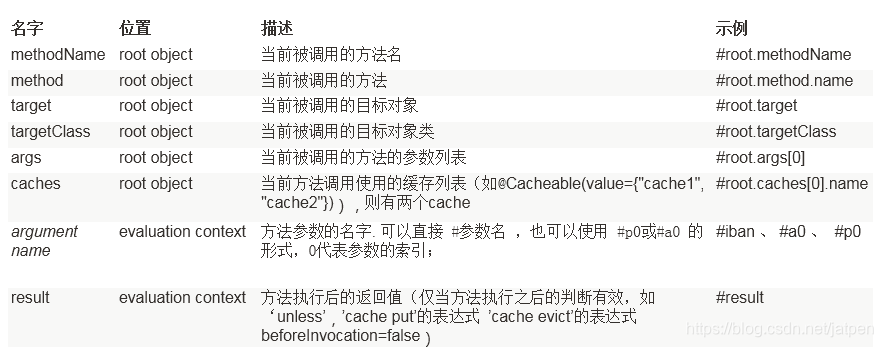
3、Cache SpEL available metadata
4、缓存的使用
一、搭建基本环境,
1**、导入基本环境,创建出department和employee**
2、创建javabean
3、整合mybatis操作数据库
1)、配置数据源对象
spring.datasource.username=root
spring.datasource.password=123456
spring.datasource.url=jdbc:mysql://localhost:3306/springboot_cache?useUnicode=true&characterEncoding=utf-8&useSSL=false&serverTimezone = GMT
spring.datasource.driver-class-name=com.mysql.cj.jdbc.Driver
spring.datasource.initialization-mode=always

logging.level.com.springboot.springboot.mapper

debug=true
2)、注解版的mybatis
@Mapper
public interface EmployeeMapper {

    @Select("select * from employee where id=#{id}")
    public Employee getEmpById(Integer id);

    @Update("update employee set lastName=#{lastName},email=#{email},gender=#{gender},d_id=#{dId} where id=#{id}")
    public void updateEmp(Employee employee);

    @Insert("insert into employee(lastName,email,gender,d_id) values(#{lastName},#{email},#{gender},#{id}")
    public void insertEmp(Employee employee);

    @Delete("delete from employee where id=#{id}")
    public void deleteEmp(Integer id);

    @Select("select * from employee where lastName=#{lastName}")
    public Employee getEmpByLastName(String lastName);
}
1、@MapperScan需要扫描的mapper接口
可以新建一个mybatis配置类
@EnableCaching //开启基于缓存的注解
@MapperScan("com.springboot.springboot.mapper")
@org.springframework.context.annotation.Configuration
public class MybatisConfig {

    @Bean
    public ConfigurationCustomizer configurationCustomizer() {
        return new ConfigurationCustomizer() {
            @Override
            public void customize(Configuration configuration) {
                configuration.setMapUnderscoreToCamelCase(true);
            }

        };
    }

}
这里开启驼峰命名也可以在properties中配置
二、快速体验缓存
步骤:
1、开启基于注解的缓存*
在mybatis配置类中添加:
@EnableCaching //开启基于缓存的注解
2、标注缓存注解*
在EmployeeService类中标注缓存注解进行测试,将方法的运行结果进行缓存,以后获取相同的数据,直接从缓存找,不用调用方法
1)@EnableCaching 开启基于注解的缓存*
2)@Cacheable 主要针对方法配置,能够根据方法的请求参数对其结果进行缓存**
CacheManager管理多个Cache组件,对缓存的真正的CRUD操作在Cache组件中,每一个缓存组件有自己的名字。
属性介绍:
-
cacheNames/value: 指定缓存组件的名字,将方法的返回结果放在缓存中,是数组的方式,可以指定多个缓存
-
key:缓存数据使用的key,可以用它进行指定默认是使用方法参数的值1,值为方法的返回值*
编写可使用spEL: #id参数id的值 #a0 #p0 #root.args[0]*
自定义key:*
1、实例:key显示为getEmp[2]*
@Cacheable(cacheNames = {"emp"},key = "#root.methodName+'['+#id+']'
2、自定义keyGenerator生成器,在配置类中配置
@Configuration
public class MyCacheConfig {

    @Bean("myKeyGenerator")
    public KeyGenerator keyGenerator(){

        return new KeyGenerator() {
            @Override
            public Object generate(Object target, Method method, Object... params) {
                return method.getName()+"["+ Arrays.asList(params)+"]";
            }
        };
    }
}
- keyGenerator:key的生成器,可以指定key的生成器组件id
注意:keyGenerator/key二选一*
-
cacheManager:指定缓存管理器,或者cacheResolver指定获取解析器*
-
condition:指定符合条件的情况向下才进行缓存*
-
unless:否定缓存,当unless指定的条件为true时,方法的返回值才不会缓存,可以获取结果进行判断* unless=’#resultnull’* unless=’#a02’ 如果第一个参数值是2,结果不缓存*
-
sync:是否使用异步模式
-
@CacheEvict 清空缓存
-
@CachePut 保证方法被调用,又希望结果被缓存。
默认使用的是:ConcurrentMapCacheManager===ConcurrentMapCache(private final ConcurrentMap<Object, Object> store;)
实际开发:使用缓存中间件:redis|memcached|ehcache
EmployeeService
 //  @Cacheable(cacheNames = {"emp"},key = "#root.methodName+'['+#id+']'")
    @Cacheable(cacheNames = {"emp"}/*keyGenerator = "myKeyGenerator",condition = "#a0>1",unless = "#a0==2"*/)
    public Employee getEmp(Integer id){
        System.out.println("查询员工"+id);
        Employee emp =employeeMapper.getEmpById(id);
        return emp;
    }
Controller:
@RestController
public class EmployeeController {

    @Autowired
    EmployeeService employeeService;

    @GetMapping("/emp/{id}")
    public Employee getEmp(@PathVariable("id") Integer id){
        Employee emp= employeeService.getEmp(id);
        return emp;
    }
3、原理介绍
这里以@Cacheable 为例子介绍原理:
1、自动配置类 CacheAutoConfiguration*
@Configuration
@ConditionalOnClass(CacheManager.class)
@ConditionalOnBean(CacheAspectSupport.class)
@ConditionalOnMissingBean(value = CacheManager.class, name = "cacheResolver")
@EnableConfigurationProperties(CacheProperties.class)
@AutoConfigureAfter({ CouchbaseAutoConfiguration.class, HazelcastAutoConfiguration.class,
		HibernateJpaAutoConfiguration.class, RedisAutoConfiguration.class })
@Import(CacheConfigurationImportSelector.class)
public class CacheAutoConfiguration {
    /**
	 * {@link ImportSelector} to add {@link CacheType} configuration classes.
	 给容器中导入一些缓存配置类
	 */
	static class CacheConfigurationImportSelector implements ImportSelector {

		@Override
		public String[] selectImports(AnnotationMetadata importingClassMetadata) {
			CacheType[] types = CacheType.values();
			String[] imports = new String[types.length];
			for (int i = 0; i < types.length; i++) {
				imports[i] = CacheConfigurations.getConfigurationClass(types[i]);
			}
			return imports;
		}

	}
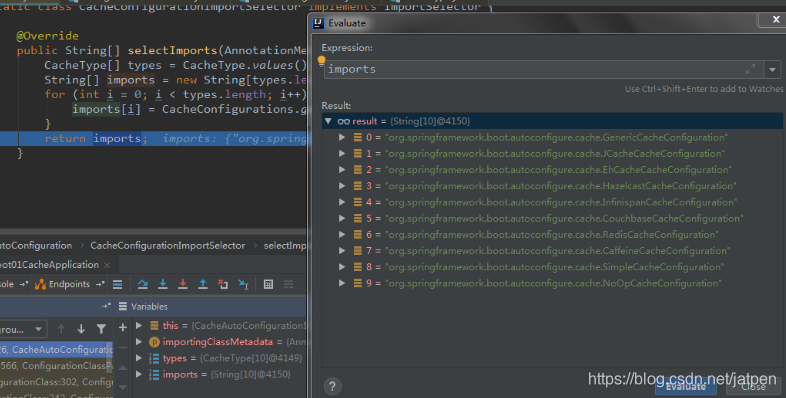
2、缓存的配置类*
org.springframework.boot.autoconfigure.cache.GenericCacheConfiguration* org.springframework.boot.autoconfigure.cache.JCacheCacheConfiguration* org.springframework.boot.autoconfigure.cache.EhCacheCacheConfiguration* org.springframework.boot.autoconfigure.cache.HazelcastCacheConfiguration* org.springframework.boot.autoconfigure.cache.InfinispanCacheConfiguration* org.springframework.boot.autoconfigure.cache.CouchbaseCacheConfiguration* org.springframework.boot.autoconfigure.cache.RedisCacheConfiguration* org.springframework.boot.autoconfigure.cache.CaffeineCacheConfiguration* org.springframework.boot.autoconfigure.cache.SimpleCacheConfiguration* org.springframework.boot.autoconfigure.cache.NoOpCacheConfiguration
3、哪个配置类会生效呢?
SimpleCacheConfiguration
4、给容器配置了一个CacheManager:ConcurrentMapCacheManager**
@Configuration
@ConditionalOnMissingBean(CacheManager.class)
@Conditional(CacheCondition.class)
class SimpleCacheConfiguration {

	private final CacheProperties cacheProperties;

	private final CacheManagerCustomizers customizerInvoker;

	SimpleCacheConfiguration(CacheProperties cacheProperties, CacheManagerCustomizers customizerInvoker) {
		this.cacheProperties = cacheProperties;
		this.customizerInvoker = customizerInvoker;
	}

	@Bean
	public ConcurrentMapCacheManager cacheManager() {
		ConcurrentMapCacheManager cacheManager = new ConcurrentMapCacheManager();
		List<String> cacheNames = this.cacheProperties.getCacheNames();
		if (!cacheNames.isEmpty()) {
			cacheManager.setCacheNames(cacheNames);
		}
		return this.customizerInvoker.customize(cacheManager);
	}

}
ConcurrentMapCacheManager
ConcurrentMapCacheManager
	@Override
	@Nullable
	public Cache getCache(String name) {
		Cache cache = this.cacheMap.get(name);
		if (cache == null && this.dynamic) {
			synchronized (this.cacheMap) {
				cache = this.cacheMap.get(name);
				if (cache == null) {
				//	调用本类的
					cache = createConcurrentMapCache(name);
					this.cacheMap.put(name, cache);
				}
			}
		}
		return cache;
	}
5、可以获取和创建createConcurrentMapCache类型的缓存,
这里会创建一个Cache组件
protected Cache createConcurrentMapCache(String name) {
		SerializationDelegate actualSerialization = (isStoreByValue() ? this.serialization : null);
		return new ConcurrentMapCache(name, new ConcurrentHashMap<>(256),
				isAllowNullValues(), actualSerialization);

	}
ConcurrentMapCache:
作用将数据保存在ConcurrentMap中
private final ConcurrentMap<Object, Object> store;
4、运行流程
运行流程(以@Cacheable为列子)
1、方法运行之前,先查询Cache(缓存组件),按照cacheNames指定的名字进行获取 (CacheManager先获取相应的缓存)第一次获取缓存如果没有Cache组件会自动创建出来**
	@Override
	@Nullable
	public Cache getCache(String name) {
		Cache cache = this.cacheMap.get(name);
		if (cache == null && this.dynamic) {
			synchronized (this.cacheMap) {
				cache = this.cacheMap.get(name);
				if (cache == null) {
					cache = createConcurrentMapCache(name);
					this.cacheMap.put(name, cache);
				}
			}
		}
		return cache;
	}
2、去Cache去查找缓存的内容,使用一个key,key默认就是方法的参数,
ConcurrentMapCache
@Override
	@Nullable
	protected Object lookup(Object key) {
		return this.store.get(key);
	}
key是按照某种策略生成的,默认使用SimpleKeyGenerator生成key ,默认使用SimpleKeyGenerator生成策略。
SimpleKeyGenerator生成策略:
-
如果没有参数:key=new SimpleKey()
-
如果有一个参数:key=参数的值
-
如果有多个参数:key=new SimpleKey(params)
public static Object generateKey(Object... params) {
		if (params.length == 0) {
			return SimpleKey.EMPTY;
		}
		if (params.length == 1) {
			Object param = params[0];
			if (param != null && !param.getClass().isArray()) {
				return param;
			}
		}
		return new SimpleKey(params);
	}
CacheAspectSupport
Object key = generateKey(context, result);
@Nullable
	private Cache.ValueWrapper findCachedItem(Collection<CacheOperationContext> contexts) {
		Object result = CacheOperationExpressionEvaluator.NO_RESULT;
		for (CacheOperationContext context : contexts) {
			if (isConditionPassing(context, result)) {
				Object key = generateKey(context, result);
				Cache.ValueWrapper cached = findInCaches(context, key);
				if (cached != null) {
					return cached;
				}
				else {
					if (logger.isTraceEnabled()) {
						logger.trace("No cache entry for key '" + key + "' in cache(s) " + context.getCacheNames());
					}
				}
			}
		}
		return null;
	}
调用本类此方法
private Object generateKey(CacheOperationContext context, @Nullable Object result){
    Object key = context.generateKey(result);
		if (key == null) {
			throw new IllegalArgumentException("Null key returned for cache operation (maybe you are " +
					"using named params on classes without debug info?) " + context.metadata.operation);
		}
		if (logger.isTraceEnabled()) {
			logger.trace("Computed cache key '" + key + "' for operation " + context.metadata.operation);
		}
		return key;

}
再调用本类:generateKey()方法,计算给定缓存操作的密钥(key)
/**
		 * Compute the key for the given caching operation.
		 */
		@Nullable
		protected Object generateKey(@Nullable Object result) {
			if (StringUtils.hasText(this.metadata.operation.getKey())) {
				EvaluationContext evaluationContext = createEvaluationContext(result);
				return evaluator.key(this.metadata.operation.getKey(), this.metadata.methodKey, evaluationContext);
			}
			return this.metadata.keyGenerator.generate(this.target, this.metadata.method, this.args);
		}
3、没有查询到缓存就调用目标方法
4、将目标方法返回的结果,放进缓存中
总结:@Cacheable标注的方法执行之前先来检查缓存中有没有这个数据,默认按照参数的值作为key去查询缓存,如果没有就运行方法,并且将结果放到缓存中,以后再来调用就直接可以从缓存中拿到数据的值** *
核心: 1、使用CacheManager【ConcurrentMapCacheManager】按照名字得到Cache【ConcurrentMapCache】组件*
2、key使用keyGenerator生成的,默认是SimpleKeyGenerator
5、其它注解说明
@CachePut 即调用方法,又更新缓存数据 达到同步更新的目的
修改了数据库的某个数据,同时更新缓存;
运行时机: 1、先调用目标方法 2、将目标方法的结果缓存起来
测试步骤:
1、先查询1号员工,查到结果会放到缓存中
key :1 , value:lastName
2、以后查询还是之前的结果
3、更新1号员工的信息(lastName:zhangsan,gender=0) ,将方法的返回值也放进了缓存中
key:employee
value:返回的employee对象
4、查询1号员工信息
预测:应该是更新后的信息,但是数据还是没更新前的数据(缓存中的数据),这时数据库已经更新了*
key应该是更新的员工信息:
key="#employee.id",使用传入员工的参数id*
key="#result.id" 使用返回后的id*
注意:@Cacheable的key是不能用result* 为什么没有更新?(1号员工没有在缓存中进行更新)
EmployeeService
 @CachePut(value = "emp",key = "#result.id")
    public Employee updateEmp( Employee employee){
        System.out.println("udapte..."+employee);
        employeeMapper.updateEmp(employee);
        return employee;
    }
controller
 @GetMapping("/emp")
    public Employee updateEmp(Employee employee){
        Employee emp = employeeService.updateEmp(employee);
        return emp;
    }
测试自行测试
@CacheEvict 清空缓存
**key:**指定要删除的数据
allEntries:清空这个value中所有的缓存数据,
beforeInvocation:缓存的清除是否在方法之前执行,默认false ,false:代表方法之后执行,如果出现异常缓存就不会清除
beforeInvocation =true: 代表清除缓存是在方法执行之前清空,无论方法是否出现异常方法都会清空
 @CacheEvict(value = "emp",allEntries = true,beforeInvocation =true)
    public void deleteEmp(Integer id){
        System.out.println("deleteEmp"+id);
        int a=10/0;
        //employeeMapper.deleteEmp(id);

    }
@Caching:定义多个缓存规则
@Target({ElementType.TYPE, ElementType.METHOD})
@Retention(RetentionPolicy.RUNTIME)
@Inherited
@Documented
public @interface Caching {

	Cacheable[] cacheable() default {};

	CachePut[] put() default {};

	CacheEvict[] evict() default {};

}
定义复杂的缓存规则
 @Caching(
            cacheable={
                    @Cacheable(value = "emp",key="#lastName")

            },

            put={
                    @CachePut(value = "emp",key = "#result.id"),
                    @CachePut(value = "emp",key="#result.email")
            }

    )
    public Employee getEmpByLastName(String lastName){
       return employeeMapper.getEmpByLastName(lastName);

    }
@CacheConfg:抽取缓存的公共配置,之后的其他缓存属性可以不用写
@Service
@CacheConfig(cacheNames = "emp")
public class EmployeeService {}

 浙公网安备 33010602011771号