二叉搜索树(BST)
 none
none
1. 二叉搜索树的定义
- [14-1] [binary search tree] 二叉搜索树是一棵二叉树, 可为空, 满足以下性质:
- 每个元素有一个唯一的 key.
- 根的左子树的 key 都小于根的 key; 根的右子树的 key 都大于根的 key.
- 根的左右子树也是二叉搜索树.
2. 定义 btNode 和 BSTree
<utility> 头文件提供了 std::pair 的定义, 便于使用融合 key 类型和 value 类型的复合类型.
<iostream> 头文件提供的输出方法由 private method preOrder 使用, 以测试代码正确性.
Click to show the codes
// Binary Search Tree

#include <utility>
#include <iostream>

/**
 * @brief Binary tree node.
 * @tparam T Should be std::pair<Key_Typt, Element_Type> in binary search tree.
*/
template<class T>
struct btNode
{
    T data;
    btNode<T>* left, * right;
    // Constructor for btNode.
    btNode(T d = {}, btNode<T>* l = nullptr, btNode<T>* r = nullptr) :
        data(d), left(l), right(r) {}
};

template<class K, class E>
class BSTree
{
public:
    // Constructor for BSTree.
    BSTree() :root(nullptr) {}
    // @brief PreOrder ouput.
    void preOrder() { preOrder(this->root); }

public:
    // @brief Find the node with key {tKey} and return its address.
    btNode<std::pair<K, E>>* find(const K& theKey) const;
    // @brief [Iteration] Create a node with {tPair} and insert it to the tree.
    void insert_I(const std::pair<K, E>& tPair);
    // @brief [Recursion] Create a node with {tPair} and invoke method {m_insert_R}.
    void insert_R(const std::pair<K, E>& tPair);
    // @brief [Iteration] Erase the node with key {tKey}.
    void erase_I(const K& tKey);
    // @brief [Recursion] Erase the node with key {tKey}.
    void erase_R(const K& tKey);

private:
    // @brief Private recurse method to insert.
    btNode<std::pair<K, E>>* m_insert_R(btNode<std::pair<K, E>>* tRoot, btNode<std::pair<K, E>>* tNode);
    // @brief Private recurse method to erase.
    btNode<std::pair<K, E>>* m_erase_R(btNode<std::pair<K, E>>* tRoot, const K& tKey);
    // @brief Private recurse method for preorder output.
    void preOrder(btNode<std::pair<K, E>>* tRoot);
private:
    btNode<std::pair<K, E>>* root;
};

template<class K, class E>
void BSTree<K, E>::preOrder(btNode<std::pair<K, E>>* tRoot)
{
    if (!tRoot) return;
    std::cout << tRoot->data.second;
    preOrder(tRoot->left);
    preOrder(tRoot->right);
}
3. find
BST 的查找实现起来非常简单, 时间复杂度为 \(O(\log{n})\) .
这里要注意 while 里的三个判断条件中 {keyNode->data.first} equals {theKey} 应该最后比较, 不然最坏情况下要比较 \(2*O(\log{n})\) 次.
Click to show the codes
// @brief Find the node with key {theKey} and return its address.
template<class K, class E>
btNode<std::pair<K, E>>* BSTree<K, E>::find(const K& theKey) const
{
    // {keyNode} traverse the tree, searching for matched node.
    btNode<std::pair<K, E>>* keyNode = root;
    // Iteration ends if {keyNode} is nullptr.
    while (keyNode) {
        if (theKey < keyNode->data.first) {
            keyNode = keyNode->left;
        } else if (theKey > keyNode->element.first) {
            keyNode = keyNode->right;
        }
        // ELSE: {keyNode->data.first} equals {theKey}.
        else {
            return keyNode;
        }
    }
    // No matching pair.
    return nullptr;
}
4. insert
4.1. 方法1 迭代插入元素
迭代插入可以分为两步:
- Step 1: 找到插入的位置
- Step 2: 创建结点并插入
若发现树中存在有相同 key 的结点, 直接替换结点的 value 然后退出函数.
Click to show the codes
// @brief [Iteration] Create a node with thePair and insert it to the tree.
template<class K, class E>
void BSTree<K, E>::insert_I(const std::pair<K, E>& thePair)
{
    // Step 1: Find the place to insert.
    // @{
    btNode<std::pair<K, E>>* keyNode = root, * pkeyNode = nullptr;
    // The loop ends either {keyNode} iterates to external nullptr,
    //               or func is returned after the matched pair is found and replaced.
    while (keyNode) {
        pkeyNode = keyNode; // {pkeyNode} is the parent of {keyNode}.
        if (thePair.first < keyNode->data.first) {
            keyNode = keyNode->left;
        } else if (thePair.first > keyNode->data.first) {
            keyNode = keyNode->right;
        }
        // ELSE: When the node with matched key is found, replace the value and exit directly.
        else {
            keyNode->data.second = thePair.second;
            return;
        }
    }
    // @}

    // Step 2: Create and insert {newNode}.
    // @{
    btNode<std::pair<K, E>>* newNode = new btNode<std::pair<K, E>>(thePair);
    // IF: {this->root} is nullptr, i.e. the tree is empty.
    if (!root) {
        root = newNode;
    }
    // ELSE: The tree is not empty.
    else {
        // Find the place to insert {newNode}.
        if (pkeyNode->data.first < thePair.second) {
            pkeyNode->right = newNode;
        } else {
            pkeyNode->left = newNode;
        }
    }
    return;
    // @}
}
4.2. 方法2 递归插入元素
递归插入挺好理解的, 注释也写得很详细了.
外部接口 insert_R 调用 private method m_insert_R 实现递归插入.
Click to show the codes
// @brief [Recursion] Create a node with {thePair} and invoke method {m_insert_R}.
template<class K, class E>
void BSTree<K, E>::insert_R(const std::pair<K, E>& thePair)
{
    btNode<std::pair<K, E>>* newNode = new btNode<std::pair<K, E>>(thePair);
    this->root = m_insert_R(this->root, newNode);
    return;
}

// @brief Private recurse method to insert.
template<class K, class E>
btNode<std::pair<K, E>>* BSTree<K, E>::m_insert_R(btNode<std::pair<K, E>>* tRoot, btNode<std::pair<K, E>>* tNode)
{
    // IF: {tRoot} of the subtree is nullptr, return {tNode} to replace the ptr pointing here.
    if (tRoot == nullptr) { return tNode; }
    // Recurse to subtree
    // and assign the return value to {tRoot->left} or {tRoot->right}.
    if (tNode->data.first < tRoot->data.first) {
        tRoot->left = m_insert_R(tRoot->left, tNode);
    } else if (tNode->data.first > tRoot->data.first) {
        tRoot->right = m_insert_R(tRoot->right, tNode);
    } else {
        tRoot->data.second = tNode->data.second;
    }
    // Return origin {tRoot} to prev level if {tRoot} is not nullptr,
    // i.e. {tRoot} is not replaced by {tNode}.
    return tRoot;
}
4.3. 测试两种插入方法
Click to show the codes
int main()
{
    std::pair<int, int> testData[] = { {8,8}, {1,1},{2,2} ,{6,6},{0,0},{7,7}, {4,4},{3,3} };
    BSTree<int, int> testTree[2];
    // Insert Data.
    for (auto a : testData) {
        testTree[0].insert_I(a);
        testTree[1].insert_R(a);
    }
    /*
    * The tree should be:
    *      8
    *     / \
    *    1   6
    *   /|  / \
    *  0 2 4   7
    *      |
    *      3
    */
    testTree[0].preOrder();
    std::cout << std::endl;
    testTree[1].preOrder();
    std::cout << std::endl;

    system("pause");
}
5. erase
5.1. 方法1 迭代删除元素
在二叉搜索树中, 迭代删除元素是较难理解的.
需要做的事情大体上也能分为两步:
- Step 1: 找到删除元素的位置
- Step 2: 删除找到的元素并且重构 BST
5.1.1. Step1 找到删除元素位置
Step 1 的实现较为简单, 利用循环迭代即可. 如果搜索结束 keyNode 依然为 nullptr , 说明未找到要求删除的 node , 因此直接结束函数.
Click to show the codes
// Step 1: search for node with key {tKey}.
// @{
btNode<std::pair<K, E>>* keyNode = root, * pKeyNode = nullptr;
while (keyNode != nullptr) {
    if (tKey < keyNode->data.first) {
        pKeyNode = keyNode;
        keyNode = keyNode->left;
    } else if(tKey > keyNode->data.first) {
        pKeyNode = keyNode;
        keyNode = keyNode->right;
    } else {
        break;
    }
}
// IF: no matched pair, exit the function.
if (keyNode == nullptr) { return; }
// @}
5.1.2. Step2-case2 keyNode 只有一个 child
假设已有 Step1 中得到的 pKeyNode 和 keyNode .
Step 2 的实现比较复杂, 我们先考虑 keyNode 只有一个 child 或者没有 child 的情况 (将这种情况当作 case 2).
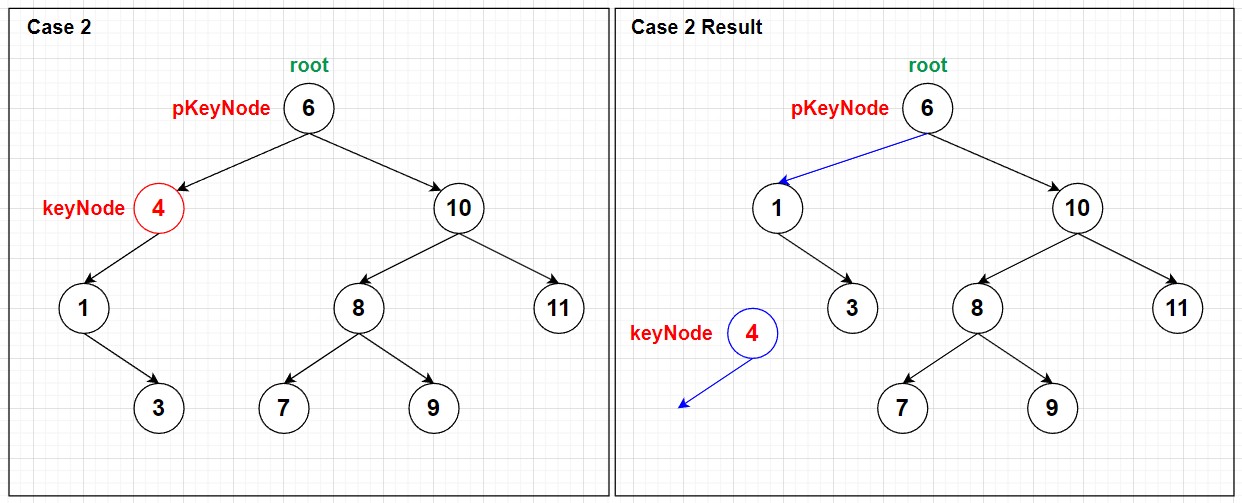
现要删除上图中的 node 4, 执行以下步骤:
- 将
pKeyNode中原先指向keyNode的指针指向keyNode唯一的 child (node 1) ; - 删除
keyNode.
究竟是左右哪个指针指向了 keyNode 和 keyNode 的孩子是需要判断的; 但是这并不困难.
另外第 2 步还需考虑到:
若 keyNode 就是 root, 那么不再执行 "重新分配 pKeyNode 的指针" 的步骤.
Click to show the codes
// Case 2: when {keyNode} has only one child.
// @[
btNode<std::pair<K, E>>* onlyChild;
// Make {onlyChild} point to the only child.
if (keyNode->left != nullptr) {
    onlyChild = keyNode->left;
} else {
    onlyChild = keyNode->right;
}

// IF: {keyNode} is not root, make {pkeyNode} point to {onlyChild} or nullptr.
if (keyNode != root) {
    if (keyNode == pKeyNode->left) {
        pKeyNode->left = onlyChild;
    } else {
        pKeyNode->right = onlyChild;
    }
}
// ELSE: {keyNode} is root (and {keyNode} has only one child), make {onlyChild} the root directly.
else { root = onlyChild; }
delete keyNode;
// @]
5.1.3. Step2-case1 keyNode 有两个 child
假设已有 Step1 中得到的 pKeyNode 和 keyNode .
当 keyNode 有两个 child (将这种情况称为 case 1), 需要对删除 keyNode 后的 BST 进行重构.
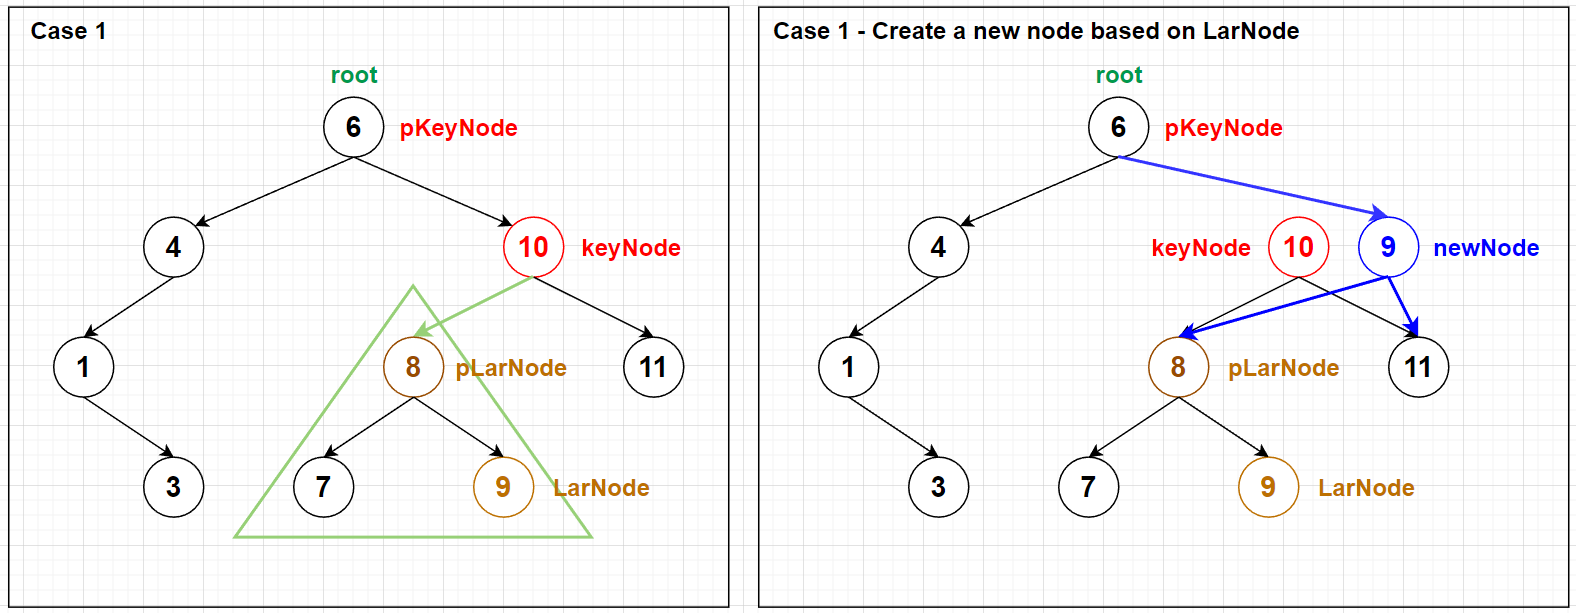
现要删除上图中的 node 10 , 先执行以下步骤:
- 找到
keyNode(node 10) 的左子树中的最右 (最大 key) node (node 9), 地址赋值给指针LarNode, 同时保证pLarNode指向LarNode的 parent (node 8); - 接着利用
LarNode(node 9) 的 data 创建newNode, 并让newNode的左右 child 分别指向keyNode的左右 child ; - 最后将
pKeyNode(node 6) 原本指向keyNode(node 10) 的指针指向newNode.
直接将 keyNode 的数据替换成 LarNode 的数据在部分情况下可行;
但如果 key 是 const 类型就不能轻易赋值.
因此上面的第 3 步利用 LarNode 的数据新建了一个 newNode .
第 4 步需要考虑到:
若 newNode 是 root, i.e. pKeyNode 是 nullptr, 应当直接将 newNode 赋值给 this->root , 而不是处理 pKeyNode .
接下来的主要问题是如何删除 keyNode 和 LarNode .
keyNode 可以直接 delete 释放掉; 但 LarNode 由于不知其是否有 child , 不能直接释放.

如上图所示, LarNode 的位置可以根据 pLarNode 是否为 keyNode 分为两种情况.
这两种情况下 LarNode 都不可能有 right child.
这里自然可以重新写代码删除 LarNode 并把其 subtree 连接至 pLarNode (如果是上图左边 pLarNode 是 keyNode 的情况, 应当 subtree 连接至 newNode ).
但实际上我们将要做的行为 --- 知道 pLarNode 而删除 LarNode --- 正与上一节的 case 2 中知道 pKeyNode 而删除 keyNode 如出一辙.
因此在 case 1 的最后将 LarNode 赋值给 keyNode ( keyNode 在先前应该已经被释放),
并将 pLarNode (如果是上图左边 pLarNode 是 keyNode 的情况, 应当将 newNode ) 赋值给 pKeyNode ,
然后无论有无执行 case 1,
都继续对于已有的 pKeyNode 和 keyNode 执行 case 2.
case 1 的代码在下一节的代码总结中一同给出
5.1.3. erase_I 代码总结
Click to show the codes
// @brief [Iteration] Erase the node with key {tKey}.
template<class K, class E>
void BSTree<K, E>::erase_I(const K& tKey)
{
    // Step 1: search for node with key {tKey}.
    // @{
    btNode<std::pair<K, E>>* keyNode = root, * pKeyNode = nullptr;
    while (keyNode != nullptr) {
        if (tKey < keyNode->data.first) {
            pKeyNode = keyNode;
            keyNode = keyNode->left;
        } else if (tKey > keyNode->data.first) {
            pKeyNode = keyNode;
            keyNode = keyNode->right;
        } else {
            break;
        }
    }
    // IF: no matched pair, exit the function.
    if (keyNode == nullptr) { return; }
    // @}

    // Step 2: delete {keyNode} and restructure the tree.
    // @{
    // Case 1: when keyNode has two children.
    // @[
    if (keyNode->left != nullptr && keyNode->right != nullptr) {
        btNode<std::pair<K, E>>* LarNode = keyNode->left, * pLarNode = keyNode;
        // Move 'LarNode' to the rightest node in left subtree of {keyNode}.
        while (LarNode->right != nullptr) {
            pLarNode = LarNode;
            LarNode = LarNode->right;
        }
        // Create {newNode} with data of {LarNode}; {newNode} will replace {keyNode}.
        btNode<std::pair<K, E>>* newNode = new btNode<std::pair<K, E>>(LarNode->data, keyNode->left, keyNode->right);
        // IF: the deleted node is root (that's why 'pKeyNode' is nullptr).
        if (pKeyNode == nullptr) {
            root = newNode;
        } else if (keyNode == pKeyNode->left) {
            pKeyNode->left = newNode;
        } else {
            pKeyNode->right = newNode;
        }

        if (pLarNode == keyNode) {
            pKeyNode = newNode;
        } else {
            pKeyNode = pLarNode;
        }
        delete keyNode;
        keyNode = LarNode;
    }
    // @]
    // Case 2: when {keyNode} has only one child.
    // @[
    btNode<std::pair<K, E>>* onlyChild;
    // Make {onlyChild} point to the only child.
    if (keyNode->left != nullptr) {
        onlyChild = keyNode->left;
    } else {
        onlyChild = keyNode->right;
    }

    // IF: {keyNode} is not root, make {pkeyNode} point to {onlyChild} or nullptr.
    if (keyNode != root) {
        if (keyNode == pKeyNode->left) {
            pKeyNode->left = onlyChild;
        } else {
            pKeyNode->right = onlyChild;
        }
    }
    // ELSE: {keyNode} is root (and {keyNode} has only one child), make {onlyChild} the root directly.
    else {
        root = onlyChild;
    }
    delete keyNode;
    // @]
    // @}
}
5.2. 方法2 迭代删除元素
先写个简单的 public method 用来给用户调用:
template<class K, class E>
void BSTree<K, E>::erase_R(const K& tKey)
{
    root = m_erase_R(root, tKey);
}
个人认为迭代版本的 m_erase_R 比递归版本更容易理解.
因为注释写得非常详细了, 就懒得解释和画图了.
Click to show the codes
// @brief Private recurse method to erase.
template<class K, class E>
btNode<std::pair<K, E>>* BSTree<K, E>::m_erase_R(btNode<std::pair<K, E>>* tRoot, const K& tKey)
{
    // IF: {tRoot} is nullptr, directly return nullptr.
    if (tRoot == nullptr) { return nullptr; }

    // IF: key of {tRoot} is larger or smaller, recurse to next level.
    if (tRoot->data.first > tKey) {
        tRoot->left = m_erase_R(tRoot->left, tKey);
    } else if (tRoot->data.first < tKey) {
        tRoot->right = m_erase_R(tRoot->right, tKey);
    }
    // ELSE: key of {tRoot} equals {tKey}
    else {
        // In this "ELSE" case, {tRoot} is now the node to be erased.

        // Step 1: Find the rightest (the largest key) node in left subtree of {tRoot}.
        // @{
        btNode<std::pair<K, E>>* LarNode = tRoot->left;
        while (LarNode && LarNode->right) { LarNode = LarNode->right; }
        // @}

        // Step 2: Delete node.
        // {tRoot} is sure not to be a nullptr,
        // while {LarNode} is set to be {tRoot->left} and to traverse the subtree.
        // {LarNode} would be nullptr only when {tRoot} has no left child.
        // @{
        // case 1: {tRoot} has no left child.
        // @[
        if (LarNode == nullptr) {
            // The only right child of {tRoot} now should be the new node to replace {tRoot}.
            btNode<std::pair<K, E>>* new_tRoot = tRoot->right;
            delete tRoot;
            return new_tRoot;
        }
        // @]
        // case 2: {tRoot} has left child.
        // @[
        // Create a new node to replace {tRoot}, based on data of {LarNode} and right child of {tRoot}.
        btNode<std::pair<K, E>>* new_tRoot = new btNode<std::pair<K, E>>(LarNode->data, nullptr, tRoot->right);
        // Erase {LarNode} in left subtree of {tRoot}.
        new_tRoot->left = m_erase_R(tRoot->left, LarNode->data.first);
        // Erase origin {tRoot}.
        delete tRoot;
        // Return {new_tRoot}.
        return new_tRoot;
        // @]
        // @}
    }
    // Return unchanged root to previous level of recursion.
    return tRoot;
}
5.3. 两种删除方法测试
有趣的一点是两种删除方法的结果在某些情况下不一样, 这是由于分类方式不同所致.
两种方法都是正确的.
Click to show the codes
int main()
{
    std::pair<const int, int> testData[] = { {6,6},{4,4},{10,10},{1,1},{8,8},{11,11},{3,3},{7,7},{9,9} };
    BSTree<const int, int> testTree[2];
    // Insert Data.
    for (auto a : testData) {
        testTree[0].insert_I(a);
        testTree[1].insert_R(a);
    }
    /*
    * The origin tree is:
    *      6
    *    /   \
    *   4     10
    *  /      /\
    * 1      8  11
    *  \    / \
    *   3  7   9
    */

    // Erase test 1.
    // @{
    testTree[0].erase_I(10);
    testTree[1].erase_R(10);
    // @}

    // Erase result 1.
    // @{
    /*
    * Iterative erase (10) result:
    *      6
    *    /   \
    *   4     9
    *  /     / \
    * 1      8  11
    *  \    / \
    *   3  7   9
    */
    testTree[0].preOrder();
    std::cout << std::endl;
    /*
    * Recursive erase (10) result:
    *      6
    *    /   \
    *   4     9
    *  /     / \
    * 1      8  11
    *  \    /
    *   3  7
    */
    testTree[1].preOrder();
    std::cout << std::endl;
    // @}

    // Erase test 2.
    // @{
    testTree[0].erase_I(4);
    testTree[1].erase_R(4);
    // @}

    // Erase result 1.
    // @{
    /*
    * Iterative erase (4) result:
    *      6
    *    /   \
    *  1      9
    *   \    / \
    *    3  8  11
    *      / \
    *     7   9
    */
    testTree[0].preOrder();
    std::cout << std::endl;
    /*
    * Iterative erase (4) result:
    *      6
    *    /   \
    *   3     9
    *  /     / \
    * 1     8  11
    *      /
    *     7
    */
    testTree[1].preOrder();
    std::cout << std::endl;
    // @}
    system("pause");
}
Reference | Data Structures, Algoritms, and Applications in C++, Sartaj Sahni

 浙公网安备 33010602011771号