SpringBoot+WebSocket实时监控异常
写在前面
此异常非彼异常,标题所说的异常是业务上的异常。
最近做了一个需求,消防的设备巡检,如果巡检发现异常,通过手机端提交,后台的实时监控页面实时获取到该设备的信息及位置,然后安排员工去处理。
因为需要服务端主动向客户端发送消息,所以很容易的就想到了用WebSocket来实现这一功能。
WebSocket就不做介绍了,上链接:https://developer.mozilla.org/zh-CN/docs/Web/API/WebSocket
前端略微复杂,需要在一张位置分布图上进行鼠标描点定位各个设备和根据不同屏幕大小渲染,本文不做介绍,只是简单地用页面样式进行效果呈现。
绿色代表正常,红色代表异常
预期效果,未接收到请求前----->id为3的提交了异常,id为3的王五变成了红色


实现:
前端:
直接贴代码
  1 <!DOCTYPE html>
  2 <html>
  3     <head>
  4         <meta charset="utf-8" />
  5         <title>实时监控</title>
  6     </head>
  7     <style>
  8         .item {
  9             display: flex;
 10             border-bottom: 1px solid #000000;
 11             justify-content: space-between;
 12             width: 30%;
 13             line-height: 50px;
 14             height: 50px;
 15         }
 16
 17         .item span:nth-child(2){
 18             margin-right: 10px;
 19             margin-top: 15px;
 20             width: 20px;
 21             height: 20px;
 22             border-radius: 50%;
 23             background: #55ff00;
 24         }
 25         .nowI{
 26             background: #ff0000 !important;
 27         }
 28     </style>
 29     <body>
 30         <div id="app">
 31             <div v-for="item in list" class="item">
 32                 <span>{{item.id}}.{{item.name}}</span>
 33                 <span :class='item.state==-1?"nowI":""'></span>
 34             </div>
 35         </div>
 36     </body>
 37     <script src="./js/vue.min.js"></script>
 38     <script type="text/javascript">
 39         var vm = new Vue({
 40             el: "#app",
 41             data: {
 42                 list: [{
 43                         id: 1,
 44                         name: '张三',
 45                         state: 1
 46                     },
 47                     {
 48                         id: 2,
 49                         name: '李四',
 50                         state: 1
 51                     },
 52                     {
 53                         id: 3,
 54                         name: '王五',
 55                         state: 1
 56                     },
 57                     {
 58                         id: 4,
 59                         name: '韩梅梅',
 60                         state: 1
 61                     },
 62                     {
 63                         id: 5,
 64                         name: '李磊',
 65                         state: 1
 66                     },
 67                 ]
 68             }
 69         })
 70
 71         var webSocket = null;
 72         if ('WebSocket' in window) {
 73             //创建WebSocket对象
 74             webSocket = new WebSocket("ws://localhost:18801/webSocket/" + getUUID());
 75
 76             //连接成功
 77             webSocket.onopen = function() {
 78                 console.log("已连接");
 79                 webSocket.send("消息发送测试")
 80             }
 81             //接收到消息
 82             webSocket.onmessage = function(msg) {
 83                 //处理消息
 84                 var serverMsg = msg.data;
 85                 var t_id = parseInt(serverMsg)    //服务端发过来的消息,ID,string需转化为int类型才能比较
 86                 for (var i = 0; i < vm.list.length; i++) {
 87                     var item = vm.list[i];
 88                     if(item.id == t_id){
 89                         item.state = -1;
 90                         vm.list.splice(i,1,item)
 91                         break;
 92                     }
 93                 }
 94             };
 95
 96             //关闭事件
 97             webSocket.onclose = function() {
 98                 console.log("websocket已关闭");
 99             };
100             //发生了错误事件
101             webSocket.onerror = function() {
102                 console.log("websocket发生了错误");
103             }
104         } else {
105             alert("很遗憾,您的浏览器不支持WebSocket!")
106         }
107
108         function getUUID() {    //获取唯一的UUID
109             return 'xxxxxxxx-xxxx-4xxx-yxxx-xxxxxxxxxxxx'.replace(/[xy]/g, function(c) {
110
111                 var r = Math.random() * 16 | 0,
112                     v = c == 'x' ? r : (r & 0x3 | 0x8);
113                 return v.toString(16);
114             });
115         }
116     </script>
117 </html>
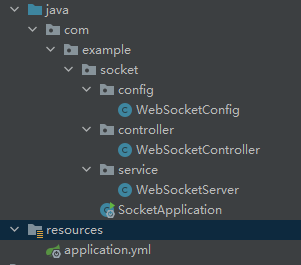
后端:
项目结构是这样子的,后面的代码关键注释都有,就不重复描述了
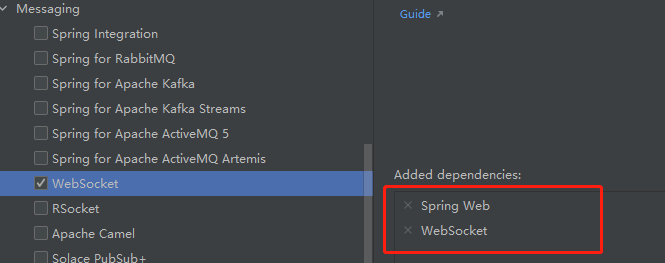
1、新建SpringBoot工程,选择web和WebSocket依赖
2、配置application.yml
#端口
server:
  port: 18801

#密码,因为接口不需要权限,所以加了个密码做校验
mySocket:
  myPwd: jae_123
3、WebSocketConfig配置类
 1 @Configuration
 2 public class WebSocketConfig {
 3
 4     /**
 5      * 注入一个ServerEndpointExporter,该Bean会自动注册使用@ServerEndpoint注解申明的websocket endpoint
 6      */
 7     @Bean
 8     public ServerEndpointExporter serverEndpointExporter(){
 9         return new ServerEndpointExporter();
10     }
11 }
4、WebSocketServer类,用来进行服务端和客户端之间的交互
 1 /**
 2  * @author jae
 3  * @ServerEndpoint("/webSocket/{uid}") 前端通过此URI与后端建立链接
 4  */
 5
 6 @ServerEndpoint("/webSocket/{uid}")
 7 @Component
 8 public class WebSocketServer {
 9
10     private static Logger log = LoggerFactory.getLogger(WebSocketServer.class);
11
12     //静态变量,用来记录当前在线连接数。应该把它设计成线程安全的。
13     private static final AtomicInteger onlineNum = new AtomicInteger(0);
14
15     //concurrent包的线程安全Set,用来存放每个客户端对应的WebSocketServer对象。
16     private static CopyOnWriteArraySet<Session> sessionPools = new CopyOnWriteArraySet<Session>();
17
18     /**
19      * 有客户端连接成功
20      */
21     @OnOpen
22     public void onOpen(Session session, @PathParam(value = "uid") String uid){
23         sessionPools.add(session);
24         onlineNum.incrementAndGet();
25         log.info(uid + "加入webSocket!当前人数为" + onlineNum);
26     }
27
28     /**
29      * 连接关闭调用的方法
30      */
31     @OnClose
32     public void onClose(Session session) {
33         sessionPools.remove(session);
34         int cnt = onlineNum.decrementAndGet();
35         log.info("有连接关闭,当前连接数为:{}", cnt);
36     }
37
38     /**
39      * 发送消息
40      */
41     public void sendMessage(Session session, String message) throws IOException {
42         if(session != null){
43             synchronized (session) {
44                 session.getBasicRemote().sendText(message);
45             }
46         }
47     }
48
49     /**
50      * 群发消息
51      */
52     public void broadCastInfo(String message) throws IOException {
53         for (Session session : sessionPools) {
54             if(session.isOpen()){
55                 sendMessage(session, message);
56             }
57         }
58     }
59
60     /**
61      * 发生错误
62      */
63     @OnError
64     public void onError(Session session, Throwable throwable){
65         log.error("发生错误");
66         throwable.printStackTrace();
67     }
68
69 }
5、WebSocketController类,用于进行接口测试
 1 @RestController
 2 @RequestMapping("/open/socket")
 3 public class WebSocketController {
 4
 5     @Value("${mySocket.myPwd}")
 6     public String myPwd;
 7
 8     @Autowired
 9     private WebSocketServer webSocketServer;
10
11     /**
12      * 手机客户端请求接口
13      * @param id    发生异常的设备ID
14      * @param pwd   密码(实际开发记得加密)
15      * @throws IOException
16      */
17     @PostMapping(value = "/onReceive")
18     public void onReceive(String id,String pwd) throws IOException {
19         if(pwd.equals(myPwd)){  //密码校验一致(这里举例,实际开发还要有个密码加密的校验的),则进行群发
20             webSocketServer.broadCastInfo(id);
21         }
22     }
23
24 }
测试
1、打开前端页面,进行WebSocket连接
控制台输出,连接成功

2、因为是模拟数据,所以全部显示正常,没有异常提交时的页面呈现

3、接下来,我们用接口测试工具Postman提交一个异常
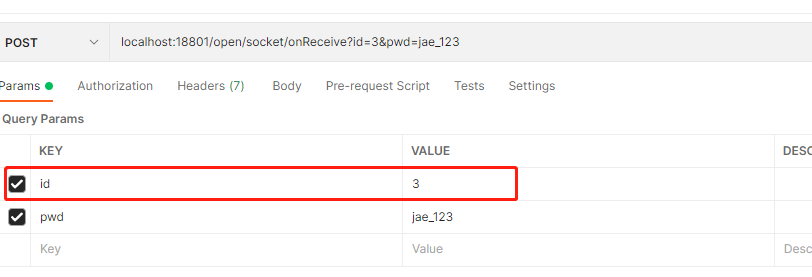
注意id为3的这个数据的状态变化

我们可以看到,id为3的王五状态已经变成异常的了,实时通讯成功。
参考:https://developer.mozilla.org/zh-CN/docs/Web/API/WebSocket
最后
工作中有这方面关于实时监控的需求,可以参考一下哦。
不足之处欢迎指出,觉得有用的话就点个推荐吧!

 浙公网安备 33010602011771号