
多线程项目中实战
1. 创建线程的方式
-
继承thread
* 写一个类继承 Thread
* 重写 run() 方法
* 创建该类的实例,调用 start() 启动线程 -
实现runnable
* 写一个类实现 Runnable
* 实现 run() 方法
* 将其实例作为参数传给 Thread 构造函数,再调用 start() -
实现callable
* 写一个类实现 Callable
* 实现 call() 方法(可返回值、抛异常)
* 配合 FutureTask 和 Thread 使用 -
线程池
* 创建线程池配置类,指明线程池相关参数
* 利用ThreadPoolExecutor相关api实现池化技术,他是JAVA中java.util.concurrent.Executor的实现类。Executor接口是JAVA中用于处理多线程相关的一个接口。 -
CompletableFuture
* Java 8 引入的异步编程工具,它扩展了Future接口,支持异步任务的组合、回调、异常处理等。简化了多线程并发编程。底层核心还是用的线程池技术。
2. Executor接口
它是一个接口,位于java.util.concurrent包下。用于解耦任务提交和执行(就是异步处理提交的任务)。
2.1 核心方法:
- void execute(Runnable command);
有且就这一个接口,表示提交一个任务给执行器去执行,不关心结果,也不阻塞当前线程。
2.2 继承体系:
常见子接口:
- ExecutorService
- ScheduledExecutorService
常见实现类:
- ThreadPoolExecutor
Java线程池的标准实现,可控制线程的创建、执行、回收全过程。
3. Future接口
它是一个接口,位于java.util.concurrent包下。用于表示异步处理的结果。它提供了一组方法来判断异步处理是否完成、获取异步处理结果,以及取消异步处理等。
典型用法场景:提交一个耗时任务,后续在需要结果时再获取,或在任务执行过程中需要取消、控制超时等待等。
3.1 Future核心方法
-
V get()
阻塞并返回结果,如果任务抛出异常,会抛出 ExecutionException,原因包含原始异常。 -
V get(long timeout, TimeUnit unit)
在指定时间内获取结果,超时未完成则抛出 TimeoutException。 -
boolean isDone()
任务是否已经完成。 -
boolean cancel(boolean mayInterruptIfRunning)
取消任务,若任务已开始执行。取决于你的传参mayInterruptIfRunning,为true,必须中断执行线程。为false,就不取消这个任务了。
3.2 Future继承体系
常见子接口:
- RunnableFuture
- ScheduledFuture
- RunnableScheduledFuture
- ScheduledFuture
常见实现类
- CompletableFuture
CompletableFuture是 Java 8 引入的异步编程工具, 实现了 Future 和 CompletionStage 接口,提供了更强大的异步编程能力,支持链式调用、组合多个异步任务、异常处理等功能。
4. Sprintgboot整合线程池后,原生方法实现异步处理
前提说明:因为我们整合了Springboot,所以推荐使用ThreadPoolTaskExecutor,它与ThreadPoolExecutor配置上有稍许不同,基于ThreadPoolExecutor实现。
ThreadPoolTaskExecutor与ThreadPoolExecutor对比:
- ThreadPoolTaskExecutor提供了@Async注解,利用被其标记的方法能更快开发异步任务。ThreadPoolExecutor也能使用这个注解但是还需要创建额外的适配器。
- ThreadPoolTaskExecutor内置了监控器会自动关闭线程池,ThreadPoolExecutor需要手动写一个监控器来监控线程状态,实现关闭功能。
- ThreadPoolTaskExecutor集成了spring的事务管理,ThreadPoolExecutor没有。
- 创建线程池配置类
@Configuration
public class ThreadPoolConfig {

    @Bean(name = "taskExecutor")
    public ThreadPoolTaskExecutor taskExecutor() {
        ThreadPoolTaskExecutor executor = new ThreadPoolTaskExecutor();
        // 核心线程数(初始化时创建的线程数量,保持活动状态)
        executor.setCorePoolSize(4);
        // 最大线程数,当队列满了,且当前线程数 < maxPoolSize 时创建新线程
        executor.setMaxPoolSize(8);
        // 队列容量。LinkedBlockingQueue(默认,无界队列)   ArrayBlockingQueue(有界队列,需要设置容量)   SynchronousQueue(不存储,直接传递)
        executor.setQueueCapacity(100);
        // 线程前缀,便于日志分析
        executor.setThreadNamePrefix("Async-Worker-");
        // 空闲线程存活时间(单位:秒),超过 核心线程数 的空闲线程在多长时间达到后被回收,默认60秒
        executor.setKeepAliveSeconds(60);
        // 是否允许核心线程也被回收  通常设为 false,核心线程不回收。 默认false
        executor.setAllowCoreThreadTimeOut(false);
        // 应用关闭时是否等待线程池中的任务执行完成。
        // false(默认)。false:不等待,立即中断所有正在执行的任务(可能丢失数据)
        // true:等待,等任务完成再退出。还可以配合setAwaitTerminationSeconds设置等待多少秒后直接退出,免得某个任务一直完成不了回收不了线程。
        executor.setWaitForTasksToCompleteOnShutdown(false);
        // 设置应用关闭时线程池等待任务完成的最大时间
        executor.setAwaitTerminationSeconds(30);
        // 拒绝策略,任务过多时的处理方式
        // new ThreadPoolExecutor.AbortPolicy();          // 直接抛出异常
        // new ThreadPoolExecutor.CallerRunsPolicy());    // 调用者线程执行
        // new ThreadPoolExecutor.DiscardPolicy());       // 直接丢弃任务
        // new ThreadPoolExecutor.DiscardOldestPolicy()); // 丢弃队列最老任务
        executor.setRejectedExecutionHandler(new ThreadPoolExecutor.CallerRunsPolicy());
        // 初始化线程池,就是项目一启动就要初始化的意思。如果不初始化线程池,无法使用线程池。等于说是必须调用嘛必须要写这个,反正写上没错。
        executor.initialize();
        return executor;
    }
}
- 创建一个线程类
public class AsyncTask implements Runnable {

    @Override
    public void run() {
        try {
            Thread.sleep(5000);
        } catch (Exception e) {
            e.printStackTrace();
        }
        System.out.println("获取到商品信息");
    }

}
3. 利用线程池调用线程
	@Autowired
	private ThreadPoolTaskExecutor taskExecutor;

	@ApiOperation(value = "异步调用线程")
	@GetMapping("/test/1")
	public Result testOne() {
		System.out.println("获取到用户信息");
		taskExecutor.execute(new AsyncTask());  // 获取到商品信息是个耗时的操作,将其异步处理,不会阻塞主线程代码执行
		System.out.println("结束");
		return Result.ok();
	}
5. Sprintgboot整合线程池后,利用提供的注解实现异步调用
PS:同一个类中调用、private修饰时、内部调用时 @Async注解不会生效
- 主启动类上加@EnableAsync注解
- 创建线程池配置类
@Configuration
public class ThreadPoolConfig {

    @Bean(name = "taskExecutor")
    public ThreadPoolTaskExecutor taskExecutor() {
        ThreadPoolTaskExecutor executor = new ThreadPoolTaskExecutor();
        // 核心线程数(初始化时创建的线程数量,保持活动状态)
        executor.setCorePoolSize(4);
        // 最大线程数,当队列满了,且当前线程数 < maxPoolSize 时创建新线程
        executor.setMaxPoolSize(8);
        // 队列容量。LinkedBlockingQueue(默认,无界队列)   ArrayBlockingQueue(有界队列,需要设置容量)   SynchronousQueue(不存储,直接传递)
        executor.setQueueCapacity(100);
        // 线程前缀,便于日志分析
        executor.setThreadNamePrefix("Async-Worker-");
        // 空闲线程存活时间(单位:秒),超过 核心线程数 的空闲线程在多长时间达到后被回收,默认60秒
        executor.setKeepAliveSeconds(60);
        // 是否允许核心线程也被回收  通常设为 false,核心线程不回收。 默认false
        executor.setAllowCoreThreadTimeOut(false);
        // 应用关闭时是否等待线程池中的任务执行完成。
        // false(默认)。false:不等待,立即中断所有正在执行的任务(可能丢失数据)
        // true:等待,等任务完成再退出。还可以配合setAwaitTerminationSeconds设置等待多少秒后直接退出,免得某个任务一直完成不了回收不了线程。
        executor.setWaitForTasksToCompleteOnShutdown(false);
        // 设置应用关闭时线程池等待任务完成的最大时间
        executor.setAwaitTerminationSeconds(30);
        // 拒绝策略,任务过多时的处理方式
        // new ThreadPoolExecutor.AbortPolicy();          // 直接抛出异常
        // new ThreadPoolExecutor.CallerRunsPolicy());    // 调用者线程执行
        // new ThreadPoolExecutor.DiscardPolicy());       // 直接丢弃任务
        // new ThreadPoolExecutor.DiscardOldestPolicy()); // 丢弃队列最老任务
        executor.setRejectedExecutionHandler(new ThreadPoolExecutor.CallerRunsPolicy());
        // 初始化线程池,就是项目一启动就要初始化的意思。如果不初始化线程池,无法使用线程池。等于说是必须调用嘛必须要写这个,反正写上没错。
        executor.initialize();
        return executor;
    }
}
- 配合@Async创建异步任务
public interface AsyncService{

	public void executeAsyncTask();

}
@Service
public class AsyncServiceImpl implements AsyncService {

    @Async(value = "taskExecutor") // 指定线程池,不指定的话,会使用默认的线程池
    public void executeAsyncTask() {
        try {
            Thread.sleep(5000);
        } catch (Exception e) {
            e.printStackTrace();
        }
        System.out.println("获取到商品信息");
    }

}
- 直接进行异步调用
	@Autowired
	private AsyncService asyncTask;

	@ApiOperation(value = "异步调用线程2")
	@GetMapping("/test/2")
	public Result testTwo() {
		System.out.println("获取到用户信息");
		asyncTask.executeAsyncTask();  // // 获取到商品信息是个耗时的操作,将其异步处理,不会阻塞主线程代码执行
		System.out.println("结束");
		return Result.ok();
	}
6. 怎么知道异步线程执行后的结果
需求:查询商品信息,需要调用3个方法得到不同的数据,最后封装成一个大数据给前端。
思路:我们将这3个方法,异步调用。当3个方法都执行完毕后再返回给前端。
- 创建线程池配置类
// 省略代码...
- 创建3个方法获得数据,并添加@Async表示异步处理该方法
public interface CategoryService {

	// 获取分类信息
	CompletableFuture<String> getCategoryName();

}

public interface ProductService {

	// 获取商品基本信息
	CompletableFuture<String> getProductInfo();

	// 获取商品详细信息
	CompletableFuture<String> getProductDetails();
}
@Service
public class CategoryServiceImpl implements CategoryService {

	@Async(value = "taskExecutor")
	@Override
	public CompletableFuture<String> getCategoryName() {
		try {
			Thread.sleep(2000); // 休眠2秒
		} catch (InterruptedException e) {
			throw new RuntimeException(e);
		}
		String s = "获取到了商品分类信息";
		System.out.println(s);
		return CompletableFuture.completedFuture(s);  // public static <U> CompletableFuture<U> completedFuture     创建一个已经完成的 CompletableFuture,直接返回给定值
	}
}


@Service
public class ProductServiceImpl implements ProductService {

	@Async
	@Override
	public CompletableFuture<String> getProductInfo() {
		try {
			Thread.sleep(1000); // 休眠1秒
		} catch (InterruptedException e) {
			throw new RuntimeException(e);
		}
		String s = "获取到了商品基本信息";
		System.out.println("获取到了商品基本信息");
		return CompletableFuture.completedFuture(s);
	}

	@Async
	@Override
	public CompletableFuture<String> getProductDetails() {
		try {
			Thread.sleep(5000); // 休眠5秒
		} catch (InterruptedException e) {
			throw new RuntimeException(e);
		}
		String s = "获取到了商品详细信息";
		System.out.println("获取到了商品详细信息");
		return CompletableFuture.completedFuture(s);
	}
}
- 编写我们的controller,异步调用方法
	@Autowired
	private CategoryService categoryService;
	@Autowired
	private ProductService productService;

	@ApiOperation(value = "异步调用线程3")
	@GetMapping("/test/3")
	public Result testThree() {
		Date begin = new Date();

		String s = "获取到了用户信息";
		System.out.println(s);
		try {
			Thread.sleep(1000); // 休眠1秒
		} catch (InterruptedException e) {
			throw new RuntimeException(e);
		}

		CompletableFuture<String> categoryName = categoryService.getCategoryName(); // 获取商品分类信息  需要2秒

		CompletableFuture<String> productInfo = productService.getProductInfo(); // 获取商品基本信息   需要1秒

		CompletableFuture<String> productDetails = productService.getProductDetails(); // 获取商品详细信息    需要5秒

		Date date = new Date();
		System.out.println("此时耗时:" + (date.getTime() - begin.getTime()) + "毫秒");

		// CompletableFuture的join()方法: 阻塞当前线程,等待 CompletableFuture 完成,然后获取结果(如果异常,抛出未包装的运行时异常)
		String result = s + categoryName.join() + productInfo.join() + productDetails.join(); // 合并结果

		Date end = new Date();
		System.out.println("此时耗时:" + (end.getTime() - begin.getTime()) + "毫秒");
		return Result.ok(result);
	}
- 现象
符合我们的预期,利用异步处理,提高了接口效率。
![image]()

6. CompletableFuture
CompletableFuture 是 Java 8 引入的异步编程工具,它实现了 Future 和 CompletionStage 接口,提供了强大的异步编程能力,支持链式调用、组合多个异步任务、异常处理等功能。
6.1 常用方法解析
- runAsync() - 无返回值的异步任务
- supplyAsync() - 有返回值的异步任务
![image]()

    // runAsync() 代码示例:
    // runAsync方法参数解析:
    // 参数1:是一个Runnable,就是一个线程。我们可以通过lambda形式来创建。
    // 参数2:是一个线程池,没有指定时会使用ForkJoinPool.commonPool() 作为它的线程池执行异步代码。如果指定线程池,则使用指定的线程池运行。

    // 基础用法
    CompletableFuture<Void> future = CompletableFuture.runAsync(() -> {
        System.out.println("执行任务");
    });

    // 指定线程池
    Executor executor = Executors.newFixedThreadPool(5);
    CompletableFuture<Void> future2 = CompletableFuture.runAsync(
        () -> System.out.println("任务"),
        executor
    );
    // supplyAsync() 代码示例:
    CompletableFuture<String> future = CompletableFuture.supplyAsync(() -> {
        return "返回结果";
    });

    // 指定线程池
    CompletableFuture<Integer> future2 = CompletableFuture.supplyAsync(() -> {
        Integer a = 100;
        return a;
    }, executor);
    // 拿到返回值
    Integer result = future2.get();
- completedFuture() - 创建已完成的Future
    // 主要用于测试或快速返回值
    CompletableFuture<String> future = CompletableFuture.completedFuture("结果");
- whenComplete() - 在 CompletableFuture 完成时(无论是正常完成还是异常完成)都会执行的回调方法。(不能修改结果)
- whenCompleteAsync() - 是 whenComplete() 的异步版本,它在任务完成后异步执行回调函数。
![image]()

    CompletableFuture<Integer> completableFuture = CompletableFuture.supplyAsync(()->{
                        System.out.println("当前线程:"+Thread.currentThread().getId());
                        int result = 10/0;
                        System.out.println("result:"+result);
                        return result;
                    },executorService).whenComplete((rs,exception)->{
                                System.out.println("结果:"+rs);
                                System.out.println(exception);
                            });
    System.out.println("main over....");
- thenApply() - 同步转换结果,当一个线程依赖另一个线程时,获取上一个任务返回的结果,并返回当前任务的返回值。
- thenApplyAsync() - 异步转换结果。这里所谓的异步指的是不在当前线程内执行。
- thenAccept() - 消费结果(无返回值),接收任务的处理结果,并消费处理,无返回结果。
- thenAcceptAsync() - 异步消费结果。这里所谓的异步指的是不在当前线程内执行。
![image]()
![image]()


        // 线程1执行返回的结果:100
        CompletableFuture<Integer> futureA =
                CompletableFuture.supplyAsync(() -> {
                    int res = 100;
                    System.out.println("线程一:"+res);
                    return res;
                });

        // thenApplyAsync
        // 线程2 获取到线程1执行的结果
        CompletableFuture<Integer> futureB = futureA.thenApplyAsync((res)->{
            System.out.println("线程二--"+res);
            return ++res;
        },executorService);

        // thenRunAsync
        //线程3: 无法获取futureA返回结果
        CompletableFuture<Void> futureC = futureA.thenRunAsync(() -> {
            System.out.println("线程三....");
        }, executorService);
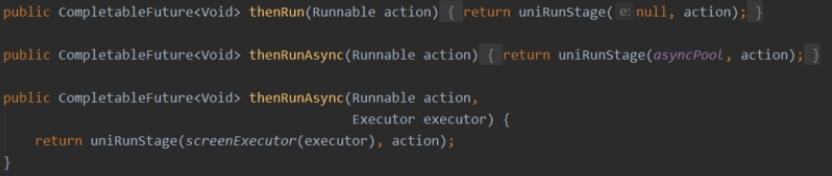
- thenRun() - 任务完成后同步执行,它只关心“任务完成”这个事件,不关心前一个任务的结果。
- thenRunAsync - 任务完成后异步执行,它只关心“任务完成”这个事件,不关心前一个任务的结果。
![image]()
    CompletableFuture<String> future = CompletableFuture.supplyAsync(() -> {
        System.out.println("生产数据...");
        return "Hello World";
    });

    // thenRunAsync 接收不到前一个任务的结果
    CompletableFuture<Void> result = future.thenRunAsync(() -> {
        System.out.println("前一个任务完成了!但不知道结果是什么");
        // 这里无法访问 "Hello World"
    });

    result.join();
- allOf() - 等待所有任务完成
- anyOf() - 任意一个任务完成
    public static CompletableFuture<Void> allOf(CompletableFuture<?>... cfs);
    public static CompletableFuture<Object> anyOf(CompletableFuture<?>... cfs);

    public class Demo5 {
        public static void main(String[] args) throws ExecutionException, InterruptedException {
            ExecutorService executorService = Executors.newFixedThreadPool(4);
            // 线程1
            CompletableFuture<Integer> futureA =
                    CompletableFuture.supplyAsync(() -> {
                        System.out.println(Thread.currentThread().getName()+"--begin..");
                        int res = 100;
                        System.out.println("一:"+res);
                        System.out.println(Thread.currentThread().getName()+"--over..");
                        return res;
                    },executorService);

            // 线程2
            CompletableFuture<Integer> futureB =
                    CompletableFuture.supplyAsync(() -> {
                        System.out.println(Thread.currentThread().getName()+"--begin..");
                        int res = 30;
                        System.out.println("二:"+res);
                        System.out.println(Thread.currentThread().getName()+"--over..");
                        return res;
                    },executorService);

            CompletableFuture<Void> all = CompletableFuture.allOf(futureA,futureB);
            all.get();
            System.out.println("over....");
        }
    }
7. Sprintgboot整合线程池后,利用CompletableFuture的静态方法创建异步任务
需求:查询商品信息,需要调用3个方法得到不同的数据,最后封装成一个大数据给前端。
思路:我们将这3个方法,异步调用。当3个方法都执行完毕后再返回给前端。
- 创建线程池配置类
// 省略代码...
- 创建3个方法获得数据,并添加@Async表示异步处理该方法
public interface CategoryService {

	// 获取分类信息
	String getCategoryName();

}

public interface ProductService {

	// 获取商品基本信息
	String getProductInfo();

	// 获取商品详细信息
	String getProductDetails();
}
@Service
public class CategoryServiceImpl implements CategoryService {

	// @Async(value = "taskExecutor")  不再需要这个注解了,我们将使用CompletableFuture提供的静态方法更快速创建异步任务
	@Override
	public String getCategoryName() {  // 返回值也不需要强制返回CompletableFuture。
		try {
			Thread.sleep(2000); // 休眠2秒
		} catch (InterruptedException e) {
			throw new RuntimeException(e);
		}
		String s = "获取到了商品分类信息";
		System.out.println(s);
		return s;
	}
}


@Service
public class ProductServiceImpl implements ProductService {

	// @Async(value = "taskExecutor")  不再需要这个注解了,我们将使用CompletableFuture提供的静态方法更快速创建异步任务
	@Override
	public String getProductInfo() {  // 返回值也不需要强制返回CompletableFuture。
		try {
			Thread.sleep(1000); // 休眠1秒
		} catch (InterruptedException e) {
			throw new RuntimeException(e);
		}
		String s = "获取到了商品基本信息";
		System.out.println("获取到了商品基本信息");
		return s;
	}

	// @Async(value = "taskExecutor")  不再需要这个注解了,我们将使用CompletableFuture提供的静态方法更快速创建异步任务
	@Override
	public String getProductDetails() {  // 返回值也不需要强制返回CompletableFuture。
		try {
			Thread.sleep(5000); // 休眠5秒
		} catch (InterruptedException e) {
			throw new RuntimeException(e);
		}
		String s = "获取到了商品详细信息";
		System.out.println("获取到了商品详细信息");
		return s;
	}
}
- 编写我们的controller,异步调用方法
	@Autowired
	private CategoryService categoryService;
	@Autowired
	private ProductService productService;
	@Autowired
	private ThreadPoolTaskExecutor taskExecutor;

	@ApiOperation(value = "异步调用线程3")
	@GetMapping("/test/3")
	public Result testThree() {
		Date begin = new Date();

		String s = "获取到了用户信息";
		System.out.println(s);
		try {
			Thread.sleep(1000); // 休眠1秒
		} catch (InterruptedException e) {
			throw new RuntimeException(e);
		}

		CompletableFuture<String> categoryName = CompletableFuture.supplyAsync(() -> { // 获取商品分类信息  需要2秒
			String name = categoryService.getCategoryName();
			return name;
		}, taskExecutor);

		CompletableFuture<String> productInfo = CompletableFuture.supplyAsync(() -> { // 获取商品基本信息   需要1秒
			String info = productService.getProductInfo();
			return info;
		}, taskExecutor);

		CompletableFuture<String> productDetails = CompletableFuture.supplyAsync(() -> { // 获取商品详细信息    需要5秒
			String details = productService.getProductDetails();
			return details;
		}, taskExecutor);

		Date date = new Date();
		System.out.println("此时耗时:" + (date.getTime() - begin.getTime()) + "毫秒");

		// CompletableFuture的join()方法: 阻塞当前线程,等待 CompletableFuture 完成,然后获取结果(如果异常,抛出未包装的运行时异常)
		String result = s + categoryName.join() + productInfo.join() + productDetails.join(); // 合并结果

		Date end = new Date();
		System.out.println("最终耗时:" + (end.getTime() - begin.getTime()) + "毫秒");
		return Result.ok(result);
	}
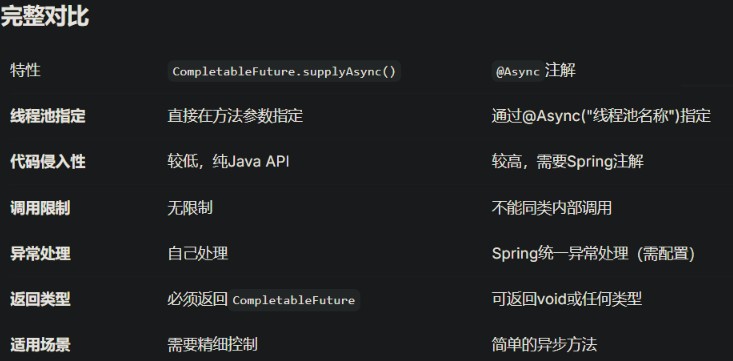
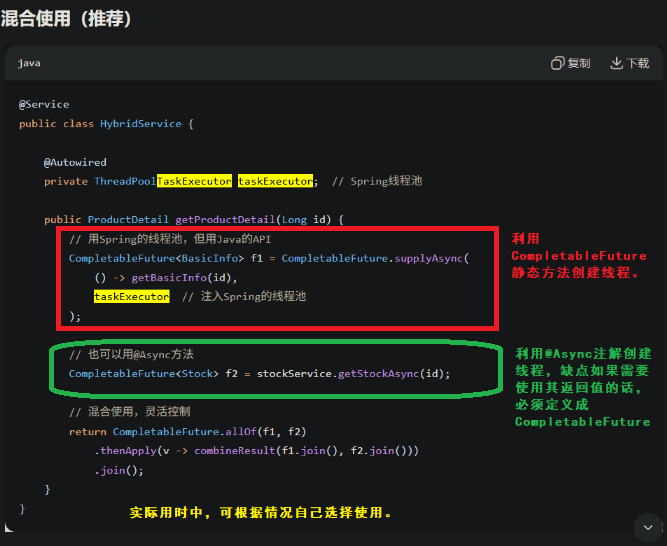
8. Sprintgboot整合线程池后,注解方式与CompletableFuture静态方式创建异步任务对比

 浙公网安备 33010602011771号