
Python基础(三)模块
模块,用一段代码实现了某个功能的代码集合。
类似于函数式编程和面向过程编程,函数式编程则完成一个功能,其他代码用来调用即可,提供了代码的重用性和代码间的耦合。而对于一个复杂的功能来,可能需要多个函数才能完成(函数又可以在不同的.py文件中),n个 .py 文件组成的代码集合就称为模块。
如:os 是系统相关的模块;file是文件操作相关的模块
模块分为三种:
- 自定义模块
- 内置模块
- 开源模块
自定义模块
1、定义模块
情景一:

情景二:

情景三:

2、导入模块
Python之所以应用越来越广泛,在一定程度上也依赖于其为程序员提供了大量的模块以供使用,如果想要使用模块,则需要导入。导入模块有一下几种方法:
|
1
2
3
4
|
import modulefrom module.xx.xx import xxfrom module.xx.xx import xx as rename from module.xx.xx import * |
导入模块其实就是告诉Python解释器去解释那个py文件
- 导入一个py文件,解释器解释该py文件
- 导入一个包,解释器解释该包下的 __init__.py 文件
那么问题来了,导入模块时是根据那个路径作为基准来进行的呢?即:sys.path
|
1
2
3
4
5
|
import sysprint (sys.path) ['/Users/chenyong/PycharmProjects/untitled/lianxi', '/Users/chenyong/PycharmProjects/untitled', '/Users/chenyong/PycharmProjects/chout', '/Users/chenyong/PycharmProjects/mysitee', '/Users/chenyong/PycharmProjects/user_manager', '/Library/Frameworks/Python.framework/Versions/3.7/lib/python37.zip', '/Library/Frameworks/Python.framework/Versions/3.7/lib/python3.7', '/Library/Frameworks/Python.framework/Versions/3.7/lib/python3.7/lib-dynload', '/Library/Frameworks/Python.framework/Versions/3.7/lib/python3.7/site-packages', '/Applications/PyCharm.app/Contents/helpers/pycharm_matplotlib_backend'] |
如果sys.path路径列表没有你想要的路径,可以通过 sys.path.append('路径') 添加。
通过os模块可以获取各种目录,例如:


mport sys
import os

pre_path = os.path.abspath('../')
sys.path.append(pre_path)
开源模块
一、下载安装
下载安装有两种方式:
yum
pip
apt-get
...

下载源码
解压源码
进入目录
编译源码    python setup.py build
安装源码    python setup.py install
注:在使用源码安装时,需要使用到gcc编译和python开发环境,所以,需要先执行:
|
1
2
3
4
|
yum install gccyum install python-devel或apt-get python-dev |
安装成功后,模块会自动安装到 sys.path 中的某个目录中,如:
|
1
|
/usr/lib/python3.7/site-packages/ |
二、导入模块
同自定义模块中导入的方式
三、模块 paramiko
paramiko是一个用于做远程控制的模块,使用该模块可以对远程服务器进行命令或文件操作,值得一说的是,fabric和ansible内部的远程管理就是使用的paramiko来现实。
1、下载安装
|
1
|
pip3 install paramiko |
或
|
1
2
3
4
5
6
7
8
9
10
11
12
13
14
15
16
17
18
19
|
# pycrypto,由于 paramiko 模块内部依赖pycrypto,所以先下载安装pycrypto# 下载安装 pycryptowget http://files.cnblogs.com/files/chenyong/pycrypto-2.6.1.tar.gztar -xvf pycrypto-2.6.1.tar.gzcd pycrypto-2.6.1python setup.py buildpython setup.py install# 进入python环境,导入Crypto检查是否安装成功# 下载安装 paramikowget http://files.cnblogs.com/files/chenyong/paramiko-1.10.1.tar.gztar -xvf paramiko-1.10.1.tar.gzcd paramiko-1.10.1python setup.py buildpython setup.py install# 进入python环境,导入paramiko检查是否安装成功 |
2、使用模块
#!/usr/bin/env python
#coding:utf-8

import paramiko

ssh = paramiko.SSHClient()
ssh.set_missing_host_key_policy(paramiko.AutoAddPolicy())
ssh.connect('192.168.1.108', 22, 'alex', '123')
stdin, stdout, stderr = ssh.exec_command('df')
print (stdout.read())
ssh.close();
import paramiko

private_key_path = '/home/auto/.ssh/id_rsa'
key = paramiko.RSAKey.from_private_key_file(private_key_path)

ssh = paramiko.SSHClient()
ssh.set_missing_host_key_policy(paramiko.AutoAddPolicy())
ssh.connect('主机名 ', 端口, '用户名', key)

stdin, stdout, stderr = ssh.exec_command('df')
print (stdout.read())
ssh.close()
import os,sys
import paramiko

t = paramiko.Transport(('182.92.219.86',22))
t.connect(username='smiled',password='123')
sftp = paramiko.SFTPClient.from_transport(t)
sftp.put('/tmp/test.py','/tmp/test.py')
t.close()


import os,sys
import paramiko

t = paramiko.Transport(('182.92.219.86',22))
t.connect(username='wupeiqi',password='123')
sftp = paramiko.SFTPClient.from_transport(t)
sftp.get('/tmp/test.py','/tmp/test2.py')
t.close()
import paramiko

pravie_key_path = '/home/auto/.ssh/id_rsa'
key = paramiko.RSAKey.from_private_key_file(pravie_key_path)

t = paramiko.Transport(('182.92.219.86',22))
t.connect(username='smiled',pkey=key)

sftp = paramiko.SFTPClient.from_transport(t)
sftp.put('/tmp/test3.py','/tmp/test3.py')

t.close()

import paramiko

pravie_key_path = '/home/auto/.ssh/id_rsa'
key = paramiko.RSAKey.from_private_key_file(pravie_key_path)

t = paramiko.Transport(('182.92.219.86',22))
t.connect(username='smiled',pkey=key)

sftp = paramiko.SFTPClient.from_transport(t)
sftp.get('/tmp/test3.py','/tmp/test4.py')

t.close()
内置模块
一、os
用于提供系统级别的操作
os.getcwd() 获取当前工作目录,即当前python脚本工作的目录路径
os.chdir("dirname")  改变当前脚本工作目录;相当于shell下cd
os.curdir  返回当前目录: ('.')
os.pardir  获取当前目录的父目录字符串名:('..')
os.makedirs('dirname1/dirname2')    可生成多层递归目录
os.removedirs('dirname1')    若目录为空,则删除,并递归到上一级目录,如若也为空,则删除,依此类推
os.mkdir('dirname')    生成单级目录;相当于shell中mkdir dirname
os.rmdir('dirname')    删除单级空目录,若目录不为空则无法删除,报错;相当于shell中rmdir dirname
os.listdir('dirname')    列出指定目录下的所有文件和子目录,包括隐藏文件,并以列表方式打印
os.remove()  删除一个文件
os.rename("oldname","newname")  重命名文件/目录
os.stat('path/filename')  获取文件/目录信息
os.sep    输出操作系统特定的路径分隔符,win下为"\\",Linux下为"/"
os.linesep    输出当前平台使用的行终止符,win下为"\t\n",Linux下为"\n"
os.pathsep    输出用于分割文件路径的字符串
os.name    输出字符串指示当前使用平台。win->'nt'; Linux->'posix'
os.system("bash command")  运行shell命令,直接显示
os.environ  获取系统环境变量
os.path.abspath(path)  返回path规范化的绝对路径
os.path.split(path)  将path分割成目录和文件名二元组返回
os.path.dirname(path)  返回path的目录。其实就是os.path.split(path)的第一个元素
os.path.basename(path)  返回path最后的文件名。如何path以/或\结尾,那么就会返回空值。即os.path.split(path)的第二个元素
os.path.exists(path)  如果path存在,返回True;如果path不存在,返回False
os.path.isabs(path)  如果path是绝对路径,返回True
os.path.isfile(path)  如果path是一个存在的文件,返回True。否则返回False
os.path.isdir(path)  如果path是一个存在的目录,则返回True。否则返回False
os.path.join(path1[, path2[, ...]])  将多个路径组合后返回,第一个绝对路径之前的参数将被忽略
os.path.getatime(path)  返回path所指向的文件或者目录的最后存取时间
os.path.getmtime(path)  返回path所指向的文件或者目录的最后修改时间
更多请点击
二、sys
用于提供对解释器相关的操作
sys.argv           命令行参数List,第一个元素是程序本身路径
sys.exit(n)        退出程序,正常退出时exit(0)
sys.version        获取Python解释程序的版本信息
sys.maxint         最大的Int值
sys.path           返回模块的搜索路径,初始化时使用PYTHONPATH环境变量的值
sys.platform       返回操作系统平台名称
sys.stdout.write('please:')
val = sys.stdin.readline()[:-1]
更多请点击
三、hashlib
用于加密相关的操作,代替了md5模块和sha模块,主要提供 SHA1, SHA224, SHA256, SHA384, SHA512 ,MD5 算法
1
2
3
4
5
6
7
8
9
10
11
12
13
14
15
16
17
18
19
20
21
22
23
24
25
26
27
28
29
30
31
32
import hashlib

# ######## md5 ########

hash = hashlib.md5()
hash.update('admin')
print hash.hexdigest()

# ######## sha1 ########

hash = hashlib.sha1()
hash.update('admin')
print hash.hexdigest()

# ######## sha256 ########

hash = hashlib.sha256()
hash.update('admin')
print hash.hexdigest()


# ######## sha384 ########

hash = hashlib.sha384()
hash.update('admin')
print hash.hexdigest()

# ######## sha512 ########

hash = hashlib.sha512()
hash.update('admin')
print hash.hexdigest()
以上加密算法虽然依然非常厉害,但时候存在缺陷,即:通过撞库可以反解。所以,有必要对加密算法中添加自定义key再来做加密。
|
1
2
3
4
5
6
7
|
import hashlib# ######## md5 ########hash = hashlib.md5('898oaFs09f')hash.update('admin')print (hash.hexdigest()) |
python 还有一个 hmac 模块,它内部对我们创建 key 和 内容 再进行处理然后再加密
|
1
2
3
4
|
import hmach = hmac.new('wueiqi')h.update('hellowo')print (h.hexdigest()) |
四、json 和 pickle
用于序列化的两个模块
- json,用于字符串 和 python数据类型间进行转换
- pickle,用于python特有的类型 和 python的数据类型间进行转换
Json模块提供了四个功能:dumps、dump、loads、load
pickle模块提供了四个功能:dumps、dump、loads、load
import pickle

data = {'k1':123,'k2':'Hello'}

p_str = pickle.dumps(data)

print(p_str)

with open('D:/result.pk','w')as ff:
    pickle.dump(data.ff)

import json

data = {'k1':123,'k2':'Hello'}

p_str = json.dumps(data)

print(p_str)

with open('D:/result.pk','w')as ff:
    json.dump(data.ff)
五、执行系统命令
可以执行shell命令的相关模块和函数有:
- os.system
- os.spawn*
以上执行shell命令的相关的模块和函数的功能均在 subprocess 模块中实现,并提供了更丰富的功能。
call
执行命令,返回状态码
|
1
2
|
ret = subprocess.call(["ls", "-l"], shell=False)ret = subprocess.call("ls -l", shell=True) |
shell = True ,允许 shell 命令是字符串形式
check_call
执行命令,如果执行状态码是 0 ,则返回0,否则抛异常
|
1
2
|
subprocess.check_call(["ls", "-l"])subprocess.check_call("exit 1", shell=True) |
check_output
执行命令,如果状态码是 0 ,则返回执行结果,否则抛异常
|
1
2
|
subprocess.check_output(["echo", "Hello World!"])subprocess.check_output("exit 1", shell=True) |
subprocess.Popen(...)
用于执行复杂的系统命令
参数:
- args:shell命令,可以是字符串或者序列类型(如:list,元组)
- bufsize:指定缓冲。0 无缓冲,1 行缓冲,其他 缓冲区大小,负值 系统缓冲
- stdin, stdout, stderr:分别表示程序的标准输入、输出、错误句柄
- preexec_fn:只在Unix平台下有效,用于指定一个可执行对象(callable object),它将在子进程运行之前被调用
- close_sfs:在windows平台下,如果close_fds被设置为True,则新创建的子进程将不会继承父进程的输入、输出、错误管道。
所以不能将close_fds设置为True同时重定向子进程的标准输入、输出与错误(stdin, stdout, stderr)。 - shell:同上
- cwd:用于设置子进程的当前目录
- env:用于指定子进程的环境变量。如果env = None,子进程的环境变量将从父进程中继承。
- universal_newlines:不同系统的换行符不同,True -> 同意使用 \n
- startupinfo与createionflags只在windows下有效
将被传递给底层的CreateProcess()函数,用于设置子进程的一些属性,如:主窗口的外观,进程的优先级等等
 执行普通命令
终端输入的命令分为两种:
- 输入即可得到输出,如:ifconfig
- 输入进行某环境,依赖再输入,如:python
View Code更多请点击
六、shutil
高级的 文件、文件夹、压缩包 处理模块
shutil.copyfileobj(fsrc, fdst[, length])
将文件内容拷贝到另一个文件中,可以部分内容
View Codeshutil.copyfile(src, dst)
拷贝文件
View Codeshutil.copymode(src, dst)
仅拷贝权限。内容、组、用户均不变
View Codeshutil.copystat(src, dst)
拷贝状态的信息,包括:mode bits, atime, mtime, flags
View Codeshutil.copy(src, dst)
拷贝文件和权限
View Codeshutil.copy2(src, dst)
拷贝文件和状态信息
View Codeshutil.ignore_patterns(*patterns)
shutil.copytree(src, dst, symlinks=False, ignore=None)
递归的去拷贝文件
例如:copytree(source, destination, ignore=ignore_patterns('*.pyc', 'tmp*'))
View Codeshutil.rmtree(path[, ignore_errors[, onerror]])
递归的去删除文件
View Codeshutil.move(src, dst)
递归的去移动文件
View Codeshutil.make_archive(base_name, format,...)
创建压缩包并返回文件路径,例如:zip、tar
- base_name: 压缩包的文件名,也可以是压缩包的路径。只是文件名时,则保存至当前目录,否则保存至指定路径,
如:www =>保存至当前路径
如:/Users/chenyong/www =>保存至/Users/chenyong/ - format: 压缩包种类,“zip”, “tar”, “bztar”,“gztar”
- root_dir: 要压缩的文件夹路径(默认当前目录)
- owner: 用户,默认当前用户
- group: 组,默认当前组
- logger: 用于记录日志,通常是logging.Logger对象
|
1
2
3
4
5
6
7
8
9
|
#将 /Users/smiled/Downloads/test 下的文件打包放置当前程序目录import shutilret = shutil.make_archive("wwwwwwwwww", 'gztar', root_dir='/Users/smiled/Downloads/test')#将 /Users/smiled/Downloads/test 下的文件打包放置 /Users/smiled/目录import shutilret = shutil.make_archive("/Users/smiled/wwwwwwwwww", 'gztar', root_dir='/Users/smiled/Downloads/test') |
View Codeshutil 对压缩包的处理是调用 ZipFile 和 TarFile 两个模块来进行的,详细:
zipfile 压缩解压 tarfile 压缩解压 ZipFile TarFile 七、ConfigParser
用于对特定的配置进行操作,当前模块的名称在 python 3.x 版本中变更为 configparser。
|
1
2
3
4
5
6
7
8
9
|
# 注释1; 注释2[section1]k1 = v1k2:v2[section2]k1 = v1 |
|
1
2
3
4
5
6
7
8
9
10
11
12
13
14
15
16
17
18
19
20
21
22
23
24
25
26
27
28
29
30
31
|
import ConfigParserconfig = ConfigParser.ConfigParser()config.read('i.cfg')# ########## 读 ###########secs = config.sections()#print secs#options = config.options('group2')#print options#item_list = config.items('group2')#print item_list#val = config.get('group1','key')#val = config.getint('group1','key')# ########## 改写 ###########sec = config.remove_section('group1')#config.write(open('i.cfg', "w"))#sec = config.has_section('wupeiqi')#sec = config.add_section('wupeiqi')#config.write(open('i.cfg', "w"))#config.set('group2','k1',11111)#config.write(open('i.cfg', "w"))#config.remove_option('group2','age')#config.write(open('i.cfg', "w")) |
八、logging
用于便捷记录日志且线程安全的模块
|
1
2
3
4
5
6
7
8
9
10
11
12
13
14
|
import logginglogging.basicConfig(filename='log.log', format='%(asctime)s - %(name)s - %(levelname)s -%(module)s: %(message)s', datefmt='%Y-%m-%d %H:%M:%S %p', level=10)logging.debug('debug')logging.info('info')logging.warning('warning')logging.error('error')logging.critical('critical')logging.log(10,'log') |
对于等级:
|
1
2
3
4
5
6
7
8
|
CRITICAL = 50FATAL = CRITICALERROR = 40WARNING = 30WARN = WARNINGINFO = 20DEBUG = 10NOTSET = 0 |
只有大于当前日志等级的操作才会被记录。
对于格式,有如下属性可是配置:
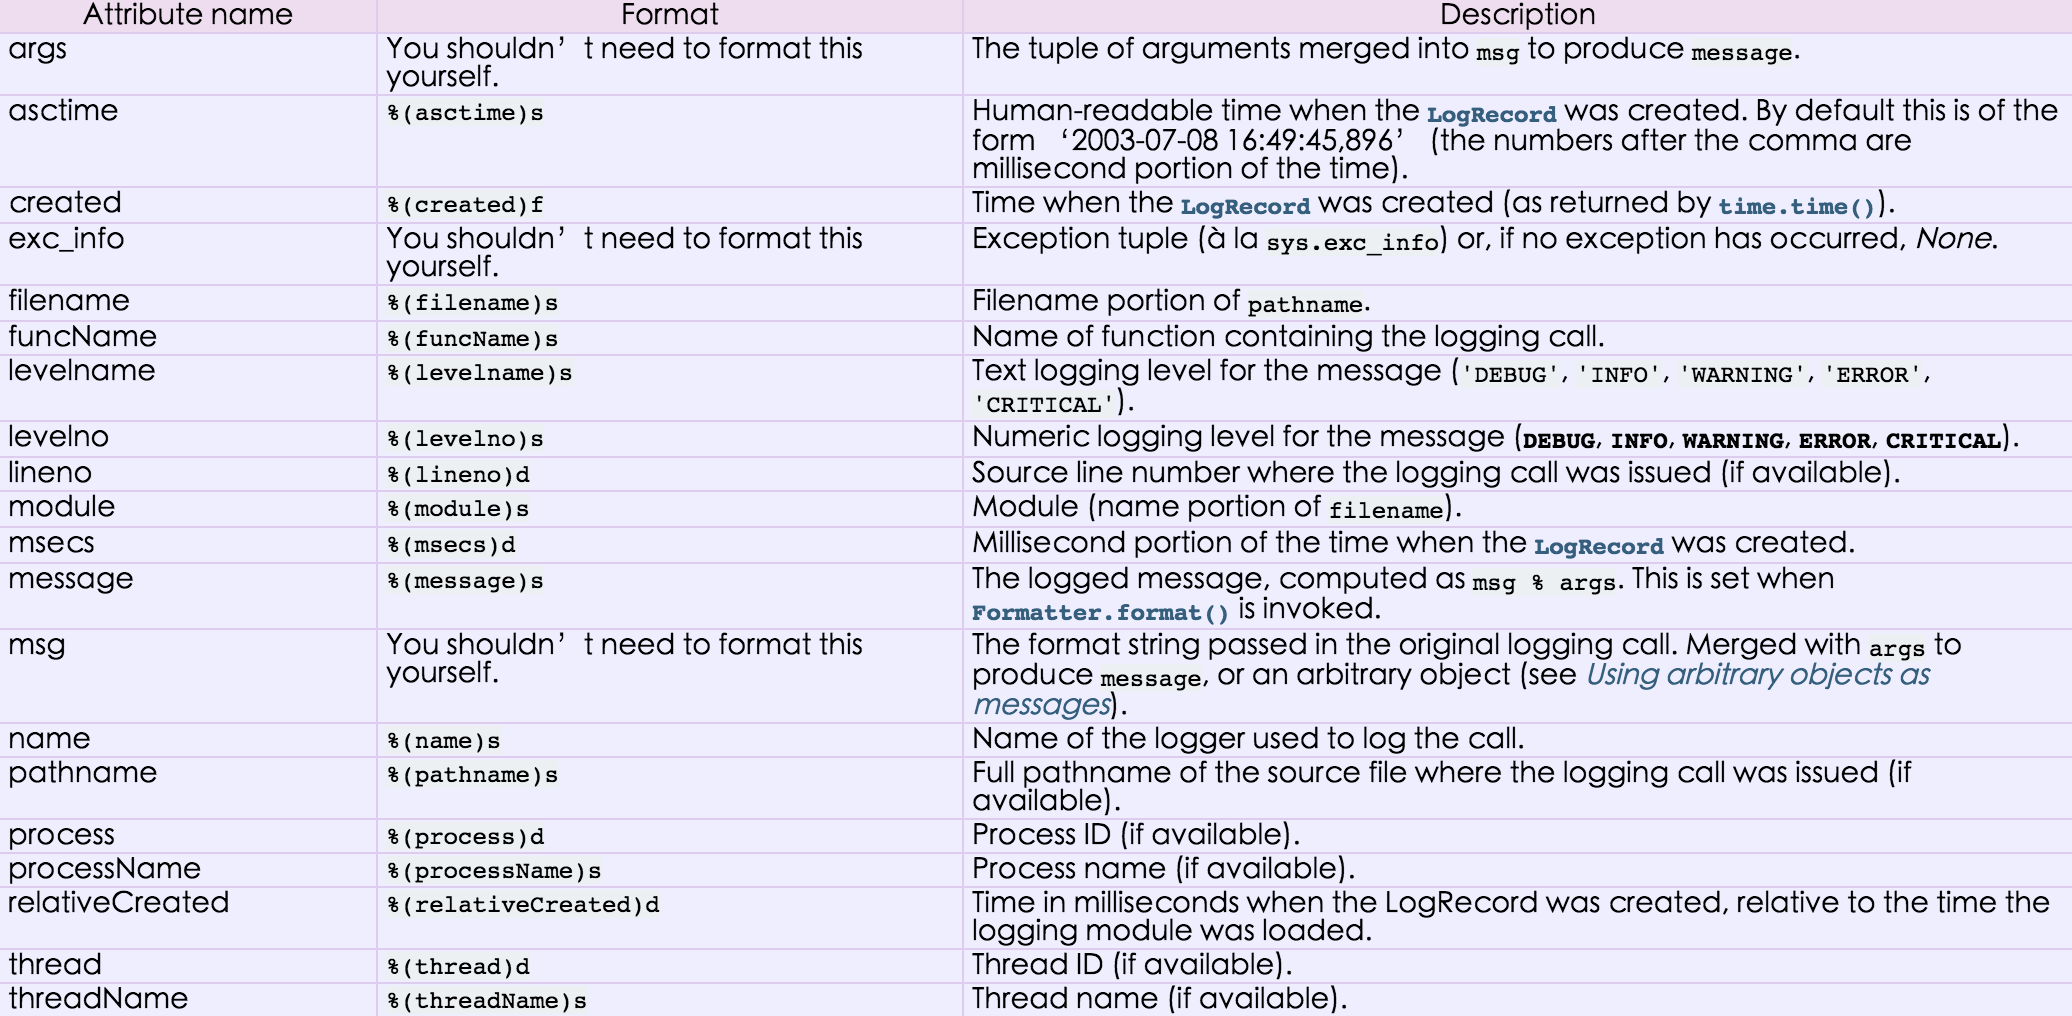
九、time
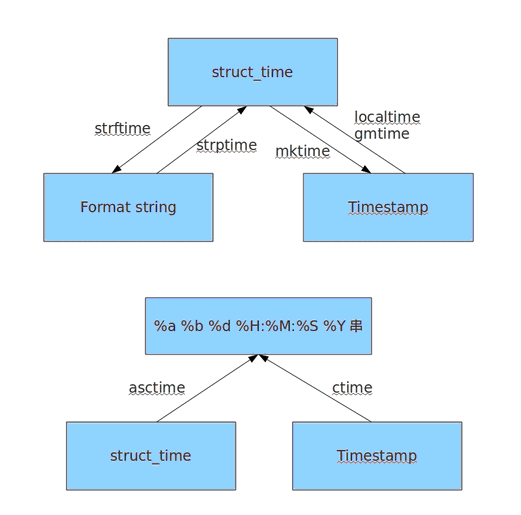
时间相关的操作,时间有三种表示方式:
- 时间戳 1970年1月1日之后的秒,即:time.time()
- 格式化的字符串 2014-11-11 11:11, 即:time.strftime('%Y-%m-%d')
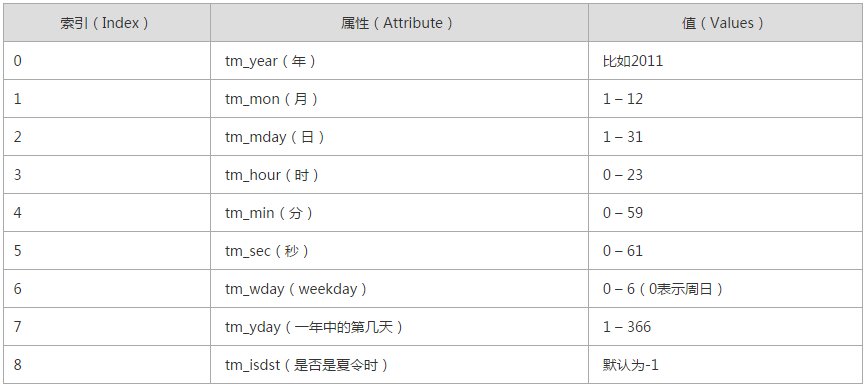
- 结构化时间 元组包含了:年、日、星期等... time.struct_time 即:time.localtime()
|
1
2
3
4
5
6
7
8
9
10
11
12
13
14
15
16
17
18
19
20
21
22
23
24
25
|
print (time.time())print (time.mktime(time.localtime())) print (time.gmtime() ) #可加时间戳参数print (time.localtime()) #可加时间戳参数print (time.strptime('2014-11-11', '%Y-%m-%d')) print (time.strftime('%Y-%m-%d')) #默认当前时间print (time.strftime('%Y-%m-%d',time.localtime())) #默认当前时间print (time.asctime())print (time.asctime(time.localtime()))print (time.ctime(time.time())) import datetime'''datetime.date:表示日期的类。常用的属性有year, month, daydatetime.time:表示时间的类。常用的属性有hour, minute, second, microseconddatetime.datetime:表示日期时间datetime.timedelta:表示时间间隔,即两个时间点之间的长度timedelta([days[, seconds[, microseconds[, milliseconds[, minutes[, hours[, weeks]]]]]]])strftime("%Y-%m-%d")'''import datetimeprint (datetime.datetime.now())print (datetime.datetime.now()) - datetime.timedelta(days=5) |
十、re
re模块用于对python的正则表达式的操作。
字符:
. 匹配除换行符以外的任意字符
\w 匹配字母或数字或下划线或汉字
\s 匹配任意的空白符
\d 匹配数字
\b 匹配单词的开始或结束
^ 匹配字符串的开始
$ 匹配字符串的结束
次数:
* 重复零次或更多次
+ 重复一次或更多次
? 重复零次或一次
{n} 重复n次
{n,} 重复n次或更多次
{n,m} 重复n到m次
IP:
^(25[0-5]|2[0-4]\d|[0-1]?\d?\d)(\.(25[0-5]|2[0-4]\d|[0-1]?\d?\d)){3}$
手机号:
^1[3|4|5|8][0-9]\d{8}$
1、match(pattern, string, flags=0)
从起始位置开始根据模型去字符串中匹配指定内容,匹配单个
- 正则表达式
- 要匹配的字符串
- 标志位,用于控制正则表达式的匹配方式
import re

obj = re.match('\d+', '123uuasf')
if obj:
    print (obj.group())
flags2、search(pattern, string, flags=0)
根据模型去字符串中匹配指定内容,匹配单个
import re

obj = re.search('\d+', 'u123uu888asf')
if obj:
    print (obj.group())
3、group和groups

a = "123abc456"
print (re.search("([0-9]*)([a-z]*)([0-9]*)", a).group())

print (re.search("([0-9]*)([a-z]*)([0-9]*)", a).group(0))
print (re.search("([0-9]*)([a-z]*)([0-9]*)", a).group(1))
print (re.search("([0-9]*)([a-z]*)([0-9]*)", a).group(2))

print (re.search("([0-9]*)([a-z]*)([0-9]*)", a).groups())
4、findall(pattern, string, flags=0)
上述两中方式均用于匹配单值,即:只能匹配字符串中的一个,如果想要匹配到字符串中所有符合条件的元素,则需要使用 findall。
import re

obj = re.findall('\d+', 'fa123uu888asf')
print (obj)
5、sub(pattern, repl, string, count=0, flags=0)
用于替换匹配的字符串
content = "123abc456"
new_content = re.sub('\d+', 'sb', content)
# new_content = re.sub('\d+', 'sb', content, 1)
print (new_content)
相比于str.replace功能更加强大
6、split(pattern, string, maxsplit=0, flags=0)
根据指定匹配进行分组
content = "'1 - 2 * ((60-30+1*(9-2*5/3+7/3*99/4*2998+10*568/14))-(-4*3)/(16-3*2) )'"
new_content = re.split('\*', content)
# new_content = re.split('\*', content, 1)
print (new_content)
content = "'1 - 2 * ((60-30+1*(9-2*5/3+7/3*99/4*2998+10*568/14))-(-4*3)/(16-3*2) )'"
new_content = re.split('[\+\-\*\/]+', content)
# new_content = re.split('\*', content, 1)
print (new_content)
inpp = '1-2*((60-30 +(-40-5)*(9-2*5/3 + 7 /3*99/4*2998 +10 * 568/14 )) - (-4*3)/ (16-3*2))'
inpp = re.sub('\s*','',inpp)
new_content = re.split('\(([\+\-\*\/]?\d+[\+\-\*\/]?\d+){1}\)', inpp, 1)
print (new_content)
相比于str.split更加强大
十一、random
随机数
|
1
2
3
4
|
mport randomprint (random.random())print (random.randint(1,2))print (random.randrange(1,10)) |
随机验证码实例:
|
1
2
3
4
5
6
7
8
9
10
|
import randomcheckcode = ''for i in range(4): current = random.randrange(0,4) if current != i: temp = chr(random.randint(65,90)) else: temp = random.randint(0,9) checkcode += str(temp)print (checkcode)
|

 浙公网安备 33010602011771号