我的Cnblog个人主页美化重构小结
首先感谢国家感谢党,也感谢Cnblog,给博主自主编辑CSS和Html代码的权利,于是自然也能添加<script>标签,加入JS代码。
先看下效果:
当然这个是一个很粗糙的改版,我比较喜欢微软雅黑字体,在火狐中国版中看上去还可以,但是在其他非雅黑字体的浏览器中看上去就不是很好了,尤其在现在号称最快的浏览器Opera10.50上字体和段落行间距上渲染得都不是很好。
注意一个小地方,背景小色块的位置和颜色是随机变化的,实现这个效果的不复杂,下面会说到。
我禁用了模板默认的CSS之后,存了个人主页的在本地用Dreamwaver边修改编测试的。
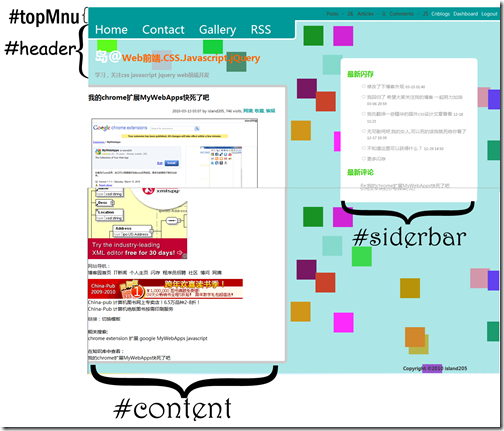
HTML的结构(还算清晰):
#footer没有标出来,还有一些外包#container和#warpper等,但是主要结构就是这几个。搞笑的是#topMnu是不是故意的?
CSS代码如下:
1: <style>
2: /*------------------整体修改-------------------------*/
3: body{
4: margin:0;
5: padding:0;
6: font-size:85%;
7: color:#333;
8: background-color:#ACE6E6;
9: }
10: a,a:link,a:visited,a:active{
11: text-decoration:none;
12: color:#000;
13: }
14: a:hover{
15: color:#999;
16: }
17: .minyx{
18: display:none;
19: }
20: #mySearchWrapper{
21: display:none;
22: }
23: #itnews{
24: display:none;!important
25: }
26: /*------------------#topMnu-----------------------*/
27: #topMnu{
28: width:100%;
29: text-align:right;
30: background-color:#009999;
31: margin:0;
32: padding:10px;
33: float:right;
34: color:#FFF;
35: border-bottom:#fff 4px solid;
36: word-spacing:0.5em;
37: }
38: #topMnu li{
39: color:#55331C;
40: }
41:
42: #topMnu a,#topMnu a:link,#topMnu a:visited,#topMnu a:active{
43: color:#FFF;
44: }
45: #menu a,#menu a:link,#menu a:visited,#menu a:active{
46: color:#FFF;
47: }
48: #topMnu a:hover,#menu a:hover{
49: color:#FF6600;
50: }
51: /*----------------#menu-and---#header-----------------*/
52:
53: #header h1 a{
54: margin-left:19px;
55: padding-bottom:20px;
56: width:550px;
57: display:block;
58: color:#FF6600;
59: }
60: #header h1 a:first-letter{
61: font-size:1.5em;
62: color:#FFF;
63: }
64: #header h1 small{
65: margin-left:20px;
66: font-size:60%;
67: color:#999;
68: }
69: #menu{
70: clear:both;
71: font-size:2.5em;
72: margin:0;
73: padding:5px;
74: padding-left:20px;
75: word-spacing:1em;
76: position:relative;
77: top:-4px;
78: background-color:#009999;
79: width:600px;
80: border-bottom:#fff 4px solid;
81: border-right:#fff 4px solid;
82: -moz-border-radius-bottomright:10px;
83: -webkit-border-bottom-right-radius:10px;
84: }
85: #menu li.current{
86: color:#00F;!import
87: }
88:
89: /*-------一起定义menu----------*/
90: #topMnu,#menu{
91: list-style:none;
92: }
93: #topMnu li,#menu li{
94: display:inline;
95: }
96: /*-----------------#content--------------------*/
97: #content{
98: background-color:#FFF;
99: width:575px;
100: float:left;
101: -moz-border-radius-topright:10px;
102: -webkit-border-top-right-radius:10px;
103: -moz-border-radius-bottomright:10px;
104: -webkit-border-bottom-right-radius:10px;
105: border: 8px #CCC solid;
106: border-left:none;
107: padding-right:20px;
108: overflow:hidden;
109: }
110: .PostTitle{
111: background-color:#ACE6E6;
112: width:95%;
113: display:block;
114: padding:10px;
115: }
116: .post small{
117: float:right;
118: margin-right:10px;
119: }
120: .post small a{
121: font-weight:bold;
122: font-size:1.3em;
123: color:#009999;
124: }
125: .post .entry{
126: clear:both;
127: padding:10px;
128: text-indent:2em;
129: border-bottom:#CCC 4px dashed;
130: }
131: .post .entry strong{
132: color:#F00;
133: }
134: .post .entry .desc_link{
135: color:#090;
136: font-weight:bold;
137: }
138: .postmetadata li a{
139: color:#F00;
140: }
141: #pager{
142: text-align:right;
143: font-weight:bold;
144: margin-bottom:20px;
145: font-size:1.5em;
146: }
147: /*------------------#sidebar--------------------*/
148: #sidebar{
149: position:relative;
150: background-color:#FFF;
151: width:30%;
152: float:right;
153: margin-right:70px;
154: padding:20px;
155: -webkit-border-radius:10px;
156: -moz-border-radius:10px;
157: top:-80px;
158: }
159: #sidebar ul{
160: list-style:none;
161: }
162: #sideMain ul li a,#sideRight ul li a,#sideLeft ul li a{
163: margin-bottom:10px;
164: display:block;
165: color:#999;!important
166: }
167: #sideMain ul li a:hover,#sideRight ul li a:hover,#sideLeft ul li a:hover{
168: color:#090;
169: text-decoration:underline;
170: }
171: #sideMain,#sideRight,#sideLeft h2{
172: color:#3C0;!important
173: }
174: /*----------#footer------------*/
175: #footer{
176: clear:both;
177: }
178: #footer a{
179: display:none;
180: }
181: .footText{
182: float:right;
183: margin-right:100px;
184: font-weight:bold;
185: color:#333;
186: }
187: </style>
关键步骤:
- 首先应藏了下没必要的两个.minyx等连接;
- font-size:85%;调节了字体大小,下一步整体定义所有a标签;
- 对顶菜单和主菜单的<li>inline显示,调节#topMnu位置,右对齐文本,将#menu的position:absolute,top:-4px在原位置上上移4个像素,和#topMnu的下边框重叠,出现连接在一起的效果;
- 左浮动#content,右浮动#sidebar,类似于#menu一样上调#sidebar的位置,调节边框和和内外边距,处理好位置关系;
- #footer clear:both,清除浮动。
- 整体布局弄好后,调节局部大小和颜色;
- 圆角效果是采用了CSS3标准的border-radius:除了IE和Opera都有不错的支持;
- 最后觉得背景有些单调,于是把寒假自己DIY的用Javascript随机显示的彩色方块加了进去,下面说一些具体的细节。
Javascript部分:
1: <script type="text/javascript">
2:
3: var width = screen.availWidth;
4: var height = screen.availHeight;
5: var count = 40;
6:
7: for (var i = 0; i < count; i++) {
8: var left = Math.round(Math.random() * width);
9: var top1 = Math.round(Math.random() * height);
10: var redColor = Math.round(Math.random() * 255);
11: var greenColor = Math.round(Math.random() * 255);
12: var blueColor = Math.round(Math.random() * 255);
13: document.write('<div style="width:60px; height:60px; position:fixed; background-color:RGB(' + redColor + ',' + greenColor + ',' + blueColor + '); top:' + top1 + 'px; left:' + left + 'px;z-index:-1000;"></div>')
14: }
15: </script>
解释下:
1: var width = screen.availWidth;
2: var height = screen.availHeight;
取屏幕的高度和宽度;
1: var left = Math.round(Math.random() * width);
2: var top1 = Math.round(Math.random() * height);
随机产生每个小彩块的位置;
3.
1: var redColor = Math.round(Math.random() * 255);
2: var greenColor = Math.round(Math.random() * 255);
3: var blueColor = Math.round(Math.random() * 255);
随机产生每个小块的RGB颜色;
4.画彩块。
有没有注意到变量是top1,而不是top,因为用top的时候在chrome会有个小bug,显示top的类型为DOMobject,我也弄不明白,请高人指点下。
这是一个很粗糙的改版,请大家提提意见,喜欢的话也可以把代码拷过去,自己改改用用。


 浙公网安备 33010602011771号