给设计师的jQuery教程.part3.End
给设计师的jQuery教程.part3.End
7.可折叠面板(Demo)
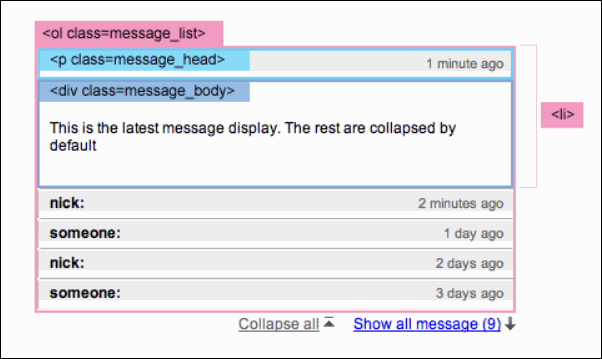
结合前面的技巧我们来实现一个可折叠的面板列(类似于gmail的邮件面板)。是否注意到我在Web Designer Wall的留言列表也运用了这种个效果?
$(document).ready(function(){

	//hide message_body after the first one
	$(".message_list .message_body:gt(0)").hide();

	//hide message li after the 5th
	$(".message_list li:gt(4)").hide();

	//toggle message_body
	$(".message_head").click(function(){
	  $(this).next(".message_body").slideToggle(500)
	  return false;
	});

	//collapse all messages
	$(".collpase_all_message").click(function(){
	  $(".message_body").slideUp(500)
	  return false;
	});

	//show all messages
	$(".show_all_message").click(function(){
	  $(this).hide()
	  $(".show_recent_only").show()
	  $(".message_list li:gt(4)").slideDown()
	  return false;
	});

	//show recent messages only
	$(".show_recent_only").click(function(){
	  $(this).hide()
	  $(".show_all_message").show()
	  $(".message_list li:gt(4)").slideUp()
	  return false;
	});

});
每部分代码的细节:
- 影藏除去第一个的所有<div class=”message_body”>
- 影藏第四个<li>后面的所有<li>
- 当<p calss=”message_head”>被点击后,滑入显示兄弟元素<div class=”message_body”>
- 绑定<a class=”collpase_all_message”>按钮click事件,滑出影藏所有的<div class=”message_body”>
- 绑定<a class=”show_all_message”>按钮click事件,影藏了自己,显示<a class=”show_recent_only”>,滑入显示所有的剩下的所有的<li>
- 绑定<a class=”show_recent_only”>按钮click事件,影藏自己,显示<a class=”show_all_message”>,并且影藏除去前5个<li>
8.模仿WordPress的留言管理后台(Demo)
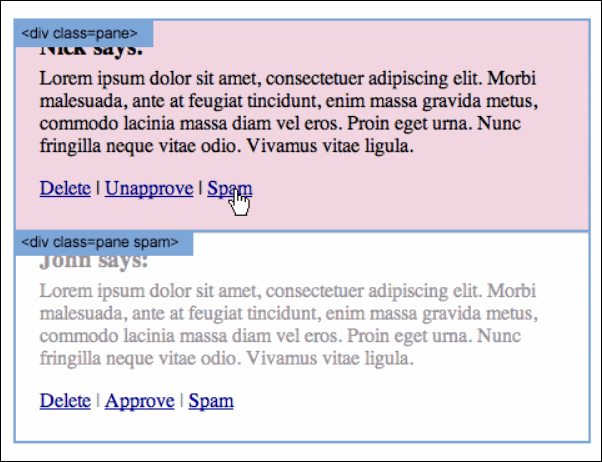
我相信你们大多数人都看到过WordPress留言管理的后台。让我们用jQuery来模仿着试试看。为了模仿它的背景颜色,你必须添加Color Anination插件。
//don't forget to include the Color Animations plugin
//<script type="text/javascript" src="jquery.color.js"></script>

$(document).ready(function(){

	$(".pane:even").addClass("alt");

	$(".pane .btn-delete").click(function(){
	  alert("This comment will be deleted!");

	  $(this).parents(".pane").animate({ backgroundColor: "#fbc7c7" }, "fast")
	  .animate({ opacity: "hide" }, "slow")
	  return false;
	});

	$(".pane .btn-unapprove").click(function(){
	  $(this).parents(".pane").animate({ backgroundColor: "#fff568" }, "fast")
	  .animate({ backgroundColor: "#ffffff" }, "slow")
	  .addClass("spam")
	  return false;
	});

	$(".pane .btn-approve").click(function(){
	  $(this).parents(".pane").animate({ backgroundColor: "#dafda5" }, "fast")
	  .animate({ backgroundColor: "#ffffff" }, "slow")
	  .removeClass("spam")
	  return false;
	});

	$(".pane .btn-spam").click(function(){
	  $(this).parents(".pane").animate({ backgroundColor: "#fbc7c7" }, "fast")
	  .animate({ opacity: "hide" }, "slow")
	  return false;
	});

});
各部分代码细节
- 为每个<div class=”pane”>添加”alt”CSS类(使得其他的div背景为灰色)
- 绑定click事件到<a class=”btn_delete”>,弹出警告消息,然后定义颜色变化和淡出效果
- 绑定click事件到<a class=”btn_unapprove”>,先变换背景颜色到黄色,再到白,然后添加“spam” CSS类
- 绑定click事件到<a class=”btn_approve”>,变换背景颜色到绿色,然后白色,然后去掉”span”类
- 类似同上
9.图片展览馆(Demo)
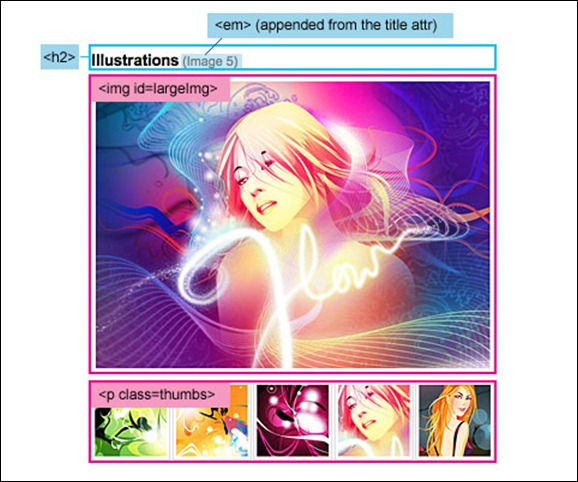
你想无刷新的展览一些你的图片作品集?可以的,往元素中加载图片就可以了。
$(document).ready(function(){

	$("h2").append('<em></em>')

	$(".thumbs a").click(function(){

	  var largePath = $(this).attr("href");
	  var largeAlt = $(this).attr("title");

	  $("#largeImg").attr({ src: largePath, alt: largeAlt });

	  $("h2 em").html(" (" + largeAlt + ")"); return false;
	});

});
过程
- 在<h2>后面添加兄弟元素<em>
- 当一个链接.thumbs a被点击 把被点击的<a>标签的href键值存储到”IargePath”变量中,把它的title键值存储到”IargeAlt”变量中。
- 用”largePath”替换<img id=”IargeImg”>的src键值,”LargeAlt”为alt的键值。
- “LargeAlt”外加括号添加给<em>
10.样式化不同的类型的链接(Demo)
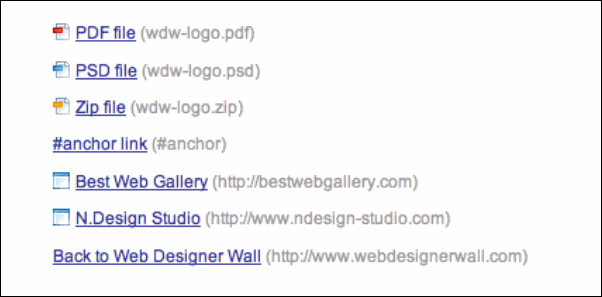
绝大多数的浏览器,样式化链接选择器很简单,比如说:样式化一个.pdf链接,你只需简单如此写CSS选择器:a[href $=’.pdf’]{……}。不幸的是,IE6不支持这种选择器(这也是我们讨厌IE的又一个原因!)。但是可以运用jQuery修补这个问题。
$(document).ready(function(){

	$("a[@href$=pdf]").addClass("pdf");

	$("a[@href$=zip]").addClass("zip");

	$("a[@href$=psd]").addClass("psd");

	$("a:not([@href*=http://www.webdesignerwall.com])").not("[href^=#]")
	  .addClass("external")
	  .attr({ target: "_blank" });

});
前三行很简单,就是根据a的href的不同为其添加不同的CSS class。
接下来为所有href中有”http://www.webdesignerwall.com“字符串并且不以”#”开头的<a>添加class “esternal”并且设置target=”_blank”。


 浙公网安备 33010602011771号