
UIView Class Reference - Instance Methods
layoutSubviews
Lays out subviews.
Discussion
The default implementation of this method does nothing on iOS 5.1 and earlier. Otherwise, the default implementation uses any constraints you have set to determine the size and position of any subviews.
Subclasses can override this method as needed to perform more precise layout of their subviews. You should override this method only if the autoresizing and constraint-based behaviors of the subviews do not offer the behavior you want. You can use your implementation to set the frame rectangles of your subviews directly.
You should not call this method directly. If you want to force a layout update, call the setNeedsLayout method instead to do so prior to the next drawing update. If you want to update the layout of your views immediately, call the layoutIfNeeded method.
Availability
- Available in iOS 2.0 and later.
setNeedsLayout
Invalidates the current layout of the receiver and triggers a layout update during the next update cycle.
Discussion
Call this method on your application’s main thread when you want to adjust the layout of a view’s subviews. This method makes a note of the request and returns immediately. Because this method does not force an immediate update, but instead waits for the next update cycle, you can use it to invalidate the layout of multiple views before any of those views are updated. This behavior allows you to consolidate(合并) all of your layout updates to one update cycle, which is usually better for performance.
Availability
- Available in iOS 2.0 and later.
layoutIfNeeded
Lays out the subviews immediately.
Discussion
Use this method to force the layout of subviews before drawing. Starting with the receiver, this method traverses upward(向上遍历) through the view hierarchy as long as(只要) superviews require layout. Then it lays out the entire tree beneath(在下方) that ancestor(祖先). Therefore, calling this method can potentially(可能) force the layout of your entire view hierarchy. The UIView implementation of this calls the equivalent CALayer method and so has the same behavior as CALayer.
Availability
- Available in iOS 2.0 and later.
 1 - (id)initWithStyle:(UITableViewCellStyle)style reuseIdentifier:(NSString *)reuseIdentifier
 2 {
 3     if (self = [super initWithStyle:style reuseIdentifier:reuseIdentifier])
 4     {
 5         self.accessoryType = UITableViewCellAccessoryDetailDisclosureButton;
 6
 7         // cell's title label
 8         self.textLabel.backgroundColor = self.backgroundColor;
 9         self.textLabel.opaque = NO;
10         self.textLabel.textColor = [UIColor blackColor];
11         self.textLabel.highlightedTextColor = [UIColor whiteColor];
12         self.textLabel.font = [UIFont boldSystemFontOfSize:18.0];
13
14         // cell's check button
15         checkButton = [[UIButton buttonWithType:UIButtonTypeCustom] retain];
16         checkButton.frame = CGRectZero;
17         checkButton.contentVerticalAlignment = UIControlContentVerticalAlignmentCenter;
18         checkButton.contentHorizontalAlignment = UIControlContentHorizontalAlignmentCenter;
19         [checkButton addTarget:self action:@selector(checkAction:) forControlEvents:UIControlEventTouchDown];
20         checkButton.backgroundColor = self.backgroundColor;
21         [self.contentView addSubview:checkButton];
22     }
23     return self;
24 }
25
26 - (void)layoutSubviews
27 {
28     [super layoutSubviews];
29
30     CGRect contentRect = [self.contentView bounds];
31
32     CGRect frame = CGRectMake(contentRect.origin.x + 40.0, 8.0, contentRect.size.width, 30.0);
33     self.textLabel.frame = frame;
34
35     // layout the check button image
36     UIImage *checkedImage = [UIImage imageNamed:@"checked.png"];
37     frame = CGRectMake(contentRect.origin.x + 10.0, 12.0, checkedImage.size.width, checkedImage.size.height);
38     checkButton.frame = frame;
39
40     UIImage *image = (self.checked) ? checkedImage: [UIImage imageNamed:@"unchecked.png"];
41     UIImage *newImage = [image stretchableImageWithLeftCapWidth:12.0 topCapHeight:0.0];
42     [checkButton setBackgroundImage:newImage forState:UIControlStateNormal];
43 }
setNeedsDisplay
Marks the receiver’s entire bounds rectangle as needing to be redrawn.
Discussion
You can use this method or the setNeedsDisplayInRect: to notify the system that your view’s contents need to be redrawn. This method makes a note of the request and returns immediately. The view is not actually redrawn until the next drawing cycle, at which point all invalidated views are updated.
Note: If your view is backed by a CAEAGLLayer object, this method has no effect. It is intended for use only with views that use native drawing technologies (such as UIKit and Core Graphics) to render their content.
You should use this method to request that a view be redrawn only when the content or appearance of the view change. If you simply change the geometry of the view, the view is typically not redrawn. Instead, its existing content is adjusted based on the value in the view’s contentMode property. Redisplaying the existing content improves performance by avoiding the need to redraw content that has not changed.
Availability
- Available in iOS 2.0 and later.
See Also
1 - (void)init
2 {
3     needleLayer = [CALayer layer];
4     needleLayer.bounds = self.bounds;
5     needleLayer.position = CGPointMake(self.bounds.size.width / 2.0, self.bounds.size.height / 2.0);
6     needleLayer.needsDisplayOnBoundsChange = YES;
7     [self.layer addSublayer:needleLayer];
8     [needleLayer setNeedsDisplay];
9 }
drawRect:
Draws the receiver’s image within the passed-in rectangle.
Parameters
- rect
-
The portion of the view’s bounds that needs to be updated. The first time your view is drawn, this rectangle is typically the entire visible bounds of your view. However, during subsequent drawing operations, the rectangle may specify only part of your view.
Discussion
The default implementation of this method does nothing. Subclasses that use native drawing technologies (such as Core Graphics and UIKit) to draw their view’s content should override this method and implement their drawing code there. You do not need to override this method if your view sets its content in other ways. For example, you do not need to override this method if your view just displays a background color or if your view sets its content directly using the underlying layer object. Similarly, you should not override this method if your view uses OpenGL ES to do its drawing.
By the time this method is called, UIKit has configured the drawing environment appropriately for your view and you can simply call whatever drawing methods and functions you need to render your content. Specifically, UIKit creates and configures a graphics context for drawing and adjusts the transform of that context so that its origin matches the origin of your view’s bounds rectangle. You can get a reference to the graphics context using the UIGraphicsGetCurrentContext function, but do not retain the graphics context because it can change between calls to the drawRect: method.
You should limit any drawing to the rectangle specified in the rect parameter. In addition, if the opaque property of your view is set to YES, your drawRect: method must totally fill the specified rectangle with opaque content.
If you subclass UIView directly, your implementation of this method does not need to call super. However, if you are subclassing a different view class, you should call super at some point in your implementation.
This method is called when a view is first displayed or when an event occurs that invalidates a visible part of the view. You should never call this method directly yourself. To invalidate part of your view, and thus cause that portion to be redrawn, call the setNeedsDisplay or setNeedsDisplayInRect: method instead.
Availability
- Available in iOS 2.0 and later.
The UIKit Graphics System
In iOS, all drawing to the screen—regardless of whether it involves OpenGL, Quartz, UIKit, or Core Animation—occurs within the confines of an instance of the UIView class or a subclass thereof. Views define the portion of the screen in which drawing occurs. If you use system-provided views, this drawing is handled for you automatically. If you define custom views, however, you must provide the drawing code yourself. If you use Quartz, Core Animation, and UIKit to draw, you use the drawing concepts described in the following sections.
In addition to drawing directly to the screen, UIKit also allows you to draw into offscreen bitmap and PDF graphics contexts. When you draw in an offscreen context, you are not drawing in a view, which means that concepts such as the view drawing cycle do not apply (unless you then obtain that image and draw it in an image view or similar).
The View Drawing Cycle
The basic drawing model for subclasses of the UIView class involves updating content on demand. The UIView class makes the update process easier and more efficient; however, by gathering the update requests you make and delivering them to your drawing code at the most appropriate time.
When a view is first shown or when a portion of the view needs to be redrawn, iOS asks the view to draw its content by calling the view’s drawRect: method.
There are several actions that can trigger a view update:
-
Moving or removing another view that was partially obscuring your view
-
Making a previously hidden view visible again by setting its
hiddenproperty toNO -
Scrolling a view off of the screen and then back onto the screen
-
Explicitly calling the
setNeedsDisplayorsetNeedsDisplayInRect:method of your view
System views are redrawn automatically. For custom views, you must override the drawRect: method and perform all your drawing inside it. Inside your drawRect: method, use the native drawing technologies to draw shapes, text, images, gradients, or any other visual content you want. The first time your view becomes visible, iOS passes a rectangle to the view’s drawRect: method that contains your view’s entire visible area. During subsequent calls, the rectangle includes only the portion of the view that actually needs to be redrawn. For maximum performance, you should redraw only affected content.
After calling your drawRect: method, the view marks itself as updated and waits for new actions to arrive and trigger another update cycle. If your view displays static content, then all you need to do is respond to changes in your view’s visibility caused by scrolling and the presence of other views.
If you want to change the contents of the view, however, you must tell your view to redraw its contents. To do this, call the setNeedsDisplay or setNeedsDisplayInRect: method to trigger an update. For example, if you were updating content several times a second, you might want to set up a timer to update your view. You might also update your view in response to user interactions or the creation of new content in your view.
Important: Do not call your view’s drawRect: method yourself. That method should be called only by code built into iOS during a screen repaint. At other times, no graphics context exists, so drawing is not possible. (Graphics contexts are explained in the next section.)
Coordinate Systems and Drawing in iOS
When an app draws something in iOS, it has to locate the drawn content in a two-dimensional space defined by a coordinate system. This notion might seem straightforward at first glance, but it isn’t. Apps in iOS sometimes have to deal with different coordinate systems when drawing.
In iOS, all drawing occurs in a graphics context. Conceptually, a graphics context is an object that describes where and how drawing should occur, including basic drawing attributes such as the colors to use when drawing, the clipping area, line width and style information, font information, compositing options, and so on.
In addition, as shown in Figure 1-1, each graphics context has a coordinate system. More precisely, each graphics context has three coordinate systems:
-
The drawing (user) coordinate system. This coordinate system is used when you issue drawing commands.
-
The view coordinate system (base space). This coordinate system is a fixed coordinate system relative to the view.
-
The (physical) device coordinate system. This coordinate system represents pixels on the physical screen.
Figure 1-1 The relationship between drawing coordinates, view coordinates, and hardware coordinates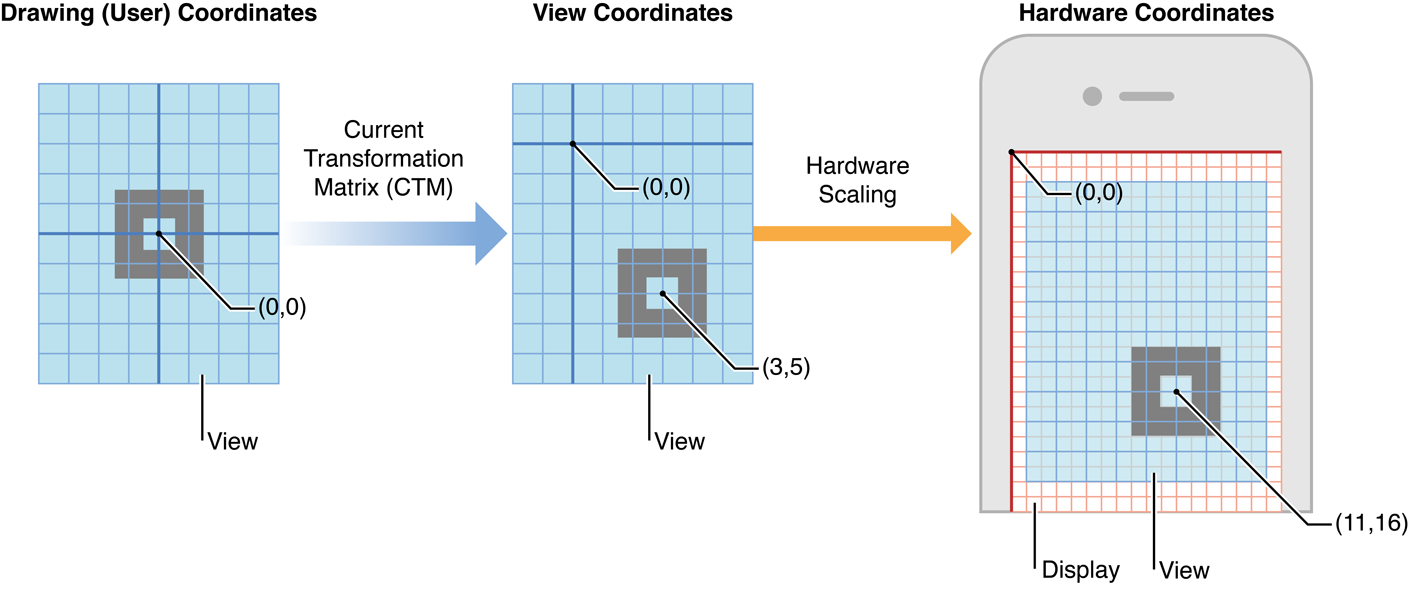
The drawing frameworks of iOS create graphics contexts for drawing to specific destinations—the screen, bitmaps, PDF content, and so on—and these graphics contexts establish the initial drawing coordinate system for that destination. This initial drawing coordinate system is known as the default coordinate system, and is a 1:1 mapping onto the view’s underlying coordinate system.
Each view also has a current transformation matrix (CTM), a mathematical matrix that maps the points in the current drawing coordinate system to the (fixed) view coordinate system. The app can modify this matrix (as described later) to change the behavior of future drawing operations.
Each of the drawing frameworks of iOS establishes a default coordinate system based on the current graphics context. In iOS, there are two main types of coordinate systems:
-
An upper-left-origin coordinate system (ULO), in which the origin of drawing operations is at the upper-left corner of the drawing area, with positive values extending downward and to the right. The default coordinate system used by the UIKit and Core Animation frameworks is ULO-based.
-
A lower-left-origin coordinate system (LLO), in which the origin of drawing operations is at the lower-left corner of the drawing area, with positive values extending upward and to the right. The default coordinate system used by Core Graphics framework is LLO-based.
These coordinate systems are shown in Figure 1-2.
Figure 1-2 Default coordinate systems in iOS
Note: The default coordinate system in OS X is LLO-based. Although the drawing functions and methods of the Core Graphics and AppKit frameworks are perfectly suited to this default coordinate system, AppKit provides programmatic support for flipping the drawing coordinate system to have an upper-left origin.
Before calling your view’s drawRect: method, UIKit establishes the default coordinate system for drawing to the screen by making a graphics context available for drawing operations. Within a view’s drawRect: method, an app can set graphics-state parameters (such as fill color) and draw to the current graphics context without needing to refer to the graphics context explicitly. This implicit graphics context establishes a ULO default coordinate system.
Points Versus Pixels
In iOS there is a distinction between the coordinates you specify in your drawing code and the pixels of the underlying device. When using native drawing technologies such as Quartz, UIKit, and Core Animation, the drawing coordinate space and the view’s coordinate space are both logical coordinate spaces, with distances measured in points. These logical coordinate systems are decoupled from the device coordinate space used by the system frameworks to manage the pixels onscreen.
The system automatically maps points in the view’s coordinate space to pixels in the device coordinate space, but this mapping is not always one-to-one. This behavior leads to an important fact that you should always remember:
-
One point does not necessarily correspond to one physical pixel.
The purpose of using points (and the logical coordinate system) is to provide a consistent size of output that is device independent. For most purposes, the actual size of a point is irrelevant. The goal of points is to provide a relatively consistent scale that you can use in your code to specify the size and position of views and rendered content. How points are actually mapped to pixels is a detail that is handled by the system frameworks. For example, on a device with a high-resolution screen, a line that is one point wide may actually result in a line that is two physical pixels wide. The result is that if you draw the same content on two similar devices, with only one of them having a high-resolution screen, the content appears to be about the same size on both devices.
In iOS, the UIScreen, UIView, UIImage, and CALayer classes provide properties to obtain (and, in some cases, set) a scale factor that describes the relationship between points and pixels for that particular object. For example, every UIKit view has acontentScaleFactor property. On a standard-resolution screen, the scale factor is typically 1.0. On a high-resolution screen, the scale factor is typically 2.0. In the future, other scale factors may also be possible. (In iOS prior to version 4, you should assume a scale factor of 1.0.)
Native drawing technologies, such as Core Graphics, take the current scale factor into account for you. For example, if one of your views implements a drawRect: method, UIKit automatically sets the scale factor for that view to the screen’s scale factor. In addition, UIKit automatically modifies the current transformation matrix of any graphics contexts used during drawing to take into account the view’s scale factor. Thus, any content you draw in your drawRect: method is scaled appropriately for the underlying device’s screen.
Because of this automatic mapping, when writing drawing code, pixels usually don’t matter. However, there are times when you might need to change your app’s drawing behavior depending on how points are mapped to pixels—to download higher-resolution images on devices with high-resolution screens or to avoid scaling artifacts when drawing on a low-resolution screen, for example.
In iOS, when you draw things onscreen, the graphics subsystem uses a technique called antialiasing to approximate a higher-resolution image on a lower-resolution screen. The best way to explain this technique is by example. When you draw a black vertical line on a solid white background, if that line falls exactly on a pixel, it appears as a series of black pixels in a field of white. If it appears exactly between two pixels, however, it appears as two grey pixels side-by-side, as shown in Figure 1-3.
Figure 1-3 A one-point line centered at a whole-numbered point value![]()
Positions defined by whole-numbered points fall at the midpoint between pixels. For example, if you draw a one-pixel-wide vertical line from (1.0, 1.0) to (10.0, 10.0), you get a fuzzy grey line. If you draw a two-pixel-wide line, you get a solid black line because it fully covers two pixels (one on either side of the specified point). As a rule, lines that are an odd number of physical pixels wide appear softer than lines with widths measured in even numbers of physical pixels unless you adjust their position to make them cover pixels fully.
Where the scale factor comes into play is when determining how many pixels are covered by a one-point-wide line.
On a low-resolution display (with a scale factor of 1.0), a one-point-wide line is one pixel wide. To avoid antialiasing when you draw a one-point-wide horizontal or vertical line, if the line is an odd number of pixels in width, you must offset the position by 0.5 points to either side of a whole-numbered position. If the line is an even number of points in width, to avoid a fuzzy line, you must not do so.
Figure 1-4 Appearance of one-point-wide lines on standard and retina displays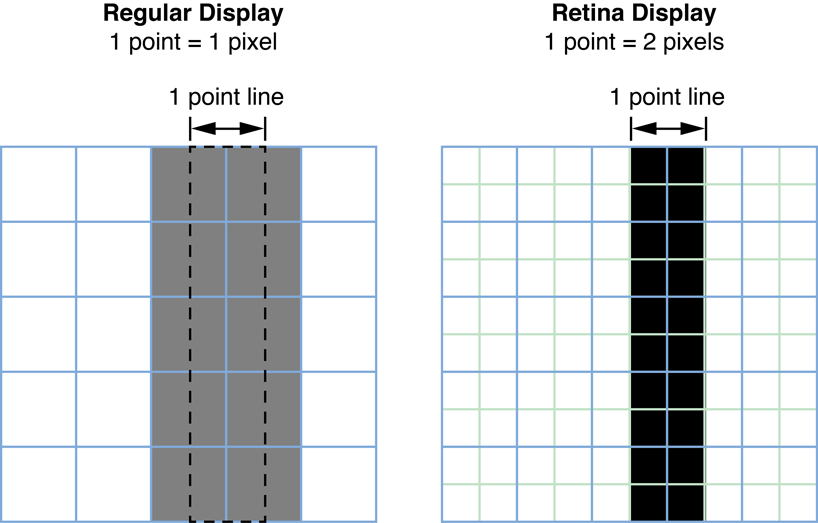
On a high-resolution display (with a scale factor of 2.0), a line that is one point wide is not antialiased at all because it occupies two full pixels (from -0.5 to +0.5). To draw a line that covers only a single physical pixel, you would need to make it 0.5 points in thickness and offset its position by 0.25 points. A comparison between the two types of screens is shown in Figure 1-4.
Of course, changing drawing characteristics based on scale factor may have unexpected consequences. A 1-pixel-wide line might look nice on some devices but on a high-resolution device might be so thin that it is difficult to see clearly. It is up to you to determine whether to make such a change.
南来地,北往的,上班的,下岗的,走过路过不要错过!
======================个性签名=====================
之前认为Apple 的iOS 设计的要比 Android 稳定,我错了吗?
下载的许多客户端程序/游戏程序,经常会Crash,是程序写的不好(内存泄漏?刚启动也会吗?)还是iOS本身的不稳定!!!
如果在Android手机中可以简单联接到ddms,就可以查看系统log,很容易看到程序为什么出错,在iPhone中如何得知呢?试试Organizer吧,分析一下Device logs,也许有用.


 浙公网安备 33010602011771号