Bus消息总线
学习地址:https://www.bilibili.com/video/BV18E411x7eT?p=78
源码分享:https://github.com/mobiwusihuan288/SpringCloud2020
SpringCloud Bus 消息总线
分布式自动刷新配置功能
Spring Cloud Bus配合Spring Cloud Config使用可以实现配置的动态刷新
SpringCloud Bus 是用来将分布式系统的节点与轻量级消息系统链接起来的框架,它整合了Java的事件处理机制和消息中间件的功能。目前支持两种消息代理:RabbitMQ和Kafka
作用
SpringCloud Bus能管理和传播分布式系统间的消息,就像一个分布式执行器,可用于广播状态更改、事件推送等,也可以当作微服务之间的通信信道
什么是总线
在微服务架构的系统中,通常会使用轻量级的消息代理来构建一个共用的消息主题, 并让系统中所有微服务实例都连接上来。由于该注题中产生的消息会被所有实例监听和消费,所以称它为消息总线。在总线上的各个实例,都可以方便地广播一些要让其他连接在该主题上的实例都知道的消息。
基本原理
ConfigClient实例都监听MQ中同一个topic(默认是springCloudBus)。 当-个服务刷新数据的时候,它会把这个信息放入到Topic中,这样其它监听同一Topic的服务就能得到通知,然后去更新自身的配置。
RabbitMQ安装
安装Erlang,下载地址:http://erlang.org/download/
安装RabbitMQ,下载地址:https://dl.bintray.com/rabbitmq/all/rabbitmq-server/
注意:
电脑名字不能有中文、若有安装前先修改、重启;
先安装Erlang、再安装RabbitMQ;
根据https://www.rabbitmq.com/which-erlang.html安装对应版本
演示:Erlang为otp_win64_23.1.1 RabbitMQ为rabbitmq-server-3.8.9
-
下载安装
-
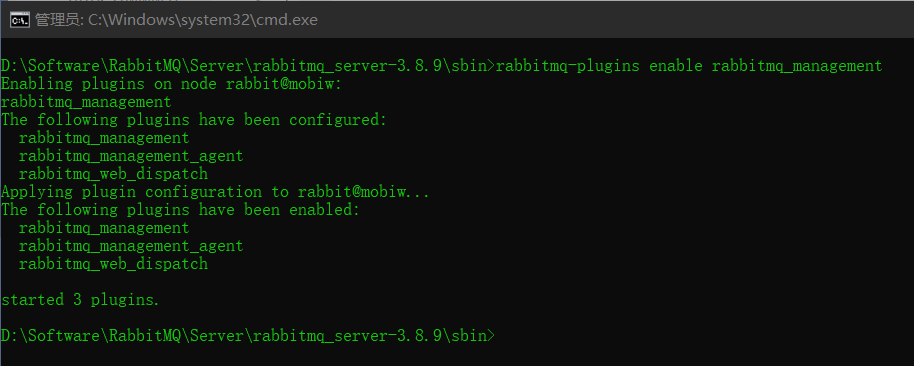
安装可视化插件
# 进入RabbitMQ安装目录下的sbin目录
rabbitmq-plugins enable rabbitmq_management
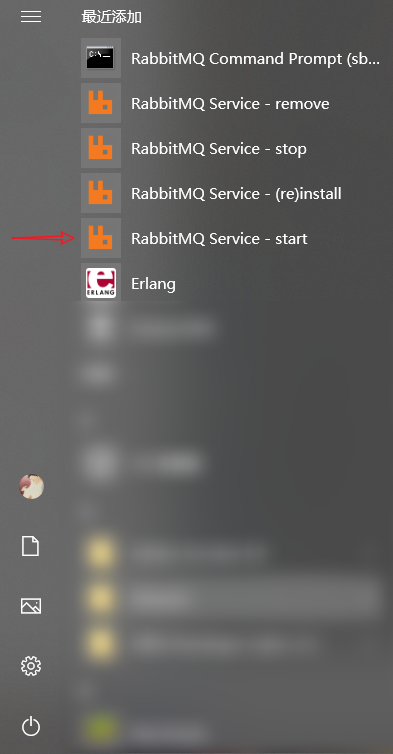
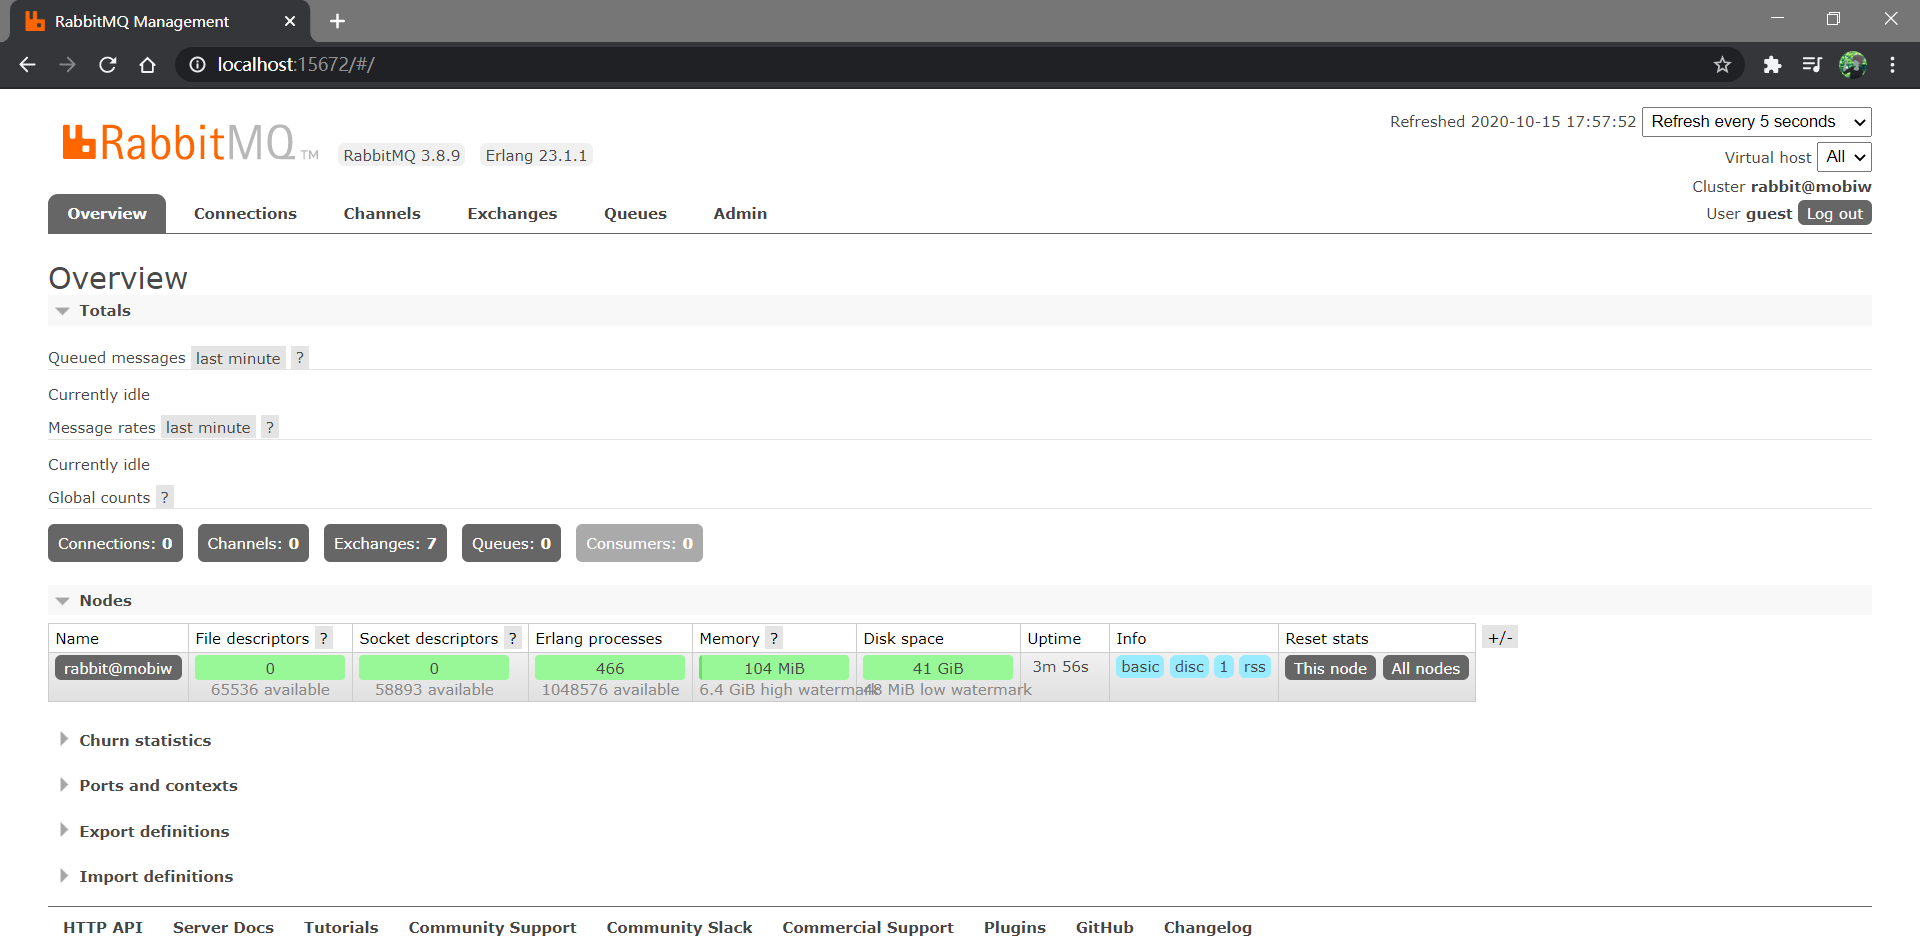
启动

访问
账号/密码:guest
SpringCloud Bus动态刷新全局广播
前提:必须先具备良好的RabbitMQ环境先
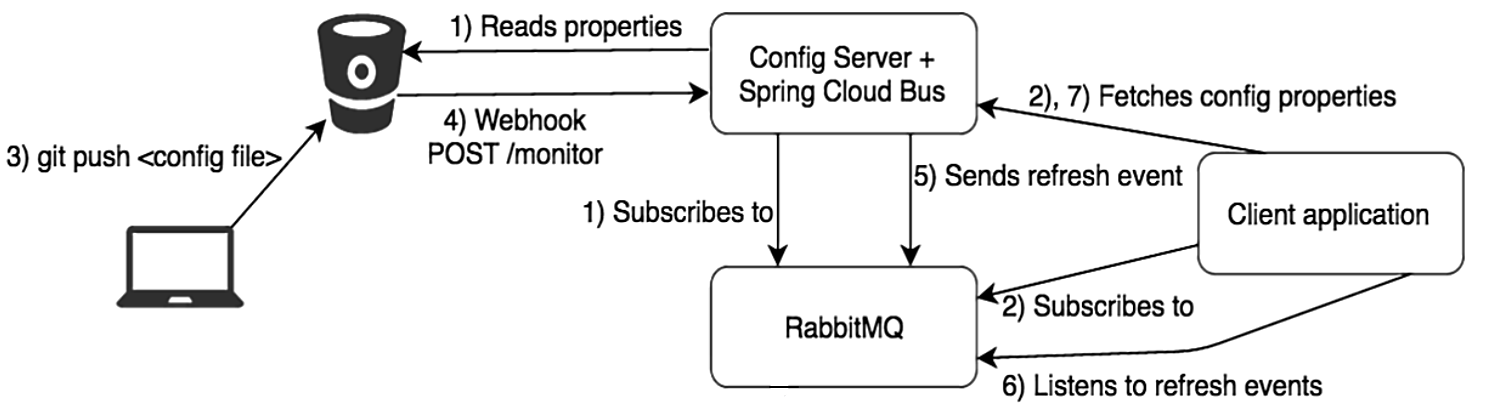
设计思想
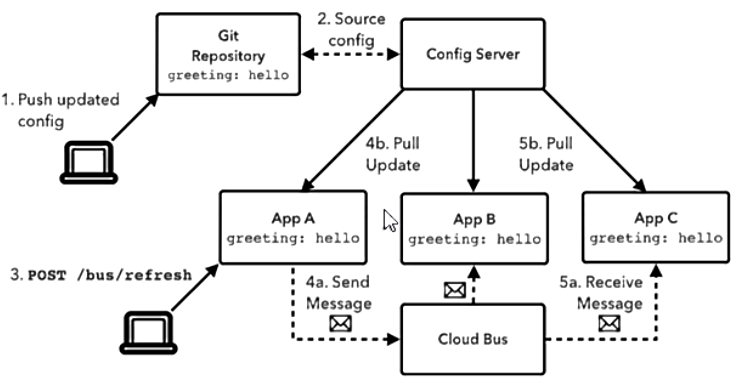
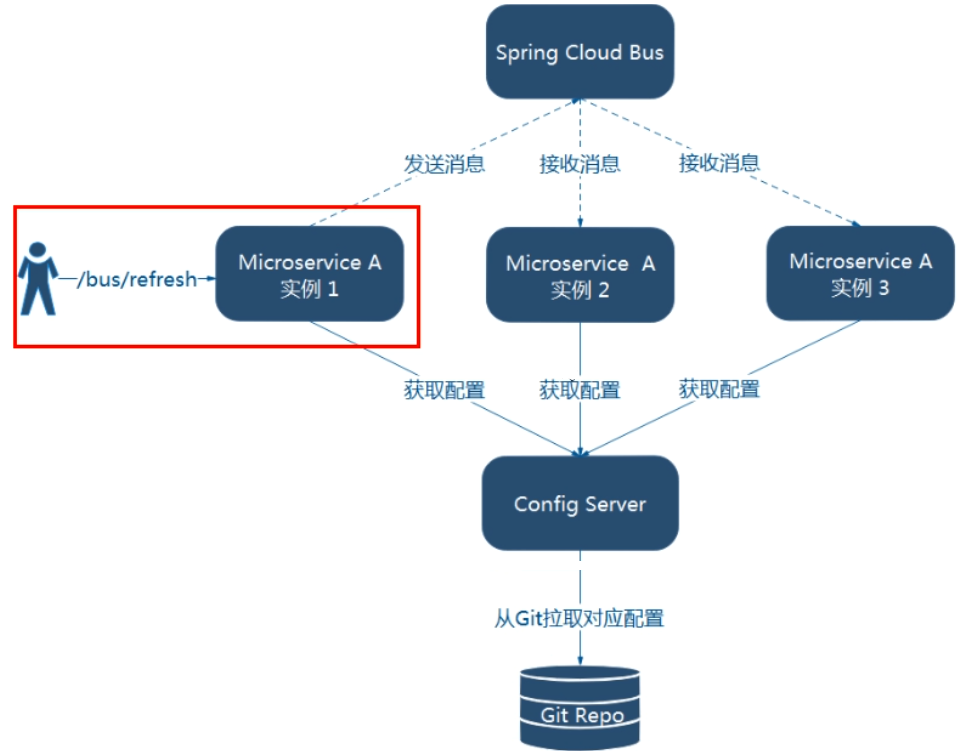
- 利用消息总线触发一个客户端/bus/refresh,而刷新所有客户端的配置
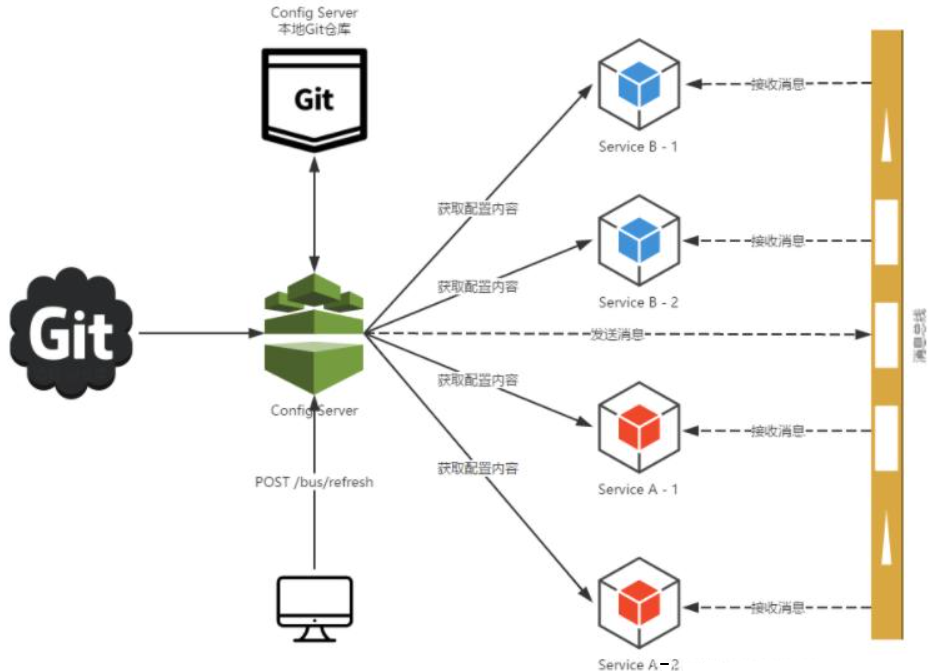
- 利用消息总线触发一个服务端ConfigServer的/bus/refresh端点,而刷新所有客户端的配置(更加推荐)
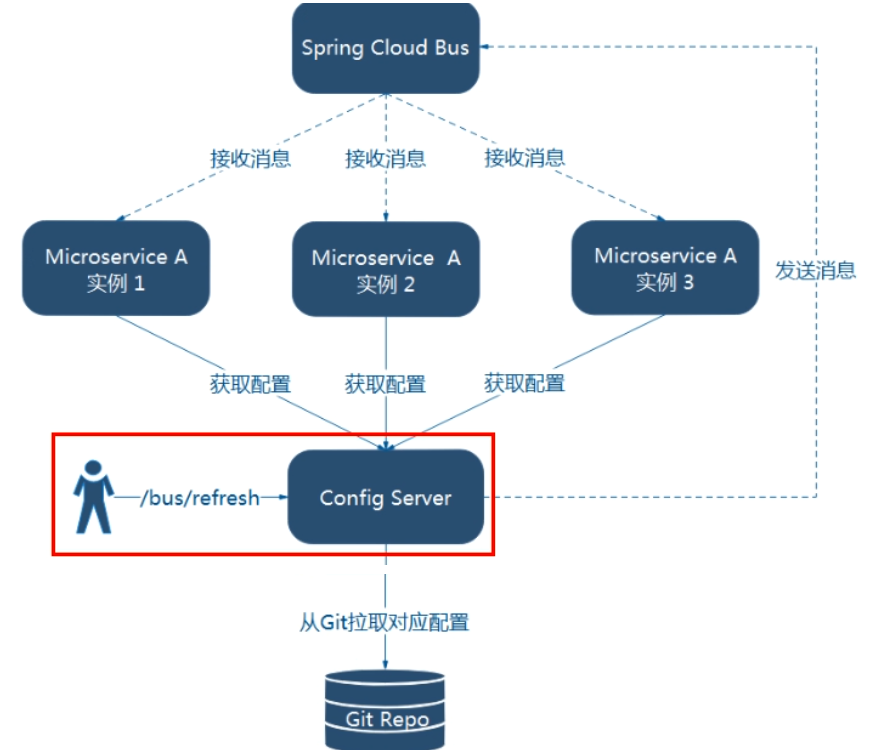
图二的架构显然更加合适,图一不适合的原因如下
-
打破了微服务的职责单一性,因为微服务本身是业务模块,它本不应该承担配置刷新职责
-
破坏了微服务各节点的对等性
-
有一定的局限性。例如,微服务在迁移时,它的网络地址常常会发生变化,此时如果想要做到自动刷新,那就会增加更多的修改
cloud-config-client-3366
-
建module
-
写POM
<?xml version="1.0" encoding="UTF-8"?>
<project xmlns="http://maven.apache.org/POM/4.0.0"
         xmlns:xsi="http://www.w3.org/2001/XMLSchema-instance"
         xsi:schemaLocation="http://maven.apache.org/POM/4.0.0 http://maven.apache.org/xsd/maven-4.0.0.xsd">
    <parent>
        <artifactId>springcloud2020</artifactId>
        <groupId>com.nuc.springcloud</groupId>
        <version>1.0-SNAPSHOT</version>
    </parent>
    <modelVersion>4.0.0</modelVersion>

    <artifactId>cloud-config-client-3366</artifactId>


    <dependencies>
        <dependency>
            <groupId>org.springframework.cloud</groupId>
            <artifactId>spring-cloud-starter-bus-amqp</artifactId>
        </dependency>
        <dependency>
            <groupId>org.springframework.cloud</groupId>
            <artifactId>spring-cloud-starter-config</artifactId>
        </dependency>
        <dependency>
            <groupId>org.springframework.cloud</groupId>
            <artifactId>spring-cloud-starter-netflix-eureka-client</artifactId>
        </dependency>
        <dependency>
            <groupId>com.nuc.springcloud</groupId>
            <artifactId>cloud-api-commons</artifactId>
            <version>${project.version}</version>
        </dependency>
        <dependency>
            <groupId>org.springframework.boot</groupId>
            <artifactId>spring-boot-starter-web</artifactId>
        </dependency>

        <dependency>
            <groupId>org.springframework.boot</groupId>
            <artifactId>spring-boot-starter-actuator</artifactId>
        </dependency>

        <dependency>
            <groupId>org.springframework.boot</groupId>
            <artifactId>spring-boot-devtools</artifactId>
            <scope>runtime</scope>
            <optional>true</optional>
        </dependency>

        <dependency>
            <groupId>org.projectlombok</groupId>
            <artifactId>lombok</artifactId>
            <optional>true</optional>
        </dependency>
        <dependency>
            <groupId>org.springframework.boot</groupId>
            <artifactId>spring-boot-starter-test</artifactId>
            <scope>test</scope>
        </dependency>
    </dependencies>
</project>
- 写YML(bootstrap.yml)
server:
  port: 3366

spring:
  application:
    name: config-client
  cloud:
    config:
      label: master
      name: config
      profile: dev
      uri: http://localhost:3344
eureka:
  client:
    service-url:
      defaultZone: http://eureka7001.com:7001/eureka
management:
  endpoints:
    web:
      exposure:
        include: "*"
- 主启动类
@SpringBootApplication
@EnableEurekaClient
public class ConfigClientMain3366 {
    public static void main(String[] args) {
        SpringApplication.run(ConfigClientMain3366.class,args);
    }
}
- 业务类
@RestController
@RefreshScope
public class ConfigClientController {
    @Value("${server.port}")
    private String serverPort;

    @Value("${config.info}")
    private String configInfo;


    @GetMapping("/configInfo")
    public String getConfigInfo(){
        return "serverPort:"+serverPort+"\t\n\n configInfo: "+configInfo;
    }

}
cloud-config-center-3344
配置中心服务端添加消息总线支持
- 添加POM依赖
<dependency>
    <groupId>org.springframework.cloud</groupId>
    <artifactId>spring-cloud-starter-bus-amqp</artifactId>
</dependency>
- 改YML
#RabbitMQ配置
management:
  endpoints:
    web:
      exposure:
        include: 'bus-refresh'
cloud-config-center-3355
客户端添加消息总线支持
- 添加POM依赖
<dependency>
    <groupId>org.springframework.cloud</groupId>
    <artifactId>spring-cloud-starter-bus-amqp</artifactId>
</dependency>
- 改YML
spring:
  #RrrbitMQ相关配置15672是Web管理界面端口:5672是MQ访问的端口
  rabbitmq:
    host: localhost
    port: 5672
    username: guest
    password: guest
测试
启动7001、3344、3355、3366

修改Github上配置文件增加版本号
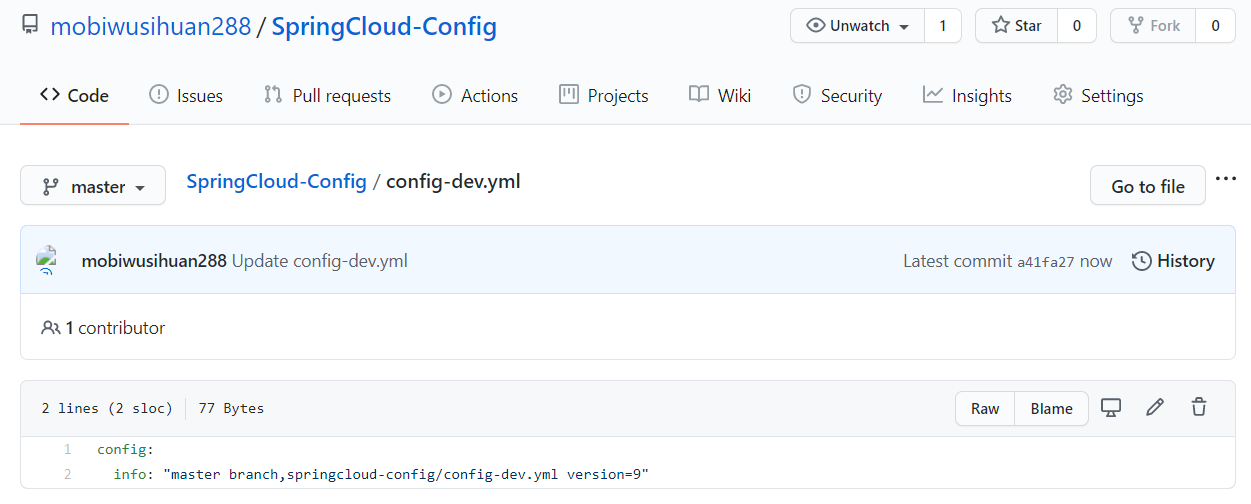
给配置中心发送POST请求
curl -X POST "http://localhost:3344/actuator/bus-refresh"
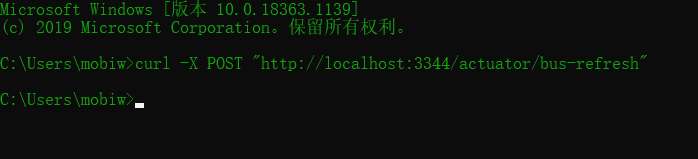
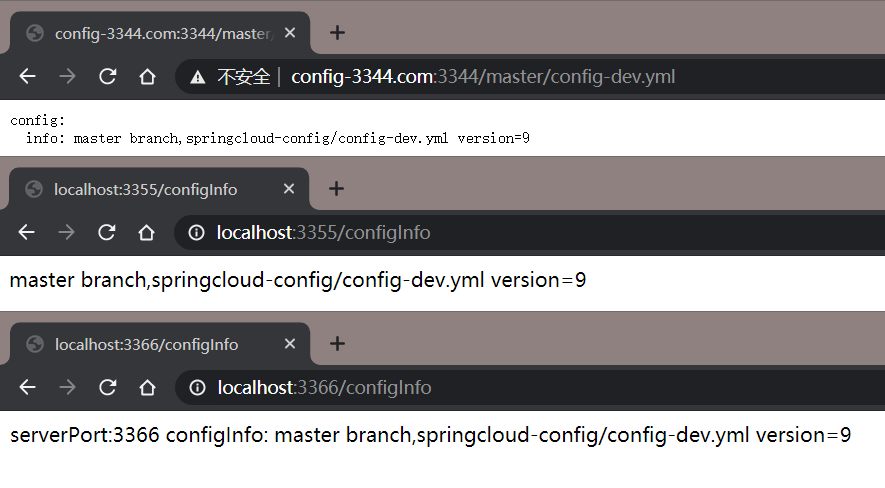
一次修改,广播通知,处处生效
SpringCloud Bus动态刷新定点通知
不想全部通知,只想定点通知
指定具体某一个实例生效而不是全部
公式:http://localhost:配置中心的端口号/actuator/bus-refresh/{destination}
/bus/refresh请求不再发送到具体的服务实例上,而是发给config server并通过destination参数类指定需要更新配置的服务或实例
测试,只通知3355、不通知3366
修改Github上配置文件增加版本号
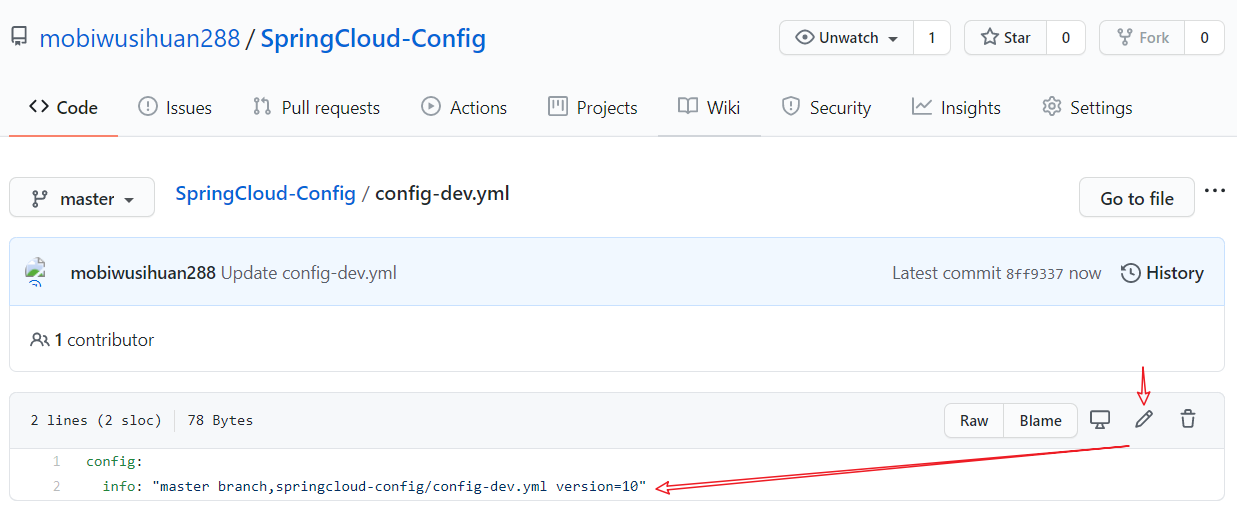
给配置中心发送POST请求
curl -X POST "http://localhost:3344/actuator/bus-refresh/config-client:3355"


总结

 浙公网安备 33010602011771号