


Scrapy框架
第一板块:scrapy介绍、安装、基本使用
-什么是框架?
-就是一个集成了很多功能并且具有很强通用性的一个项目模板。
-如何学习框架?
-专门学习框架封装的各种功能的详细用法。
-什么是scrapy?
-爬虫中封装好的一个明星框架。功能:高性能的持久化操作,异步的数据下载,高性能的数据解析,分布式。
-scrapy框架的基本使用
-环境的安装:
-mac or linux: pip install scrapy
-windows:
-下载twisted,下载地址为:
http://www.lfd.uci.edu/~gohlke/pythonlibs/#twisted
-安装twisted:
pip install Twisted-17.1.0-cp36-cp36m-win_amd64.whl
-pip install pywin32
-pip install scrapy
测试:在终端里录入scrapy指令,没有报错即表示安装成功!
-创建一个工程:scrapy startproject xxxPro
-cd xxxPro
-在spiders子目录中创建一个爬虫文件
-scrapy genspider spiderName www.xxx.com
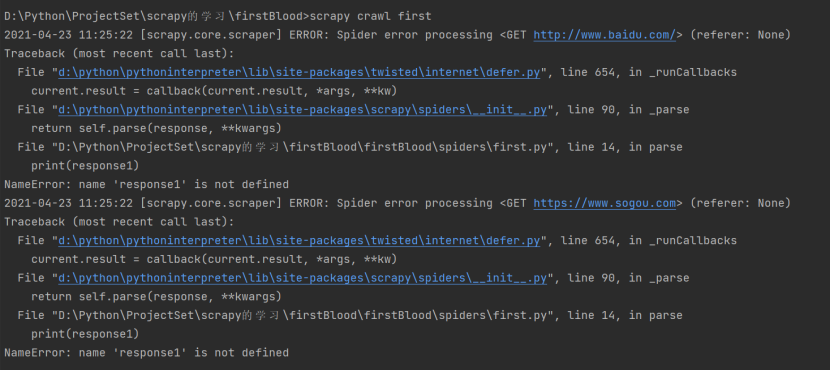
-执行工程:
-scrapy crawl spiderName
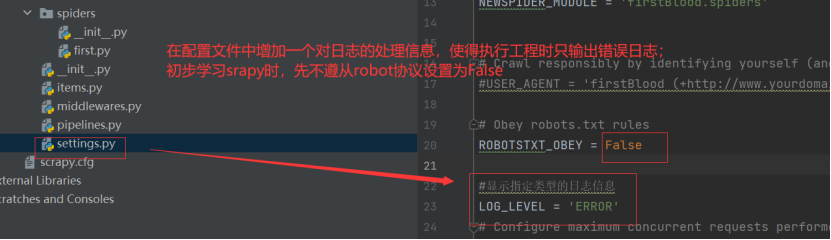
scrapy的配置文件修改:
运行结果如下:
在spiders文件夹中创建一个基于scrapy框架的爬虫文件后,对配置文件必要的设置如下:(UA伪装)

第二大板块:基于scrapy的数据解析
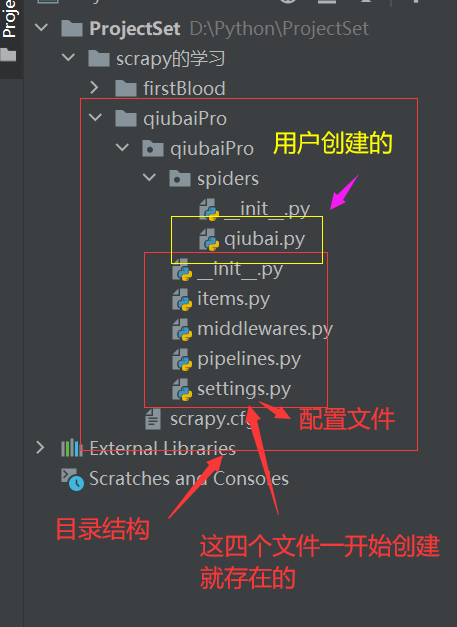
-创建一个scrapy工程的基本目录结构如下:
qiubai.py
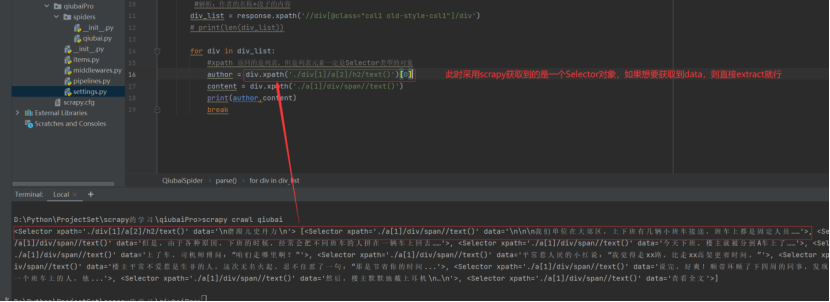
 1 import scrapy
 2
 3
 4 class QiubaiSpider(scrapy.Spider):
 5     name = 'qiubai'
 6     # allowed_domains = ['www.xxx.com']
 7     start_urls = ['https://www.qiushibaike.com/text/']
 8
 9     def parse(self, response):
10         #解析:作者的名称+段子的内容
11        div_list = response.xpath('//div[@class="col1 old-style-col1"]/div')
12        # print(len(div_list))
13        num = 0
14        for div in div_list:
15            #xpath 返回的是列表,但是列表元素一定是Selector类型的对象
16            #extract可以将Selector对象中data参数存储的字符串提取出来
17            author = div.xpath('./div[1]/a[2]/h2/text()')[0].extract()
18            #列表调用了extract之后,则表示将列表中每一个Selector对象中data对应的字符串提取了出来
19            content = div.xpath('./a[1]/div/span//text()').extract()
20            #将列表转化成字符串
21            content = ''.join(content)
22            print("++++++++++++++++++++++++++++++++++++")
23            print(num,author,content)
24            print("++++++++++++++++++++++++++++++++++++")
25            num+=1
注意:
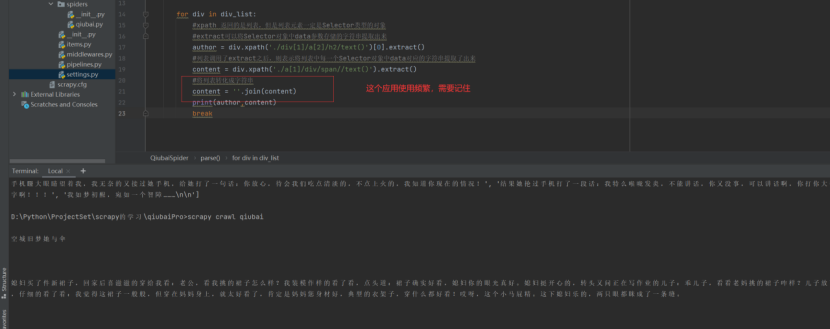
-etract_first()操作前提条件是得保证是对列表长度为1的进行操作。
总结:
UA伪装、Robot协议、日志文件的设置都在settings.py即配置文件中;
规定在spiders子目录下创建scrapy爬虫;
项目运行方式为:scrapy crawl spiderName;
对于scrapy爬虫得到的response对象,进行xpath操作后,得到的对象不是一个etree对象而是一个Selector对象,那么要取得其data数据则只需将Selecor对象进行extract操作就行;
第三大板块:scrapy持久化存储
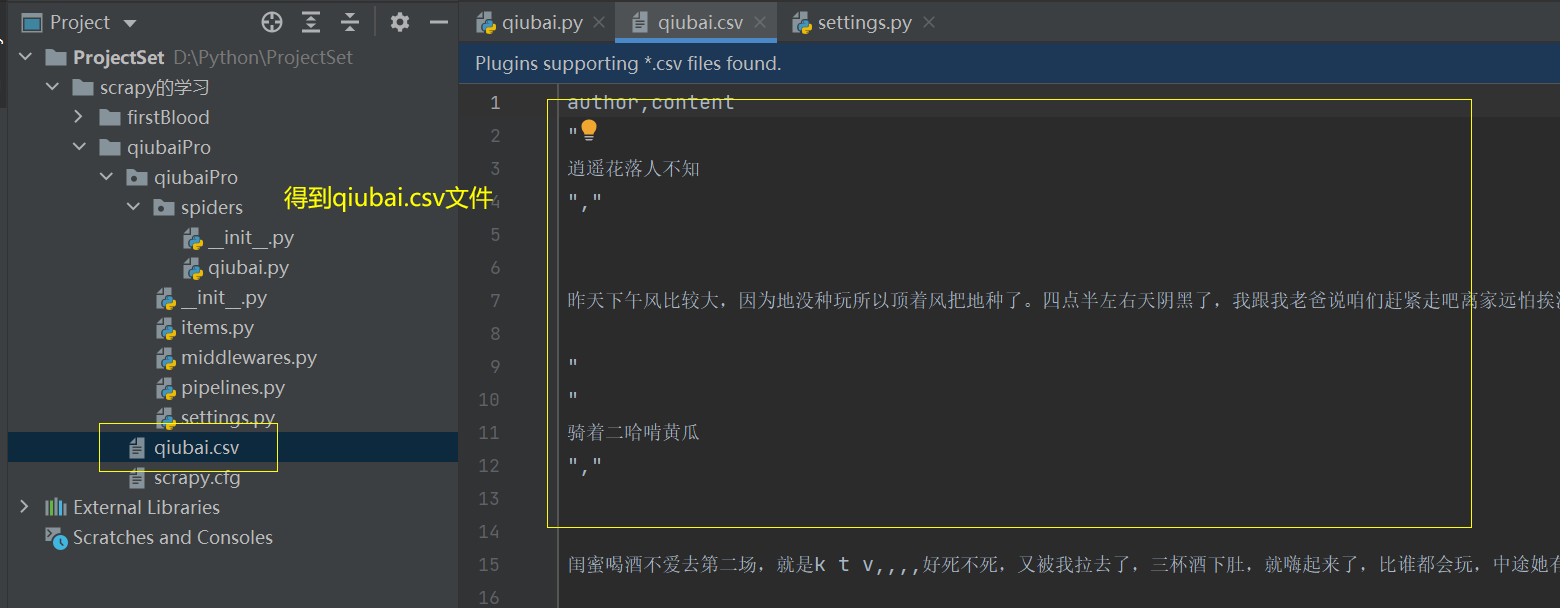
-基于终端指令:(比较小众,用得很少)
-要求:只可以将parse方法的返回值存储到本地的文本文件中
-注意:持久化存储对应的文本文件的类型只可以为:
'json', 'jsonlines', 'jl', 'csv', 'xml', 'marshal', 'pickle'
-指令:scrapy crawl xxx -o filePath
-好处:简洁高效便捷
-缺点:局限性比较强(数据只可以存储到指定后缀的文本文件中)
qiubai.py
 1 import scrapy
 2
 3
 4 class QiubaiSpider(scrapy.Spider):
 5     name = 'qiubai'
 6     # allowed_domains = ['www.xxx.com']
 7     start_urls = ['https://www.qiushibaike.com/text/']
 8
 9     def parse(self, response):
10         #解析:作者的名称+段子的内容
11        div_list = response.xpath('//div[@class="col1 old-style-col1"]/div')
12        # print(len(div_list))
13        all_data = [] #存储所有解析到的数据
14        for div in div_list:
15            #xpath 返回的是列表,但是列表元素一定是Selector类型的对象
16            #extract可以将Selector对象中data参数存储的字符串提取出来
17            author = div.xpath('./div[1]/a[2]/h2/text()')[0].extract()
18            #列表调用了extract之后,则表示将列表中每一个Selector对象中data对应的字符串提取了出来
19            content = div.xpath('./a[1]/div/span//text()').extract()
20            #将列表转化成字符串
21            content = ''.join(content)
22            dic = {
23                'author':author,
24                'content':content
25            }
26            all_data.append(dic)
27
28        return all_data
运行结果如下:
-基于管道:
-编码流程:
-数据解析
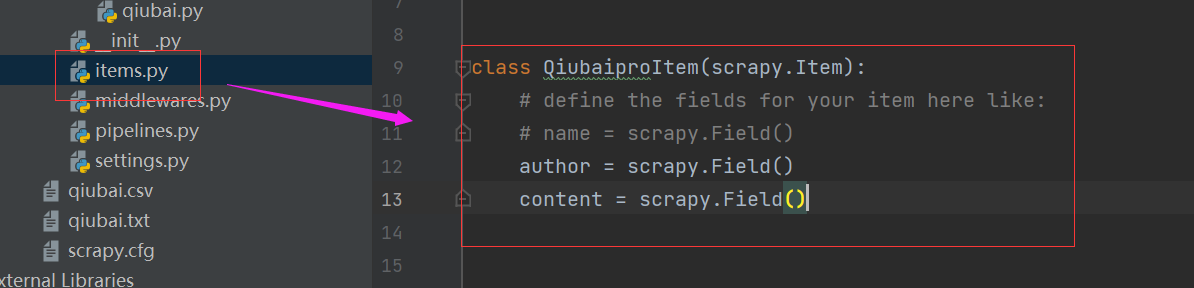
-在item类中定义相关的属性 item.py
-将解析的数据封装存储到item类型的对象
-将item类型的对象提交给管道进行持久化存储的操作
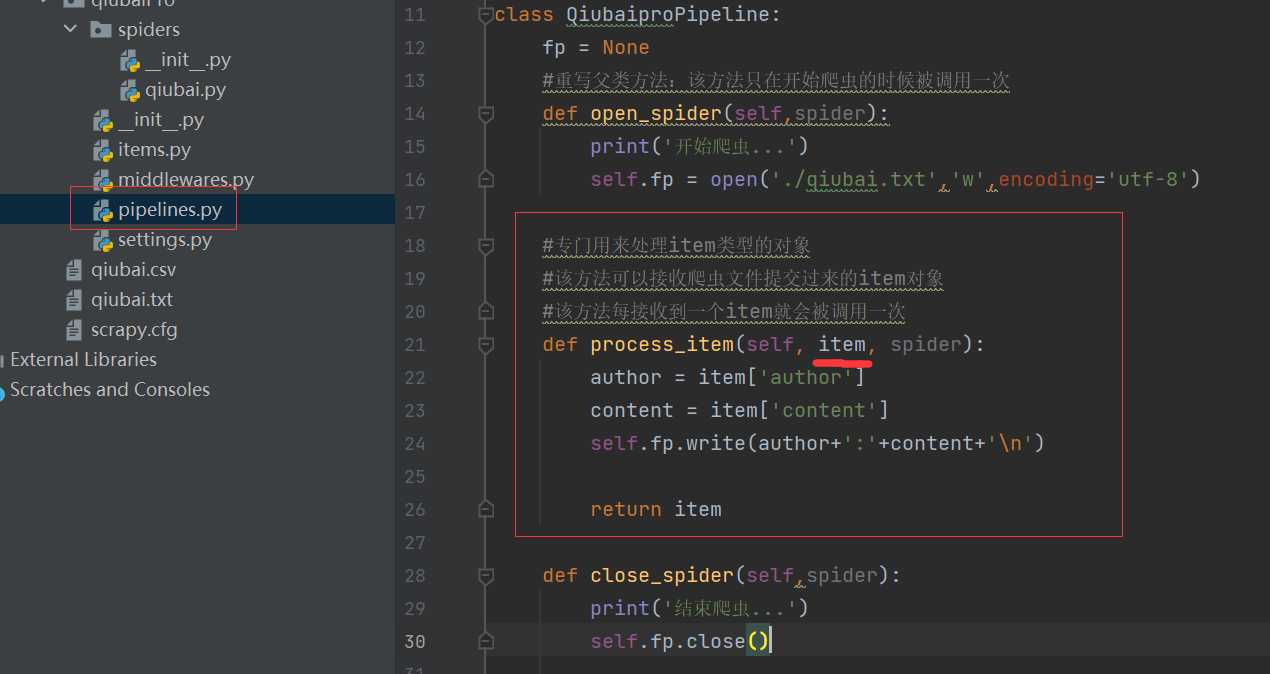
-在管道类的process_item中要将其接受到的item对象中存储的数据进行持久化存储操作 piplines.py
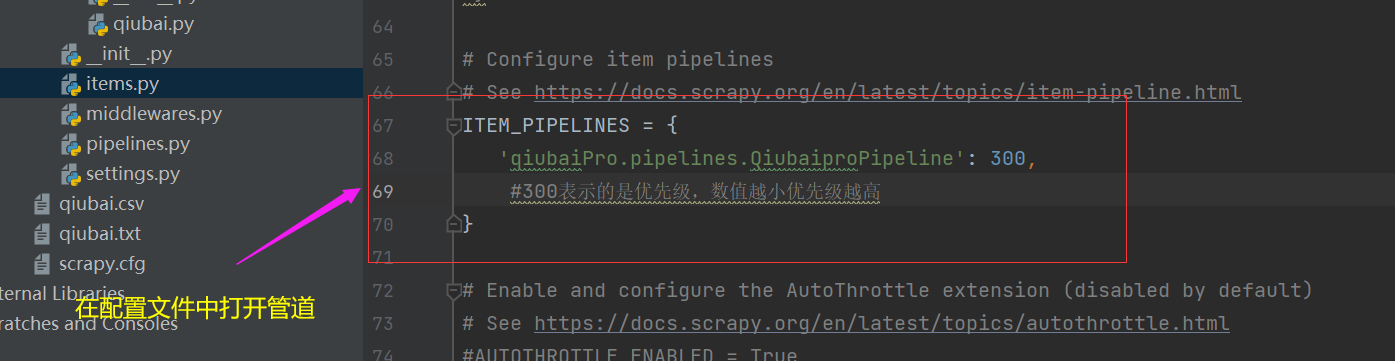
-在配置文件中开启管道
-好处:
-通用性强。
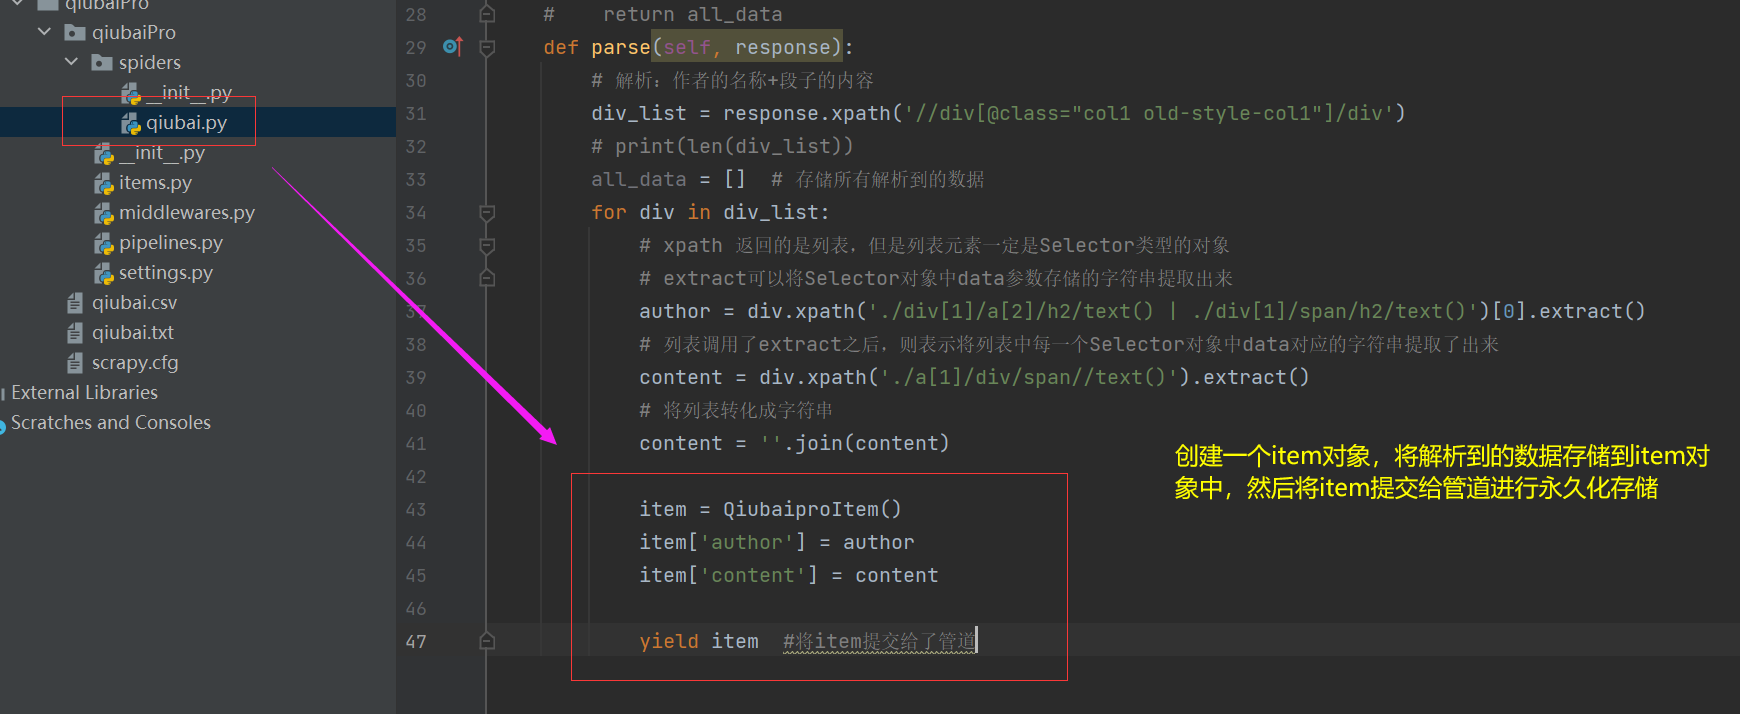
为什么要创建item对象呢?因为基于管道实现永久化存储方式是利用了process_items方法
于是就要将解析后的数据放到item对象中,再将item对象提交给管道进行存储
-面试题:将爬取到的数据一份存储到本地一份存储到数据库,如何实现?
-管道文件中一个管道类对应的是将数据存储到一种平台
-爬虫文件提交的item只会给管道文件中第一个被执行的管道类接收
-process_item中的return item表示将item传递给下一个即将被执行的管道类
qiubai.py代码如下:
 1 import scrapy
 2 from qiubaiPro.items import QiubaiproItem
 3
 4 class QiubaiSpider(scrapy.Spider):
 5     name = 'qiubai'
 6     # allowed_domains = ['www.xxx.com']
 7     start_urls = ['https://www.qiushibaike.com/text/']
 8
 9     # def parse(self, response):
10     #     #解析:作者的名称+段子的内容
11     #    div_list = response.xpath('//div[@class="col1 old-style-col1"]/div')
12     #    # print(len(div_list))
13     #    all_data = [] #存储所有解析到的数据
14     #    for div in div_list:
15     #        #xpath 返回的是列表,但是列表元素一定是Selector类型的对象
16     #        #extract可以将Selector对象中data参数存储的字符串提取出来
17     #        author = div.xpath('./div[1]/a[2]/h2/text()')[0].extract()
18     #        #列表调用了extract之后,则表示将列表中每一个Selector对象中data对应的字符串提取了出来
19     #        content = div.xpath('./a[1]/div/span//text()').extract()
20     #        #将列表转化成字符串
21     #        content = ''.join(content)
22     #        dic = {
23     #            'author':author,
24     #            'content':content
25     #        }
26     #        all_data.append(dic)
27     #
28     #    return all_data
29     def parse(self, response):
30         # 解析:作者的名称+段子的内容
31         div_list = response.xpath('//div[@class="col1 old-style-col1"]/div')
32         # print(len(div_list))
33         all_data = []  # 存储所有解析到的数据
34         for div in div_list:
35             # xpath 返回的是列表,但是列表元素一定是Selector类型的对象
36             # extract可以将Selector对象中data参数存储的字符串提取出来
37             author = div.xpath('./div[1]/a[2]/h2/text() | ./div[1]/span/h2/text()')[0].extract()
38             # 列表调用了extract之后,则表示将列表中每一个Selector对象中data对应的字符串提取了出来
39             content = div.xpath('./a[1]/div/span//text()').extract()
40             # 将列表转化成字符串
41             content = ''.join(content)
42
43             item = QiubaiproItem()
44             item['author'] = author
45             item['content'] = content
46
47             yield item  #将item提交给了管道
pipelines.py
 1 # Define your item pipelines here
 2 #
 3 # Don't forget to add your pipeline to the ITEM_PIPELINES setting
 4 # See: https://docs.scrapy.org/en/latest/topics/item-pipeline.html
 5
 6
 7 # useful for handling different item types with a single interface
 8 from itemadapter import ItemAdapter
 9
10 import pymysql
11
12 class QiubaiproPipeline:
13     fp = None
14     #重写父类方法:该方法只在开始爬虫的时候被调用一次
15     def open_spider(self,spider):
16         print('开始爬虫...')
17         self.fp = open('./qiubai.txt','w',encoding='utf8')
18
19     #专门用来处理item类型的对象
20     #该方法可以接收爬虫文件提交过来的item对象
21     #该方法每接收到一个item就会被调用一次
22     def process_item(self, item, spider):
23         author = item['author']
24         content = item['content']
25         self.fp.write(author+':'+content+'\n')
26
27         return item  #就会传递给下一个即将被执行的管道类,所以一定要加上return item
28
29     def close_spider(self,spider):
30         print('结束爬虫...')
31         self.fp.close()
32
33 #管道文件中一个管道类对应将一组数据存储到一个平台或者载体中
34 class mysqlPileLine(object):
35
36     conn = None
37     cursor = None
38     def open_spider(self,spider):
39         self.conn = pymysql.Connect(host='127.0.0.1',port=3306,user='root',password='123456',db='qiubai',charset='utf8')
40
41     def process_item(self,item,spider):
42         self.cursor = self.conn.cursor()
43
44         try:
45
46             self.cursor.execute('insert into qiubai values("%s","%s")'%(item["author"],item["content"]))
47             self.conn.commit() #事务的提交
48         except Exception as e:
49             print(e)
50             self.conn.rollback() #事务的回滚
51
52         return item
53
54     def close_spider(self,spider):
55         self.cursor.close()
56         self.conn.close()
57
58
59 #爬虫文件提交的item类型的对象最终会提交给哪一个管道类?
60     #先执行优先级最高的管道类
settings.py
 1 # Scrapy settings for qiubaiPro project
 2 #
 3 # For simplicity, this file contains only settings considered important or
 4 # commonly used. You can find more settings consulting the documentation:
 5 #
 6 #     https://docs.scrapy.org/en/latest/topics/settings.html
 7 #     https://docs.scrapy.org/en/latest/topics/downloader-middleware.html
 8 #     https://docs.scrapy.org/en/latest/topics/spider-middleware.html
 9
10 BOT_NAME = 'qiubaiPro'
11
12 SPIDER_MODULES = ['qiubaiPro.spiders']
13 NEWSPIDER_MODULE = 'qiubaiPro.spiders'
14
15
16 # Crawl responsibly by identifying yourself (and your website) on the user-agent
17 USER_AGENT = 'Mozilla/5.0 (Windows NT 10.0; Win64; x64) AppleWebKit/537.36 (KHTML, like Gecko) Chrome/90.0.4430.85 Safari/537.36'
18
19 # Obey robots.txt rules
20 ROBOTSTXT_OBEY = False
21
22 LOG_LEVEL = 'ERROR'
23
24 # Configure maximum concurrent requests performed by Scrapy (default: 16)
25 #CONCURRENT_REQUESTS = 32
26
27 # Configure a delay for requests for the same website (default: 0)
28 # See https://docs.scrapy.org/en/latest/topics/settings.html#download-delay
29 # See also autothrottle settings and docs
30 #DOWNLOAD_DELAY = 3
31 # The download delay setting will honor only one of:
32 #CONCURRENT_REQUESTS_PER_DOMAIN = 16
33 #CONCURRENT_REQUESTS_PER_IP = 16
34
35 # Disable cookies (enabled by default)
36 #COOKIES_ENABLED = False
37
38 # Disable Telnet Console (enabled by default)
39 #TELNETCONSOLE_ENABLED = False
40
41 # Override the default request headers:
42 #DEFAULT_REQUEST_HEADERS = {
43 #   'Accept': 'text/html,application/xhtml+xml,application/xml;q=0.9,*/*;q=0.8',
44 #   'Accept-Language': 'en',
45 #}
46
47 # Enable or disable spider middlewares
48 # See https://docs.scrapy.org/en/latest/topics/spider-middleware.html
49 #SPIDER_MIDDLEWARES = {
50 #    'qiubaiPro.middlewares.QiubaiproSpiderMiddleware': 543,
51 #}
52
53 # Enable or disable downloader middlewares
54 # See https://docs.scrapy.org/en/latest/topics/downloader-middleware.html
55 #DOWNLOADER_MIDDLEWARES = {
56 #    'qiubaiPro.middlewares.QiubaiproDownloaderMiddleware': 543,
57 #}
58
59 # Enable or disable extensions
60 # See https://docs.scrapy.org/en/latest/topics/extensions.html
61 #EXTENSIONS = {
62 #    'scrapy.extensions.telnet.TelnetConsole': None,
63 #}
64
65 # Configure item pipelines
66 # See https://docs.scrapy.org/en/latest/topics/item-pipeline.html
67 ITEM_PIPELINES = {
68    'qiubaiPro.pipelines.QiubaiproPipeline': 300,
69    'qiubaiPro.pipelines.mysqlPileLine': 301,
70     #300表示的是优先级,数值越小优先级越高
71 }
72
73 # Enable and configure the AutoThrottle extension (disabled by default)
74 # See https://docs.scrapy.org/en/latest/topics/autothrottle.html
75 #AUTOTHROTTLE_ENABLED = True
76 # The initial download delay
77 #AUTOTHROTTLE_START_DELAY = 5
78 # The maximum download delay to be set in case of high latencies
79 #AUTOTHROTTLE_MAX_DELAY = 60
80 # The average number of requests Scrapy should be sending in parallel to
81 # each remote server
82 #AUTOTHROTTLE_TARGET_CONCURRENCY = 1.0
83 # Enable showing throttling stats for every response received:
84 #AUTOTHROTTLE_DEBUG = False
85
86 # Enable and configure HTTP caching (disabled by default)
87 # See https://docs.scrapy.org/en/latest/topics/downloader-middleware.html#httpcache-middleware-settings
88 #HTTPCACHE_ENABLED = True
89 #HTTPCACHE_EXPIRATION_SECS = 0
90 #HTTPCACHE_DIR = 'httpcache'
91 #HTTPCACHE_IGNORE_HTTP_CODES = []
92 #HTTPCACHE_STORAGE = 'scrapy.extensions.httpcache.FilesystemCacheStorage'
items.py
 1 # Define here the models for your scraped items
 2 #
 3 # See documentation in:
 4 # https://docs.scrapy.org/en/latest/topics/items.html
 5
 6 import scrapy
 7
 8
 9 class QiubaiproItem(scrapy.Item):
10     # define the fields for your item here like:
11     # name = scrapy.Field()
12     author = scrapy.Field()
13     content = scrapy.Field()
