java之类适配器
类适配器
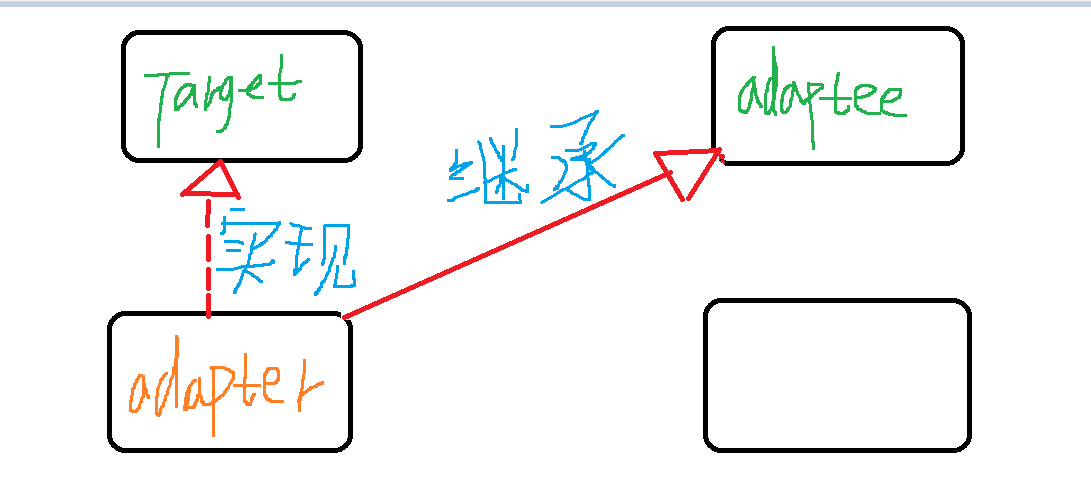
所谓类适配器,指的是适配器Adapter继承我们的被适配者Adaptee,并实现目标接口Target。由于Java中是单继承,所以这个适配器仅仅只能服务于所继承的被适配者Adaptee。代码如下:
被适配者(Adaptee)
|
1
2
3
4
5
6
7
8
9
10
11
12
13
14
15
16
|
package com.bluemsun.classadapter;public class Person { private int id; private String name; /** * person可以现在只能说英语 */ public void sayEnglish(){ System.out.println("Person can say english!"); } /** * 省略setter,getter. */} |
目标接口(Target)
|
1
2
3
4
5
6
7
8
9
10
11
12
|
package com.bluemsun.classadapter;/** * 目标要求person可以说英语,法语,日语.但是现在的person仅仅可以说英语 * @author Administrator * */public interface Target_Person { void sayEnglish(); void sayFrench(); void sayJapanese();} |
适配器(Adapter)
|
1
2
3
4
5
6
7
8
9
10
11
12
13
14
15
16
17
18
19
20
|
package com.bluemsun.classadapter;/** * 类适配器,因为继承了Person,而Java中只能单继承,所以这个适配器只为person这一个类服务 * 这个适配器就让person类在不修改源码的基础上能实现目标接口所指定的方法 * @author Administrator * */public class Adapter_Person extends Person implements Target_Person{ @Override public void sayFrench() { System.out.println("Person can say French!"); } @Override public void sayJapanese() { System.out.println("Person can say Japanese!"); }} |
客户端(Client)
|
1
2
3
4
5
6
7
8
9
10
11
|
package com.bluemsun.classadapter;public class Test { public static void main(String[] args) { Target_Person person = new Adapter_Person(); person.sayEnglish(); person.sayFrench(); person.sayJapanese(); }} |
上面的几段简单代码演示了类适配器的作用。正如我们开始所言,这个适配器Adapter只能为Person这一个类所服务。这时候你可能会想,要是我所需要适配的类很多,是不是都需要为每一个需要适配的类写一个Adapter?有没有更加灵活的方式呢?答案是:有!就是对象适配器。
##############################################################

一句话描述:Adapter类,通过继承 src类,实现 dst 类接口,完成src->dst的适配。
别的文章都用生活中充电器的例子来讲解适配器,的确,这是个极佳的举例,本文也不能免俗:
充电器本身相当于Adapter,220V交流电相当于src,我们的目dst标是5V直流电。
我们现有的src类:
public class Voltage220 {
    public int output220V() {
        int src = 220;
        System.out.println("我是" + src + "V");
        return src;
    }
}
我们想要的dst接口:
public interface Voltage5 {
    int output5V();
}
适配器类:
public class VoltageAdapter extends Voltage220 implements Voltage5 {
    @Override
    public int output5V() {
        int src = output220V();
        System.out.println("适配器工作开始适配电压");
        int dst = src / 44;
        System.out.println("适配完成后输出电压:" + dst);
        return dst;
    }
}
Client类:
public class Mobile {
    public void charging(Voltage5 voltage5) {
        if (voltage5.output5V() == 5) {
            System.out.println("电压刚刚好5V,开始充电");
        } else if (voltage5.output5V() > 5) {
            System.out.println("电压超过5V,都闪开 我要变成note7了");
        }
    }
}
测试代码:
        System.out.println("===============类适配器==============");
        Mobile mobile = new Mobile();
        mobile.charging(new VoltageAdapter());
输出:
===============类适配器==============
我是220V
适配器工作开始适配电压
适配完成后输出电压:5
电压刚刚好5V,开始充电
###################################################
简单的抽象一个场景:手机充电需要将220V的交流电转化为手机锂电池需要的5V直流电,我们的demo就是写一个电源适配器,将 AC220v ——> DC5V,其实适配器模式可以简单的分为三类:类适配器模式、对象的适配器模式、接口的适配器模式。我们就以这三种模式来实现上述步骤。
类适配器模式
就上面提到的功能,简单的使用类适配器模式,Source类如下:
package com.demo.adapter.classadapter;
/**
* Created by italkbb on 2018/1/24.
*/
public class AC220 {
public int output220V(){
int output = 220;
return output;
}
}
我们的目标类Destination,只需要定义方法,由适配器来转化:
package com.demo.adapter.classadapter;
/**
* Created by italkbb on 2018/1/24.
*/
public interface DC5 {
int output5V();
}
Adapter类如下:
package com.demo.adapter.classadapter;
/**
* Created by italkbb on 2018/1/24.
*/
public class PowerAdapter extends AC220 implements DC5 {
@Override
public int output5V() {
int output = output220V();
return (output / 44);
}
}
对于使用,也很简单:
/**
* 类适配器使用demo
*/
private void initClassAdapter() {
DC5 dc5 = new com.demo.adapter.classadapter.PowerAdapter();
dc5.output5V();
}
因为java单继承的缘故,Destination类必须是接口,以便于Adapter去继承Source并实现Destination,完成适配的功能,但这样就导致了Adapter里暴露了Source类的方法,使用起来的成本就增加了。

 浙公网安备 33010602011771号