UltimateXR教程
What is UltimateXR? 什么是UltimateXR?
UltimateXR is a professional-grade, free, open-source framework and toolkit for Unity. UltimateXR’s goal is to simplify the development of virtual reality applications; from simulators to videogames and from simple prototypes to full AAA-scale projects.
UltimateXR是一个专业级的,免费的,开源的Unity框架和工具包。UltimateXR的目标是简化虚拟现实应用程序的开发;从模拟器到视频游戏,从简单的原型到完整的AAA级项目。
Main features: 主要特点:
- Free and open-source under the MIT license.
在 MIT 许可下免费和开源。 - Cross-device compatibility. Support for all major headsets.
跨设备兼容性。支持所有主要耳机。 - State-of-the-art grab and manipulation mechanics.
最先进的抓取和操纵机制。 - Integrated hand pose editor.
集成手部姿势编辑器。 - Customizable full-body avatar representation with Inverse Kinematics.
具有反向运动学的可定制全身头像表示。 - Library of gender- and race-agnostic hands with special care on inclusion.
与性别和种族无关的手图书馆,特别关注包容性。 - Support for multiple locomotion mechanics.
支持多种运动机制。 - Advanced UI components including interaction and tweening.
高级 UI 组件,包括交互和补间。 - Scalable architecture. 可扩展的架构。
- Clean code; fully documented using standard XML format.
干净的代码;使用标准 XML 格式完整记录。 - Lots of tools, methods and extensions to make development easier.
许多工具,方法和扩展使开发更容易。
Getting started 开始
Requirements 要求
Unity 2021.2 or higher. LTS version is highly recommended.
Unity 2021.2 或更高版本。强烈建议使用 LTS 版本。
Uninstalling the previous version first 首先卸载以前的版本
- Before installing a new version of UltimateXR, it is extremely important to delete the old Assets/UltimateXR folder first if it exists. This will make sure that files that were deleted in newer versions aren’t preserved. Not doing so may create unwanted compilation errors. Deleting UltimateXR before installing a newer version will not break any reference link. Unity’s .meta files include IDs to ensure all references are kept correctly.
在安装新版本的旗舰版XR之前,首先删除旧的Assets/UltimateXR文件夹(如果存在)非常重要。这将确保不会保留在较新版本中删除的文件。不这样做可能会产生不必要的编译错误。在安装较新版本之前删除旗舰版不会断开任何参考链接。Unity 的 .meta 文件包含 ID,以确保正确保存所有引用。 - If the previous installation came from the Unity Package Manager, and not the Unity Asset Store or a .unitypackage file, this step is not required.
如果以前的安装来自 Unity 包管理器,而不是 Unity 资源商店或 .unitypackage 文件,则不需要执行此步骤。
Installation and setup 安装和设置
We provide the following ways to install UltimateXR:
我们提供以下方法来安装UltimateXR:
Method 1: Through the official Unity Asset Store
方法 1:通过官方 Unity 资源商店
- Delete the previous version from /Assets/UltimateXR first. Important! Not removing the folder before updating may result in incorrect files remaining after installation.
首先从 /Assets/UltimateXR 中删除以前的版本。重要!在更新之前不删除文件夹可能会导致安装后保留不正确的文件。 - Go to the Asset Store and click Open in Unity to proceed with the installation.
转到资源商店,然后单击在 Unity 中打开以继续安装。 - Remember to rate and review our asset if you liked it!
如果您喜欢我们的资产,请记住对其进行评分和评论!
Method 2: Downloading and installing the .unitypackage file
方法 2: 下载并安装 .unitypackage 文件
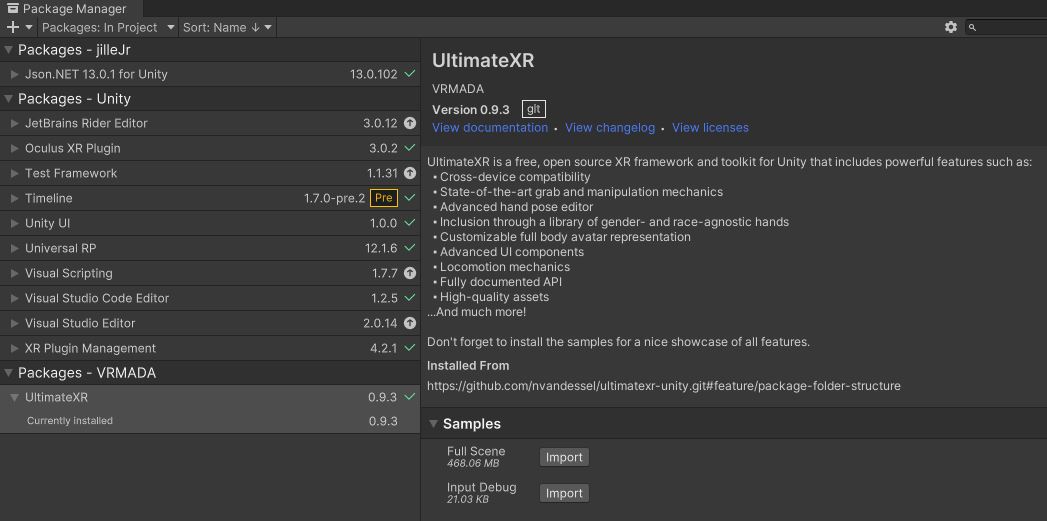
UltimateXR can be installed by downloading the latest .unitypackage (version v0.9.6).
UltimateXR可以通过下载最新的.unitypackage(版本v0.9.6)来安装。
- Delete the previous version from /Assets/UltimateXR first. Important! Not removing the folder before updating may result in incorrect files remaining after installation.
首先从 /Assets/UltimateXR 中删除以前的版本。重要!在更新之前不删除文件夹可能会导致安装后保留不正确的文件。 - Download the latest UltimateXR .unitypackage (version v0.9.6). It contains a big sample scene so the file size is larger than usual. The core package and sample scene will be split in two different packages in the future to limit disk size and lower installation time.
下载最新的 UltimateXR .unitypackage(版本 v0.9.6)。它包含一个大的样本场景,因此文件大小比平时大。核心包和示例场景将来将拆分为两个不同的包,以限制磁盘大小并缩短安装时间。 - Right click on the Project Window and select Import Package -> Custom Package….
右键单击项目窗口,然后选择导入包 - >自定义包...。
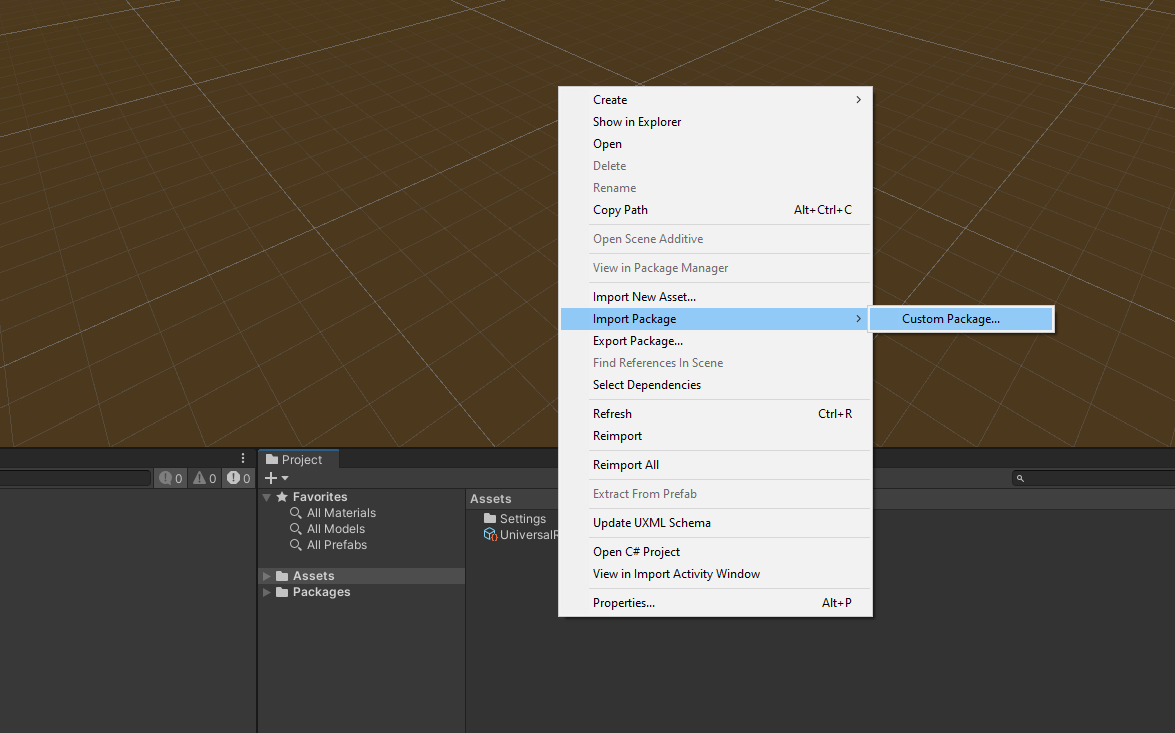
- Select the downloaded file and click Import. Importing assets may take a while due to the included sample scene.
选择下载的文件,然后单击导入。由于包含的示例场景,导入资源可能需要一段时间。
Method 3: Using the Package Manager for git users 方法 3:对 git 用户使用包管理器
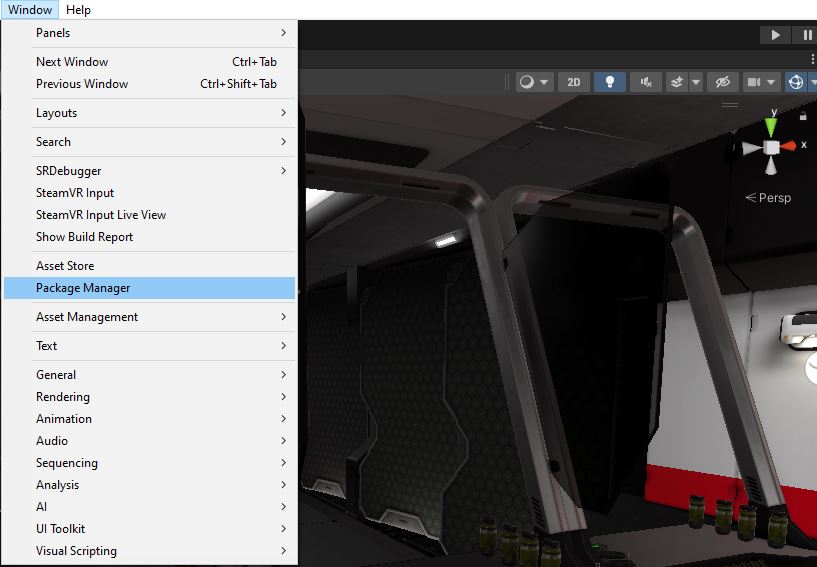
- Open the Package Manager using the Window menu -> Package Manager
使用“窗口”菜单打开包管理器 ->包管理器
- Inside the Package Manager, click on the “+” button on the top left and select “Add package from git URL…”
在包管理器中,单击左上角的“+”按钮,然后选择“从 git URL 添加包...”
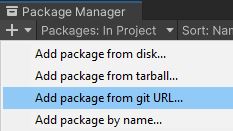
- Input the following URL: https://github.com/VRMADA/ultimatexr-unity.git and click Add.
输入以下 URL:https://github.com/VRMADA/ultimatexr-unity.git 然后单击添加。 - When the installation has completed, make sure to import the examples if it’s your first time using UltimateXR.
安装完成后,如果这是您第一次使用 UltimateXR,请确保导入示例。
Additional installation methods 其他安装方法
We are in the process of providing installation through the Unity Package Manager without requiring git. Stay tuned!
我们正在通过 Unity 包管理器提供安装,而无需 git。敬请期待!
Setting up the environment 设置环境
UltimateXR works with any render pipeline (BRP or Built-in Render Pipeline, URP or Universal Render Pipeline, HDRP or High-Definition Render Pipeline) although for the moment it comes with BRP and URP compatible materials.
UltimateXR适用于任何渲染管线(BRP或内置渲染管线,URP或通用渲染管线,HDRP或高清渲染管线),尽管目前它带有BRP和URP兼容材质。
The example scene is built using URP materials. BRP and HDRP versions will be provided in upcoming versions. URP is recommended when creating Virtual Reality applications in Unity for the following reasons:
示例场景是使用 URP 材质构建的。BRP 和 HDRP 版本将在即将推出的版本中提供。在 Unity 中创建虚拟现实应用程序时,建议使用 URP,原因如下:
- BRP will be deprecated at some point.
BRP 将在某个时候被弃用。 - URP’s goal is to work on all supported platforms, including mobile for untethered XR devices.
URP的目标是在所有受支持的平台上工作,包括用于不受限制的XR设备的移动设备。 - URP is the only viable option for untethered devices, where performance is limited. URP’s performance on these devices is very high.
对于性能有限的不受限制的设备,URP 是唯一可行的选择。URP在这些设备上的性能非常高。 - URP is very flexible and can also provide high quality graphics in more performant desktop setups.
URP 非常灵活,还可以在性能更高的桌面设置中提供高质量的图形。
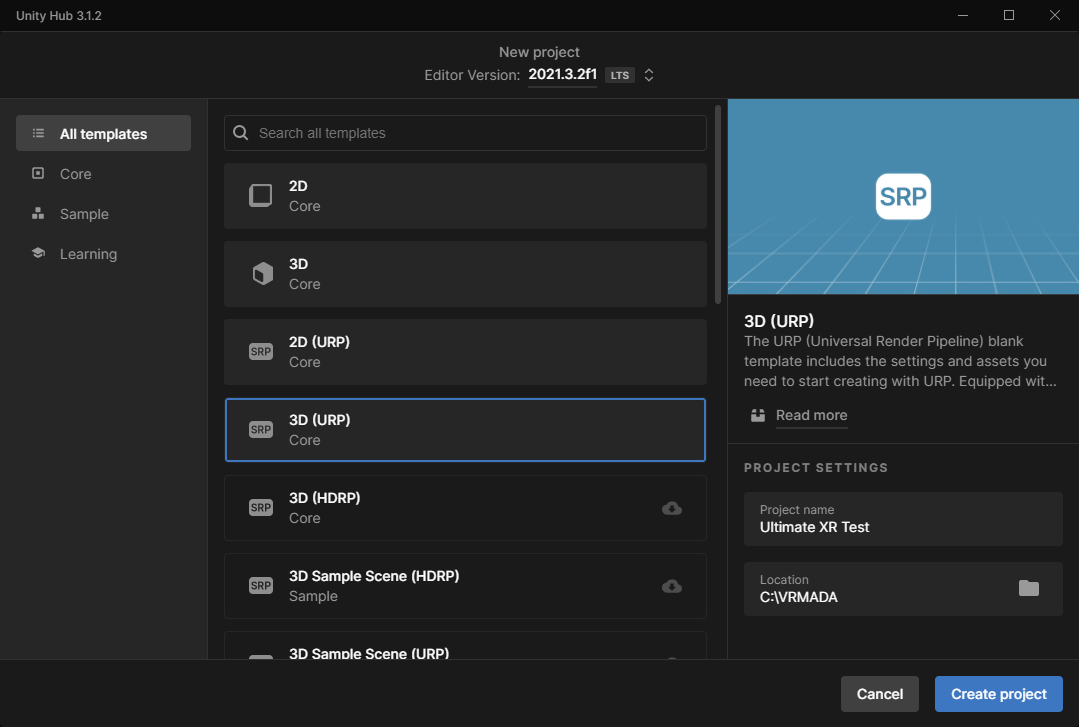
To create a project using the Universal Render Pipeline, create a new project and select the URP template:
要使用通用渲染管线创建项目,请创建一个新项目并选择 URP 模板:
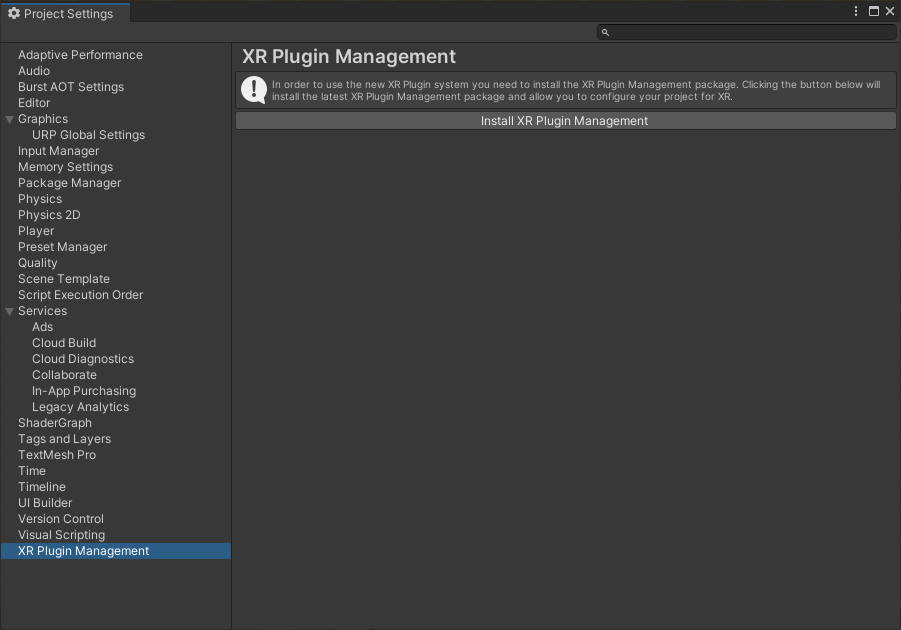
Now go to Edit -> Project settings. Select XR Plugin Management and install the XR Plugin Management package. This will enable the creation of virtual reality applications.
现在转到编辑 -> 项目设置。选择 XR 插件管理并安装 XR 插件管理包。这将使虚拟现实应用程序的创建成为可能。
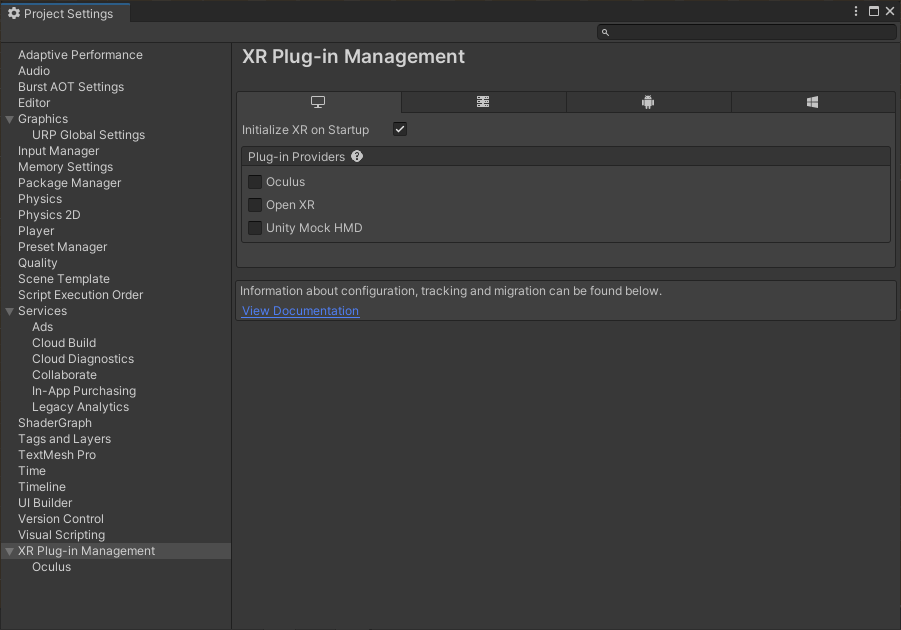
After installing the XR Plugin Management you may activate support for some of the devices that have out-of-the-box integration with Unity. Remember to activate them in desktop, which is used both by the editor in play mode and by desktop builds, and also in the destination platform for your builds, which may be different.
安装 XR 插件管理后,您可以激活对某些与 Unity 开箱即用集成的设备的支持。请记住在桌面中激活它们,编辑器在播放模式下和桌面版本中都使用它,也可以在构建的目标平台中使用它们,这可能有所不同。
Your project is now ready to go! You may want to add support for different XR devices next. Luckily UltimateXR takes care of seamlessly integrating with different XR APIs. Go to the Integrations section to check how to add support for your target devices.
您的项目现已准备就绪!接下来,您可能希望添加对不同 XR 设备的支持。幸运的是,UltimateXR负责与不同的XR API无缝集成。转到“集成”部分,查看如何为目标设备添加支持。
Supported XR platforms 支持的 XR 平台
UltimateXR currently supports the following platforms and devices:
UltimateXR目前支持以下平台和设备:
-
OVR/Oculus/Meta
:
OVR/Oculus/Meta:
- Oculus Rift/Rift-S
- Oculus Quest
- Meta Quest 2 元任务2
-
Pico XR 笔克XR
- Pico Neo 3 笔克尼奥 3
-
SteamVR 蒸汽虚拟现实
- Oculus Rift/Rift-S/Quest
- Meta Quest 2 元任务2
- HTC Vive/Vive Pro
- HTC Vive Cosmos
- Valve Index 阀门指数
-
WaveXR 波XR
- HTC Vive Focus 3
-
Windows Mixed Reality 视窗混合现实
- Standard WMR headsets 标准 WMR 耳机
- Samsung Reverb G2 三星混响G2
Installing integrations 安装集成
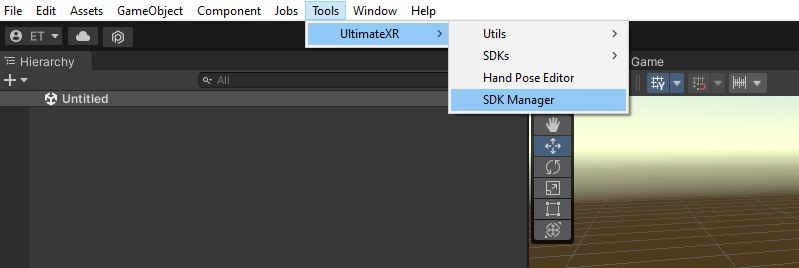
Open the UltimateXR SDK Manager window using the top menu Tools -> UltimateXR -> SDK Manager
使用顶部菜单工具 -> UltimateXR -> SDK 管理器打开 UltimateXR SDK 管理器窗口
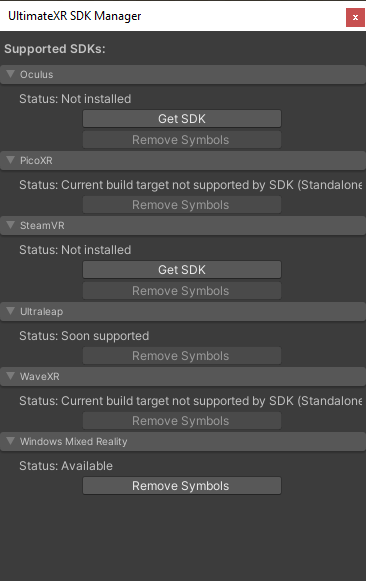
The SDK Manager is the main place to check the status of all supported integrations and add or remove SDKs.
SDK 管理器是检查所有受支持集成的状态以及添加或删除 SDK 的主要位置。
- Setting up Oculus SDK
设置 Oculus SDK - Setting up Pico XR SDK
设置笔克XR 开发工具包 - Setting up SteamVR 设置蒸汽虚拟现实
- Setting up WaveXR 设置 WaveXR
- Setting up Windows Mixed Reality
设置 Windows 混合现实
SteamVR 蒸汽虚拟现实
Installing and setting up SteamVR support 安装和设置 SteamVR 支持
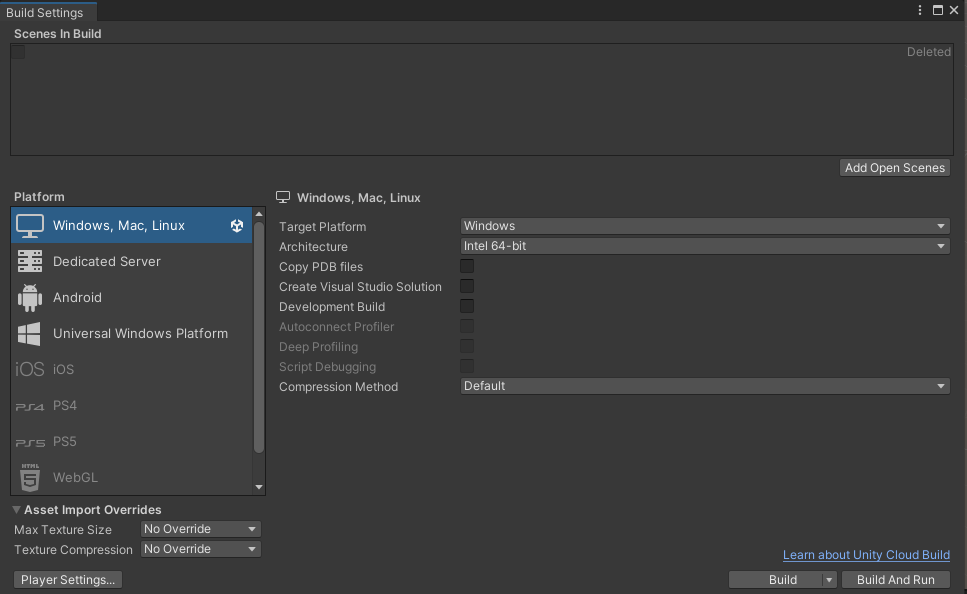
Make sure your project is currently targeting desktop in File -> Build Settings.
确保您的项目当前面向 File -> Build Settings 中的桌面。
Open the UltimateXR SDK Manager using Tools -> UltimateXR -> SDK Manager.
使用 Tools -> UltimateXR -> SDK Manager 打开 UltimateXR SDK Manager。
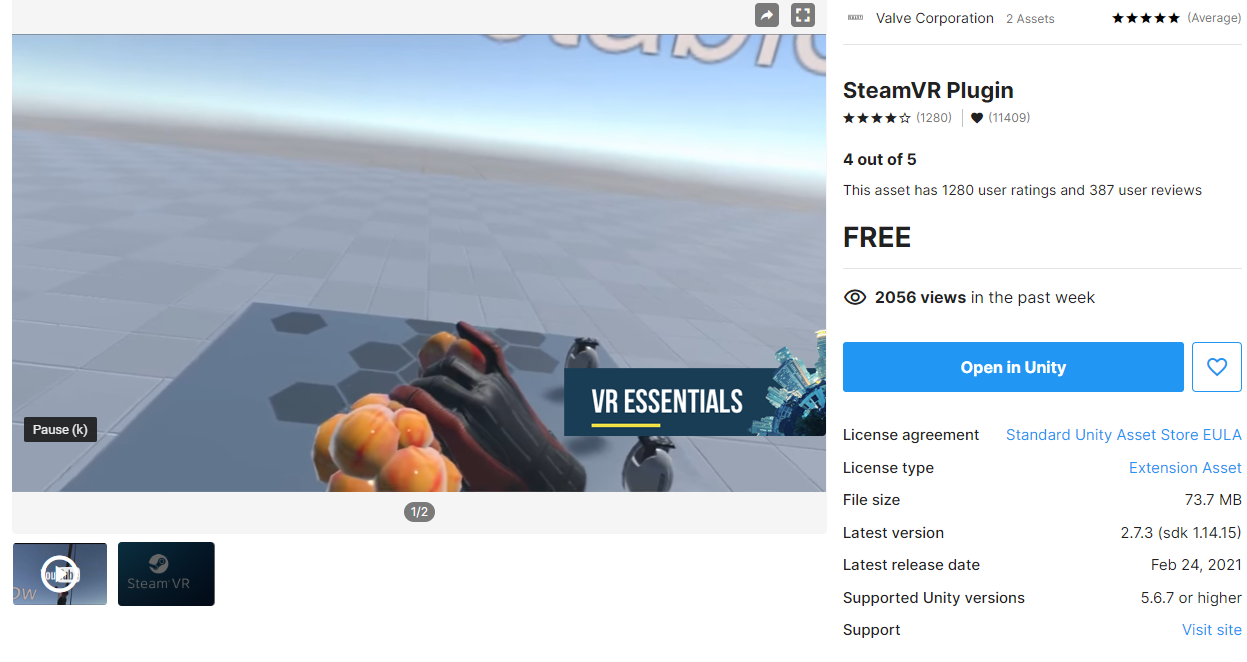
Press the Get SDK button under the SteamVR section. This will open the Asset Store. Select Add to My Assets to add it to your Unity assets.
按下 获取 SDK 按钮下 蒸汽虚拟现实 部分。这将打开资源商店。选择添加到我的资源以将其添加到 Unity 资源。
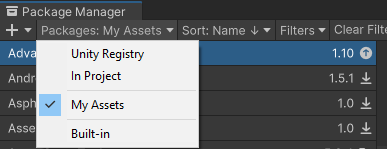
Now open the Package Manager using Window -> Package Manager. Select My Assets.
现在使用 Window -> 包管理器打开包管理器。选择我的资产。
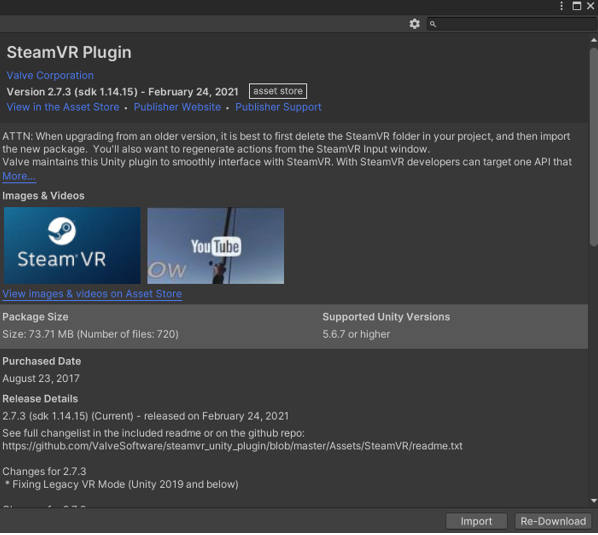
Import the SteamVR plugin
导入 SteamVR 插件
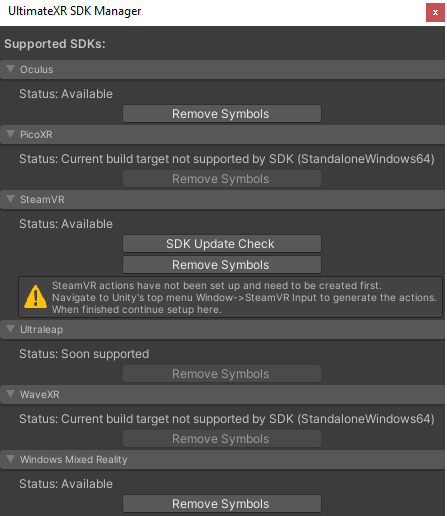
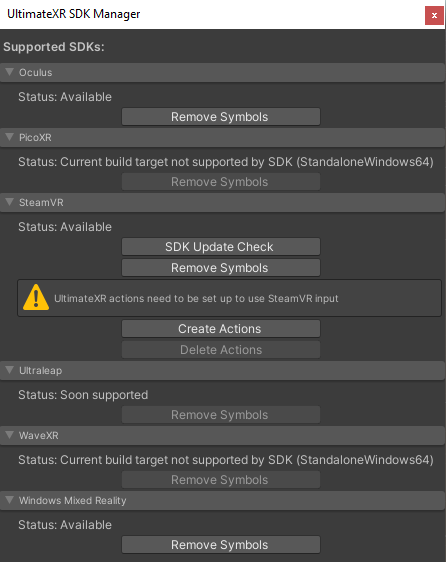
Go back to the UltimateXR SDK Manager. If everything went correctly the SteamVR section will show that the SteamVR actions need to be generated.
返回 UltimateXR SDK Manager。如果一切正常,SteamVR部分将显示需要生成SteamVR操作。
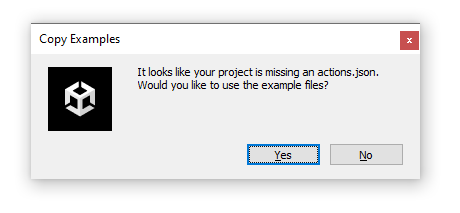
Open Window -> SteamVR Input. SteamVR will request permission to generate an actions file. Click yes.
打开窗口 - > SteamVR 输入。SteamVR 将请求生成动作文件的权限。单击“是”。
Going back to the UltimateXR SDK Manager the SteamVR section will now show the option to create the UltimateXR actions. The UltimateXR actions will allow to use the input module with SteamVR. Click on Create Actions.
回到UltimateXR SDK管理器,SteamVR部分现在将显示创建UltimateXR操作的选项。UltimateXR操作将允许将输入模块与SteamVR一起使用。单击创建操作。
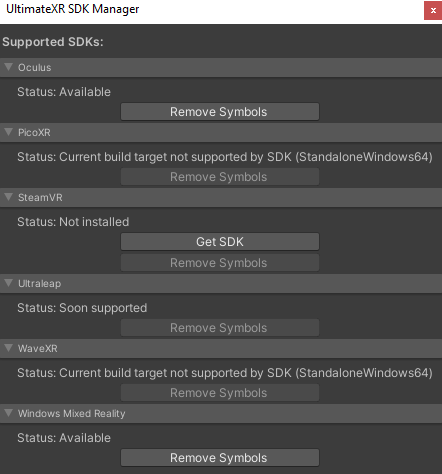
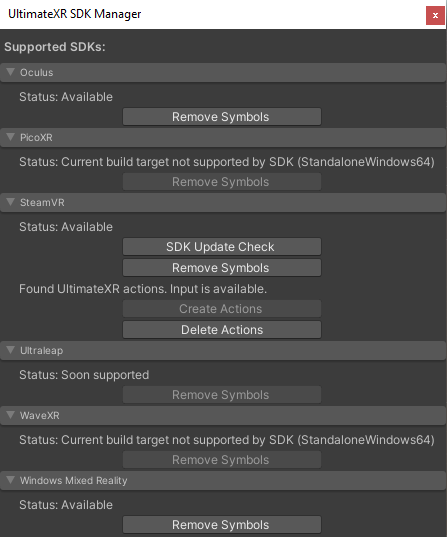
After some processing the SDK Manager should now show the following state:
经过一些处理后,SDK 管理器现在应显示以下状态:
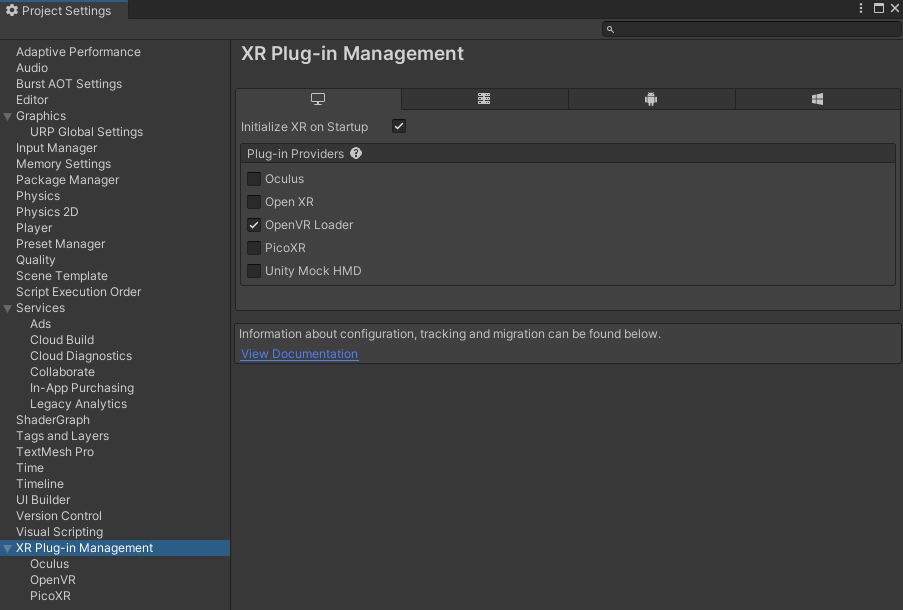
The last step is to enable the OpenVR plugin, which is the one used by the SteamVR SDK. Open Edit -> Project Settings and check the OpenVR plugin provider under the desktop section.
最后一步是启用OpenVR插件,这是SteamVR SDK使用的插件。打开编辑 -> 项目设置,然后检查桌面部分下的 OpenVR 插件提供程序。
Avatar 化身
Adding an Avatar to the scene 将头像添加到场景中
The first and most important requirement in your app is adding an avatar to your scene(s).
应用中的第一个也是最重要的要求是向场景添加头像。
An avatar is the visual representation of a user in the application. The minimal representation requires a single camera that allows the user to look around. More elements can be added such as hands to interact with the environment or a half/full body to have a more complete representation.
头像是应用程序中用户的可视表示形式。最小表示需要单个允许用户环顾四周的相机。可以添加更多元素,例如手与环境交互或半/全身以具有更完整的表示。
A special avatar is the local avatar, which is the avatar controlled by the user wearing the headset and input controllers. Non-local avatars are other avatars instantiated in the scene but not controlled by the user, either other users through the network or special cases such as automated replays.
一个特殊的头像是本地头像,是由佩戴耳机和输入控制器的用户控制的头像。非本地头像是在场景中实例化但不受用户控制的其他头像,无论是通过网络的其他用户还是自动回放等特殊情况。
There are two ways to add an avatar to the scene:
有两种方法可以将头像添加到场景中:
- Using any of the built-in avatar prefabs provided by UltimateXR
使用UltimateXR提供的任何内置头像预制件 - Creating your own avatar from scratch.
从头开始创建自己的头像。
Using an UltimateXR avatar prefab 使用 UltimateXR 头像预制件
Besides the Cyborg avatar that is used in the example scene, UltimateXR comes with 2 main avatar prefabs:
除了示例场景中使用的半机械人头像外,UltimateXR还附带了2个主要的头像预制件:
- BigHandsAvatar 大手头像
- SmallHandsAvatar 小手头像
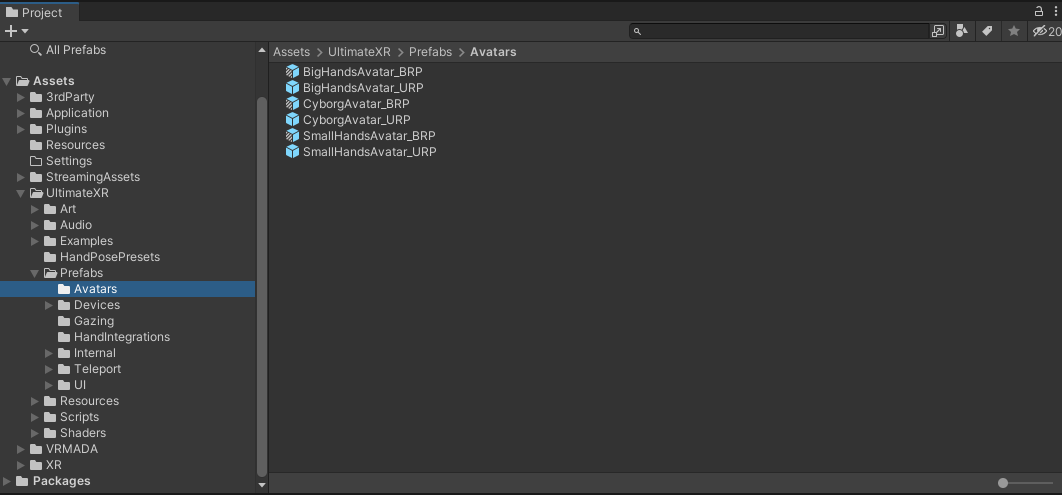
They can be found in the UltimateXR/Prefabs/Avatars folder.
它们可以在UltimateXR/Prefabs/Avatars文件夹中找到。
The _URP prefab is meant to be used in Universal Render Pipeline applications, while the _BRP variant is for applications using the Built-in Render Pipeline.
_URP预制件适用于通用渲染管线应用程序,而_BRP变体适用于使用内置渲染管线的应用程序。
The first question normally is, but where’s the normal hands avatar? The answer is there is no “normal” hand size, hand sizes can vary but in a very simplified world they can be grouped in small hands and big hands. Inclusion is one of the main goals of our avatars, and we try to support both in all our applications so that everyone feels included.
第一个问题通常是,但是正常的手头像在哪里?答案是没有“正常”的手部大小,手的大小可以变化,但在非常简化的世界中,它们可以分为小手和大手。包容性是我们头像的主要目标之一,我们尝试在所有应用程序中支持两者,以便每个人都感到被包容。
Let’s create a new scene and drag the BigHandsAvatar to it. Make sure to remove any existing camera.
让我们创建一个新场景并将 BigHandsAvatar 拖到其中。确保删除所有现有摄像机。
You will notice this warning sign on the avatar inspector:
您会在头像检查器上注意到此警告标志:
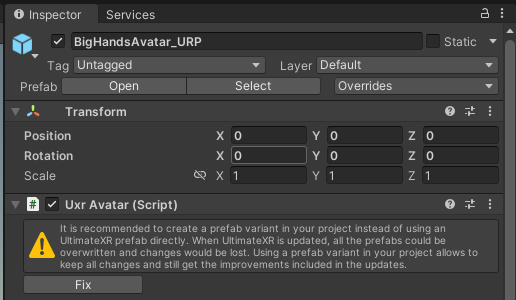
Click Fix to save your avatar prefab variant to a folder in your project. This is to make sure all changes will be applied to your avatar prefab variant instead of the UltimateXR avatar prefab. Since the UltimateXR prefab may be overwritten with changes during framework updates, you always want to work with a prefab variant that stores your modifications.
单击修复以将头像预制件变体保存到项目中的文件夹中。这是为了确保所有更改都将应用于您的头像预制件变体,而不是 UltimateXR 头像预制件。由于 UltimateXR 预制件可能会在框架更新期间被更改覆盖,因此您始终希望使用存储修改的预制件变体。
This has additional advantages:
这还有其他优点:
- No information is lost on UltimateXR updates.
UltimateXR更新不会丢失任何信息。 - If you are working with a version control system, it is better to have changes saved in your own prefab.
如果您使用的是版本控制系统,最好将更改保存在您自己的预制件中。 - If the UltimateXR prefab is updated with new functionality, your prefab will inherit all improvements automatically.
如果 UltimateXR 预制件已使用新功能进行更新,您的预制件将自动继承所有改进。 - Support for new devices will be added when they hit the market. This support will also be inherited by your prefab.
当新设备上市时,将添加对它们的支持。您的预制件也将继承此支持。
Now click Play. If your environment has been correctly set up and the device integration is working, you should be able to see your hands and make a fist by pressing the grab button.
现在单击播放。如果您的环境已正确设置并且设备集成正常工作,您应该能够通过按下抓取按钮看到您的手并握拳。
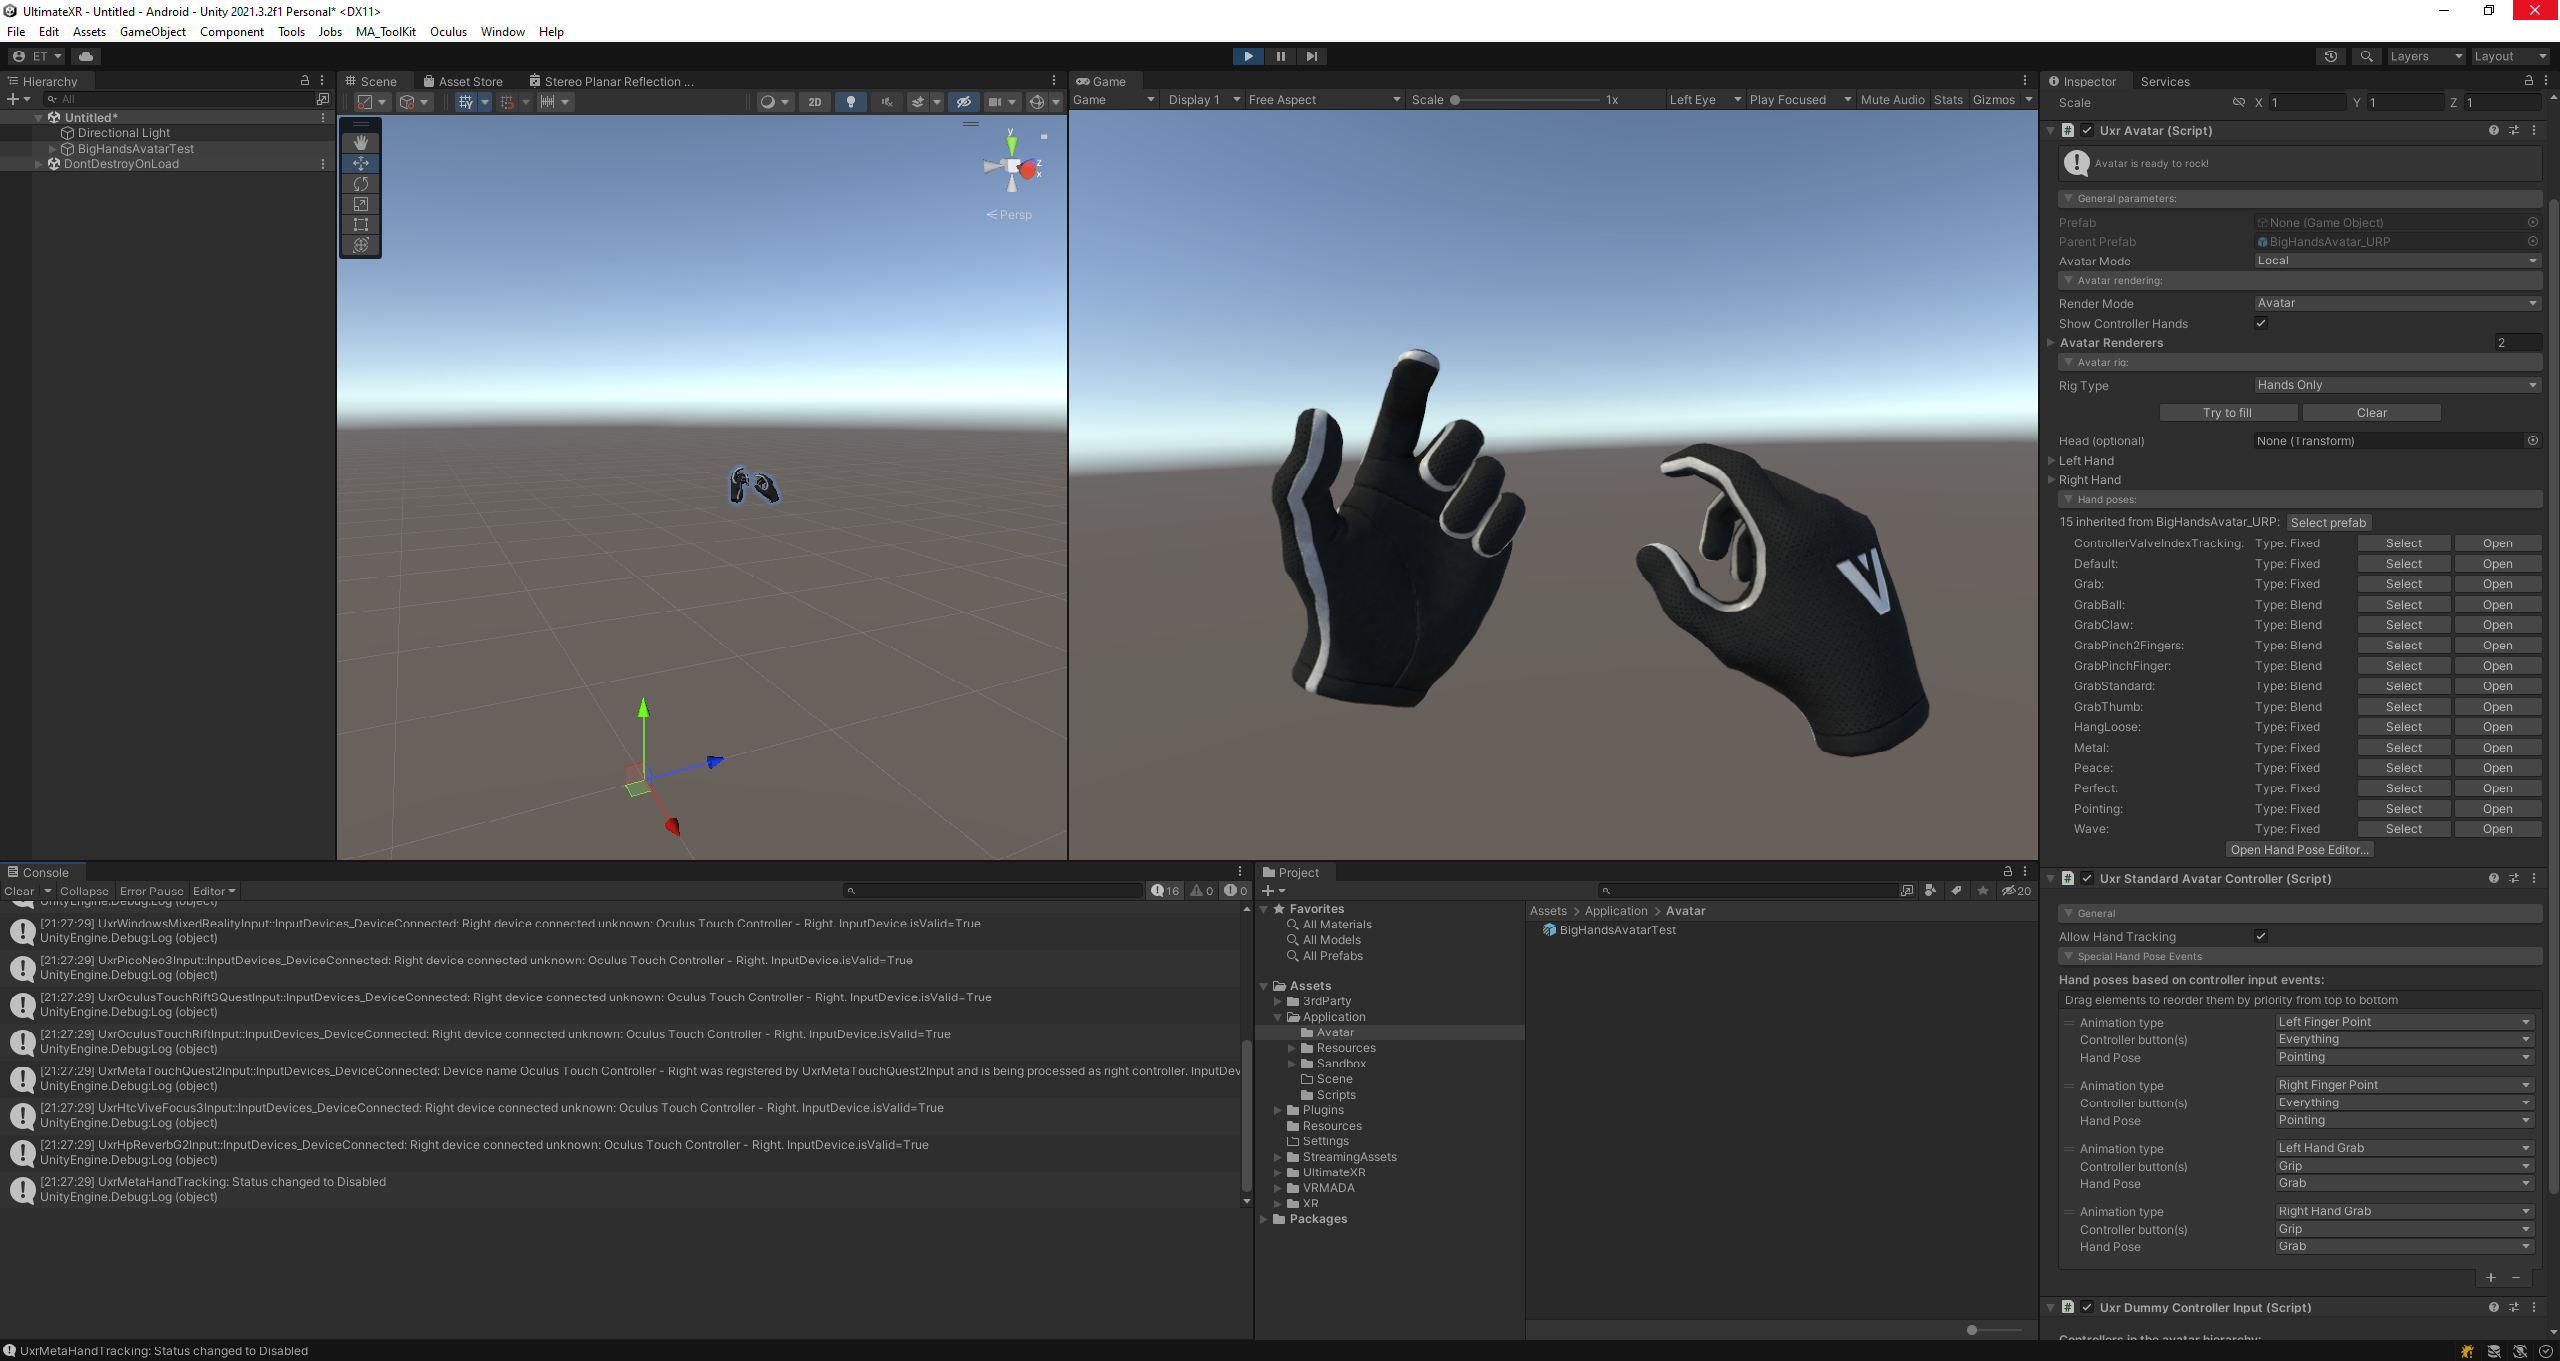
You can change your appearance using the different combinations provided. You may see that inside the avatar there are glove and hand objects for each side. You can select to activate either the gloves or the hands, and assign any of the following pre-defined materials:
您可以使用提供的不同组合更改外观。您可能会看到头像内部每侧都有手套和手部物品。您可以选择激活手套或手,并指定以下任何预定义材料:
For the glove objects:
对于手套对象:
- BigGlovesLogoMat (URP or BRP)
BigGlovesLogoMat (URP 或 BRP) - BigGlovesTechnicalMat (URP or BRP)
大手套技术垫(URP 或 BRP)
For the hand objects. From lighter skin to darker skin:
对于手部物体。从浅色皮肤到深色皮肤:
- BigHandsSkinType1Mat_PBR
- BigHandsSkinType2Mat_PBR
- BigHandsSkinType3Mat_PBR
- BigHandsSkinType4Mat_PBR
- BigHandsSkinType5Mat_PBR
- BigHandsSkinType6Mat_PBR
You can also create a new custom skin by creating a new material and assigning the UltimateXR/Hands/Hand shader. Make sure to assign the provided surface input textures or duplicate any of the existing hand materials to start using a reference.
您还可以通过创建新材质并分配旗舰版XR/手部/手部着色器来创建新的自定义皮肤。确保指定提供的表面输入纹理或复制任何现有的手部材质以开始使用参考。
If you decide to use the hand objects instead of the gloves, make sure you replace the glove renderers assigned by default in the UxrAvatar component with the hand renders:
如果您决定使用手部对象而不是手套,请确保将 UxrAvatar 组件中默认分配的手套渲染器替换为手部渲染器:

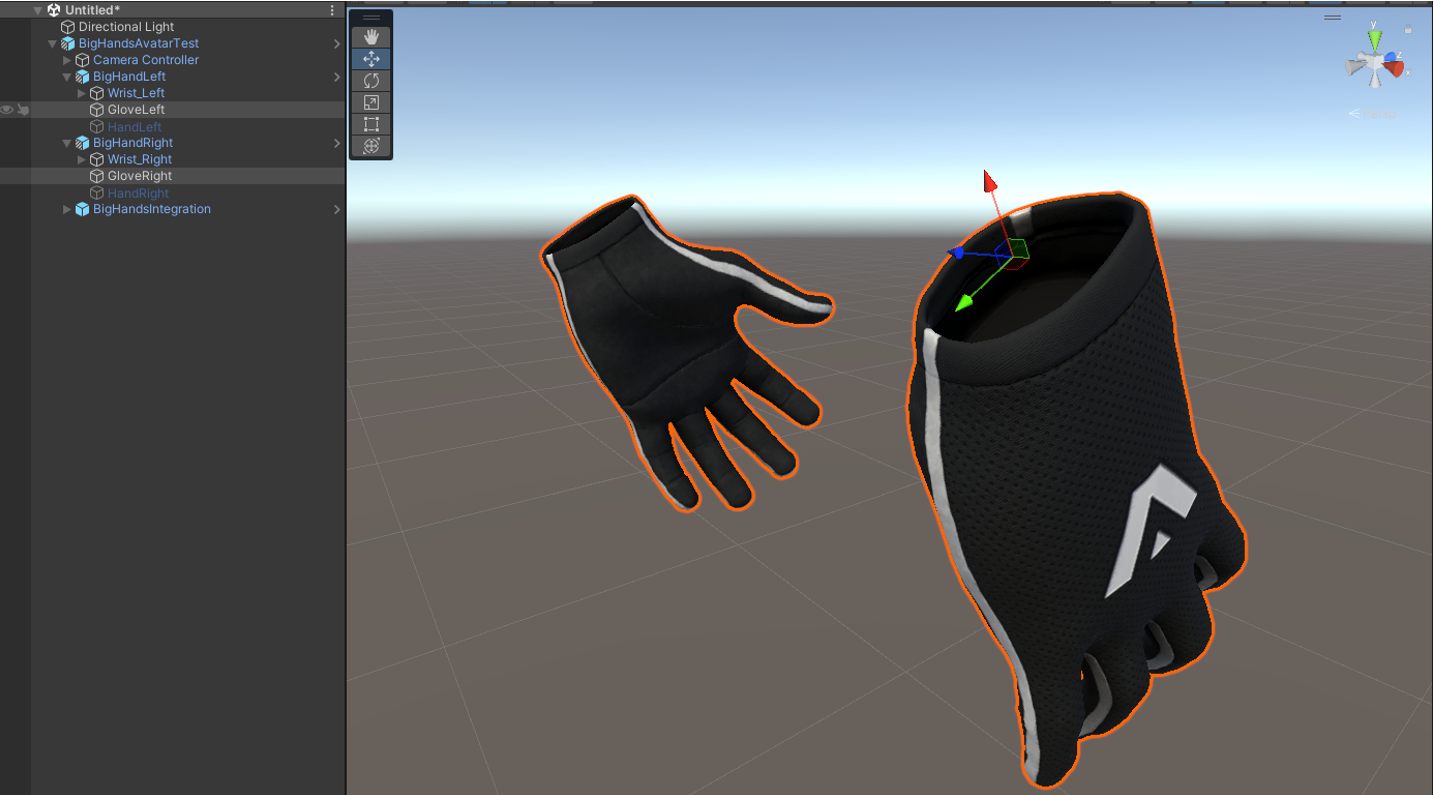
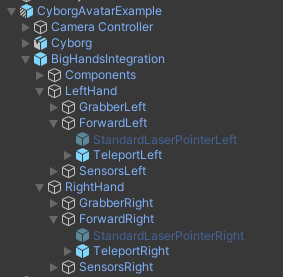
One important thing is making sure you do not move these hands, since there is another set of “virtual” hands that they depend on. If you check in the object tree, you will notice that there is a nested prefab called BigHandsIntegration.
一件重要的事情是确保您不要移动这些手,因为它们依赖另一组“虚拟”手。如果你在对象树中检查,你会注意到有一个名为BigHandsIntegration的嵌套预制件。
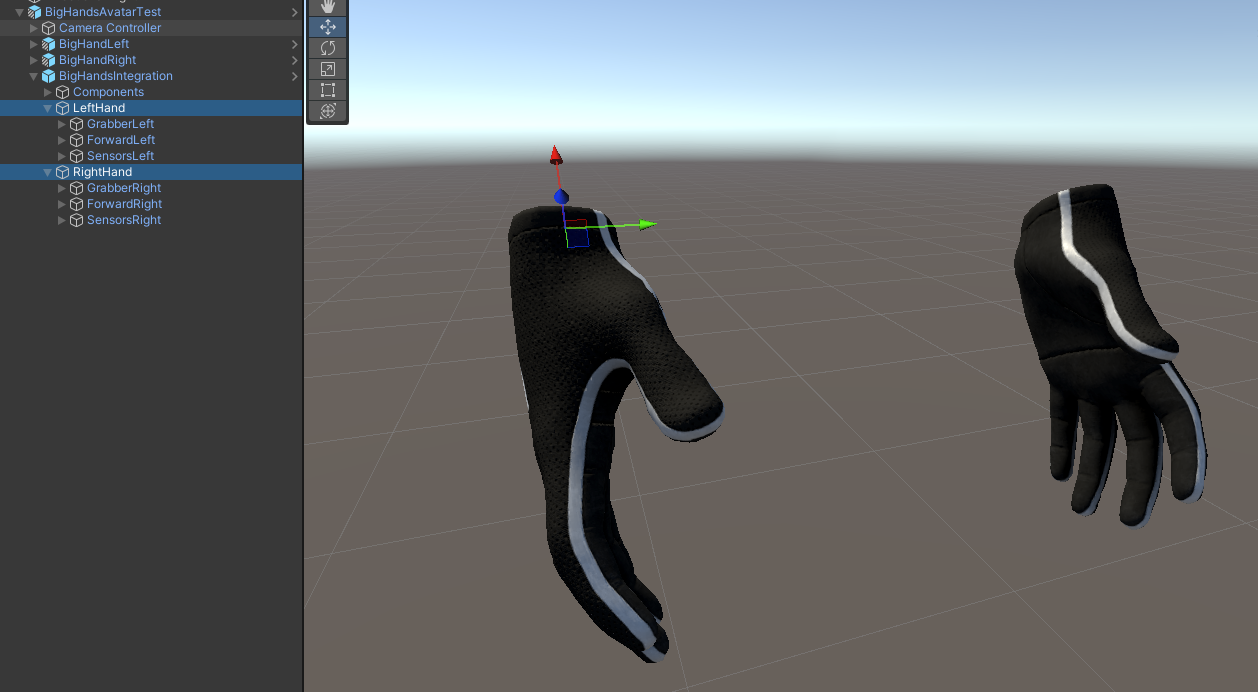
The LeftHand and RightHand objects inside BigHandsIntegration will show a green overlay hand in the scene window when selected. These hands need to be perfectly aligned with the avatar hand to work properly. Since they are already aligned, if you move any of the avatar hands they will become misaligned. If you really need to move an avatar hand for whatever reason, make sure you move the hand inside the HandsIntegration prefab to keep the alignment.
选中后,BigHandsIntegration 中的“左手”和“右手”对象将在场景窗口中显示绿色叠加手。这些手需要与头像手完美对齐才能正常工作。由于它们已经对齐,如果您移动任何头像手,它们将变得未对齐。如果您出于任何原因确实需要移动头像手,请确保在 HandsIntegration 预制件中移动手以保持对齐。
The BigHandsIntegration prefab is responsible for a lot of critical tasks:
BigHandsIntegration 预制件负责许多关键任务:
- Providing support for all available VR controllers.
为所有可用的 VR 控制器提供支持。 - Containing all graphics to represent VR controllers with hands that mimic user input (note: Inclusion of all controller graphics is still pending legal terms, but we hope it will be added soon).
包含所有图形,以表示具有模仿用户输入的手的 VR 控制器(注意:包含所有控制器图形仍有待法律条款,但我们希望尽快添加)。 - Knowing where to place the hands in space using tracking.
使用跟踪知道将手放在空间中的哪个位置。 - Provide ready-to-use components for things such as grabbing and teleporting.
为抓取和传送等提供即用型组件。
The fact that it can easily add all this functionality to any avatar, even to those created by the user, is one of the most important features in UltimateXR. By using a prefab, we make sure that any new controllers, graphics, or components will be available automatically after any update.
它可以轻松地将所有这些功能添加到任何头像中,甚至是用户创建的头像,这一事实是UltimateXR中最重要的功能之一。通过使用预制件,我们确保任何新的控制器、图形或组件在任何更新后都将自动可用。
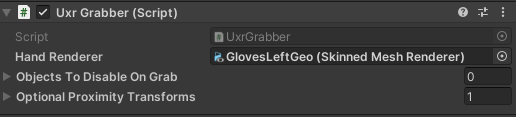
A last step is required if you opted for the hand objects instead of the gloves. Go to the grabbers located below the LeftHand and RightHand inside the BigHandsIntegration object.
如果您选择手部物品而不是手套,则需要最后一步。转到位于 BigHandsIntegration 对象中左手和右手下方的抓取器。
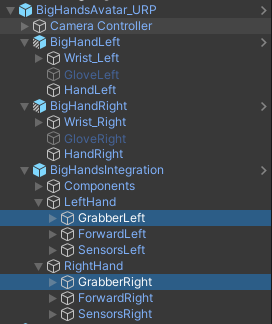
Both components currently reference the glove renderers, which you deactivated in favor of the hands. You need to reference the HandLeft and HandRight renderers that you activated instead. What this does is tell the grabbers which objects should be used to preview grab poses.
这两个组件当前都引用手套渲染器,您停用了这些渲染器以支持手部。您需要引用您激活的 HandLeft 和 HandRight 渲染器。这样做是告诉抓取器应该使用哪些对象来预览抓取姿势。

Possible next steps setting up your avatar:
设置头像的可能后续步骤:
- On the root GameObject, setting up the UxrStandardAvatarController component to add hand gestures based on user input.
在根游戏对象上,设置 UxrStandardAvatarController 组件以根据用户输入添加手势。 - On the root GameObject, adding new poses to the UxrAvatar component by going to the bottom of the Hand Poses section and opening the Hand Pose Editor.
在根游戏对象上,通过转到手部姿势部分的底部并打开手部姿势编辑器,将新姿势添加到 UxrAvatar 组件。 - Inside the BigHandsIntegration GameObject, setting up teleportation hanging from the ForwardLeft/ForwardRight objects.
在 BigHandsIntegration 游戏对象中,设置从 ForwardLeft/ForwardRight 对象挂起的传送。 - Inside the BigHandsIntegration GameObject, enabling laser pointers hanging from the ForwardLeft/ForwardRight objects to interact with Unity UIs. This will require creating an EventSystem in the scene (menu GameObject -> UI -> EventSystem) and adding a UxrPointerInputModule component to the EventSystem GameObject.
在 BigHandsIntegration GameObject 内部,使悬挂在 ForwardLeft/ForwardRight 对象的激光指示器能够与 Unity UI 进行交互。这将需要在场景中创建一个事件系统(菜单游戏对象 -> UI -> 事件系统),并将 UxrPointerInputModule 组件添加到事件系统游戏对象。 - Adding a UxrCameraWallFade component to the avatar’s Camera if you want to fade the screen to black whenever the user clips through colliders. “Allow Traverse” will only fade through the geometry while “Strict” will keep the screen black until the user returns to the original position.
将 UxrCameraWallFade 组件添加到头像的相机中,如果您想在用户通过碰撞体剪辑时将屏幕淡入黑色。“允许遍历”只会淡入几何图形,而“严格”将使屏幕保持黑色,直到用户返回到原始位置。
Creating a custom avatar from scratch 从头开始创建自定义头像
You may also want to set up a custom avatar using your own rig and graphics. We have put special effort into providing a simple yet powerful way to set up your own avatar.
您可能还想使用自己的装备和图形设置自定义头像。我们特别努力提供一种简单而强大的方法来设置您自己的头像。
It all starts by creating an empty GameObject placed at floor level. Add an UxrAvatar component to it.
这一切都始于创建一个放置在地板上的空游戏对象。向其添加 UxrAvatar 组件。
You will notice that there is immediately an assistant on top of the component that will guide you through the steps by looking at missing elements and offering an instant fix.
您会注意到组件顶部立即有一个助手,它将通过查看缺少的元素并提供即时修复来指导您完成这些步骤。
Let’s see what it can do automatically:
让我们看看它可以自动做什么:

Woops! It seems we got our first roadblock.
哎呀!看来我们遇到了第一个障碍。
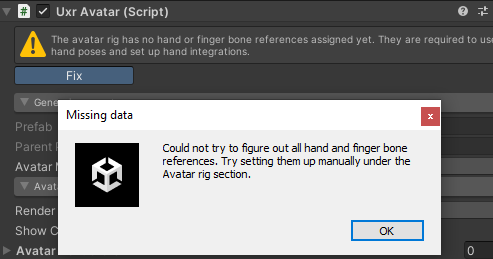
This is because we haven’t placed anything hanging from the avatar yet. Let’s add our Cyborg geometry, we’ll drag the CyborgGeo asset under the avatar GameObject.
这是因为我们还没有在头像上放置任何东西。让我们添加我们的半机械人几何体,我们将机器人地理资产拖到头像游戏对象下。
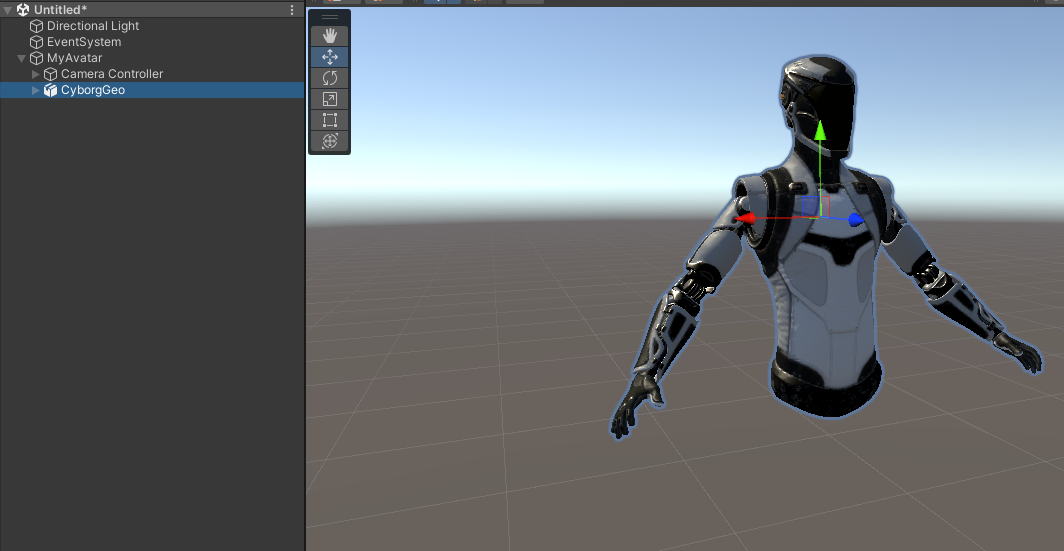
Let’s go back to the UxrAvatar assistant and try Fix again. It seems to work now!
让我们回到UxrAvatar助手,再次尝试修复。现在似乎有效!
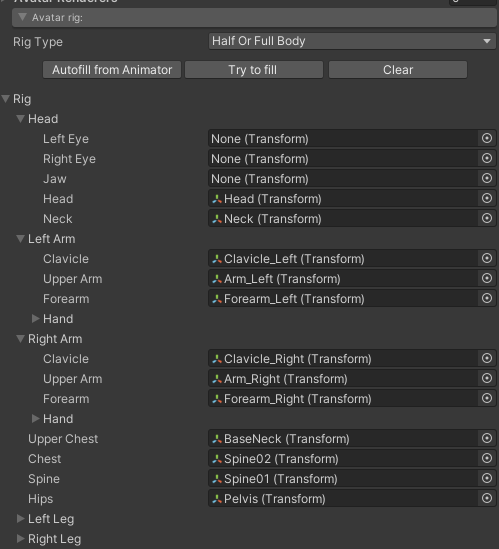
Now we set the Rig Type to Half or Full Body since the avatar is more than just head+hands.
现在我们将装备类型设置为半身或全身,因为头像不仅仅是头部+手。
We see that there are some elements that weren’t found correctly (Upper Chest, Chest, and Spine) but the rest was automatically assigned and found, including all finger bones. Let’s assign the missing elements.
我们看到有些元素没有正确找到(上胸部、胸部和脊柱),但其余元素是自动分配和找到的,包括所有手指骨。让我们分配缺少的元素。
Going back to the assistant, we see it now offers a choice between using Big Hands or Small Hands for the Hands Integration. You can check the previous section (Using a UltimateXR avatar prefab) if you are not familiar with what the Hands Integration is.
回到助手,我们看到它现在提供了使用大手或小手进行手集成之间的选择。如果您不熟悉手牌集成是什么,可以查看上一节(使用 UltimateXR 头像预制件)。
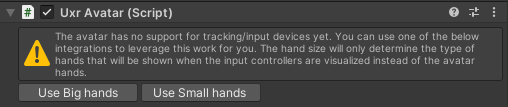
Let’s go with the small hands this time. The hand size will not affect the avatar itself; it will only decide which hands are shown when the avatar Render Mode is set to Controllers. When the Controllers are rendered, the Show Controller parameter tells whether to also render hands on top mimicking the user input on the real controllers. These hands, rendered using IK, can either be the big hands or the small hands. It really depends on what you consider your own avatar hand size to be, so that it doesn’t feel different from the avatar that you created.
这次让我们用小手去吧。手的大小不会影响头像本身;它只会决定当头像渲染模式设置为控制器时显示哪些手。渲染控制器时,Show Controller 参数会告知是否还要在顶部渲染手部,以模拟真实控制器上的用户输入。这些使用 IK 渲染的手可以是大手,也可以是小手。这实际上取决于您认为自己的头像手部大小,因此它与您创建的头像没有什么不同。

Once we have selected the small hands, we see that the assistant tells us that the avatar is ready to rock!
一旦我们选择了小手,我们看到助手告诉我们头像已经准备好摇滚了!

Let’s see how well the hand integration was automatically aligned with our avatar.
让我们看看手部集成与我们的头像自动对齐的程度如何。
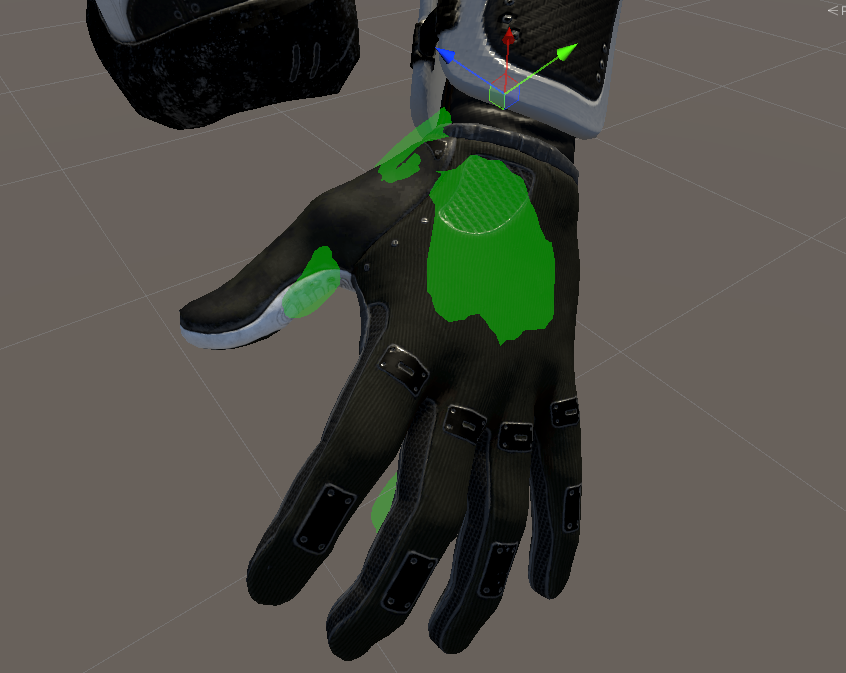
Open the SmallHandsIntegration object added to our avatar and select the LeftHand object. We see that it needs a little push forward so that both palms align. The goal is to make sure that the palm centers are approximately in the same place and that both palms lie on the same plane. Fingers can be a little misleading, it’s usually better to focus on getting the palms aligned.
打开添加到头像的 SmallHandsIntegration 对象,然后选择 LeftHand 对象。我们看到它需要向前一点推动,以便两只手掌对齐。目标是确保手掌中心大致位于同一位置,并且两个手掌位于同一平面上。手指可能有点误导,通常最好专注于使手掌对齐。
Do the same operation on the right hand.
在右手上执行相同的操作。
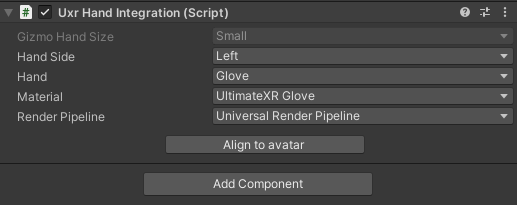
When selecting LeftHand and RightHand in the SmallHandsIntegration object, you may also have noticed that the inspector lets you choose which hands are shown when the avatar Render Mode is set to LeftController + RightController. Set up which combination you prefer.
在 SmallHandsIntegration 对象中选择“左手”和“右手”时,您可能还注意到,当头像“渲染模式”设置为“左控制器 + 右控制器”时,检查器允许您选择显示哪些手。设置您喜欢的组合。
The next step is quite critical for manipulation: Go to the GrabberLeft and GrabberRight objects hanging from LeftHand/RightHand and assign them the correct renderers for each hand. This will provide a way to preview grab hand poses when editing the pose properties of a grabbable object.
下一步对于操作非常关键:转到悬挂在 LeftHand /RightHand 上的 GrabberLeft 和 GrabberRight 对象,并为它们分配每只手的正确渲染器。这将提供一种在编辑可抓取对象的姿势属性时预览抓取手部姿势的方法。
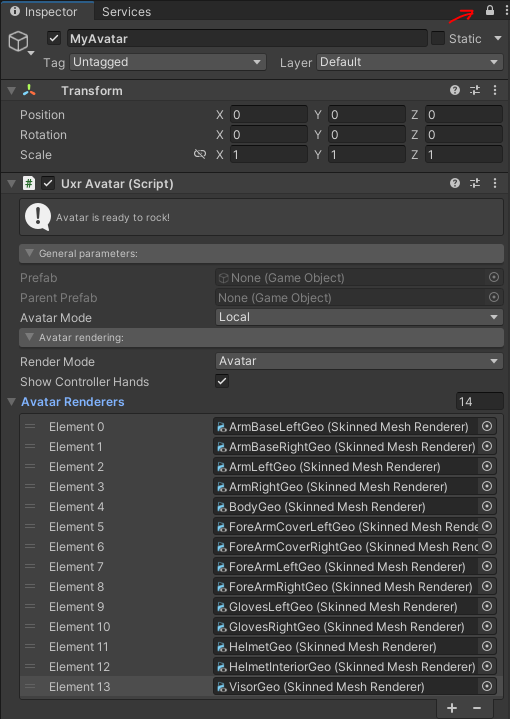
Now go to the UxrAvatar component and drag all the renderers in your avatar to the Avatar Renderers field. It can be useful to click the lock on the inspector to be able to multi-select all renderers in the hierarchy and drag&drop them to the Avatar Renderers.
现在转到 UxrAvatar 组件,并将头像中的所有渲染器拖到“头像渲染器”字段。单击检查器上的锁以能够多选层次结构中的所有渲染器并将它们拖放到头像渲染器中会很有用。
To finish let’s go to the root GameObject and edit the UxrStandardAvatarController component. We can adjust the eyes height so that the gizmos shown coincide with the eyes on the avatar. All other values are good by default.
最后,让我们转到根游戏对象并编辑 UxrStandardAvatarController 组件。我们可以调整眼睛高度,使显示的小玩意与头像上的眼睛重合。默认情况下,所有其他值都很好。
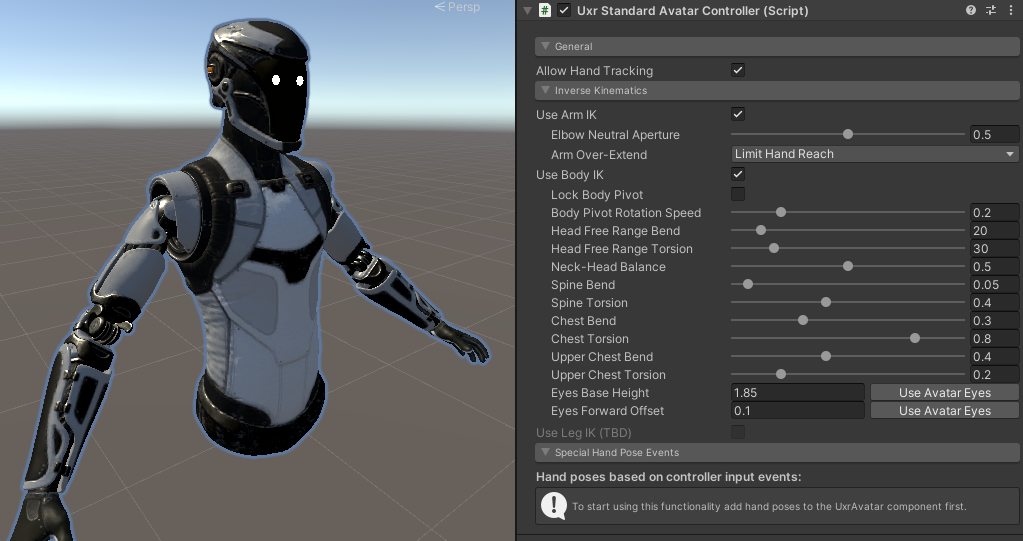
Now click Play to test the avatar.
现在单击“播放”以测试头像。
It seems to work nice! That was easy right? We hope the assistant can help you set up many other avatars the same way.
它似乎工作得很好!这很容易吧?我们希望助手可以帮助您以相同的方式设置许多其他头像。
Where to go from here:
从这里去哪里:
- On the root GameObject, add new poses to the UxrAvatar component by going to the Hand Poses section and opening the Hand Pose Editor. You may need to click Create Prefab first to save the avatar you just created as a prefab.
在根游戏对象上,通过转到手部姿势部分并打开手部姿势编辑器,将新姿势添加到 UxrAvatar 组件。您可能需要先单击创建预制件,将刚刚创建的头像保存为预制件。 - After creating hand poses, on the root GameObject you can set up the UxrStandardAvatarController component to add hand gestures based on user input.
创建手势后,您可以在根游戏对象上设置 UxrStandardAvatarController 组件,以根据用户输入添加手势。 - Inside the HandsIntegration GameObject, you can set up the teleportation parameters hanging from the ForwardLeft/ForwardRight objects.
在HandsIntegration游戏对象中,您可以设置悬挂在ForwardLeft/ForwardRight对象的传送参数。 - Inside the HandsIntegration GameObject, you can enable laser pointers hanging from the ForwardLeft/ForwardRight objects to interact with Unity UIs. This will require creating an EventSystem in the scene (menu GameObject -> UI -> EventSystem) and adding a UxrPointerInputModule component to the EventSystem GameObject.
在 HandsIntegration 游戏对象中,您可以启用悬挂在 ForwardLeft/ForwardRight 对象的激光笔与 Unity UI 进行交互。这将需要在场景中创建一个事件系统(菜单游戏对象 -> UI -> 事件系统),并将 UxrPointerInputModule 组件添加到事件系统游戏对象。 - Adding a UxrCameraWallFade component to the avatar’s Camera if you want to fade the screen to black whenever the user clips through colliders. “Allow Traverse” will only fade through the geometry while “Strict” will keep the screen black until the user returns to the original position.
将 UxrCameraWallFade 组件添加到头像的相机中,如果您想在用户通过碰撞体剪辑时将屏幕淡入黑色。“允许遍历”只会淡入几何图形,而“严格”将使屏幕保持黑色,直到用户返回到原始位置。 - Set up grabbable objects that the avatar can interact with.
设置头像可以与之交互的可抓取对象。
Locomotion 运动
Introduction 介绍
Locomotion in Virtual Reality is the technique that enables travelling from one place to another. Current headsets allow the user to explore the virtual world simply by walking around in the real world. In most cases, however, the available room space is not enough. In addition, there are other limitations that cannot be solved by walking around in a room, such as climbing up ladders, jumping off cliffs, or exploring huge scenarios.
虚拟现实中的运动是一种能够从一个地方到另一个地方旅行的技术。当前的耳机允许用户通过在现实世界中四处走动来探索虚拟世界。然而,在大多数情况下,可用的房间空间是不够的。此外,还有其他限制无法通过在房间里走动来解决,例如爬**、跳下悬崖或探索巨大的场景。
Locomotion methods try to solve all these limitations.
运动方法试图解决所有这些限制。
One of the biggest challenges since VR became mainstream has been consolidating standard locomotion methods to explore the virtual world. Some of the reasons why it is so challenging are:
自VR成为主流以来,最大的挑战之一是整合标准运动方法来探索虚拟世界。它如此具有挑战性的一些原因是:
- Motion sickness, which happens when your eyes tell your brain you’re moving around but your body feels still.
晕动病,当您的眼睛告诉您的大脑您正在四处走动但您的身体感觉静止时,就会发生这种情况。 - Intuitiveness. Users must learn and get used to new input mechanics to move around.
直观性。用户必须学习并习惯新的输入机制才能四处走动。 - Personal preferences. Users have very different preferences, and it is very important to support them all.
个人喜好。用户有非常不同的偏好,支持它们非常重要。
UltimateXR provides built-in components to support the most common locomotion methods. Built-in locomotion components, such as UxrTeleportLocomotion or UxrSmoothLocomotion, can be placed on any object in the avatar hierarchy. The UltimateXR avatar prefabs, for example, come with teleport components by default. Switching to another locomotion method can be done by disabling these default components and adding other component(s) to any object in the avatar hierarchy.
UltimateXR提供内置组件来支持最常见的运动方法。内置的运动组件,如UxrTeleportLocomotion或UxrSmoothLocomotion,可以放置在头像层次结构中的任何对象上。例如,UltimateXR头像预制件默认带有传送组件。切换到另一种运动方法可以通过禁用这些默认组件并将其他组件添加到头像层次结构中的任何对象来完成。
The framework also provides great flexibility to create new mechanics. There is no limitation on the amount of active locomotion components in an avatar. Some might add a single feature to the already existing components, such as climbing, but it is important that they all can work together.
该框架还为创建新机制提供了极大的灵活性。头像中活动运动组件的数量没有限制。有些人可能会在现有的组件中添加单个功能,例如攀爬,但重要的是它们都可以协同工作。
It is also possible to have a single custom locomotion component that takes care of everything.
也可以有一个自定义运动组件来处理所有事情。
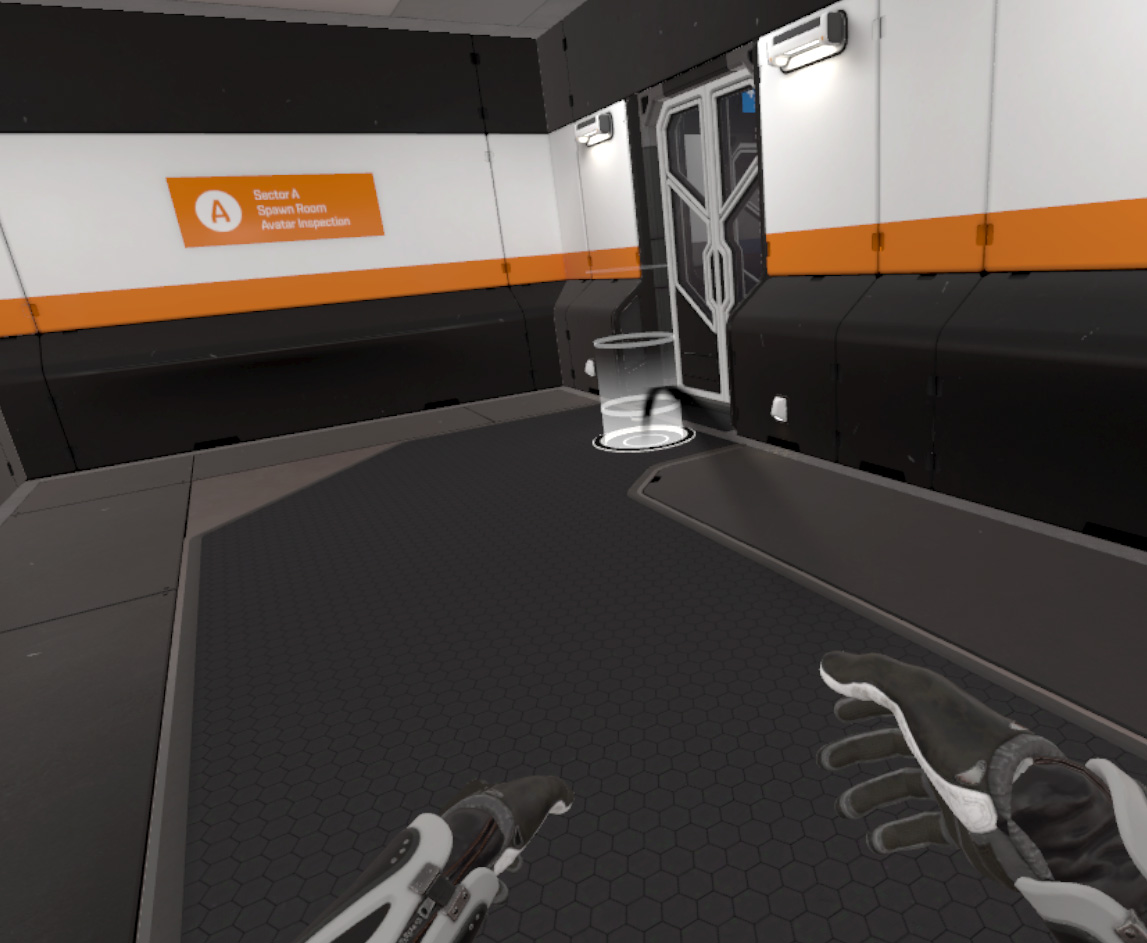
Teleporting 传送
Teleporting is one of the most common ways to move around in Virtual Reality. It solves a wide range of limitations, such as being able to move up or down different levels and move quickly around vast fields with minimal motion sickness.
传送是虚拟现实中最常见的移动方式之一。它解决了广泛的限制,例如能够上下移动不同的水平,并以最小的晕动病在广阔的田野中快速移动。
The avatar prefabs in UltimateXR come with teleporting components by default, which can be found hanging from the HandsIntegration object.
UltimateXR中的头像预制件默认带有传送组件,这些组件可以从HandsIntegration对象中找到悬挂。
Teleporting uses one component for each hand. These default components can be disabled and changed by any other locomotion component(s). They can also be left enabled and complemented with new locomotion component(s) in the case they add more features.
瞬移每只手使用一个组件。这些默认组件可由任何其他运动组件禁用和更改。它们也可以保持启用状态,并在添加更多功能的情况下补充新的运动组件。
At runtime, teleporting looks like this:
在运行时,传送如下所示:
The UxrTeleportLocomotion component UxrTeleportLocomotion组件
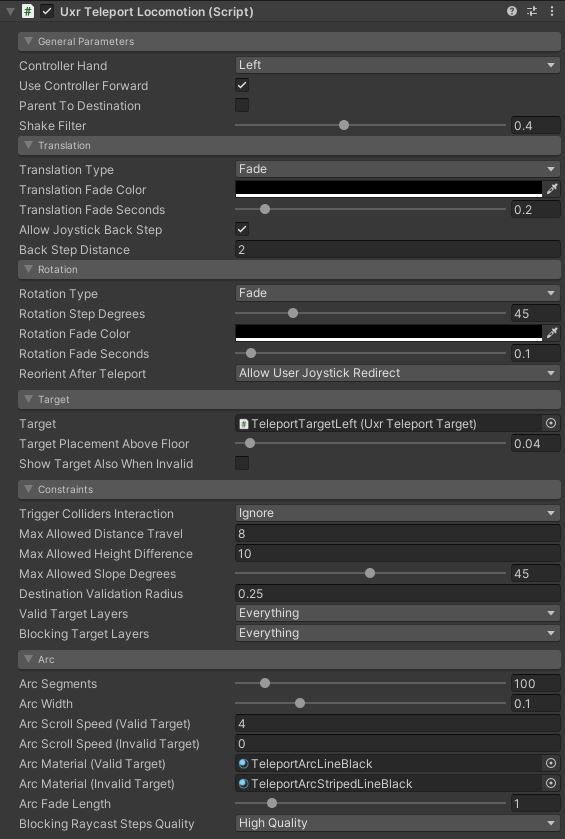
General parameters 一般参数
- Controller Hand: Which hand controls the input.
控制器手:哪只手控制输入。 - Use Controller Forward: Will the teleport use the controller’s forward vector instead of its own transform forward?
使用控制器前进:传送会使用控制器的前向矢量而不是自己的向前变换吗? - Parent To Destination: Whether to parent the avatar to the destination object after teleport. Use it when building applications with moving vehicles or platforms the avatar can move on, so that the avatar keeps the relative position/orientation after teleporting.
父级到目的地:传送后是否将头像父级到目的对象。在构建带有移动车辆或平台的应用程序时使用它,化身可以继续移动,以便化身在传送后保持相对位置/方向。 - Shake Filter: The amount of filtering to apply to the hand movement to smooth it out.
摇晃过滤器:应用于手部运动以使其平滑的过滤量。
Translation 译本
- Translation Type: Which translation method to use.
翻译类型:要使用的翻译方法。 - Translation Fade Color: The fade color when Fade translation type is used.
翻译淡入淡出颜色:使用淡入淡出翻译类型时的淡入淡出颜色。 - Translation Fade Seconds: The fade transition in seconds when Fade translation type is used.
翻译淡入淡出秒数:使用淡入淡出翻译类型时的淡入淡出过渡(以秒为单位)。 - Smooth Translation Seconds: The translation duration in seconds when Smooth translation type is used.
平滑翻译秒数:使用平滑翻译类型时的翻译持续时间(以秒为单位)。 - Allow Joystick Back Step: Whether to allow back steps by pressing the joystick down.
允许操纵杆后退:是否通过按下操纵杆来允许后退步。 - Back Step Distance: The distance of each back step.
后退步距:每个后退步的距离。
Rotation 旋转
- Rotation Type: Which rotation method to use.
旋转类型:要使用的旋转方法。 - Rotation Step Degrees: The amount of degrees of each turn for Immediate and Fade rotations.
旋转步长度数:“立即”和“淡入淡出”旋转的每个转弯的度数。 - Rotation Fade Color: The fade color when Fade rotation is used.
旋转淡入淡出颜色:使用淡入淡出旋转时的淡入淡出颜色。 - Rotation Fade Seconds: The fade transition in seconds when Fade rotation is used.
旋转淡入淡出秒数:使用淡入淡出旋转时的淡入淡出过渡(以秒为单位)。 - Smooth Rotation Seconds: The rotation duration in seconds when Smooth rotation is used.
平滑旋转秒数:使用平滑旋转时的旋转持续时间(以秒为单位)。 - Reorient After Teleport: How to orient the view right after teleporting.
传送后重新定向:如何在传送后立即调整视图方向。
Target 目标
- Target: Which teleport target to use. Can be either a prefab or an already instantiated object.
目标:使用哪个传送目标。可以是预制件或已实例化的对象。 - Target Placement Above Floor: Offset applied to the teleport target to help placing it a little above the floor.
目标放置在地板以上:应用于传送目标的偏移,以帮助将其放置在地板上方一点。 - Show Target Also When Invalid: Whether to show the target object also when the destination is not valid.
无效时也显示目标:是否在目标无效时也显示目标对象。 - Target Color When Valid: Target color to use when the destination is valid.
有效时的目标颜色:目标有效时要使用的目标颜色。 - Target Color When Invalid: Target color to use when the destination is not valid.
无效时的目标颜色:目标无效时要使用的目标颜色。
Constraints 约束
- Trigger Colliders Interaction: Whether colliders with the trigger property set will interact with the teleport raycasts.
触发碰撞体交互:设置了触发属性的碰撞体是否会与传送光线投射交互。 - Max Allowed Distance Travel: Maximum allowed distance that can be travelled using each teleport.
最大允许距离行进:使用每个传送可以行进的最大允许距离。 - Max Allowed Height Difference: Maximum allowed height difference to be able to teleport.
最大允许高度差:能够传送的最大允许高度差。 - Max Allowed Slope Degrees: Maximum allowed slope degrees at destination.
允许的最大坡度:目的地允许的最大坡度。 - Destination Validation Radius: Radius of a cylinder that will be used to validate the destination surroundings to allow teleporting.
目的地验证半径:圆柱体的半径,将用于验证目的地环境以允许传送。 - Valid Target Layers: Valid layers for teleporting destination objects.
有效目标图层:用于传送目标对象的有效图层。 - Blocking Target Layers: Objects that will block teleporting raycasts.
阻挡目标图层:将阻挡传送光线投射的对象。
Arc
- Arc Segments: The number of subdivisions to use to render the arc.
弧段:用于渲染弧的细分数。 - Arc Width: The width of the arc.
弧宽:弧的宽度。 - Arc Scroll Speed (Valid Target): The arc material scroll speed when the destination is valid.
圆弧滚动速度(有效目标):目标有效时的圆弧材料滚动速度。 - Arc Scroll Speed (Invalid Target): The arc material scroll speed when the destination is invalid.
弧形滚动速度(无效目标):目标无效时的弧形材质滚动速度。 - Arc Material (Valid Target): The arc material used when the destination is valid.
弧形材质(有效目标):目标有效时使用的圆弧材质。 - Arc Material (Invalid Target): The arc material used when the destination is invalid.
弧形材质(无效目标):目标无效时使用的弧形材质。 - Arc Fade Length: The fade length used when the arc exits the hand or collides with a target to hide intersections.
弧形淡入淡出长度:当弧线离开手部或与目标碰撞以隐藏交叉点时使用的淡入淡出长度。 - Blocking Raycast Steps Quality: How many subdivisions along the arc to perform to raycasts against the scenario.
阻挡光线投射步骤质量:沿弧线对场景的光线投射执行多少细分。
Smooth Locomotion 平稳的运动
Smooth Locomotion is an alternative movement system to Teleport Locomotion that uses continuous movement to travel across the virtual world. It can provide better immersion but is more prone to induce motion sickness. It is very popular among advanced videogames users. The controls are similar to FPS (First Person Shooter) games, where the left joystick is used to move and the right is used to turn.
平滑运动是传送运动的替代运动系统,它使用连续运动在虚拟世界中旅行。它可以提供更好的沉浸感,但更容易诱发晕动病。它在高级视频游戏用户中非常受欢迎。控制类似于FPS(第一人称射击)游戏,其中左操纵杆用于移动,右操纵杆用于转动。
The UxrSmoothLocomotion component UxrSmoothLocomotion 组件
The UxrSmoothLocomotion component in UltimateXR provides smooth locomotion capabilities to an avatar. It also serves as a demonstration of a possible subclass implementation of the UxrLocomotion component.
UltimateXR中的UxrSmoothLocomotion组件为化身提供平滑的运动功能。它还演示了 UxrLocomotion 组件的可能子类实现。
Note: The current smooth locomotion provided by UxrSmoothLocomotion is very basic. A more robust implementation will be released very soon.
注意:UxrSmoothLocomotion提供的当前平滑运动是非常基本的。更强大的实现将很快发布。
Setting up UxrSmoothLocomotion on an avatar:
在头像上设置 UxrSmoothLocomotion:
- Have an avatar instantiated in the scene. You can use any of the UltimateXR avatar prefabs located in /UltimateXR/Prefabs/Avatars
在场景中实例化头像。您可以使用位于 /UltimateXR/Prefabs/Avatars 中的任何 UltimateXR 头像预制件 - Make sure that any UxrTeleportLocomotion components on your Avatar are inactive
确保头像上的任何UxrTeleportLocomotion组件都处于非活动状态 - Add the UxrSmoothLocomotion component anywhere in your Avatar’s hierarchy
将 UxrSmoothLocomotion 组件添加到头像层次结构中的任何位置
That’s it! With the default settings, you can now smoothly move with the left controller joystick, and smoothly rotate with the right controller joystick.
就是这样!使用默认设置,您现在可以使用左侧控制器操纵杆平滑移动,并使用右侧控制器操纵杆平滑旋转。
What’s Next? Tweak the following parameters to dial in the precise movement you desire.
下一步是什么?调整以下参数以拨入您想要的精确运动。

General parameters 一般参数
-
Parent To Destination: Whether to parent the avatar to the destination object after teleport. Use it when building applications with moving vehicles or platforms the avatar can move on, so that the avatar keeps the relative position/orientation after teleporting.
父级到目的地:传送后是否将头像父级到目的对象。在构建带有移动车辆或平台的应用程序时使用它,化身可以继续移动,以便化身在传送后保持相对位置/方向。 -
Meters Per Second Normal: Speed of normal joystick movement.
米每秒正常:正常操纵杆移动的速度。 -
Meters Per Second Print: Speed of movement while pressing the sprint button.
米每秒打印:按下冲刺按钮时的移动速度。 -
Walk Direction: Options for what the Up/Forward on the Joystick is based on
:
步行方向:操纵杆上的向上/向前选项:
- Controller Forward - Forward direction of your left controller.
控制器前进 - 左侧控制器的前进方向。 - Avatar Forward - Forward direction your Avatar.
头像向前 - 向前方向你的头像。 - Look Direction - Forward direction of your Camera.
看方向 - 相机的前进方向。
- Controller Forward - Forward direction of your left controller.
-
Rotation Degrees Per Second Normal: Speed of normal smooth rotation.
每秒旋转度数 法线:正常平滑旋转的速度。 -
Rotation Degrees Per Second Sprint: Speed of smooth rotation while sprinting.
每秒冲刺旋转度数:冲刺时平稳旋转的速度。 -
Gravity: Gravity Acceleration to apply in the Y direction. -9.81 approximates Earth gravity.
重力:应用于Y方向的重力加速度。-9.81近似于地球重力。
Input parameters 输入参数
Sprint Button Hand: Which Hand can enable sprint. Sprint Button: Button to press to enable sprint.
冲刺按钮手:哪只手可以启用冲刺。冲刺按钮:按下按钮以启用冲刺。
Constraints 约束
- Trigger Colliders Interaction: Whether colliders with the trigger property set will interact with the teleport raycasts.
触发碰撞体交互:设置了触发属性的碰撞体是否会与传送光线投射交互。 - Collision Layer Mask: Layers of colliders that will block your movement.
碰撞层蒙版:将阻止您移动的碰撞体层。 - Capsule Radius: In Meters, size of your body collider.
胶囊半径:以米为单位,身体对撞机的大小。 - Max Step Height: In Meters, you will climb geometry if it is within this height of your current ground.
最大台阶高度:以米为单位,如果几何图形在当前地面的此高度范围内,您将攀爬几何图形。 - Max Slope Degrees: You will climb geometry if the slope is less than this amount.
最大坡度数:如果坡度小于此量,则将攀爬几何图形。 - Step Distance Check: How far forwards to check for Max Steps & Max Slopes.
步距检查:检查最大步数和最大坡度的前进距离。
Creating new locomotion components 创建新的运动组件
To create your own locomotion components using scripting follow these steps:
要使用脚本创建您自己的运动组件,请执行以下步骤:
- Create a new class derived from UxrLocomotion
创建派生自 UxrLocomotion 的新类 - Override the IsSmoothLocomotion boolean property to indicate whether the component updates the avatar position every frame or at discrete times.
重写 IsSmoothLocomotion 布尔属性,以指示组件是每帧更新一次还是在离散时间更新头像位置。 - Override the UpdateLocomotion() method that will be called every frame.
重写将每帧调用的 UpdateLocomotion() 方法。 - Use methods in UxrManager such as MoveAvatarTo(), TranslateAvatar(), RotateAvatar(), TeleportLocalAvatar() so that the locomotion integrates correctly with the event system. This is important for other components in the framework such as LOD switching or in networking environments.
在 UxrManager 中使用方法,例如 MoveAvatarTo()、TranslateAvatar()、RotateAvatar()、TeleportLocalAvatar(),以便运动与事件系统正确集成。这对于框架中的其他组件(如 LOD 切换或网络环境中)非常重要。 - Disable the other locomotion components in the avatar if required and add the new component anywhere in the hierarchy.
如果需要,禁用头像中的其他运动组件,并将新组件添加到层次结构中的任何位置。
A good start can be checking out the UxrSmoothLocomotion component to see how it works.
一个好的开始可以是查看UxrSmoothLocomotion组件,看看它是如何工作的。
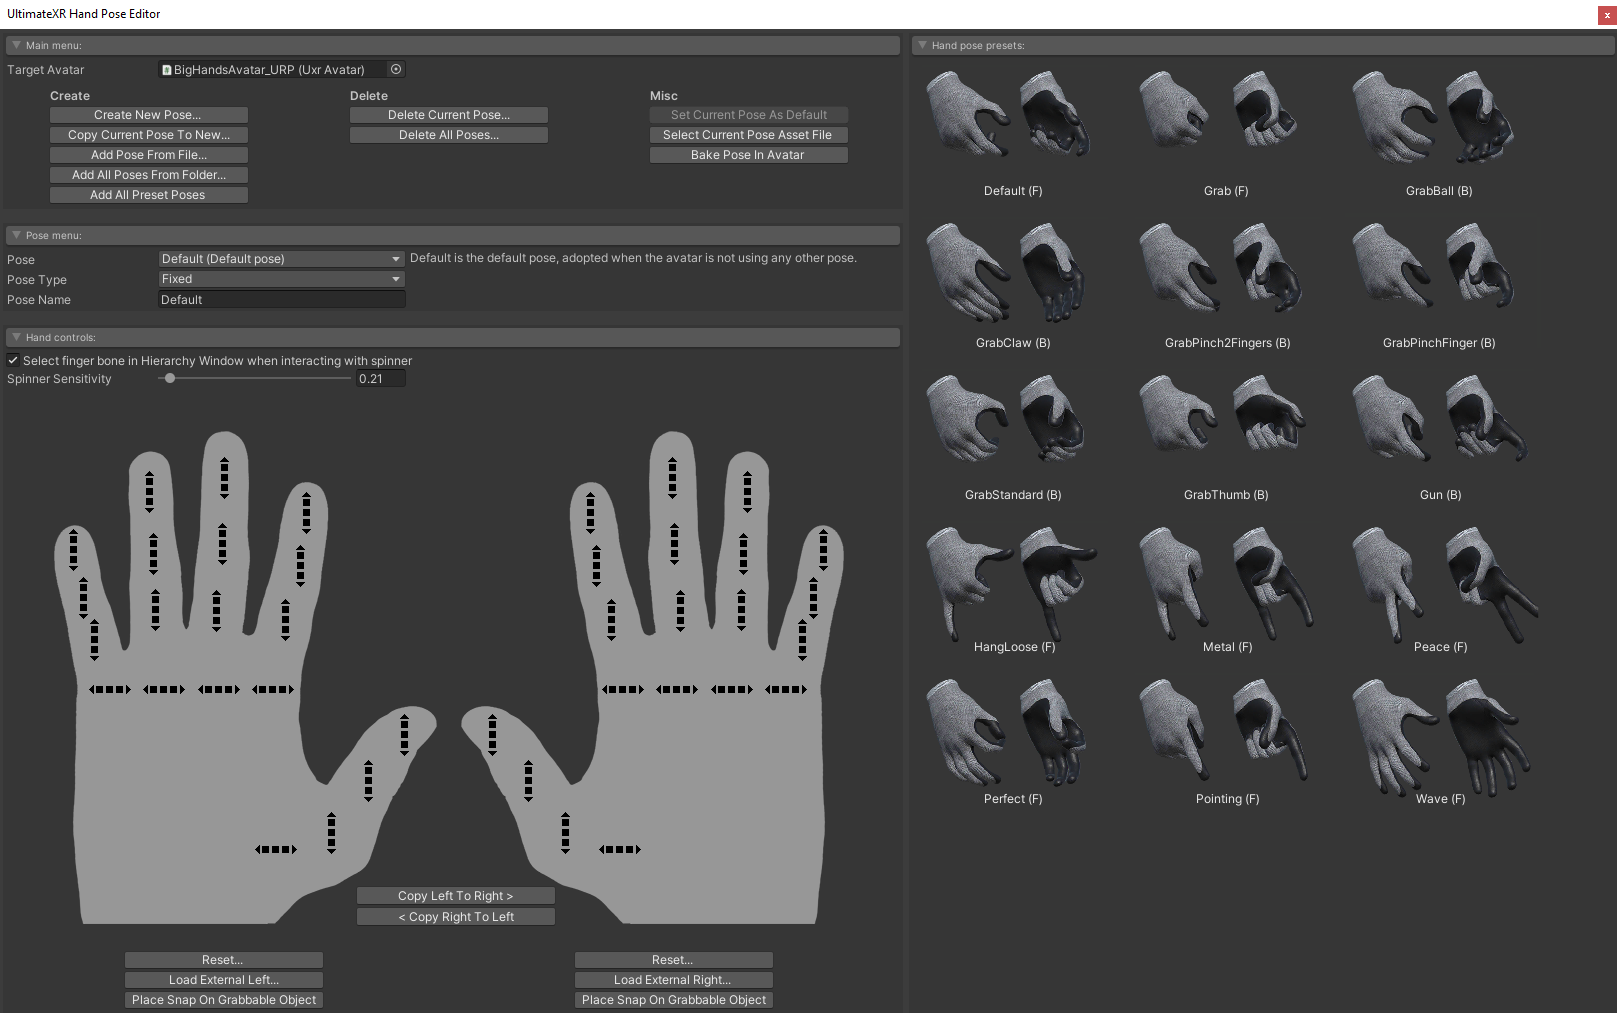
Using the Hand Pose Editor 使用手部姿势编辑器
The UltimateXR Hand Pose Editor is an important tool when adding interactivity to our avatars. It simplifies the creation of hand poses that can be used at runtime to make hand gestures or to grab objects with different shapes.
UltimateXR手部姿势编辑器是为我们的头像添加交互性的重要工具。它简化了手部姿势的创建,这些姿势可在运行时用于制作手势或抓取具有不同形状的对象。
Hand poses are used primarily by these components:
手部姿势主要由以下组件使用:
-
- UxrStandardAvatarController
- Present in the root GameObject of our avatar. It controls which hand poses are used depending on the controller buttons that are pressed. There are different pose types that can be specified:
UxrStandardAvatarController:存在于我们头像的根游戏对象中。它根据按下的控制器按钮控制使用哪些手部姿势。可以指定不同的姿势类型:
- Grab: Normally assigned to the grip button. This special pose will also trigger the grabbing functionality to interact with UxrGrabbableObject components.
抓取:通常分配给握把按钮。这个特殊的姿势还将触发抓取功能,与UxrGrabbableObject组件进行交互。 - Pointing: It can be assigned to a button but if you don’t want the user to be able to point with the hands using buttons you can specify Everything as the button combination. It is a special pose because when the hand is inside a volume defined by a UxrFingerPointingVolume component, the hand will adopt the pointing pose. It is used in front of UIs to facilitate touch interaction.
指向:可以将其分配给按钮,但如果不希望用户能够使用按钮用手指向,则可以将“一切”指定为按钮组合。这是一个特殊的姿势,因为当手在由 UxrFingerPointingVolume 组件定义的卷内时,手将采用指向姿势。它用于 UI 前面以促进触摸交互。 - Other: These are poses that can be assigned to button events but don’t have any special meaning besides adopting the pose whenever the button is pressed.
其他:这些姿势可以分配给按钮事件,但除了在按下按钮时采用姿势外,没有任何特殊含义。
-
UxrGrabbableObject: Added to objects so that they can be grabbed. Here when snapping is enabled it allows you to specify which hand pose will be used to grab that specific object.
UxrGrabbableObject:添加到对象中,以便可以抓取它们。在这里,启用捕捉后,它允许您指定将使用哪种手部姿势来抓取该特定对象。 -
UxrFirearmWeapon: This component depends on a UxrGrabbableObject also present in the same GameObject, which is used to grab the weapon. The UxrGrabbableObject should have a blend pose assigned -more on blend poses later- that blends from trigger released to trigger completely pulled.
UxrFirearmWeapon:此组件依赖于同一游戏对象中也存在的UxrGrabbableObject,该对象用于抓取武器。UxrGrabbableObject 应该分配一个混合姿势 - 稍后会详细介绍混合姿势 - 从触发器释放到完全拉动触发器的混合。
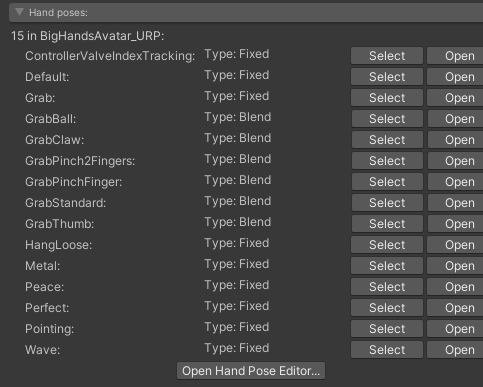
You can access the hand pose editor using the Hand Poses section in the UxrAvatar component of an avatar in the scene.
您可以使用场景中头像的 UxrAvatar 组件中的手部姿势部分访问手部姿势编辑器。
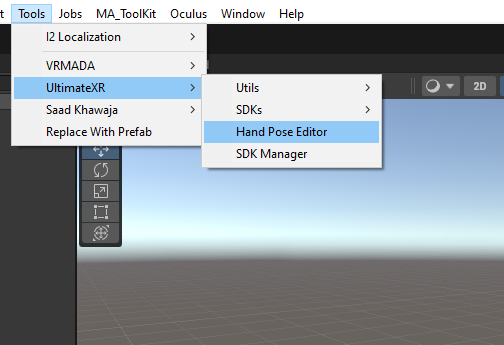
Or by using the Tools -> UltimateXR -> Hand Pose Editor menu.
或者使用工具 -> 终极版XR ->手部姿势编辑器菜单。
Let’s first list some important concepts to understand how hand poses work:
让我们首先列出一些重要的概念来了解手部姿势的工作原理:
-
You edit hand poses of an avatar by loading the avatar in the Hand Pose Editor.
您可以通过在手部姿势编辑器中加载头像来编辑头像的手部姿势。 -
Hand Poses are created by the Hand Pose Editor, added to an avatar and stored in an .asset file in your project.
手部姿势由手部姿势编辑器创建,添加到头像中并存储在项目的 .asset 文件中。 -
An avatar can have many different hand poses.
头像可以有许多不同的手部姿势。 -
A special pose is the default hand pose, which is the pose the hands will adopt when there is no user input and no events that change it.
特殊姿势是默认的手部姿势,这是在没有用户输入且没有更改它的事件时手将采用的姿势。 -
There are two types of hand poses:
有两种类型的手势:
- Fixed: A hand pose with fixed bone orientations.
固定:具有固定骨骼方向的手部姿势。 - Blend: A hand pose defined by two different hand poses. A blend pose allows the hand to adopt any pose in between the two. Blend poses are useful to create generic grab poses where the start pose adopts a completely open grip and the second pose adopts a completely closed grip. This can then be used in UxrGrabbableObject components where a slider will let you control the pose that perfectly fits an object. UltimateXR avatars come with a set of common blend poses that can be used to grab most objects. Blend poses are also used in cases where you want to blend between two poses while an object is being grabbed, such as a firearm. The start pose would have the trigger released and the end pose the trigger pulled. Depending on the controller’s analog trigger button the pose would blend from start to end.
混合:由两种不同的手部姿势定义的手部姿势。混合姿势允许手在两者之间采用任何姿势。混合姿势对于创建通用抓取姿势很有用,其中起始姿势采用完全开放的握把,第二个姿势采用完全封闭的抓地力。然后可以在UxrGrabbableObject组件中使用,其中滑块可让您控制完全适合对象的姿势。UltimateXR头像带有一组常见的混合姿势,可用于抓取大多数物体。混合姿势也用于在抓取物体(例如枪支)时要在两个姿势之间混合的情况。开始姿势将释放扳机并扣动扳机的结束姿势。根据控制器的模拟触发按钮,姿势将从头到尾混合。
- Fixed: A hand pose with fixed bone orientations.
-
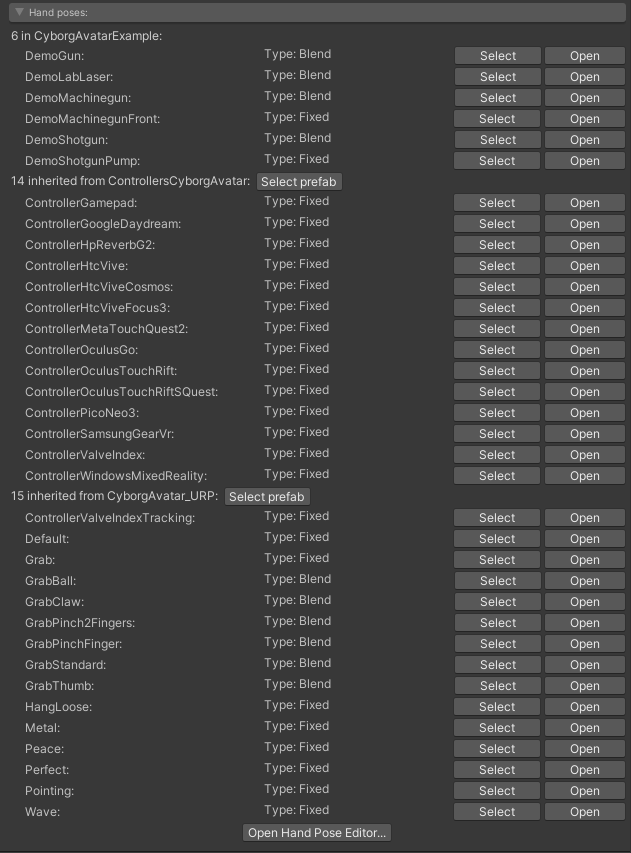
If you create a prefab variant of an avatar, the prefab variant will inherit all hand poses of the parent prefabs and will be able to use them. However, these hand poses will be marked as read-only in the editor to prevent changing poses that don’t belong to the avatar, but to a parent.
如果您创建头像的预制件变体,则该预制件变体将继承父预制件的所有手部姿势,并且能够使用它们。但是,这些手部姿势将在编辑器中标记为只读,以防止更改不属于头像而是属于父级的姿势。 -
You can create a new hand pose with the same name as an inherited pose. In this case the pose will be shown as an “override” pose.
您可以创建与继承姿势同名的新手部姿势。在这种情况下,姿势将显示为“覆盖”姿势。 -
The editor will detect the coordinate system used by each avatar. It should be able to import any rig and even exchange hand pose assets between different avatars using different coordinate system, although the results may vary.
编辑器将检测每个头像使用的坐标系。它应该能够导入任何装备,甚至可以使用不同的坐标系在不同头像之间交换手部姿势资源,尽管结果可能会有所不同。
Being able to work with avatar prefab variants and inherit poses is a powerful feature. Among other things, it allows you to separate functionality and create specializations. For example, our sample scene uses prefab variants for all avatars (cyborg, big hands, small hands). This allows us to inherit all basic hand poses available in the parent prefabs but still add new ones that do not belong to the core functionality, such as grabbing the shooting range weapons and using the laser in the lab. These poses are specific to the example scene, and do not belong in the UltimateXR core prefabs.
能够使用头像预制件变体并继承姿势是一项强大的功能。除此之外,它还允许您分离功能并创建专业化。例如,我们的示例场景对所有头像(半机械人、大手、小手)使用预制变体。这允许我们继承父预制件中可用的所有基本手部姿势,但仍添加不属于核心功能的新姿势,例如抓取射击场武器和在实验室中使用激光。这些姿势特定于示例场景,不属于旗舰版 XR 核心预制件。
Using the main menu 使用主菜单

Create 创造
- Create New Pose: Creates a new pose for the avatar.
创建新姿势:为头像创建新姿势。 - Copy Current Pose to New: Creates a new pose for the avatar using the current pose finger orientations.
将当前姿势复制到新姿势:使用当前姿势手指方向为头像创建新姿势。 - Add Pose from File: Creates a new pose for the avatar loading a pose asset file from disk. It can be a pose from a different avatar, independently of which coordinate system they use, but the result may vary depending on how different they are rigged. It can be used as a starting point to improve on.
从文件添加姿势:为从磁盘加载姿势资源文件的头像创建新姿势。它可以是来自不同头像的姿势,与它们使用的坐标系无关,但结果可能会因它们纵的不同程度而异。它可以用作改进的起点。 - Add all Poses from Folder: Creates a set of poses for the avatar using all the pose asset files on a disk folder. They can be from different avatars, independently of which coordinate system they use, but the result may vary.
从文件夹添加所有姿势:使用磁盘文件夹上的所有姿势资源文件为头像创建一组姿势。它们可以来自不同的头像,与它们使用的坐标系无关,但结果可能会有所不同。 - Add all Preset Poses: Will add all poses in the preset window to the avatar.
添加所有预设姿势:将预设窗口中的所有姿势添加到头像。
Delete 删除
- Delete Current Pose: Will delete the currently selected pose from the avatar and remove the .asset file from disk.
删除当前姿势:将从头像中删除当前选定的姿势,并从磁盘中删除 .asset 文件。 - Delete All Poses: Will delete all avatar poses and remove the .asset files from disk.
删除所有姿势:将删除所有头像姿势并从磁盘中删除 .asset 文件。
Misc 杂项
- Set Current Pose as Default: Will set the currently selected pose as the default pose for the avatar. The default pose is the pose the avatar hands will adopt when there is no user input and no events that change the pose.
将当前姿势设置为默认姿势:将当前选定的姿势设置为头像的默认姿势。默认姿势是头像手在没有用户输入且没有更改姿势的事件时将采用的姿势。 - Select Current Pose Asset File: Selects and highlights the current pose asset file in the project window.
选择当前姿势资源文件:在项目窗口中选择并突出显示当前姿势资源文件。 - Bake Pose in Avatar: Saves the current finger transforms in the avatar prefab.
在头像中烘焙姿势:将当前手指变换保存在头像预制件中。
Prefab Hierarchy 预制件层次结构
• If the selected avatar is a prefab variant, it will show a top to bottom prefab hierarchy where the root parent prefab is at the top and the avatar being edited at the bottom.
• 如果所选头像是预制件变体,它将显示从上到下的预制件层次结构,其中根父预制件位于顶部,正在编辑的头像位于底部。
Using the pose menu 使用姿势菜单
-
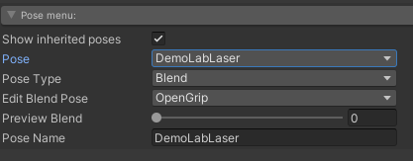
Show inherited poses: Lets you choose between showing only the poses stored in the avatar being edited or also include the poses inherited through parent prefabs. Inherited poses will be read-only and can only be edited using the appropriate parent prefab.
显示继承的姿势:允许您选择仅显示存储在正在编辑的头像中的姿势,或者还包括通过父预制件继承的姿势。继承的姿势将是只读的,只能使用相应的父预制件进行编辑。 -
Pose: Lets you select the current pose being edited. When you switch between poses, the avatar hands in the scene window will preview the transforms of each pose.
姿势:允许您选择正在编辑的当前姿势。当您在姿势之间切换时,场景窗口中的头像手将预览每个姿势的变换。 -
Pose Type: Lets you choose if the current pose is a fixed pose or a blend pose.
姿势类型:允许您选择当前姿势是固定姿势还是混合姿势。
- Fixed poses have fixed transforms.
固定姿势具有固定变换。 - Blend poses are defined by an open grip and a closed grip and allow to adopt any pose in between. They are used to provide flexible grab poses that can adapt to different object sizes. They can also be used to blend while an object is being grabbed, for example to pull a trigger while holding a firearm.
混合姿势由开放式握把和闭合握法定义,并允许采用介于两者之间的任何姿势。它们用于提供灵活的抓取姿势,可以适应不同的物体尺寸。它们还可用于在抓取物体时混合,例如在握住枪支时扣动扳机。
- Fixed poses have fixed transforms.
-
Edit Blend Pose: Lets you select in a blend pose which one of the two poses (open or closed) is currently being edited.
编辑混合姿势:允许您在混合姿势中选择当前正在编辑两个姿势(打开或关闭)之一。 -
Pose Name: Lets you change the pose name. If you set the same name as an inherited pose, the pose will be shown as override. Override poses will hide the inherited pose and use the new pose instead.
姿势名称:允许您更改姿势名称。如果将相同的名称设置为继承的姿势,则该姿势将显示为覆盖。覆盖姿势将隐藏继承的姿势并改用新姿势。
Using the Hand Controls 使用手控
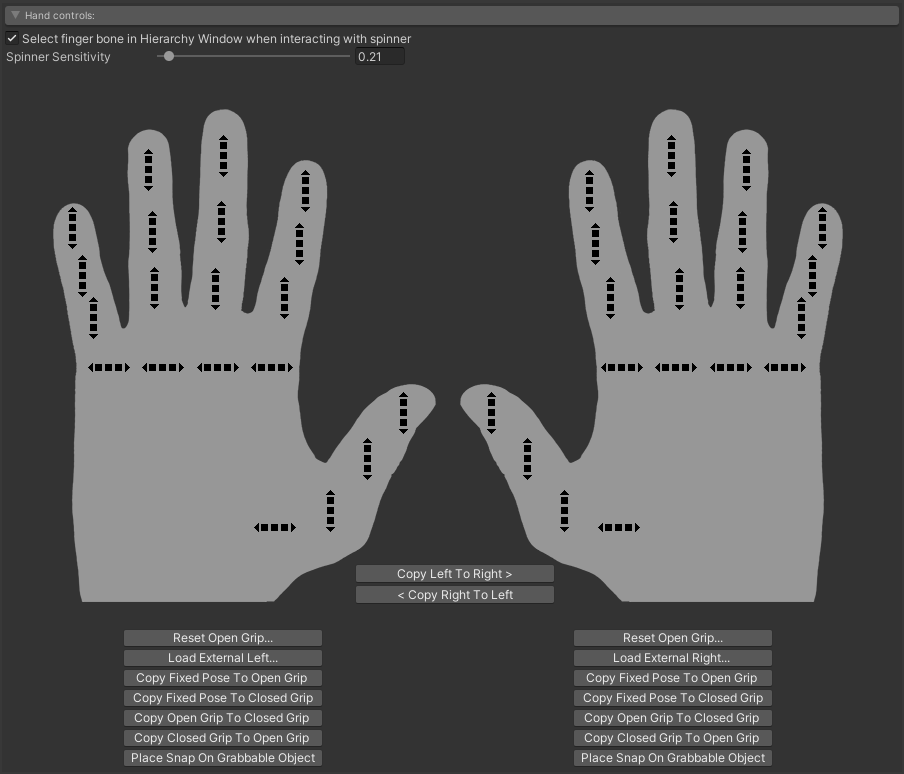
The hand controls provide an easy way to rotate individual finger bones and to copy data from one hand to the other. When the hands show up without the spinners it means that there is no pose currently selected, or the selected pose is read-only because it’s from a parent prefab. There are two ways finger transforms can be edited:
手控提供了一种简单的方法来旋转单个手指骨骼并将数据从一只手复制到另一只手。当手在没有微调器的情况下显示时,表示当前没有选择姿势,或者所选姿势是只读的,因为它来自父预制件。有两种方法可以编辑手指变换:
- Using the provided spinner controls. The spinner sensitivity will let you adjust how much the transforms rotate when dragging the controls.
使用提供的微调器控件。微调器灵敏度可让您在拖动控件时调整变换的旋转程度。 - Using Unity to rotate the finger transforms like you would normally do. The hand pose editor will monitor changes and keep everything in sync. The Select finger bone in Hierarchy Window when interacting with spinner option can be handy to select the given object in the hierarchy window each time a spinner is clicked.
使用 Unity 旋转手指可以像往常一样进行变换。手部姿势编辑器将监控更改并保持所有内容同步。每次单击微调器时,“与微调器交互时在层次结构窗口中选择手指骨骼”选项可以方便地在层次结构窗口中选择给定对象。
Using Unity to rotate can be especially useful when editing the thumb rotations, which can be buggy sometimes when using the spinner controls.
使用 Unity 进行旋转在编辑拇指旋转时特别有用,但在使用微调器控件时有时会出错。
Options: 选项:
- Copy Left to Right/Right to Left: Will copy the current finger rotations from one hand to the other. When editing a blend pose, it will copy only the currently active Open Grip or Closed Grip.
从左到右/从右到左复制:将当前手指旋转从一只手复制到另一只手。编辑混合姿势时,它将仅复制当前活动的“打开夹点”或“闭合夹点”。 - Reset Open Grip: Resets all finger transforms to the defaults in the prefab. When editing a blend pose, it will only reset the currently active Open Grip or Closed Grip.
重置打开的夹点:将所有手指变换重置为预制件中的默认值。编辑混合姿势时,它只会重置当前活动的“打开夹点”或“闭合夹点”。 - Load External: Lets you load an external hand pose asset file to the given hand, which may be from a different avatar. If it is from a different avatar, the results may vary a bit. When editing a blend pose, it will only override the currently active Open Grip or Closed Grip.
加载外部:允许您将外部手部姿势资源文件加载到给定的手部,该手牌可能来自不同的头像。如果它来自不同的头像,结果可能会有所不同。编辑混合姿势时,它只会覆盖当前活动的“打开夹点”或“闭合夹点”。 - Copy Pose: In blend poses, it allows you to copy finger orientations from one grip to another.
复制姿势:在混合姿势中,它允许您将手指方向从一个握把复制到另一个握把。 - Place Snap on Grabbable Object: If you are editing a grab pose by placing the grabbable object in the avatar hand and using the hand pose editor to adjust the grip on the object, this option can help you create a snap transform. You will need to have the grabbable object currently selected in the hierarchy window. The created snap transform can later be assigned in the UxrGrabbableObject component to select where the hand should snap when grabbing the object using the pose.
在可抓取对象上放置捕捉姿势:如果要通过将可抓取对象放在头像手中并使用手部姿势编辑器调整对象上的抓地力来编辑抓取姿势,则此选项可以帮助您创建捕捉变换。您需要在层次结构窗口中选择当前可抓取的对象。稍后可以在 UxrGrabbableObject 组件中分配创建的捕捉变换,以选择在使用姿势抓取对象时手应捕捉的位置。
Using the hand pose presets 使用手部姿势预设
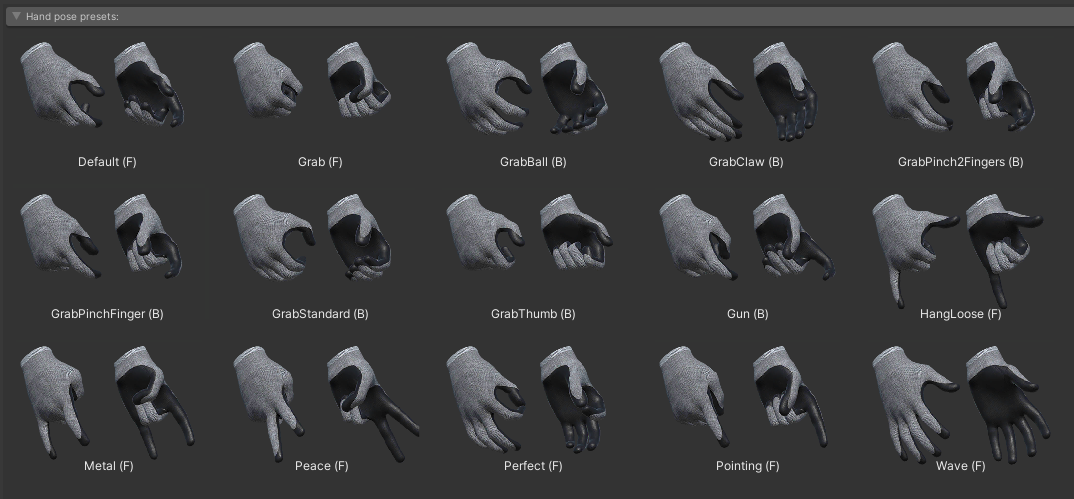
The presets window contains a set of commonly used poses that can speed up the creation process. By clicking on any preset, the editor will automatically load it into the avatar pose being edited.
预设窗口包含一组常用的姿势,可以加快创建过程。通过单击任何预设,编辑器会自动将其加载到正在编辑的头像姿势中。
The Hand Pose Editor automatically detects the coordinate system used by the avatar transforms, which means that no matter which coordinate system is used, you will be able to load presets and exchange poses between any avatar. This is a very power feature, however, since avatars are rigged in different ways, the quality of the results may vary. We expect to improve how the presets work but in most cases it provides a very good starting point that can quickly be improved manually.
手部姿势编辑器会自动检测头像变换使用的坐标系,这意味着无论使用哪种坐标系,您都可以加载预设并在任何头像之间交换姿势。但是,这是一个非常强大的功能,由于头像以不同的方式操纵,因此结果的质量可能会有所不同。我们希望改进预设的工作方式,但在大多数情况下,它提供了一个非常好的起点,可以快速手动改进。
Manipulation 操作
Overview 概述
Developing object interaction for Virtual Reality is a very challenging task. In traditional applications one normally gets close an interactive object and presses a key that will trigger an animation. Sometimes these interactions can get more complicated and procedural animation is required to make sure the interaction looks more natural.
为虚拟现实开发对象交互是一项非常具有挑战性的任务。在传统应用程序中,人们通常会靠近交互式对象并按下将触发动画的键。有时这些交互会变得更加复杂,需要程序动画来确保交互看起来更自然。
In Virtual Reality you are not looking at the world from a small window, you are inside the world.
在虚拟现实中,你不是从一个小窗口看世界,而是在世界里面。
Things work on a very different scale, and you rely on your own hands to touch things. You no longer look at a screen when you interact with something, you are moving your real hands close to an object to grab it. You can even try to cheat since the physical limitations do no longer apply. There is nothing that prevents you from punching through a virtual wall since there is no wall in the real world that will stop your hand. Well… Sometimes accidents happen and you break your TV by mistake.
事物的运作规模非常不同,你依靠自己的双手来触摸事物。当你与某物互动时,你不再看屏幕,你正在将你的真实手靠近一个物体来抓住它。您甚至可以尝试作弊,因为物理限制不再适用。没有什么可以阻止您冲破虚拟墙,因为现实世界中没有墙可以阻止您的手。井。。。有时会发生事故,您误打误撞坏了电视。
All this makes it very difficult to create interactive VR applications from scratch without any help.
所有这些都使得在没有任何帮助的情况下从头开始创建交互式VR应用程序变得非常困难。
One of the biggest challenges of UltimateXR was creating a manipulation system that would feel natural. Bad interactions immediately throw somebody off and ruin an application. Good interactions create memorable experiences and that is what we are aiming for.
UltimateXR最大的挑战之一是创建一个感觉自然的操作系统。糟糕的交互会立即使某人失望并破坏应用程序。良好的互动创造难忘的体验,这就是我们的目标。
In this section we will show you which components play a significant role in manipulation using UltimateXR:
在本节中,我们将向您展示哪些组件在使用 UltimateXR 的操作中起着重要作用:
- UxrGrabber: Component added to each hand of an avatar enabling it to grab objects.
UxrGrabber:添加到头像的每只手上的组件,使其能够抓取物体。 - UxrGrabbableObject: Component that enables an object to be grabbed.
UxrGrabbableObject:允许抓取对象的组件。 - UxrGrabbableObjectAnchor: Component that can be used to place a UxrGrabableObject on.
UxrGrabbableObjectAnchor:可用于放置 UxrGrabableObject 的组件。
Prerequisites 先决条件
- Having an avatar instantiated in the scene, preferably with some grab poses already added. It should have a grab action with a default grab pose set in the UxrStandardAvatarController component in the avatar root object.
在场景中实例化一个头像,最好已经添加了一些抓取姿势。它应该有一个抓取动作,并在头像根对象的 UxrStandardAvatarController 组件中设置默认抓取姿势。
You can use any of the UltimateXR avatar prefabs located in /UltimateXR/prefabs/avatars
您可以使用位于 /UltimateXR/prefabs/avatars 中的任何 UltimateXR 头像预制件
UxrGrabbableObject
The UxrGrabbableObject component can be added to an object so that it becomes grabbable by an avatar.
可以将 UxrGrabbableObject 组件添加到对象中,以便它可由头像抓取。
Let’s create a small sphere with scale x=0.07 y=0.07 z=0.07 and add the UxrGrabbableObject component. After adding the component, it should already work out-of-the-box. This means that tuning grabbing behavior becomes changing the default parameters instead of figuring out how to configure it from scratch.
让我们创建一个比例为 x=0.07 y=0.07 z=0.07 的小球体,并添加 UxrGrabbableObject 组件。添加组件后,它应该已经开箱即用。这意味着调整抓取行为变成了更改默认参数,而不是弄清楚如何从头开始配置它。
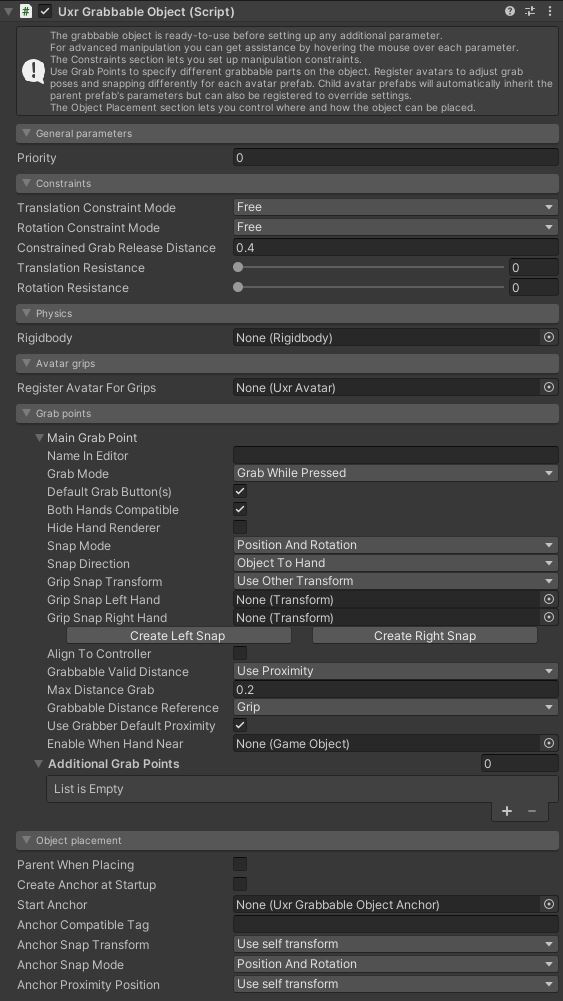
By pressing Play you should be able to grab the ball and move it around. It will snap to the hand but will not fit.
通过按播放,您应该能够抓住球并移动它。它会卡在手上,但不适合。
At this point you have 2 main choices:
此时,您有 2 个主要选择:
- Enable the Hide Hand Renderer option in the UxrGrabbableObject component. This will hide the hands while the object is being grabbed. It removes the need to create specific grab poses and works surprisingly well. Owlchemy Labs, a talented team of Virtual Reality videogame developers, called this “Tomato Presence”; the concept that hand presence can be maintained using a stand-in object.
在 UxrGrabbableObject 组件中启用“隐藏手形渲染器”选项。这将在抓取物体时隐藏手。它消除了创建特定抓取姿势的需要,并且效果出奇地好。Owlchemy Labs是一支才华横溢的虚拟现实视频游戏开发团队,称之为“番茄存在”;可以使用替身对象保持手部存在的概念。 - Register the avatar to use grip poses by dragging it to the Register Avatar for Grips field.
注册头像以使用握把姿势,方法是将其拖动到“为握把注册头像”字段。
Using grab poses 使用抓取姿势
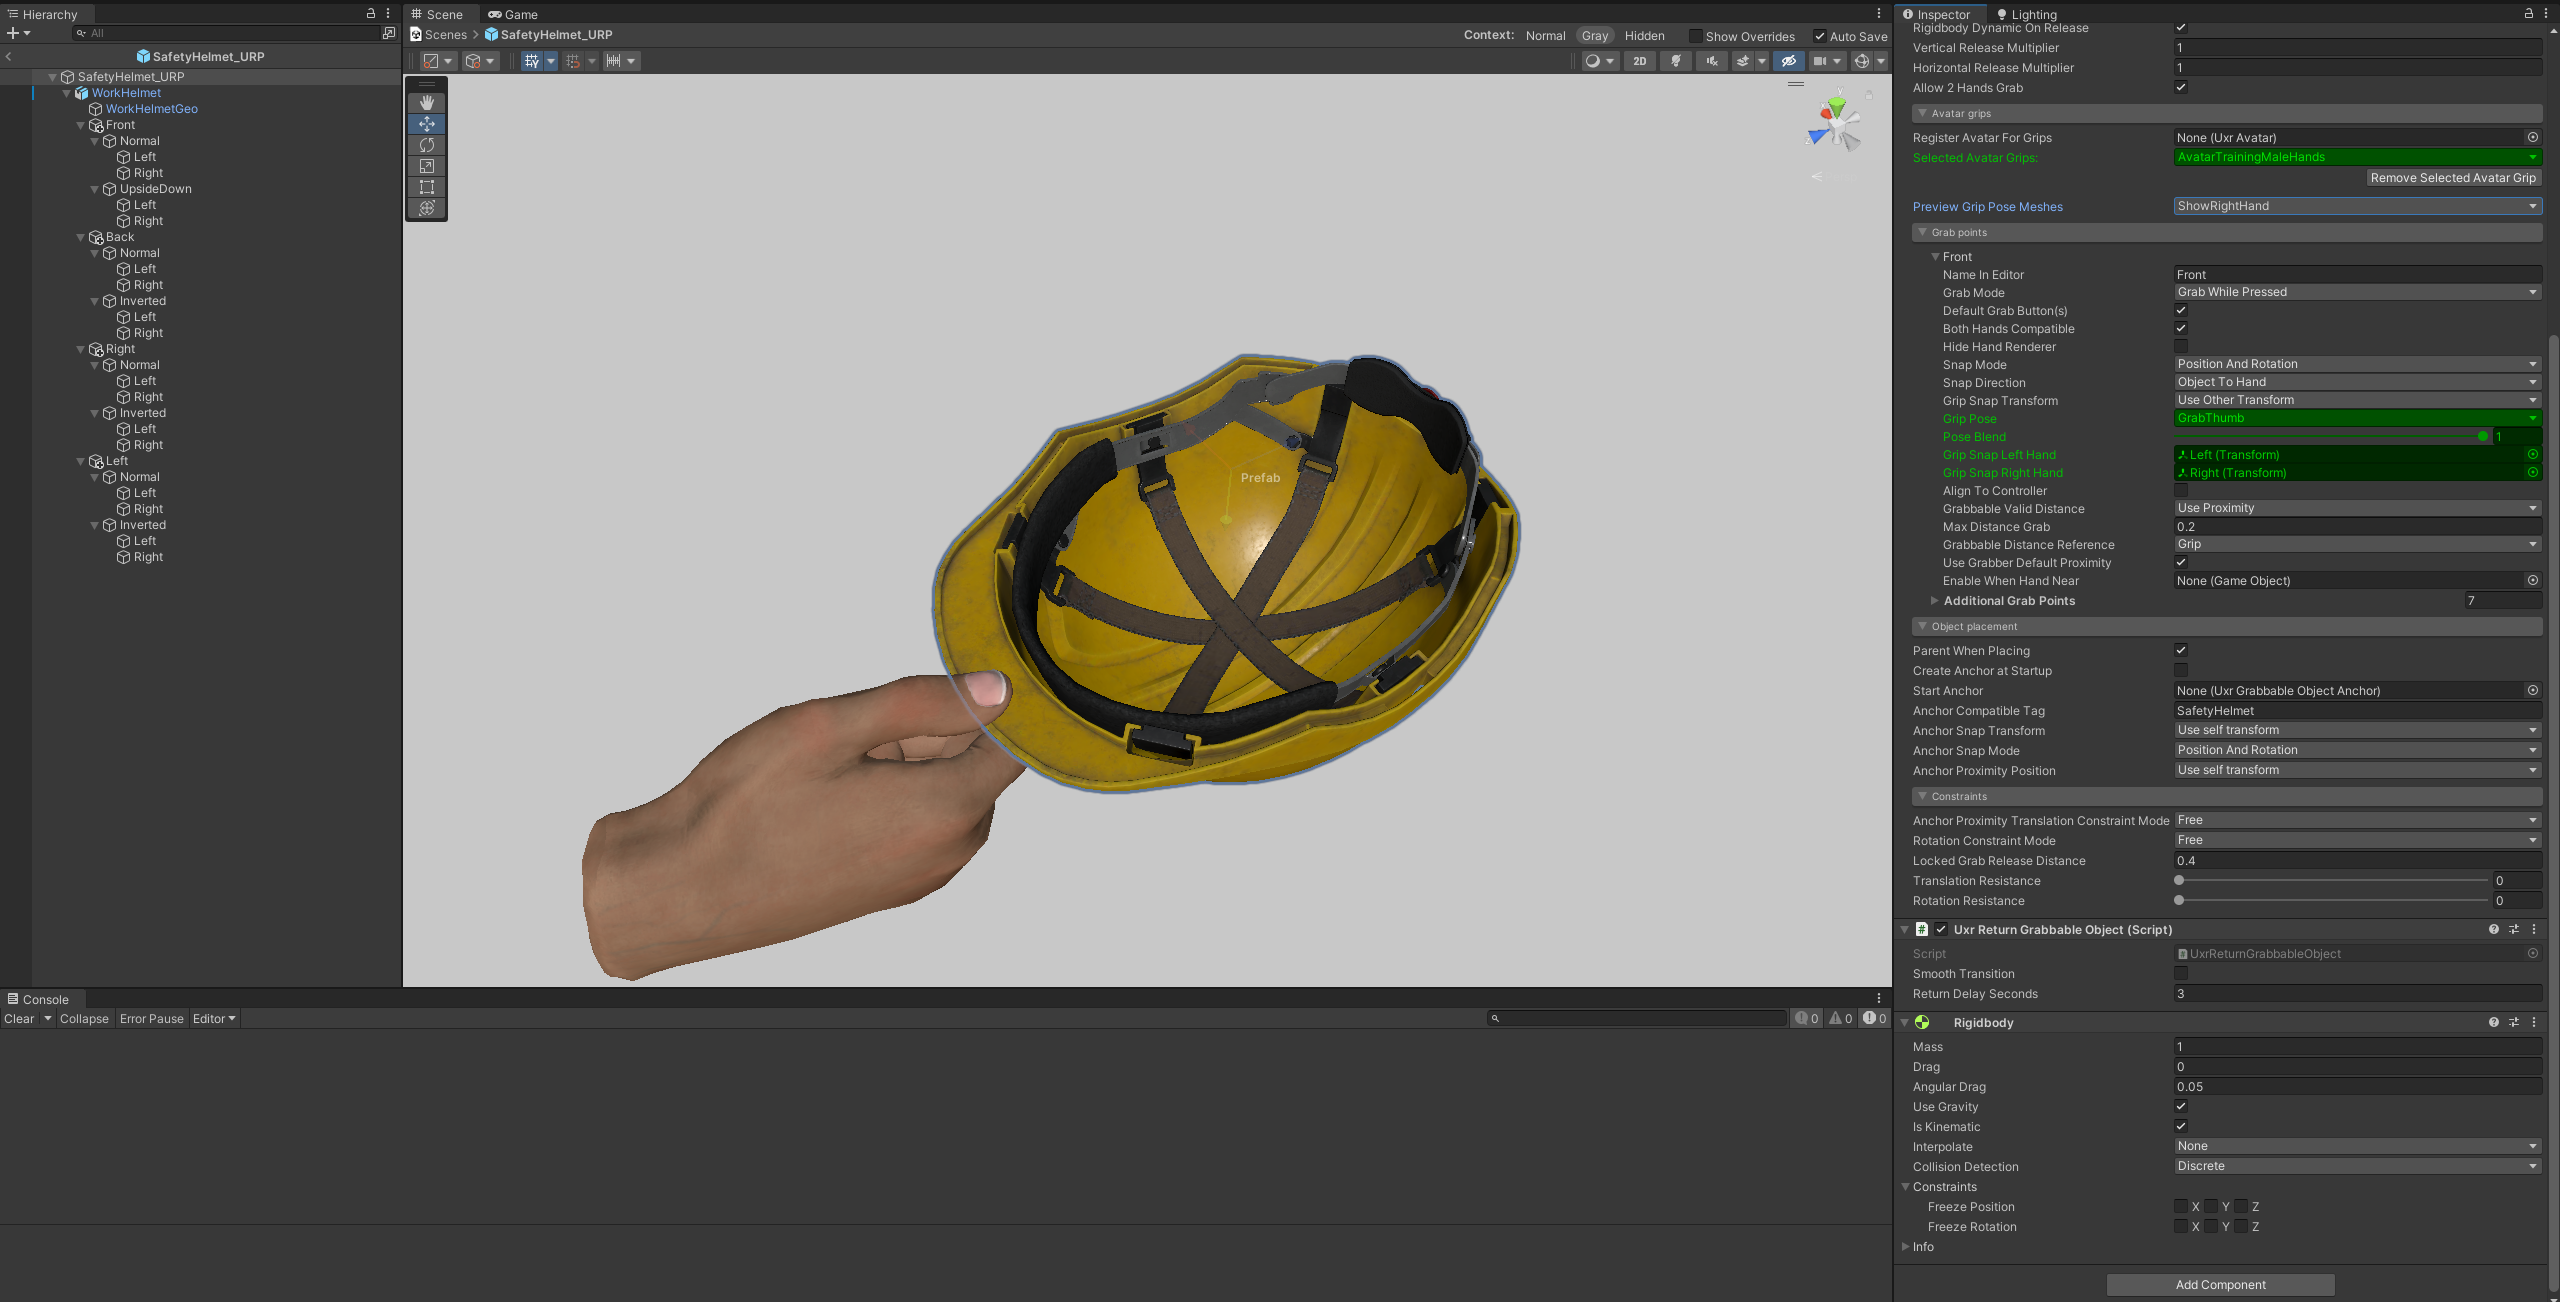
Let’s continue with the previous example and register the avatar to use grab poses. The inspector will now look like this:
让我们继续前面的示例,并注册头像以使用抓取姿势。检查器现在将如下所示:
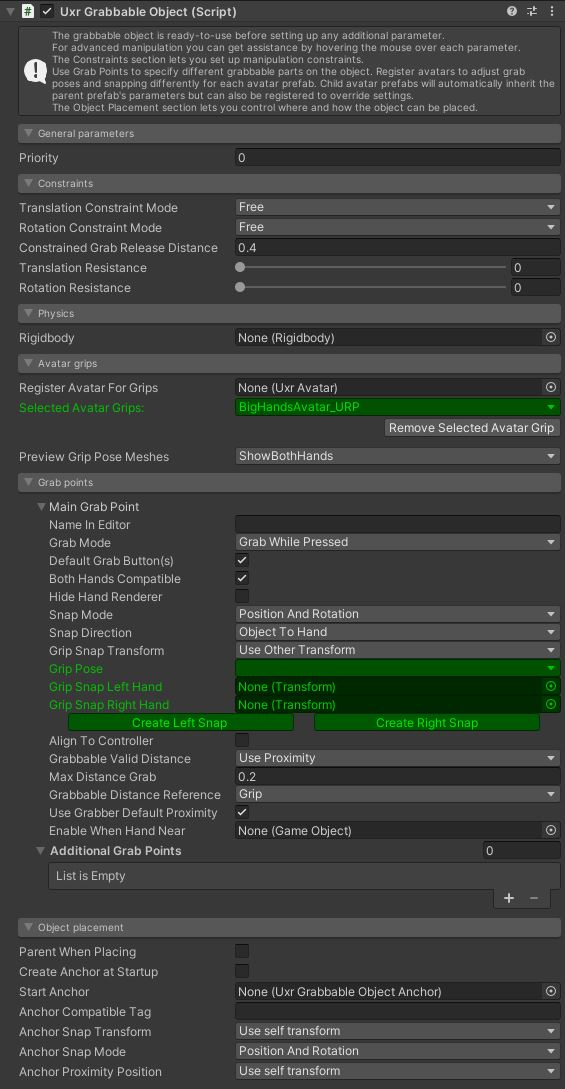
The green fields now tell you which fields have specific values for the selected avatar. Each avatar that is registered will have its own set of values for the green fields, which in this case means that every avatar can specify its own pose and snap points for the left and right hand.
绿色字段现在告诉您哪些字段具有所选头像的特定值。注册的每个头像都有自己的一组绿色字段值,在这种情况下,这意味着每个头像都可以为左手和右手指定自己的姿势和对齐点。
This is a powerful feature that favors inclusion and is important in cases where totally different avatars need to interact with the same objects.
这是一个强大的功能,有利于包含,在完全不同的头像需要与相同的对象交互的情况下很重要。
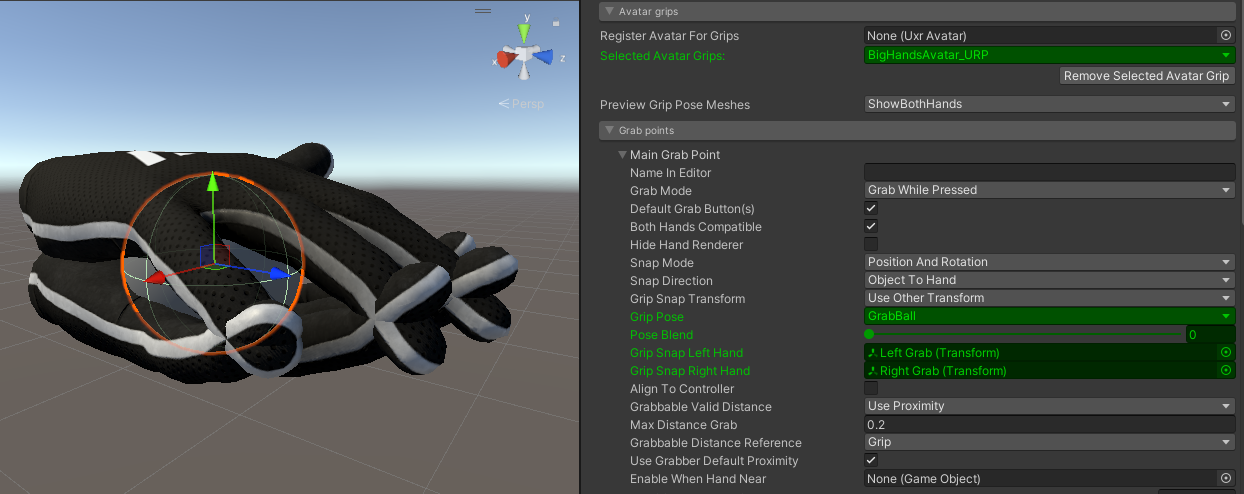
If you used any of the UltimateXR avatar prefabs you can select the GrabBall pose that is included.
如果您使用了任何 UltimateXR 头像预制件,则可以选择随附的 GrabBall 姿势。
By pressing the Create Left Snap and Create Right Snap buttons you will create two transforms that will hang from the grabbable object that will allow you to move where the ball snaps to the hand when it is grabbed.
通过按下创建左捕捉和创建右捕捉按钮,您将创建两个变换,它们将悬挂在可抓取对象上,允许您在球被抓住时移动到手上的位置。
At this point you should be able to see a preview mesh in the Scene Window for the grab pose of both hands.
此时,您应该能够在场景窗口中看到双手抓取姿势的预览网格。
If you select the newly created Left Grab or Right Grab object, you will notice that the preview will switch to the snap that is selected.
如果选择新创建的“左抓取”或“右抓取”对象,您会注意到预览将切换到所选的捕捉。
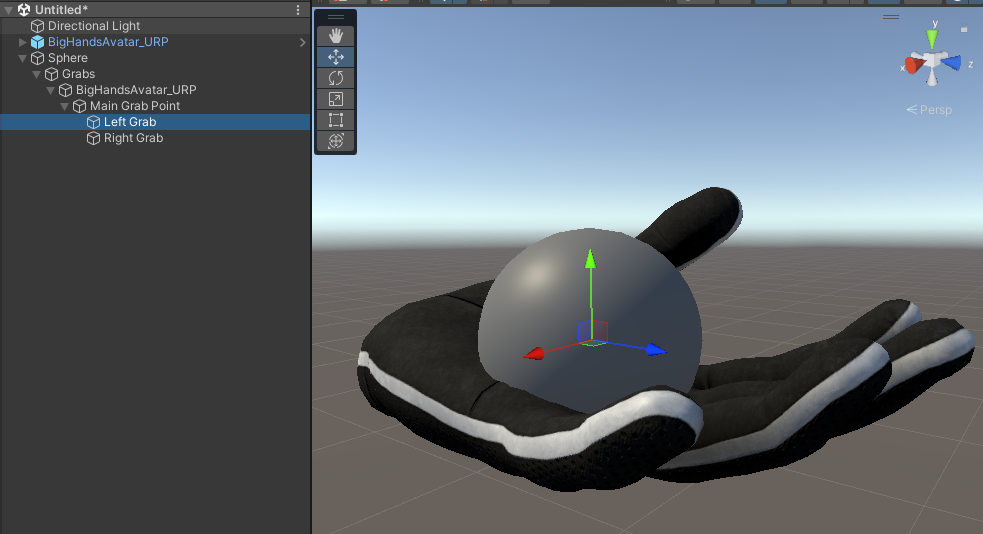
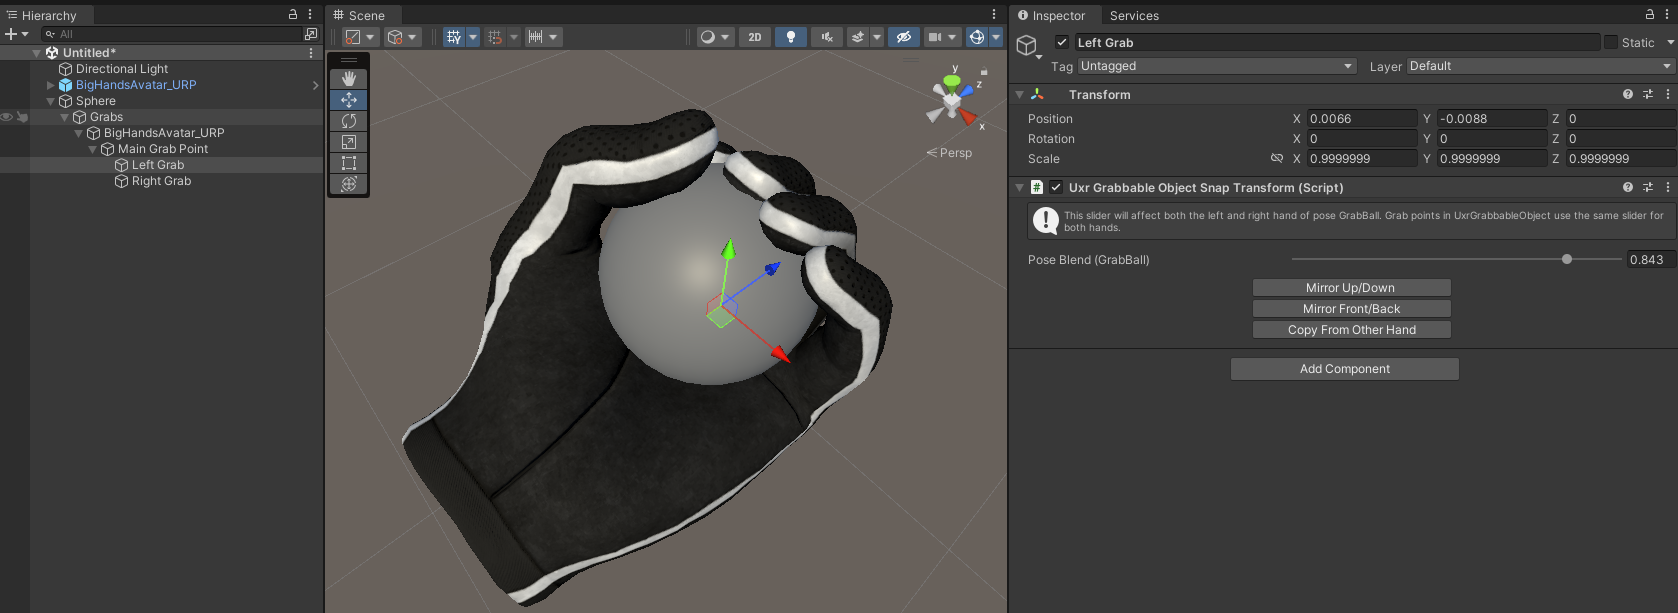
That is because a UxrGrabbableSnapTransform component was added, that will also let you adjust the blend value since the GrabBall pose is a blend pose.
这是因为添加了UxrGrabbableSnapTransform组件,这也可以让您调整混合值,因为GrabBall姿势是混合姿势。
Now, by adjusting the blend value and moving the transform around, you can easily place how the object will be grabbed. There are additional utilities that will let you copy/mirror the position and orientation.
现在,通过调整混合值并移动变换,您可以轻松放置对象的抓取方式。还有其他实用程序可让您复制/镜像位置和方向。
With some small adjustments you should now be able to end up with a grip that fits the sphere perfectly.
通过一些小的调整,您现在应该能够最终获得完美适合球体的握把。
Do this for both hands, keeping in mind that the blend pose value is shared between left and right, and you should now be able to check in play mode your improvements.
对双手执行此操作,请记住,混合姿势值在左右之间共享,您现在应该能够在播放模式下检查您的改进。
You can add more grab points to grabbable objects so that they can be grabbed from many angles and using different grips. The framework will be able to determine the grip that will be used based on the position and orientation of the object. Click on the + at the end of the Grab Points section to add new grab points.
您可以为可抓取的对象添加更多抓取点,以便可以从多个角度和使用不同的夹点抓取它们。该框架将能够根据对象的位置和方向确定将使用的夹点。单击抓取点部分末尾的 + 以添加新的抓取点。
A good practice is to name each grab point so that the snap transforms that are generated later have meaningful names. This will make it easier for other developers to understand how the grabs are structured.
一个好的做法是命名每个抓取点,以便稍后生成的捕捉转换具有有意义的名称。这将使其他开发人员更容易理解抓取的结构。
Sometimes it is easy to end up with many different grab points that end up cluttering the scene window:
有时很容易得到许多不同的抓取点,最终使场景窗口变得混乱:
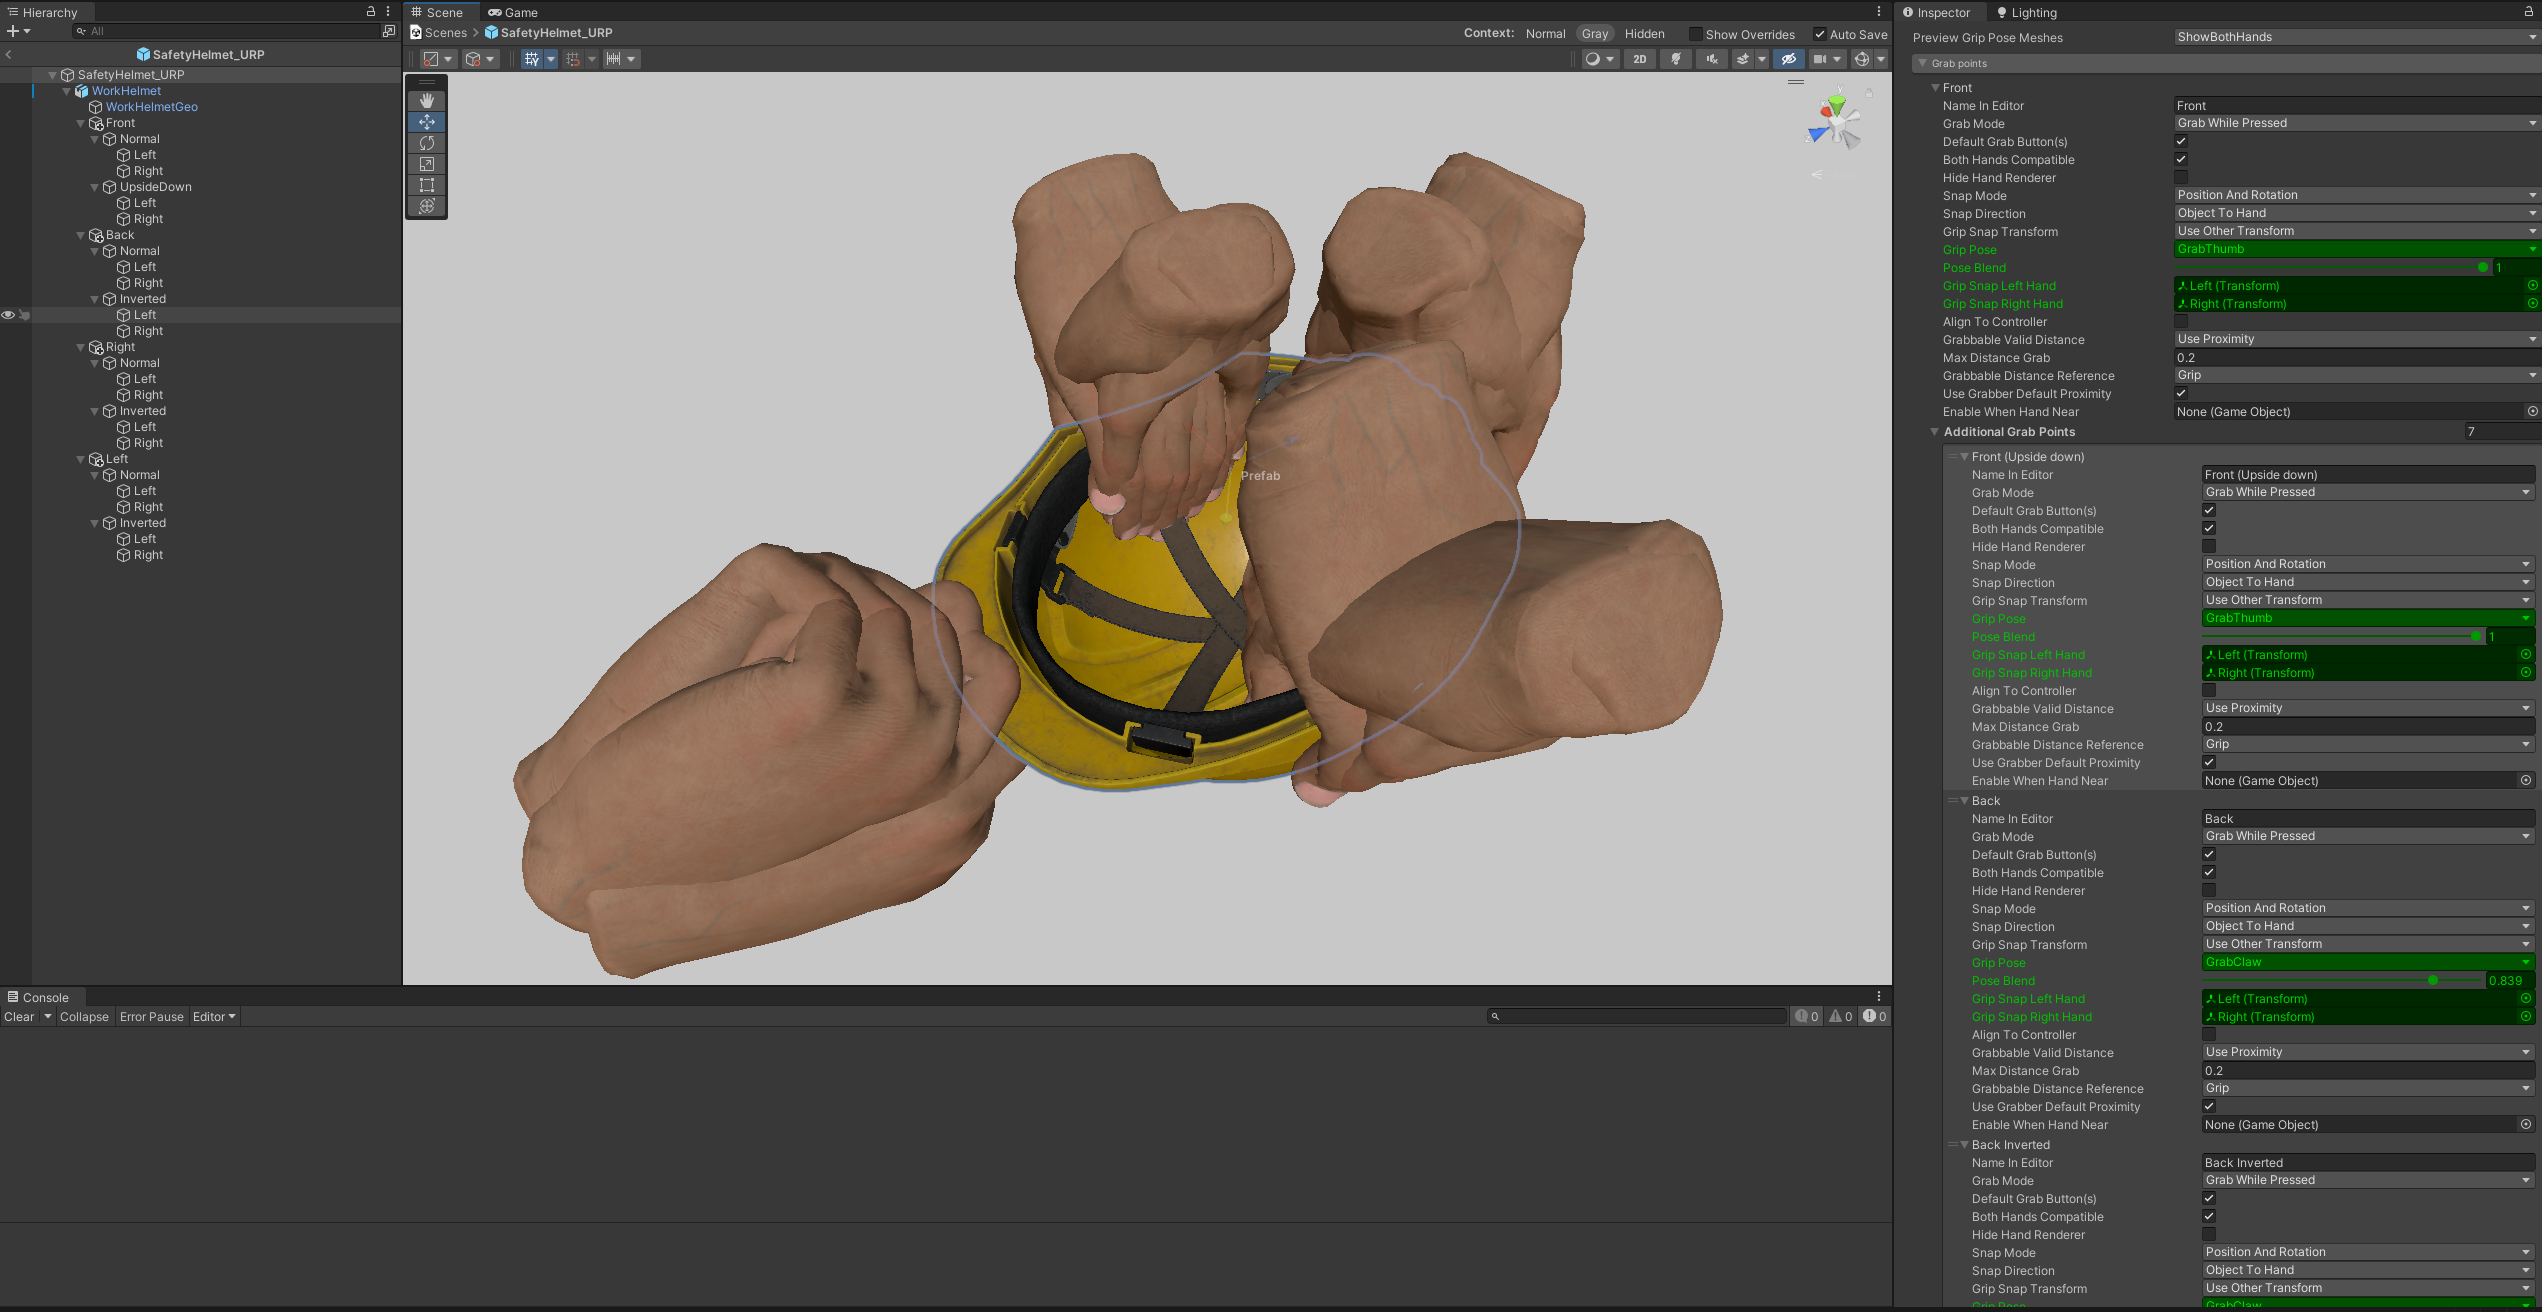
You can filter out grab previews by:
您可以通过以下方式过滤掉抓取预览:
- Collapsing the grab points you don’t want to preview.
折叠您不想预览的抓取点。 - Changing the Preview Grip Pose Meshes parameters switching between showing only the left hand, the right hand, both or none.
更改预览夹点姿势网格体参数在仅显示左手、右手、两者或不显示之间切换。
Here is the same view with all grab points collapsed and filtering out the left hand
这是相同的视图,所有抓取点都折叠并过滤掉左手
Here are some other tips that can be useful:
以下是一些其他有用的提示:
- To be able to see the preview grab meshes, it is required to have an avatar of that type available instantiated in the scene.
为了能够看到预览抓取网格体,需要在场景中实例化该类型的头像。 - You can edit grab poses using the Hand Editor and the preview poses will be updated in real-time.
您可以使用手部编辑器编辑抓取姿势,预览姿势将实时更新。 - If you want to quickly settings from one grab point to another you can do so using Unity copy & paste of the whole grab point set.
如果要快速设置从一个抓取点到另一个抓取点,可以使用整个抓取点集的 Unity 复制和粘贴来实现。
We will keep updating this documentation with more advanced tutorials and step by steps. Meanwhile, here is the complete reference guide. You can also hover on the component fields; every item has its own tooltip.
我们将通过更高级的教程和分步不断更新此文档。同时,这是完整的参考指南。您也可以将鼠标悬停在组件字段上;每个项目都有自己的工具提示。
Parameter reference 参数参考
-
Register Avatar for Grips: Registers an avatar to have the possibility to have different grip parameters for each avatar. This allows to fine-tune how different hand shapes and sizes wrap around the same object. Parameters that can be adjusted for each avatar will be colored to help in the process.
为握把注册头像:注册头像,以便每个头像有不同的握持参数。这允许微调不同的手形和大小如何环绕同一对象。可以为每个头像调整的参数将被着色以帮助完成该过程。 -
Selected Avatar Grips: Switches the avatar currently selected to edit its grip parameters. Being able to register different avatars allows to fine-tune how different hand shapes and sizes wrap around the same object. Parameters that can be adjusted for each avatar will be colored to help in the process.
选定的头像握把:切换当前选定的头像以编辑其握把参数。能够注册不同的头像可以微调不同的手形和大小如何环绕同一对象。可以为每个头像调整的参数将被着色以帮助完成该过程。 -
Ignore Parent Dependency: In objects with grabbable parents, mark this to ignore the parent constraint and tell this object is independent.
忽略父依赖关系:在具有可抓取父项的对象中,标记此项以忽略父约束,并告知此对象是独立的。 -
Priority: By default, closer objects will be always grabbed over far objects. Using priority, objects with higher priority will always be grabbed if they are in range.
优先级:默认情况下,较近的对象将始终抓取到较远的对象上。使用优先级,如果具有较高优先级的对象在范围内,则始终会抓取它们。 -
Translation Constraint Mode: Allows to constrain the translation of this object while being grabbed.
平移约束模式:允许在被抓取时约束此对象的平移。 -
Restrict To Box: Allowed volume where this object’s pivot will be allowed to move while being grabbed.
限制到框:允许的卷,允许此对象的枢轴在被抓取时移动。 -
Restrict To Sphere: Allowed volume where this object’s pivot will be allowed to move while being grabbed.
限制到球体:允许的体积,允许此对象的枢轴在被抓取时移动。 -
Translation Offset Min: Minimum allowed offset along the local axes.
最小平移偏移:沿局部轴的最小允许偏移。 -
Translation Offset Max: Maximum allowed offset along the local axes.
最大平移偏移:沿局部轴允许的最大偏移。 -
Rotation Constraint Mode: Allows to constrain the rotation of this object while being grabbed.
旋转约束模式:允许在抓取时限制此对象的旋转。 -
Rotation Angle Limits Min: Minimum allowed rotation offset degrees around the local axes.
最小旋转角度限制:允许的围绕局部轴的最小旋转偏移度数。 -
Rotation Angle Limits Max: Maximum allowed rotation offset degrees around the local axes.
最大旋转角度限制:允许围绕局部轴的最大旋转偏移度数。 -
Rotation Provider: Controls how an object with constrained position is rotated. Auto will to try to infer the most appropriate rotation provider automatically based on the object shape and the grip. HandOrientation will rotate the object directly by rotating the hand, useful for knobs or small joysticks where the torque is applied mostly by twisting the wrist. HandPositionAroundPivot will rotate the object using the position of the hand around the pivot instead, useful for levers, bigger joysticks, steering wheels and similar objects where the torque is applied using hand leverage around the rotation axis.
旋转提供程序:控制具有受限位置的对象如何旋转。自动意志尝试根据对象形状和握把自动推断出最合适的旋转提供程序。HandOrientation将通过旋转手直接旋转物体,这对于旋钮或小型操纵杆很有用,其中扭矩主要通过扭转手腕来施加。HandPositionAroundPivot 将使用手围绕枢轴的位置旋转对象,这对于杠杆、较大的操纵杆、方向盘和类似物体很有用,在这些物体中,使用手杠杆围绕旋转轴施加扭矩。 -
Longitudinal Axis: Specifies which axis, in the object coordinate system, is the longitudinal axis. The longitudinal axis is the axis that goes from head to tail along the object.
纵轴:指定对象坐标系中的哪个轴是纵轴。纵轴是沿物体从头到尾的轴。 -
Needs 2 Hands to Rotate: When manipulation mode is set to Rotate Around Axis this will tell if the user will be able to rotate the object using one hand only or the object needs to be grabbed with two hands to rotate it.
需要 2 只手旋转:当操作模式设置为绕轴旋转时,这将告诉用户是否只能用一只手旋转对象,或者需要用两只手抓住对象来旋转它。 -
Constrained Grab Release Distance: Maximum allowed distance of a locked grab to move away from the grab point before being released.
受限抓取释放距离:锁定抓取在释放之前远离抓取点的最大允许距离。 -
Translation Resistance: Resistance of the object to being moved. Values higher than zero may be used to simulate heavy objects.
平移阻力:物体对移动的阻力。大于零的值可用于模拟重物。 -
Rotation Resistance: Resistance of the object to being rotated. Values higher than zero may be used to simulate heavy objects.
旋转阻力:物体对被旋转的阻力。大于零的值可用于模拟重物。 -
Rigidbody: References the object’s rigidbody when physics are required. The object will be made kinematic when grabbed and optionally dynamic when released.
刚体:在需要物理物理时引用对象的刚体。该物体在被抓取时将变为运动学,并在释放时选择动态。 -
Rigidbody Dynamic on Release: When a rigidbody is specified it controls whether it will be marked as dynamic after being grabbed and released. Otherwise, it will continue to be kinematic after being released.
释放时刚体动态:指定刚体时,它控制在抓取和释放后是否将其标记为动态。否则,它被释放后将继续运动。 -
Vertical Release Multiplier: When throwing a rigidbody this parameter will enable increasing or decreasing the actual release velocity (vertical component).
垂直释放倍数:投掷刚体时,此参数将允许增加或减少实际释放速度(垂直分量)。 -
Horizontal Release Multiplier: When throwing a rigidbody this parameter will enable increasing or decreasing the actual release velocity (horizontal component).
水平释放倍数:投掷刚体时,此参数将允许增加或减少实际释放速度(水平分量)。 -
Allow 2 Hands Grab: When more than one grab point has been specified, this parameter will tell if the object can be grabbed with two hands at the same time.
允许 2 只手抓取:当指定了多个抓取点时,此参数将告知是否可以同时用两只手抓取对象。 -
Preview Grip Pose Meshes: Will show/hide the preview grip pose meshes in the Scene Window.
预览夹点姿势网格体:将在场景窗口中显示/隐藏预览夹点姿势网格体。 -
First Grab Point Is Main: Whether the first grab point in the list is the main grab in objects with more than one grab point. When an object is grabbed with both hands, the main grab controls the actual position while the secondary grab controls the direction. Set it to true in objects like a rifle, where the trigger hand should be the first grab to keep the object in place, and the front grab will control the aiming direction. If false, the grab point order is irrelevant and the hand that grabbed the object first will be considered as the main grab.
第一个抓取点是主抓取点:列表中的第一个抓取点是否是具有多个抓取点的对象中的主抓取点。当用双手抓取物体时,主抓取控制实际位置,而辅助抓取控制方向。在步枪等物体中将其设置为 true,其中扳机手应该是第一个抓斗以将物体固定到位,前抓斗将控制瞄准方向。如果为 false,则抓取点顺序无关紧要,首先抓取物体的手将被视为主抓取。 -
Grab Point: Parameters of the main grabbing point.
抓取点:主抓取点的参数。 -
- Additional Grab Points
- Parameters of the additional grabbing points which enables grabbing the object using more than one hand.
附加抓取点:允许使用多只手抓取物体的附加抓取点的参数。
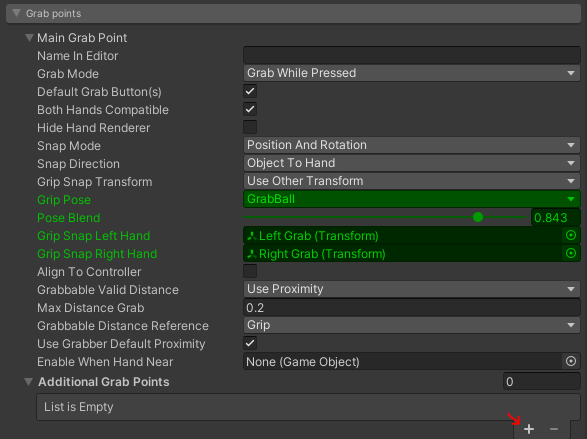
- Name In Editor: The display name showed for this grab point in the editor’s foldout label.
编辑器中的名称:编辑器的折叠标签中为此抓取点显示的显示名称。 - Grab Mode: Whether the object will a) Be grabbed while keeping the grab button pressed, b) Keep being grabbed until the grab button is pressed again or c) Keep being grabbed until another hand grabs it or it is requested through scripting.
抓取模式:物体是否会 a) 在按住抓取按钮的同时被抓取,b) 继续被抓取,直到再次按下抓取按钮或 c) 继续被抓取,直到另一只手抓住它或通过脚本请求它。 - Default Grab Button(s): Whether the object is grabbed using the grab button specified in the Avatar’s Standard Controller component. This allows to override the grab button for certain objects.
默认抓取按钮:是否使用头像的标准控制器组件中指定的抓取按钮抓取对象。这允许覆盖某些对象的抓取按钮。 - Grab Button(s): The button or combination of buttons that will be required to grab this object.
抓取按钮:抓取此对象所需的按钮或按钮组合。 - Both Hands Compatible: Whether this object can be grabbed using both hands.
双手兼容:是否可以用双手抓取此对象。 - Compatible Hand: The hand/controller this object can be picked with if the controller can only be grabbed with one hand.
兼容手:如果只能用一只手抓住控制器,则可以使用此对象的手/控制器。 - Hide Hand Renderer: Whether the hand renderers specified in the UxrGrabber component should be hidden while grabbing.
隐藏手部渲染器:抓取时是否应隐藏 UxrGrabber 组件中指定的手部渲染器。 - Grip Pose: Selects the hand grip pose to use for the selected avatar/grab point combo.
握持姿势:选择要用于所选头像/抓取点组合的握持姿势。 - Pose Blend: Move the slider to open/close the grip and adjust it to the object size and shape.
姿势混合:移动滑块以打开/关闭手柄,并将其调整为对象大小和形状。 - Grip Snap Left Hand: The transform that will be aligned to the left UxrGrabber transform if AlignToHandGrabAxes and/or PlaceInHandGrabPivot are active.
Grip Snap Left Hand:如果 AlignToHandGrabAxes 和/或 PlaceInHandGrabPivot 处于活动状态,则该变换将与左侧 UxrGrabber 变换对齐。 - Grip Snap Right Hand: The transform that will be aligned to the right UxrGrabber transform if AlignToHandGrabAxes and/or PlaceInHandGrabPivot are active.
Grip Snap Right Hand:如果 AlignToHandGrabAxes 和/或 PlaceInHandGrabPivot 处于活动状态,则该变换将与右侧 UxrGrabber 变换对齐。 - Create Left Snap: Create a dummy as left snap transform.
创建左捕捉:创建一个虚拟人作为左捕捉变换。 - Create Right Snap: Create a dummy as right snap transform.
创建右捕捉:创建一个虚拟人作为右捕捉变换。 - Snap Mode: How this object’s grab-alignment-transform axes will snap to the UxrGrabber transform after being grabbed.
捕捉模式:此对象的抓取-对齐-变换轴在抓取后如何捕捉到 UxrGrabber 变换。 - Snap Direction: Whether this object will be snapped to the hand, or the hand will snap to the object.
对齐方向:是将此对象捕捉到手部,还是手部将捕捉到对象。 - Grip Snap Transform: Whether the grabbed object will be aligned with the UxrGrabber transform while being grabbed or another snap transform will be used.
抓握捕捉变换:抓取的对象是在被抓取时与 UxrGrabber 变换对齐,还是使用另一个捕捉变换。 - Align To Controller: Aligns the object to the controller when it is being grabbed. This is very important for objects like weapons where aiming correctly is critical.
与控制器对齐:在抓取对象时将对象与控制器对齐。这对于正确瞄准至关重要的武器等物体非常重要。 - Align To Controller Axes: By default, if no transform specified, it will use the objects axes as reference to align (z forward, etc.). Otherwise, it can use another transform as reference.
对齐到控制器轴:默认情况下,如果未指定变换,它将使用对象轴作为参考对齐(z 向前等)。否则,它可以使用另一个转换作为引用。 - Grabbable Valid Distance: Tells which method to use to detect if a UxrGrabber can grab this object.
可抓取有效距离:告知使用哪种方法来检测 UxrGrabber 是否可以抓取此对象。 - Grabbable Valid Box: Volume the UxrGrabber needs to be in to grab this object.
可抓取的有效框:UxrGrabber 需要进入的音量才能抓取此对象。 - Max Distance Grab: The maximum distance the UxrGrabber can be to be able to grab it. This is called the proximity.
最大距离抓取:UxrGrabber能够抓取它的最大距离。这称为邻近性。 - Grabbable Distance Reference: The reference from the grabbable object that will be used to know if the UxrGrabber is close enough to grab it.
可抓取距离参考:来自可抓取对象的参考,用于了解 UxrGrabber 是否足够接近以抓取它。 - Grabbable Proximity Transform: Position the UxrGrabber needs to be close to to grab this object.
可抓取的邻近变换:UxrGrabber 需要靠近的位置才能抓取此对象。 - Use Grabber Default Proximity: Uses the grabber’s own transform for proximity computation (distance from hand to object). Optionally you can specify different transforms in the grabber component for more precise interactions, for example one for precise distance to a dummy in the palm of the hand and other for precise distance to the dummy near the index finger.
使用抓取器默认邻近度:使用抓取器自己的转换进行邻近度计算(从手到物体的距离)。(可选)您可以在抓取器组件中指定不同的变换以实现更精确的交互,例如,一个变换用于与手掌中假人的精确距离,另一个用于与食指附近的假人的精确距离。 - Grabber Proximity Index: Allows to specify a different transform for proximity computation (distance from hand to object). This index tells which transform from the UxrGrabber component’s proximity list is used.
抓取器邻近指数:允许为邻近度计算指定不同的变换(从手到物体的距离)。此索引指示使用 UxrGrabber 组件的邻近列表中的哪个转换。 - Enable When Hand Near: Optional GameObject that will be enabled if a hand is close enough to grab this object.
当手靠近时启用:可选游戏对象,如果手足够近以抓取此对象,则将启用该游戏对象。
-
Parent When Placing: Will parent this GameObject to the UxrGrabbableAnchor when placing it.
放置时的父级:放置时将此游戏对象作为 UxrGrabbableAnchor 的父级。 -
Create Anchor at Startup: Will generate an UxrGrabbableObjectAnchor during startup and place this object on it, keeping the position and rotation. If the object has an Anchor Compatible Tag assigned, the tag will be the only compatible tag allowed by the anchor. This is useful to have a fixed anchor where the object can be placed back again after picking it up.
在启动时创建定位点:将在启动期间生成一个 UxrGrabbableObjectAnchor,并将此对象放在其上,保持位置和旋转。如果对象分配了“定位点兼容标记”,则该标记将是定位点允许的唯一兼容标记。这对于拥有一个固定的锚点很有用,可以在拾取对象后将其再次放回原处。 -
Start Anchor: If this object is initially placed on an UxrGrabbableObjectAnchor, select here which anchor it is placed on.
起始锚点:如果此对象最初放置在 UxrGrabbableObjectAnchor 上,请在此处选择放置它的锚点。 -
Anchor Compatible Tag: String identifier that can be used to filter which objects can be placed on which UxrGrabbableObjectAnchor objects.
Anchor Compatible Tag:字符串标识符,可用于筛选哪些对象可以放置在哪些 UxrGrabbableObjectAnchor 对象上。 -
Anchor Snap: The transform where objects will be snapped to when being placed.
锚点捕捉:放置对象时将捕捉到的变换。 -
Anchor Snap Mode: How this object will snap to the UxrGrabbableObjectAnchor transform after being placing on it.
锚点捕捉模式:此对象在放置在其上后如何捕捉到 UxrGrabbableObjectAnchor 变换。 -
Anchor Proximity Position: The reference that will be used to know if this object is close enough to an UxrGrabbableObjectAnchor to place it there.
锚点邻近位置:将用于了解此对象是否足够接近 UxrGrabbableObjectAnchor 以将其放置在那里的引用。
UI Interaction 用户界面交互
Introduction 介绍
Graphical user interfaces, like in traditional software, are a key element in Virtual Reality to visualize data and interact with the application.
与传统软件一样,图形用户界面是虚拟现实中可视化数据并与应用程序交互的关键元素。
Data is normally represented using components such as text, images, and video while the different actions are performed by pressing interactive elements like buttons and scroll views.
数据通常使用文本、图像和视频等组件表示,而不同的操作则通过按按钮和滚动视图等交互式元素来执行。
To provide maximum compatibility with existing workflows and designs, UltimateXR fully supports Unity UI and TextMeshPro. This means that even user interfaces that were designed without VR in mind, can automatically work using UltimateXR without any additional effort.
为了提供与现有工作流程和设计的最大兼容性,UltimateXR完全支持Unity UI和TextMeshPro。这意味着,即使是在设计时没有考虑VR的用户界面,也可以使用UltimateXR自动工作,而无需任何额外的努力。
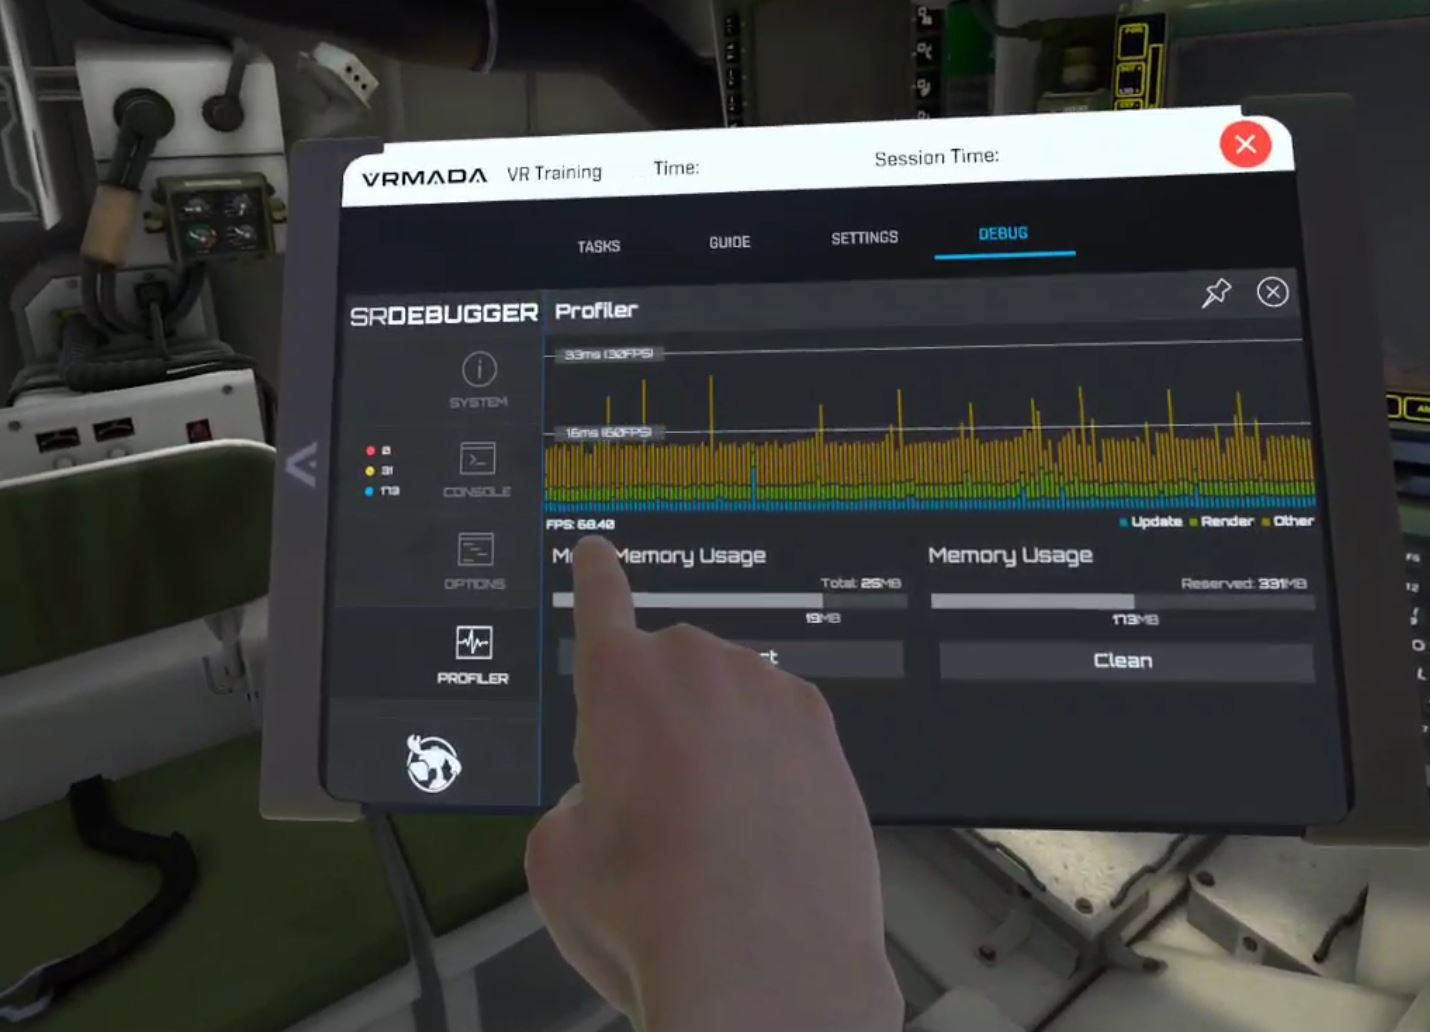
Here is an example of the popular SRDebugger tool, working in VR using UltimateXR:
以下是流行的SRDebugger工具的示例,该工具使用UltimateXR在VR中工作:
Interacting with a UI 与 UI 交互
UltimateXR supports two ways to interact with a user interface:
UltimateXR支持两种与用户界面交互的方式:
- Direct touch, using the fingertips that have a UxrFingerTip component.
直接触摸,使用具有 UxrFingerTip 组件的指尖。 - From a distance, using a laser pointer on one or both hands, through the UxrLaserPointer component.
从远处看,使用一只或两只手上的激光笔,通过 UxrLaserPointer 组件。
Setting up a UI 设置用户界面
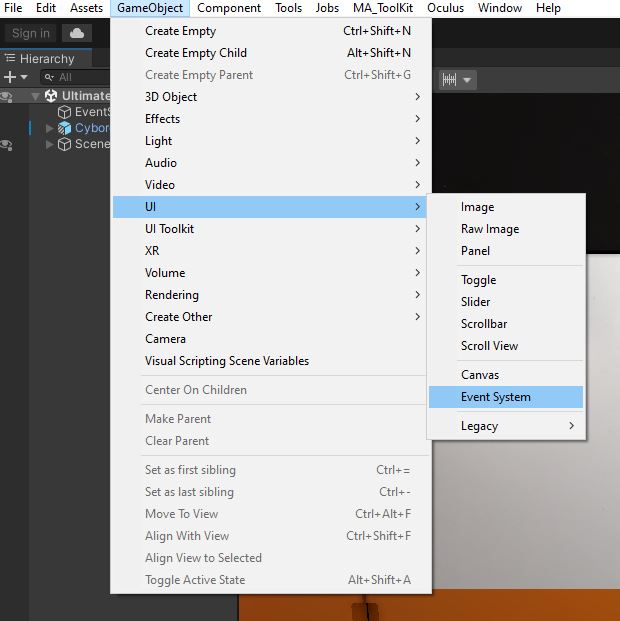
The first requirement to be able to use user interfaces is to add a Unity EventSystem GameObject to the scene using the GameObject -> UI -> EventSystem menu:
能够使用用户界面的第一个要求是使用游戏对象 -> UI -> 事件系统菜单将 Unity 事件系统游戏对象添加到场景中:
We then add the UxrPointerInputModule component to the EventSystem GameObject which looks as follows:
然后,我们将 UxrPointerInputModule 组件添加到 EventSystem GameObject 中,如下所示:
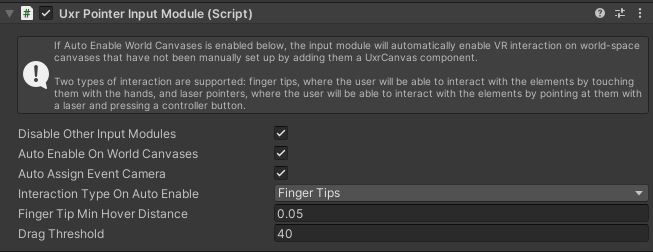
The UxrPointerInputModule is required to enable interaction with canvases in the scene.
需要 UxrPointerInputModule 才能启用与场景中画布的交互。
The Auto Enable On World Canvases option allows UltimateXR to automatically setup all the canvases in the scene that work in World mode (i.e. in 3D). This means that they will automatically support interaction using the given input type (fingertips or laser pointers).
自动启用世界画布选项允许 UltimateXR 自动设置场景中在世界模式(即 3D)下工作的所有画布。这意味着它们将自动支持使用给定输入类型(指尖或激光笔)的交互。
If for some reason you don’t want UltimateXR to automatically set up pre-existing canvases or you are instantiating a canvas at runtime, you need to set up the canvas manually. This is done by simply adding a UxrCanvas component on the same GameObject that has the Unity Canvas:
如果出于某种原因,您不希望 UltimateXR 自动设置预先存在的画布,或者您在运行时实例化画布,则需要手动设置画布。只需在具有 Unity Canvas 的同一游戏对象上添加一个 UxrCanvas 组件即可完成此操作:

A common mistake is to forget adding the UxrCanvas component to prefabs that are instantiated at runtime.
一个常见的错误是忘记将 UxrCanvas 组件添加到在运行时实例化的预制件中。
Setting up the avatar 设置头像
The built-in avatars in UltimateXR already come with fingertips and laser pointers pre-configured. The prefabs have the fingertips enabled and the laser pointers disabled by default. If you want to use laser pointers instead, you can enable them by enabling the GameObjects hanging from the HandsIntegration object as shown below:
UltimateXR中的内置头像已经预先配置了指尖和激光指示器。默认情况下,预制件启用指尖并禁用激光指示器。如果要改用激光笔,可以通过启用悬挂在 HandsIntegration 对象的游戏对象来启用它们,如下所示:
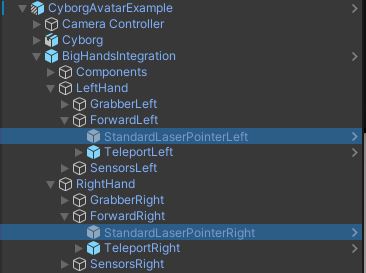
Setting up fingertips in a custom avatar 在自定义头像中设置指尖
Fingertips are enabled using the UxrFingerTip component and are normally added only to the index finger on each hand, to facilitate touch interaction and avoid undesired pressing. You may use a GameObject hanging from the distal bone of the finger.
指尖是使用 UxrFingerTip 组件启用的,通常只添加到每只手的食指上,以促进触摸交互并避免不必要的按压。您可以使用悬挂在手指远端骨头上的游戏对象。
An important consideration is to align the forward vector of the GameObject containing the UxrFingerTip component in the direction the pressing is performed. Using a slight downward angle is desired because press actions are normally performed that way. UltimateXR filters out press actions that aren’t performed in a natural angle, so be careful with this step. The right and up vectors do not require to have a specific orientation.
一个重要的注意事项是将包含 UxrFingerTip 组件的游戏对象的前向矢量与执行按下的方向对齐。需要使用轻微的向下角度,因为按压操作通常以这种方式执行。UltimateXR过滤掉了不是以自然角度执行的新闻动作,因此请小心这一步。右向量和向上向量不需要具有特定方向。
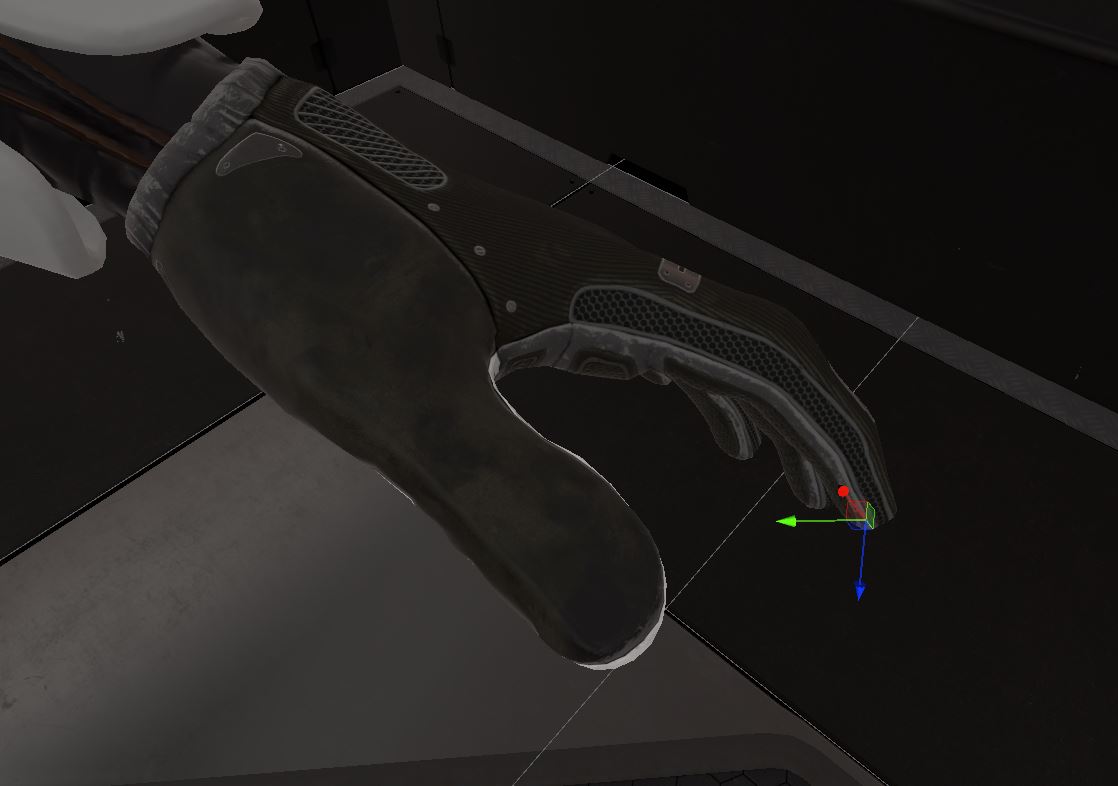
Setting up laser pointers in a custom avatar. 在自定义头像中设置激光指示器。
UI laser pointers are enabled using the UxrLaserPointer component, which are normally added to an object hanging from each hand in the avatar.
UI 激光指示器是使用 UxrLaserPointer 组件启用的,该组件通常添加到头像中悬挂在每只手上的对象中。
The UxrLaserPointer shows the following parameters:
UxrLaserPointer 显示以下参数:
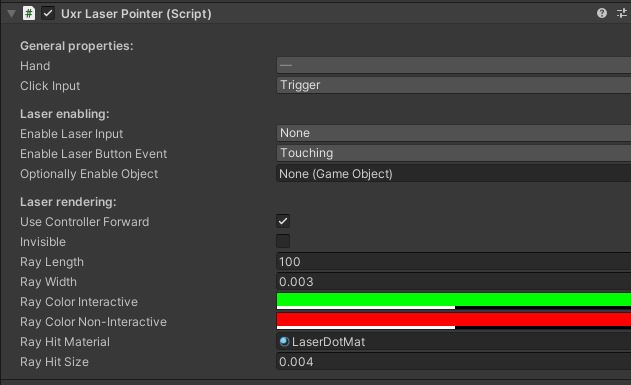
General properties 一般属性
- Hand: Selects which controller will be used to control the laser.
手:选择将用于控制激光器的控制器。 - Click Input: Which controller button will be used to perform clicks on UI elements.
单击输入:将使用哪个控制器按钮对 UI 元素执行单击。
Laser enabling 激光启用
- Enable Laser Input: Selects which controller button will be used to enable the laser.
启用激光输入:选择用于启用激光的控制器按钮。 - Enable Laser Button Event: Tells which controller button input event will be needed to enable the laser.
启用激光按钮事件:告知启用激光需要哪个控制器按钮输入事件。 - Optionally Enable Object: Optional additional object that will be enabled/disabled at the same time the laser is enabled or disabled.
可选启用对象:在启用或禁用激光器的同时启用/禁用的可选附加对象。
Laser rendering 激光渲染
- Use Controller Forward: When the avatar is rendered in controllers mode, will the laser use the controller’s forward vector instead of its own?
使用控制器转发:当头像在控制器模式下渲染时,激光会使用控制器的前向矢量而不是自己的矢量吗? - Invisible: Should the laser be invisible? This does not affect any raycasts, they still would be performed but the ray itself will be invisible.
隐形:激光应该是隐形的吗?这不会影响任何光线投射,它们仍然会被执行,但光线本身是不可见的。 - Ray Length: Laser ray length.
射线长度:激光长度。 - Ray Width: Laser ray width.
射线宽度:激光宽度。 - Ray Color Interactive: Laser color when hovering over interactive UI elements.
光线颜色交互:将鼠标悬停在交互式 UI 元素上时的激光颜色。 - Ray Color Non-Interactive: Laser color when hovering over non-interactive UI elements.
光线颜色非交互式:将鼠标悬停在非交互式 UI 元素上时的激光颜色。 - Ray Hit Material: Material that will be used to render the quad representing the hit with the scenario or UI elements.
光线命中材质:将用于渲染表示场景或 UI 元素命中的四边形的材质。 - Ray Hit Size: Size of the quad representing the hit with the scenario or UI elements.
光线命中大小:表示方案或 UI 元素命中大小的四边形大小。
The UxrControlInput component UxrControlInput 组件
The UxrControlInput is a very useful component that provides additional functionality when added to interactive components such as buttons or even images. Among other things it allows to:
UxrControlInput 是一个非常有用的组件,当添加到交互式组件(如按钮甚至图像)时,它提供了额外的功能。除其他事项外,它还允许:
- Specify audios whenever an element was pressed/clicked/released.
每当按下/单击/释放元素时指定音频。 - Specify haptic feedback whenever an element was pressed/clicked/released.
指定每当按下/单击/释放元素时的触觉反馈。 - Provide a clean scripting API with properties and events that facilitate the programming of UI interaction.
提供干净的脚本 API,其中包含有助于 UI 交互编程的属性和事件。
Audio and haptic feedback can be configured using the UxrControlInput inspector:
音频和触觉反馈可以使用 UxrControlInput 检查器进行配置:

Which completely expanded looks like this:
完全展开的外观如下所示:
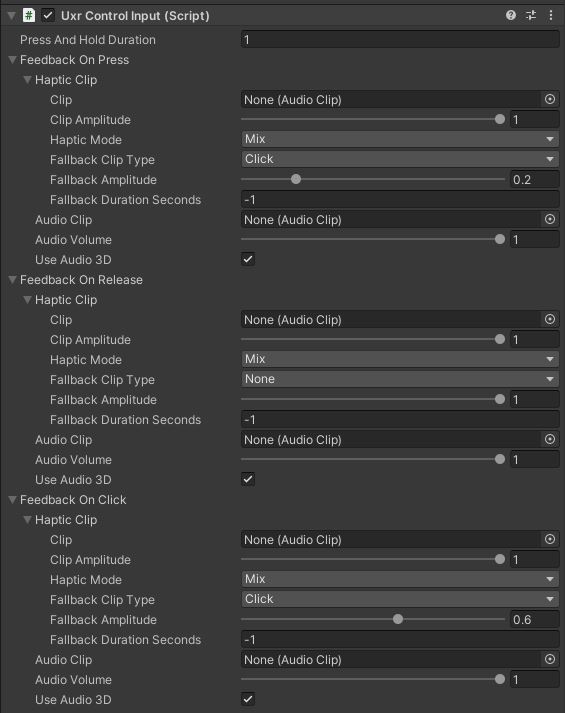
Each press/release/click event allows to specify an optional audio clip that should be played and optional haptic feedback.
每个按下/释放/单击事件都允许指定应播放的可选音频剪辑和可选的触觉反馈。
The haptic clip supports some interesting features:
触觉夹支持一些有趣的功能:
- If a Clip (audio file) is specified and the current system supports audio data as haptic feedback, the clip will be transformed to vibration and played through the controllers.
如果指定了剪辑(音频文件),并且当前系统支持音频数据作为触觉反馈,则该剪辑将转换为振动并通过控制器播放。 - If a Clip was not specified or the current system doesn’t support audio data as haptic feedback, a Fallback Clip from a pre-defined set of vibrations can be played. You may use a negative value as duration in seconds to specify the default clip duration.
如果未指定剪辑或当前系统不支持音频数据作为触觉反馈,则可以播放一组预定义振动的回退剪辑。您可以使用负值作为持续时间(以秒为单位)来指定默认剪辑持续时间。
UxrControlInput scripting UxrControl输入脚本
Some examples of common UxrControlInput use can be found here.
可以在此处找到一些常见 UxrControlInput 用法的示例。
The full UxrControlInput API can be found here.
完整的 UxrControlInput API 可以在这里找到。
Tweening 补间
UltimateXR comes with a full UI tweening animation system. It supports animation and setup both using the inspector and through scripting.
UltimateXR带有完整的UI补间动画系统。它支持使用检查器和脚本进行动画和设置。
The full set of tweening animation components are:
全套补间动画组件包括:
- UxrCanvasAlphaTween
- UxrColorTween
- UxrImageFillTween
- UxrPositionTween
- UxrRotationTween
- UxrScaleTween
- UxrTextContentTween
They can be added to the different elements in a UI and will perform the given animation when enabled.
它们可以添加到 UI 中的不同元素中,并在启用时执行给定的动画。
For examples of use via scripting go to How do I?
有关通过脚本使用的示例,请转到如何实现?
You can also check the full tweening API here.
您还可以在此处查看完整的补间 API。
Scripting 脚本
UltimateXR was designed from the beginning to be an easy-to-use yet powerful and scalable framework. Regarding the code, we always tried to apply the highest standards.
UltimateXR从一开始就被设计成一个易于使用但功能强大且可扩展的框架。关于代码,我们一直试图应用最高标准。
These are some of the principles that we tried to follow:
这些是我们试图遵循的一些原则:
- Contribute considering that any small improvement will help cutting hours of work to many other coworkers and developers.
考虑到任何小的改进都将有助于减少许多其他同事和开发人员的工作时间,做出贡献。 - Write well-structured and clean code. Framework code will be used in many projects, during many years by many developers. Write the API that we would love existed.
编写结构良好且干净的代码。框架代码将在许多项目中使用,多年来被许多开发人员使用。编写我们希望存在的 API。 - Documentation is a top priority:
文档是重中之重:- Every class, every method, every event, or property is fully documented using standard XML tags. No matter the visibility, public, protected, or private. This will enable programmers to visualize contextual help in the IDE whenever they access any UltimateXR class or member. It also provides a way to automatically create the API documentation on this website.
每个类、每个方法、每个事件或属性都使用标准 XML 标记完整记录。无论可见性、公共、受保护还是私有。这将使程序员能够在访问任何 UltimateXR 类或成员时在 IDE 中可视化上下文帮助。它还提供了一种在此网站上自动创建 API 文档的方法。 - In longer sections of code, inserting comments every few steps indicating what happens next compartmentalizes the algorithm. At the same time, it helps getting a quicker idea of what each part does even if it could be inferred by looking at the code itself.
在较长的代码部分中,每隔几个步骤插入一次注释,指示接下来会发生什么,从而划分算法。同时,它有助于更快地了解每个部分的作用,即使可以通过查看代码本身来推断。
- Every class, every method, every event, or property is fully documented using standard XML tags. No matter the visibility, public, protected, or private. This will enable programmers to visualize contextual help in the IDE whenever they access any UltimateXR class or member. It also provides a way to automatically create the API documentation on this website.
- Always write code when it is required, not because it could be useful. Every single line of code in the framework was written because it was required in a project. By doing this, the API will naturally evolve to how it makes sense in real use cases. If we want to implement new features that are not required, we need to create a real-world scenario where it would be used.
始终在需要时编写代码,而不是因为它可能有用。框架中的每一行代码都是因为项目中需要它而编写的。通过这样做,API 将自然演变为它在实际用例中的意义。如果我们想实现不需要的新功能,我们需要创建一个使用它的真实场景。 - Follow standards whenever possible. We tried to follow the .NET Framework Design Guidelines: https://docs.microsoft.com/en-us/dotnet/standard/design-guidelines/
尽可能遵循标准。我们尝试遵循 .NET Framework 设计指南:https://docs.microsoft.com/en-us/dotnet/standard/design-guidelines/ - Use a common file structure and code style to keep homogeneity across the whole framework. We currently use Rider and its code style capabilities and have used Resharper for Visual Studio in the past. We may provide these configuration files in the future to facilitate external contributions.
使用通用的文件结构和代码样式来保持整个框架的同质性。我们目前使用Rider及其代码样式功能,并且过去曾使用过Visual Studio的Resharper。我们将来可能会提供这些配置文件,以方便外部贡献。
Here are some tips to help you navigate through the code:
下面是一些可帮助您浏览代码的提示:
Collapsed view 折叠视图
Use Ctrl+M followed by Ctrl+O to collapse to definitions. Our source files are grouped in sections that follow a logic order, and the collapsed view helps getting a quick look at what is available and how the file is organized. Public properties, events and methods will be shown on top and will help you understand how the components are used.
使用 Ctrl+M 后跟 Ctrl+O 折叠到定义。我们的源文件按逻辑顺序分组,折叠视图有助于快速查看可用内容以及文件的组织方式。公共属性、事件和方法将显示在顶部,并将帮助您了解组件的使用方式。
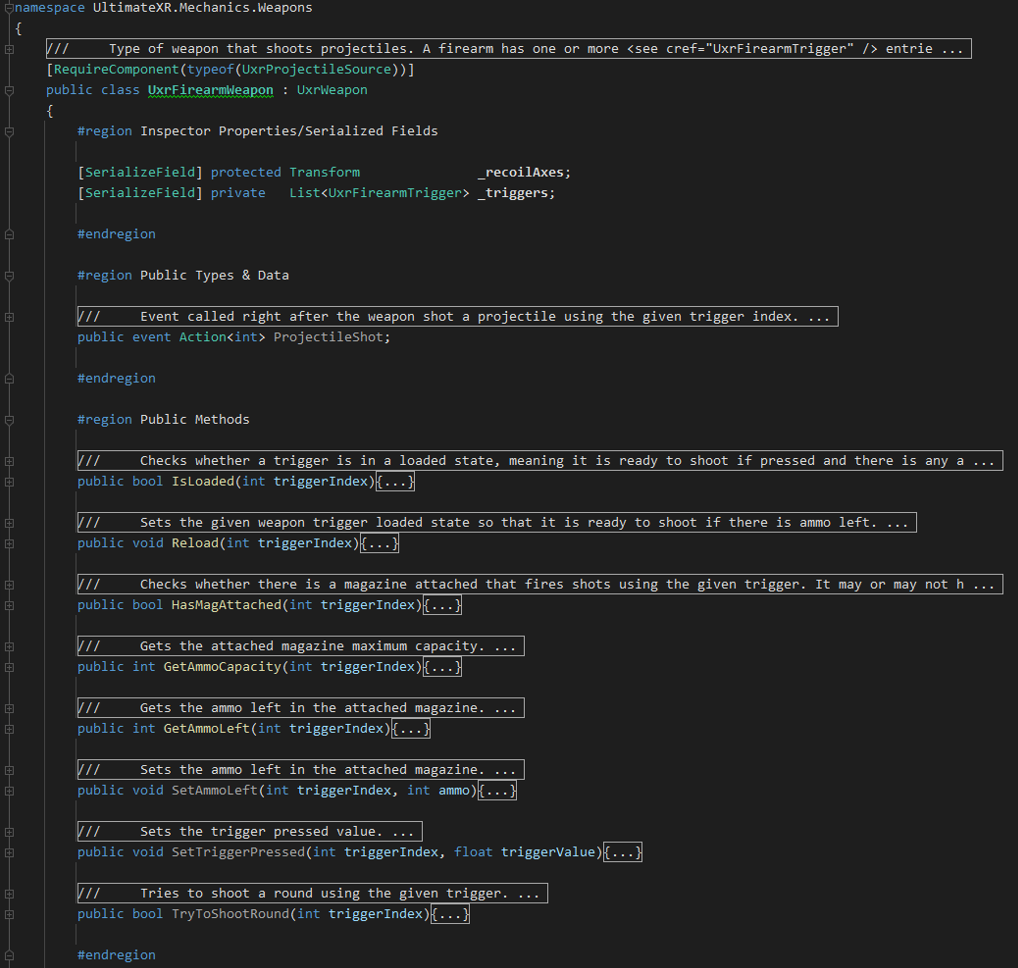
Expanded view 展开视图
Use Ctrl+M followed by Ctrl+L to expand the definitions. The collapse and expand shortcuts will help you alternate between the two views to quickly navigate through the code.
使用 Ctrl+M 后跟 Ctrl+L 展开定义。折叠和展开快捷方式将帮助您在两个视图之间交替,以快速浏览代码。
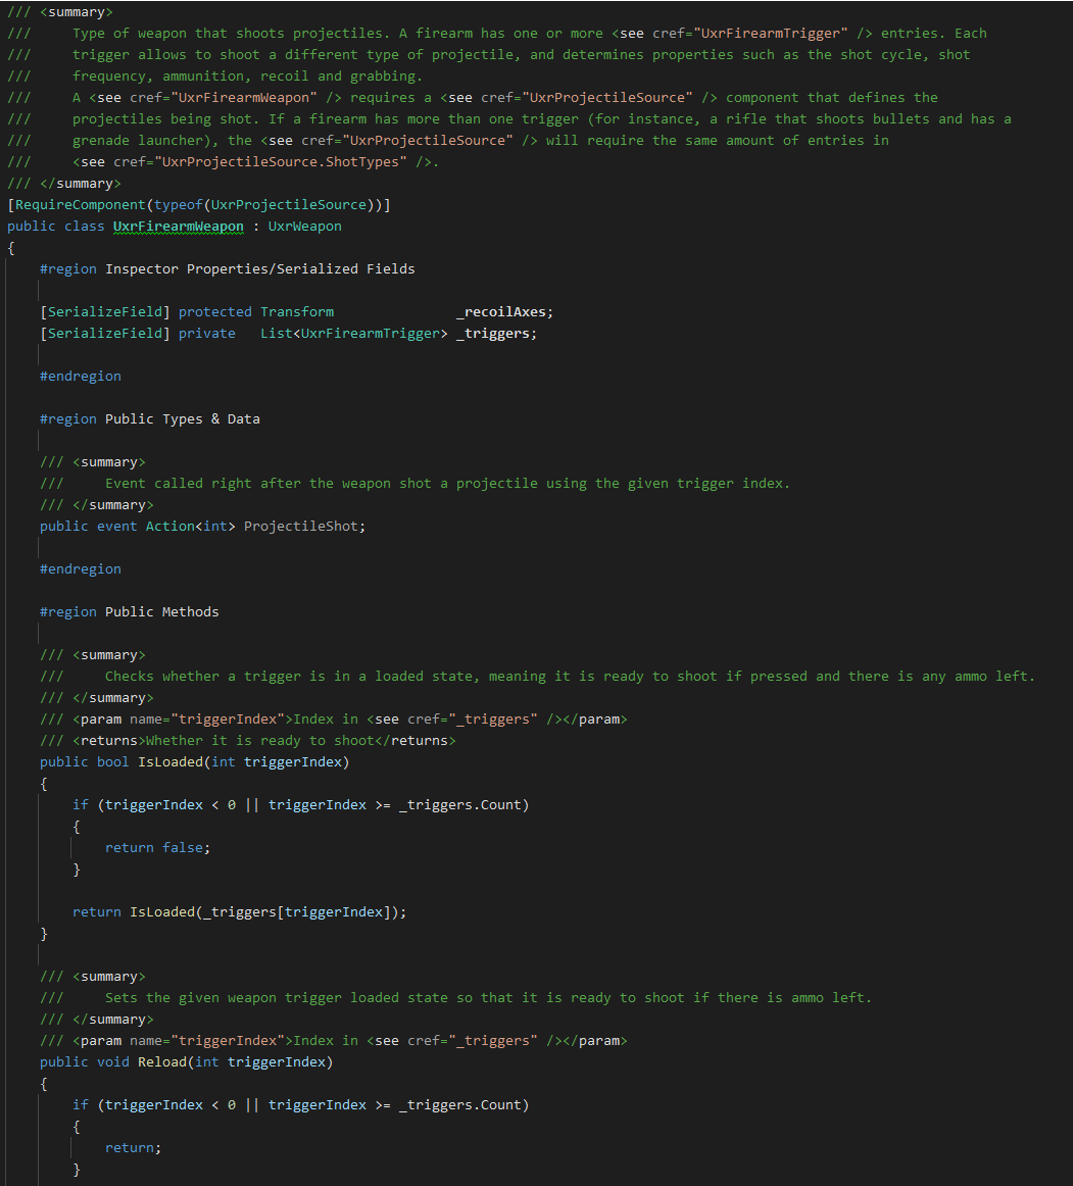
Code completion 代码完成
Make use of the autocompletion and tooltips in your IDE, such as Intellisense in Visual Studio or the built-in capabilities in Rider. The framework has full XML documentation which among other things will assist you when you write code:
利用 IDE 中的自动完成和工具提示,例如 Visual Studio 中的智能感知或 Rider 中的内置功能。该框架具有完整的XML文档,其中包括在编写代码时为您提供帮助:
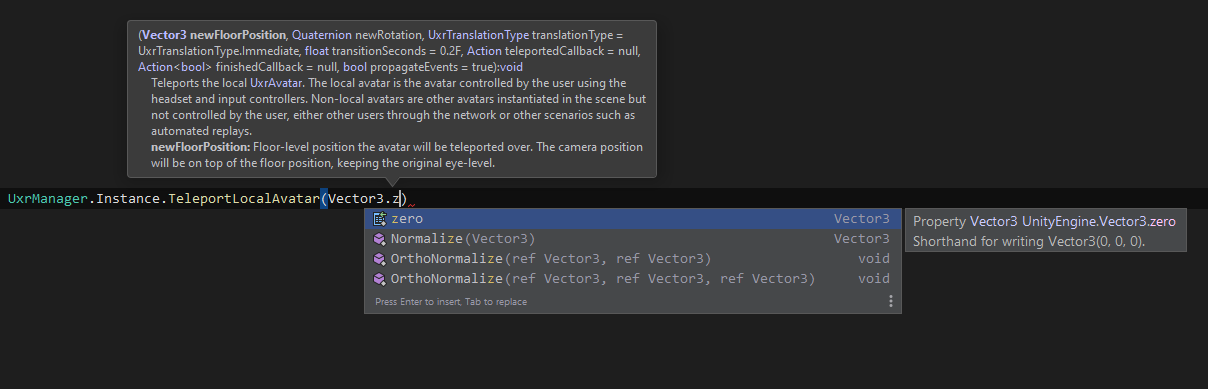
To check commonly used code snippets that will help you developing your VR apps navigate to the How Do I… section. It will also help you understand which classes are involved in the different aspects of development.
要检查可帮助您开发 VR 应用程序的常用代码片段,请导航到如何实现...部分。它还将帮助您了解哪些类涉及开发的不同方面。
If you need help regarding specific classes it is recommended to visit the API section where all functionality is detailed.
如果您需要有关特定类的帮助,建议访问 API 部分,其中详细介绍了所有功能。
Scripting: How do I…? 脚本:我该怎么做?
The goal of this section is to provide through snippets a very quick understanding of which classes are involved in the different aspects of XR development and how exactly UltimateXR can be used to solve specific problems.
本节的目标是通过片段快速了解哪些类涉及XR开发的不同方面,以及如何使用UltimateXR来解决特定问题。
Use the menu on the right to navigate to a specific topic.
使用右侧的菜单导航到特定主题。
For a full scripting reference please visit the API section.
有关完整的脚本参考,请访问 API 部分。
Animation 动画
How do I animate a material color over time?
如何随时间推移对材质颜色进行动画处理?
// Start
UxrAnimatedMaterial animation = UxrAnimatedMaterial.AnimateBlinkColor(gameObject, "_BaseColor", startColor, ColorExt.ScaleColorBrightness(startColor, 2.5f));

// Stop method #1
animation.Stop();

// Stop method #2
UxrAnimatedMaterial.Stop(gameObject);
How do I animate a material over a limited amount of time, with the maximum flexibility and do something when finished?
如何在有限的时间内以最大的灵活性对材质进行动画处理,并在完成后执行某些操作?
UxrAnimatedMaterial animation = UxrAnimatedMaterial.AnimateInterpolation(gameObject,
                                                                         materialSlotIndex,
                                                                         UxrMaterialMode.InstanceOnly,
                                                                         UxrMaterialParameterType.Float,
                                                                         "ParameterName",
                                                                         Vector4.one * startValue,
                                                                         Vector4.one * endValue,
                                                                         new UxrInterpolationSettings(durationSeconds, delaySeconds, UxrEasing.Linear),
                                                                         () => DoSomethingAtTheEnd());
How can I make an object start moving linearly in world space?
如何使物体在世界空间中开始线性移动?
// Will start moving 3 units per second in the world forward direction
UxrAnimatedTransform animation = UxrAnimatedTransform.Translate(gameObject, UxrTransformTranslationSpace.World, Vector3.forward * 3.0f);

// Stop
animation.Stop();
How can I make an object start bouncing in local space?
如何使对象在本地空间中开始弹跳?
// Start bouncing looping forever in the local Y direction where from top (above 2 units) to bottom (local zero) it takes 0.5 seconds.
UxrAnimatedTransform animation = UxrAnimatedTransform.PositionInterpolation(gameObject, UxrTransformTranslationSpace.Local, Vector3.zero, Vector3.up * 2.0f, new UxrInterpolationSettings(0.5f, 0.0f, UxrEasing.EaseOutQuart, UxrLoopMode.PingPong));

// Stop
animation.Stop();
How can I make an object start facing towards the avatar eye?
如何使物体开始朝向头像眼睛?
UxrLookAtLocalAvatar.MakeLookAt(gameObject, allowRotateAroundVerticalAxis, allowRotateAroundHorizontalAxis, useInvertedForwardAxis);

// Stop
UxrLookAtLocalAvatar.RemoveLookAt(gameObject);
Avatar 化身
How do I access my avatar at any point in the application?
如何在应用程序中的任何位置访问我的头像?
UxrAvatar myAvatar = UxrAvatar.LocalAvatar;
How do I teleport my avatar?
如何传送我的头像?
Method 1: Instant teleport:
方法一:即时传送:
UxrManager.Instance.MoveAvatarTo(UxrAvatar.LocalAvatar, Vector3.zero);
Method 2: Teleporting with a fadeout and fadein.
方法2:淡出和淡入的传送。
// Quick way

UxrManager.Instance.TeleportLocalAvatar(Vector3.zero, Quaternion.identity, UxrTranslationType.Fade);

// Taking into account re-parenting to destination and/or moving platforms

Transform destination         = ...
bool      parentToDestination = true;
UxrManager.Instance.TeleportLocalAvatarRelative(destination, parentToDestination, destination.position, Quaternion.identity, UxrTranslationType.Fade);
Method 3: Teleporting with a fadeout and fadein using async/await
方法 3:使用 async/await 进行淡出和淡入的传送
// Quick way

Debug.Log("Teleport start");
await UxrManager.Instance.TeleportLocalAvatarAsync(Vector3.zero, Quaternion.identity, UxrTranslationType.Fade);
Debug.Log("Teleport finished");

// Taking into account re-parenting to destination and/or moving platforms

Transform destination         = ...
bool      parentToDestination = true;

Debug.Log("Teleport start");
await UxrManager.Instance.TeleportLocalAvatarRelativeAsync(destination, parentToDestination, destination.position, Quaternion.identity, UxrTranslationType.Fade);
Debug.Log("Teleport finished");
Method 4: Teleporting with a fadeout and fadein using callbacks:
方法 4:使用回调淡出和淡入进行瞬移:
void SwitchScenario()
{
    // Enable/Disable objects here, because the screen is completely faded out.
}

void PlaySound()
{
    // Play sound after the screen has faded back in.
}

float teleportDurationSeconds = 0.3f;
UxrManager.Instance.TeleportLocalAvatar(Vector3.zero, Quaternion.identity, UxrTranslationType.Fade, teleportDurationSeconds, SwitchScenario, PlaySound);
How can I get notified when the avatar moved or teleported?
当头像移动或传送时,我如何获得通知?
private void OnEnable()
{
    UxrManager.AvatarMoved += UxrManager_AvatarMoved;
}

private void OnDisable()
{
    UxrManager.AvatarMoved -= UxrManager_AvatarMoved;
}

private void UxrManager_AvatarMoved(object sender, UxrAvatarMoveEventArgs e)
{
    Debug.Log($"Avatar moved from {e.OldPosition} to {e.NewPosition}");
}
How can I do something with the avatar each frame after UltimateXR finished updating it?
在 UltimateXR 完成更新后,我该如何对每一帧的头像做一些事情?
private void OnEnable()
{
    UxrManager.AvatarsUpdated += UxrManager_AvatarsUpdated;
}

private void OnDisable()
{
    UxrManager.AvatarsUpdated -= UxrManager_AvatarsUpdated;
}

private void UxrManager_AvatarsUpdated()
{
    Debug.Log("Avatars finished updating this frame");
}
How do I access bones in my avatar rig?
如何访问头像装备中的骨骼?
Example 1: Hand bone
示例 1:手骨
UxrAvatarHand leftHand = UxrAvatar.LocalAvatar.GetHand(UxrHandSide.Left);
Vector3 thumbTip = leftHand.Thumb.Distal.position;
Example 2: Head
示例 2:头部
Vector3 headPos = UxrAvatar.LocalAvatar. AvatarRig.Head.Head.position;
Example 3: All bones in left hand
示例 3:左手的所有骨骼
foreach (Transform boneTransform in UxrAvatar.LocalAvatar.GetHand(UxrHandSide.Right))
{
    Debug.Log(boneTransform.name);
}
Example 4: All bones in rig
示例 4:钻机中的所有骨骼
foreach (Transform boneTransform in UxrAvatar.LocalAvatar.AvatarRig.Transforms)
{
    Debug.Log(boneTransform.name);
}
How do I know where the current camera position is?
我如何知道当前相机位置在哪里?
Vector3 cameraPos = UxrAvatar.LocalAvatar.CameraPosition;
How do I know where the avatar is currently looking?
我怎么知道头像当前在看哪里?
Vector3 viewDirection = UxrAvatar.LocalAvatar.CameraForward;
How can I prevent other avatars in the scene from updating using code? I want to control them manually because I’m developing a multi-player game.
如何防止场景中的其他头像使用代码进行更新?我想手动控制它们,因为我正在开发一个多人游戏。
avatar.AvatarMode = UxrAvatarMode.UpdateExternally;
How do I check if an avatar is peeking through a wall?
如何检查头像是否在偷看墙壁?
// This requires an UxrCameraWallFade on the avatar’s camera to work, although if it is not present it will just return false
bool isPeeking = UxrCameraWallFade.IsAvatarPeekingThroughGeometry(UxrAvatar.LocalAvatar);
How do I fade the view? I want to fade the screen out
如何淡化视图?我想淡出屏幕
// Enable fade with total black opacity
UxrAvatar.LocalAvatar.CameraFade.EnableFadeColor(Color.black, 1.0f);

// Disable fade
UxrAvatar.LocalAvatar.CameraFade.DisableFadeColor();
How can I between showing the avatar and showing a virtual representation of the controllers that I’m currently holding? Note: This feature is currently supported but we are finalizing the legal terms to include the graphics for the controllers.
如何在显示头像和显示我当前持有的控制器的虚拟表示之间?注意:此功能目前受支持,但我们正在最终确定法律条款,以包含控制器的图形。
// Hide the avatar and show the controllers
UxrAvatar.LocalAvatar.RenderMode = UxrAvatarRenderModes.AllControllers;

// Show hands grabbing the controllers using inverse kinematics and mimicking user input
UxrAvatar.LocalAvatar.ShowControllerHands = true;

// Hide hands and show only the controllers
UxrAvatar.LocalAvatar.ShowControllerHands = false;

// Switch back to showing the avatar
UxrAvatar.LocalAvatar.RenderMode = UxrAvatarRenderModes.Avatar;
How can I list the hand pose names in the avatar?
如何在头像中列出手部姿势名称?
foreach (UxrHandPoseAsset handPose in UxrAvatar.LocalAvatar.GetAllHandPoses)
{
    Debug.Log(HandPose.name);
}
How can I override/restore the current default pose that the avatar has while idling:
如何覆盖/恢复头像在空闲时的当前默认姿势:
UxrStandardAvatarController avatarController = UxrAvatar.LocalAvatar.AvatarController as UxrStandardAvatarController;

avatarController.LeftHandDefaultPoseNameOverride = "newPoseName";
avatarController.RightHandDefaultPoseNameOverride = "newPoseName";

// Restore
avatarController.LeftHandDefaultPoseNameOverride = null;
avatarController.RightHandDefaultPoseNameOverride = null;
How can I change the blend value for a grab hand pose while an object is being grabbed? I want to see how the avatar presses the trigger while holding a gun, and the grab is a pose that blends to the trigger being pressed.
如何在抓取对象时更改抓取手姿势的混合值?我想看看化身在持枪时如何按下扳机,抓取是一个与被按下的扳机混合的姿势。
if (UxrGrabManager.Instance.GetGrabbingHand(grabbableGun, 0, out UxrGrabber grabber))
{
    float triggerPressAmount = UxrAvatar.LocalAvatarInput.GetInput1D(grabber.Side, UxrInput1D.Trigger);
    grabbableGun.GetGrabPoint(0).GetGripPoseInfo(grabber.Avatar).PoseBlendValue = triggerPressAmount;
}
Guides 指南
How can I show a guiding arrow that instructs the user to look at a specific object?
如何显示指示用户查看特定对象的引导箭头?
// Enable
UxrCompass.Instance.SetTarget(myObject.transform, UxrCompassDisplayMode.Look);

// Same but when the object is in sight it won't show the blinking eye icon
UxrCompass.Instance.SetTarget(myObject.transform, UxrCompassDisplayMode.OnlyCompass);

// Disable
UxrCompass.Instance.SetTarget(null);
How can I instruct the user to go to a certain place?
如何指示用户转到某个地方?
// Enable
UxrCompass.Instance.SetTarget(floor.transform, UxrCompassDisplayMode.Location);

// Disable
UxrCompass.Instance.SetTarget(null);
How can I instruct the user to grab a certain object?
如何指示用户抓取某个对象?
// Enable
UxrCompass.Instance.SetTarget(hammer.transform, UxrCompassDisplayMode.Grab);

// Disable
UxrCompass.Instance.SetTarget(null);
How can I instruct the user to use a certain tool?
如何指导用户使用某个工具?
// Enable
UxrCompass.Instance.SetTarget(tool.transform, UxrCompassDisplayMode.Use);

// Disable
UxrCompass.Instance.SetTarget(null);
Haptics 触觉
How can I send a haptic impulse to a specific controller?
如何向特定控制器发送触觉脉冲?
UxrAvatar.LocalAvatar.ControllerInput.SendHapticFeedback(UxrHandSide.Left, UxrHapticClipType.Click, 1.0f);
How can I send a haptic impulse only to the hands that are currently grabbing an object?
如何仅向当前正在抓取物体的手发送触觉脉冲?
UxrAvatar.LocalAvatar.ControllerInput.SendGrabbableHapticFeedback (grabbableObject, UxrHapticClipType.RumbleFreqNormal);
How can I send a haptic clip based on an audio file but if the device does not support to play audio files as haptics, play a fallback impulse instead?
如何发送基于音频文件的触觉剪辑,但如果设备不支持将音频文件作为触觉播放,请改为播放回退脉冲?
AudioClip audioClip = ...

UxrAvatar.LocalAvatar.ControllerInput.SendHapticFeedback(UxrHandSide.Left, new UxrHapticClip(audioClip, UxrHapticClickType.Click));
Input/Tracking 输入/跟踪
How can I know the name of the headset that is connected?
如何知道已连接的头戴式耳机的名称?
Debug.Log(UxrTrackingDevice.HeadsetDeviceName);
How can I know the name of the controllers that are connected?
如何知道已连接的控制器的名称?
Debug.Log(UxrAvatar.LocalAvatarInput.LeftControllerName + ", " + UxrAvatar.LocalAvatarInput.RightControllerName);
How can I know if a controller has certain elements?
如何知道控制器是否具有某些元素?
bool mainJoystickIsTouchpad = UxrAvatar.LocalAvatarInput.MainJoystickIsTouchpad;
bool hasTriggerAndGrab = UxrAvatar.LocalAvatarInput.HasControllerElements(UxrHandSide.Left, UxrControllerElements.Grip | UxrControllerElements.Trigger);
How can I know if a controller button was pressed?
我如何知道是否按下了控制器按钮?
Method1 (direct query): 方法1(直接查询):
bool wasPressed = UxrAvatar.LocalAvatarInput.GetButtonsPressDown(UxrHandSide.Left, UxrInputButtons.Button1);
Method2 (direct query):
方法2(直接查询):
bool wasPressed = UxrAvatar.LocalAvatarInput.GetButtonsEvent(UxrHandSide.Left, UxrInputButtons.Button1, UxrButtonEventType.PressDown);
Method3 (using event subscription):
方法 3(使用事件订阅):
UxrControllerInput.GlobalButtonStateChanged += Input_ButtonStateChanged;

private void Input_ButtonStateChanged(object sender, UxrInputButtonEventArgs e)
{
    Debug.Log($"Pressed {e.HandSide}, {e.Button}, {e.ButtonEventType}");
}
How can I know if two controller buttons are being pressed at the same time?
如何知道是否同时按下了两个控制器按钮?
bool areBeingPressed = UxrAvatar.LocalAvatarInput.GetButtonsPress(UxrHandSide.Left, UxrInputButtons.Button1 | UxrInputButtons.Button2);
How can I set the user handedness?
如何设置用户惯用手?
UxrAvatar.LocalAvatarInput.Handedness = UxrHandedness.Left;
How can I get a trigger input based on handedness instead of physical side?
如何根据惯用手而不是身体方面获得触发输入?
float trigger = UxrAvatar.LocalAvatarInput.GetInput1D(UxrAvatar.LocalAvatarInput.Handedness, UxrInput1D.Trigger);
How can I set to ignore input?
如何设置为忽略输入?
UxrAvatar.LocalAvatarInput.SetIgnoreControllerInput(UxrHandSide.Left, true);
How can I still know if a controller button was pressed on a controller even if it was set to ignore input?
我如何仍然知道控制器上是否按下了控制器按钮,即使它被设置为忽略输入?
bool wasPressedWhileIgnoring = UxrAvatar.LocalAvatarInput.GetButtonsPressDown(UxrHandSide.Left, UxrInputButtons.Button1, true);
How can I get the forward direction of a controller?
如何获取控制器的前进方向?
Vector3 forward = UxrAvatar.LocalAvatar.GetControllerInputForward(UxrHandSide.Left).forward;
When the avatar is rendering the controllers (avatar.RenderMode = UxrAvatarRenderModes.AllControllers), how can I make a certain button blink for a tutorial that I’m making? Note: This feature is currently supported but we are finalizing the legal terms to include the graphics for the controllers.
当头像渲染控制器时(头像。RenderMode = UxrAvatarRenderModes.AllControllers),如何使我正在制作的教程的某个按钮闪烁?注意:此功能目前受支持,但我们正在最终确定法律条款,以包含控制器的图形。
// Start blinking the trigger and grip buttons 3 times per second for 2 seconds
UxrAvatar.LocalAvatarInput.StartControllerElementsBlinking(UxrHandSide.Left, UxrControllerElements.Trigger | UxrControllerElements.Grip, Color.white, 3.0f, 2.0f);

// Stop trigger blinking
UxrAvatar.LocalAvatarInput.StopControllerElementsBlinking(UxrHandSide.Left, UxrControllerElements.Trigger);

// Stop all remaining
UxrAvatar.LocalAvatarInput.StopAllBlinking(UxrHandSide.Left);
How can I get the speed/velocity of the hands?
如何获得手的速度/速度?
if (UxrKeyboardInput.GetPressDown(UxrKey.Enter))
{
    // Velocity using current-last frame data:
    Vector3 leftInstantVelocity  = UxrAvatar.LocalAvatar.GetGrabber(UxrHandSide.Left).Velocity;
	Vector3 rightInstantVelocity = UxrAvatar.LocalAvatar.GetGrabber(UxrHandSide.Right).Velocity;

	// Velocity using multiple frame data:
	Vector3 leftSmoothVelocity   = UxrAvatar.LocalAvatar.GetGrabber(UxrHandSide.Left).SmoothVelocity;
	Vector3 rightSmoothVelocity  = UxrAvatar.LocalAvatar.GetGrabber(UxrHandSide.Right).SmoothVelocity;
}
How can I get keyboard input?
如何获取键盘输入?
if (UxrKeyboardInput.GetPressDown(UxrKey.Enter))
{
    Debug.Log("Enter key was pressed");
}
Manipulation 操纵
How do I know if an object is currently being grabbed?
如何知道当前是否正在抓取对象?
Method1: 方法1:
bool isBeingGrabbed = UxrGrabManager.Instance.IsBeingGrabbed(grabbableObject);
Method2: 方法2:
bool isBeingGrabbed = grabbableObject.IsBeingGrabbed;
How do I get the object if it is being grabbed with a specific hand?
如果物体被特定的手抓住,我如何获得它?
if (UxrGrabManager.Instance.GetObjectBeingGrabbed(avatar, UxrHandSide.Left, out UxrGrabbableObject grabbableObject)
{
    Debug.Log($"Object {grabbableObject.name} is being grabbed using the left hand");
}
How do I get the grabbing hand of an object?
如何获得物体的抓手?
if (UxrGrabManager.Instance.GetGrabbingHand(grabbableObject, 0, out UxrGrabber grabber))
{
    Debug.Log($"Avatar {grabber.Avatar.name} is grabbing object using the {grabber.Side} hand");
}
How do I get the grabbing hands if an object can be grabbed with more than one?
如果一个物体可以用多个物体抓住,我如何获得抓手?
// Querying a specific grab point
if (UxrGrabManager.Instance.GetGrabbingHands(grabbableObject, 0, out List<UxrGrabber> grabbers))
{
}

// Querying all grab points
if (UxrGrabManager.Instance.GetGrabbingHands(grabbableObject, -1, out List<UxrGrabber> grabbers))
{
}
How can I force to keep a UxrGrabbableObject in place so that it can’t be moved?
如何强制将 UxrGrabbableObject 固定在原位,使其无法移动?
grabbableObject.IsLockedInPlace = true;
How can I enable/disable a grab point in a grabbable object?
如何启用/禁用可抓取对象中的抓取点?
// Disable so that it can't be used
grabbableObject.SetGrabPointEnabled(0, false);

// Enable so that it can be used again
grabbableObject.SetGrabPointEnabled(0, true);

// Enable all grab points
grabbableObject.EnableAllGrabPoints();
How do I force to release a grabbed object?
如何强制释放被抓住的物体?
Method1: 方法1:
UxrGrabManager.Instance.ReleaseGrabs(grabbableObject, true);
Method2: 方法2:
grabbableObject.ReleaseGrabs(true);
How do I place a grabbable object on an anchor?
如何将可抓取的对象放在锚点上?
// Instant placement
UxrGrabManager.Instance.PlaceObject(grabbableObject, GrabbleObjectAnchor, UxrPlacementType.Immediate, true);

// Smooth placement
UxrGrabManager.Instance.PlaceObject(grabbableObject, GrabbleObjectAnchor, UxrPlacementType.Smooth, true);
How do I get the velocity of an object being grabbed?
如何获取被抓取物体的速度?
Vector3 velocity = UxrGrabManager.Instance.GetGrabbedObjectVelocity(grabbableObject);
How do I get the angular velocity of an object being grabbed?
如何获取被抓取物体的角速度?
Vector3 angularVelocity = UxrGrabManager.Instance.GetGrabbedObjectAngularVelocity(grabbableObject);
How do I create events to detect any object manipulation?
如何创建事件来检测任何对象操作?
private void OnEnable()
{
    UxrGrabManager.Instance.ObjectGrabbing           += UxrGrabManager_ObjectGrabbing;
    UxrGrabManager.Instance.ObjectGrabbed            += UxrGrabManager_ObjectGrabbed;
    UxrGrabManager.Instance.ObjectReleasing          += UxrGrabManager_ObjectReleasing;
    UxrGrabManager.Instance.ObjectReleased           += UxrGrabManager_ObjectReleased;
    UxrGrabManager.Instance.ObjectPlacing            += UxrGrabManager_ObjectPlacing;
    UxrGrabManager.Instance.ObjectPlaced             += UxrGrabManager_ObjectPlaced;
    UxrGrabManager.Instance.ObjectRemoving           += UxrGrabManager_ObjectRemoving;
    UxrGrabManager.Instance.ObjectRemoved            += UxrGrabManager_ObjectRemoved;
    UxrGrabManager.Instance.AnchorRangeEntered       += UxrGrabManager_AnchorRangeEntered;
    UxrGrabManager.Instance.AnchorRangeLeft          += UxrGrabManager_AnchorRangeLeft;
    UxrGrabManager.Instance.PlacedObjectRangeEntered += UxrGrabManager_PlacedObjectRangeEntered;
    UxrGrabManager.Instance.PlacedObjectRangeLeft    += UxrGrabManager_PlacedObjectRangeLeft;
}

private void OnDisable()
{
    UxrGrabManager.Instance.ObjectGrabbing           -= UxrGrabManager_ObjectGrabbing;
    UxrGrabManager.Instance.ObjectGrabbed            -= UxrGrabManager_ObjectGrabbed;
    UxrGrabManager.Instance.ObjectReleasing          -= UxrGrabManager_ObjectReleasing;
    UxrGrabManager.Instance.ObjectReleased           -= UxrGrabManager_ObjectReleased;
    UxrGrabManager.Instance.ObjectPlacing            -= UxrGrabManager_ObjectPlacing;
    UxrGrabManager.Instance.ObjectPlaced             -= UxrGrabManager_ObjectPlaced;
    UxrGrabManager.Instance.ObjectRemoving           -= UxrGrabManager_ObjectRemoving;
    UxrGrabManager.Instance.ObjectRemoved            -= UxrGrabManager_ObjectRemoved;
    UxrGrabManager.Instance.AnchorRangeEntered       -= UxrGrabManager_AnchorRangeEntered;
    UxrGrabManager.Instance.AnchorRangeLeft          -= UxrGrabManager_AnchorRangeLeft;
    UxrGrabManager.Instance.PlacedObjectRangeEntered -= UxrGrabManager_PlacedObjectRangeEntered;
    UxrGrabManager.Instance.PlacedObjectRangeLeft    -= UxrGrabManager_PlacedObjectRangeLeft;
}

private void UxrGrabManager_ObjectGrabbing(object sender, UxrManipulationEventArgs e)
{
    Debug.Log($"Object {e.GrabbableObject.name} is about to be grabbed by {e.Grabber.Avatar.name}");
}

private void UxrGrabManager_ObjectGrabbed(object sender, UxrManipulationEventArgs e)
{
    Debug.Log($"Object {e.GrabbableObject.name} was grabbed by {e.Grabber.Avatar.name}");
}

private void UxrGrabManager_ObjectReleasing(object sender, UxrManipulationEventArgs e)
{
    // Parameter e.Grabber may be null if the object was released procedurally
    Debug.Log($"Object {e.GrabbableObject.name} is about to be released by {e.Grabber.Avatar.name}");
}

private void UxrGrabManager_ObjectReleased(object sender, UxrManipulationEventArgs e)
{
    // Parameter e.Grabber may be null if the object was released procedurally
    Debug.Log($"Object {e.GrabbableObject.name} was released by {e.Grabber.Avatar.name}");
}

private void UxrGrabManager_ObjectPlacing(object sender, UxrManipulationEventArgs e)
{
    // Parameter e.Grabber may be null if the object was placed procedurally
    Debug.Log($"Object {e.GrabbableObject.name} is about to be placed on anchor {e.GrabbableAnchor.name} by {e.Grabber.Avatar.name}");
}

private void UxrGrabManager_ObjectPlaced(object sender, UxrManipulationEventArgs e)
{
    // Parameter e.Grabber may be null if the object was placed procedurally
    Debug.Log($"Object {e.GrabbableObject.name} was placed on anchor {e.GrabbableAnchor.name} by {e.Grabber.Avatar.name}");
}

private void UxrGrabManager_ObjectRemoving(object sender, UxrManipulationEventArgs e)
{
    // Parameter e.Grabber may be null if the object was removed procedurally
    Debug.Log($"Object {e.GrabbableObject.name} was is about to be removed from anchor {e.GrabbableAnchor.name} by {e.Grabber.Avatar.name}");
}

private void UxrGrabManager_ObjectRemoved(object sender, UxrManipulationEventArgs e)
{
    // Parameter e.Grabber may be null if the object was removed procedurally
    Debug.Log($"Object {e.GrabbableObject.name} was is was removed from anchor {e.GrabbableAnchor.name} by {e.Grabber.Avatar.name}");
}

private void UxrGrabManager_AnchorRangeEntered(object sender, UxrManipulationEventArgs e)
{
    Debug.Log($"Object {e.GrabbableObject.name} grabbed by {e.Grabber.Avatar.name} entered the valid drop range of anchor {e.GrabbableAnchor.name}");
}

private void UxrGrabManager_AnchorRangeLeft(object sender, UxrManipulationEventArgs e)
{
    Debug.Log($"Object {e.GrabbableObject.name} grabbed by {e.Grabber.Avatar.name} left the valid drop range of anchor {e.GrabbableAnchor.name}");
}

private void UxrGrabManager_PlacedObjectRangeEntered(object sender, UxrManipulationEventArgs e)
{
    Debug.Log($"{e.Grabber.Side} hand of {e.Grabber.Avatar.name} entered the valid grab distance of object {e.GrabbableObject.name} currently placed on anchor {e.GrabbableAnchor.name}");
}

private void UxrGrabManager_PlacedObjectRangeLeft(object sender, UxrManipulationEventArgs e)
{
    Debug.Log($"{e.Grabber.Side} hand of {e.Grabber.Avatar.name} left the valid grab distance of object {e.GrabbableObject.name} currently placed on anchor {e.GrabbableAnchor.name}");
}
How do I create events to detect manipulation on a specific object?
如何创建事件来检测对特定对象的操作?
Method1: If you are dealing with an external UxrGrabbableObject named _grabbableObject
方法1:如果您正在处理一个名为_grabbableObject的外部UxrGrabbableObject
private void OnEnable()
{
    _grabbableObject.Grabbing            += GrabbableObject_Grabbing;
    _grabbableObject.Grabbed             += GrabbableObject_Grabbed;
    _grabbableObject.Releasing           += GrabbableObject_Releasing;
    _grabbableObject.Released            += GrabbableObject_Released;
    _grabbableObject.Placing             += GrabbableObject_Placing;
    _grabbableObject.Placed              += GrabbableObject_Placed;
    _grabbableObject.ConstraintsApplying += GrabbableObject_ConstraintsApplying;
    _grabbableObject.ConstraintsApplied  += GrabbableObject_ConstraintsApplied;
    _grabbableObject.ConstraintsFinished += GrabbableObject_ConstraintsFinished;
}

private void OnDisable()
{
    _grabbableObject.Grabbing            -= GrabbableObject_Grabbing;
    _grabbableObject.Grabbed             -= GrabbableObject_Grabbed;
    _grabbableObject.Releasing           -= GrabbableObject_Releasing;
    _grabbableObject.Released            -= GrabbableObject_Released;
    _grabbableObject.Placing             -= GrabbableObject_Placing;
    _grabbableObject.Placed              -= GrabbableObject_Placed;
    _grabbableObject.ConstraintsApplying -= GrabbableObject_ConstraintsApplying;
    _grabbableObject.ConstraintsApplied  -= GrabbableObject_ConstraintsApplied;
    _grabbableObject.ConstraintsFinished -= GrabbableObject_ConstraintsFinished;
}

private void GrabbableObject_Grabbing(object sender, UxrManipulationEventArgs e)
{
    Debug.Log($"Object {e.GrabbableObject.name} is about to be grabbed by avatar {e.Grabber.Avatar.name}");
}

private void GrabbableObject_Grabbed(object sender, UxrManipulationEventArgs e)
{
    Debug.Log($"Object {e.GrabbableObject.name} was grabbed by avatar {e.Grabber.Avatar.name}");
}

private void GrabbableObject_Releasing(object sender, UxrManipulationEventArgs e)
{
    Debug.Log($"Object {e.GrabbableObject.name} is about to be released by avatar {e.Grabber.Avatar.name}");
}

private void GrabbableObject_Released(object sender, UxrManipulationEventArgs e)
{
    Debug.Log($"Object {e.GrabbableObject.name} was released by avatar {e.Grabber.Avatar.name}");
}

private void GrabbableObject_Placing(object sender, UxrManipulationEventArgs e)
{
    Debug.Log($"Object {e.GrabbableObject.name} is about to be placed on anchor {e.GrabbableAnchor.name} by avatar {e.Grabber.Avatar.name}");
}

private void GrabbableObject_Placed(object sender, UxrManipulationEventArgs e)
{
    Debug.Log($"Object {e.GrabbableObject.name} was placed on anchor {e.GrabbableAnchor.name} by avatar {e.Grabber.Avatar.name}");
}

private void GrabbableObject_ConstraintsApplying(object sender, UxrApplyConstraintsEventArgs e)
{
    Debug.Log($"Object {_grabbableObject.name} is about to be constrained (if required)");
}

private void GrabbableObject_ConstraintsApplied(object sender, UxrApplyConstraintsEventArgs e)
{
    Debug.Log($"Object {_grabbableObject.name} was constrained and can now be constrained using user specific code");
}

private void GrabbableObject_ConstraintsFinished(object sender, UxrApplyConstraintsEventArgs e)
{
    Debug.Log($"All constraints on object {_grabbableObject.name} were applied");
}
Method2: Remove boilerplate if you are creating a component class that will be added to a GameObject with an UxrgrabbableObject by inheriting from UxrGrabbableObjectComponent
方法 2:如果要创建一个组件类,请删除样板,该组件类将通过从 UxrGrabbableObjectComponent 继承添加到具有 UxrgrabbableObject 的游戏对象中
class MyComponent : UxrGrabbableObjectComponent<MyComponent>
{
    protected override void OnObjectGrabbing(UxrManipulationEventArgs e)
    {
        Debug.Log($"Object {e.GrabbableObject.name} is about to be grabbed by avatar {e.Grabber.Avatar.name}");
    }

    protected override void OnObjectGrabbed(UxrManipulationEventArgs e)
    {
        Debug.Log($"Object {e.GrabbableObject.name} was grabbed by avatar {e.Grabber.Avatar.name}");
    }

    protected override void OnObjectReleasing(UxrManipulationEventArgs e)
    {
        Debug.Log($"Object {e.GrabbableObject.name} is about to be released by avatar {e.Grabber.Avatar.name}");
    }

    protected override void OnObjectReleased(UxrManipulationEventArgs e)
    {
        Debug.Log($"Object {e.GrabbableObject.name} was released by avatar {e.Grabber.Avatar.name}");
    }

    protected override void OnObjectPlacing(UxrManipulationEventArgs e)
    {
        Debug.Log($"Object {e.GrabbableObject.name} is about to be placed on anchor {e.GrabbableAnchor.name} by avatar {e.Grabber.Avatar.name}");
    }

    protected override void OnObjectPlaced(UxrManipulationEventArgs e)
    {
        Debug.Log($"Object {e.GrabbableObject.name} was placed on anchor {e.GrabbableAnchor.name} by avatar {e.Grabber.Avatar.name}");
    }

    protected override void OnObjectConstraintsApplying(UxrApplyConstraintsEventArgs e)
    {
        Debug.Log($"Object {e.GrabbableObject.name} is about to be constrained (if required)");
    }

    protected override void OnObjectConstraintsApplied(UxrApplyConstraintsEventArgs e)
    {
        Debug.Log($"Object {e.GrabbableObject.name} was constrained and can now be constrained using user specific code");
    }

    protected override void OnObjectConstraintsFinished(UxrApplyConstraintsEventArgs e)
    {
        Debug.Log($"All constraints on object {e.GrabbableObject.name} were applied");
    }
}
How do I apply manual constraints or modifications on a grabbable object making sure that I don’t mess up with UltimateXR’s updating?
如何在可抓取对象上应用手动约束或修改,以确保不会弄乱 UltimateXR 的更新?
private void OnEnable()
{
    _grabbableObject.ConstraintsApplied += grabbableObject_ConstraintsApplied;
}

private void OnDisable()
{
    _grabbableObject.ConstraintsApplied -= grabbableObject_ConstraintsApplied;
}

// This method is called every frame right after UltimateXR updated the grabbable object
// position/rotation and applied all necessary constraints.
// We can now apply our own constraints on it or other effects. This can be used
// to add more complex behavior to a grabbed object. Some examples:
//   -Add recoil to a custom weapon.
//   -Shake an object while holding it.
//   -Apply more complex translation/rotation constraints than the UxrGrabbableObject provides.
private void grabbableObject_ConstraintsApplied(UxrApplyConstraintsEventArgs e)
{
    // Keeps the local y position between 0.8 and 1.2
    Vector3 localPosition = _grabbableObject.transform.localPosition;
    localPosition.y = Mathf.Clamp(localPosition.y, 0.8f, 1.2f);
    _grabbableObject.transform.localPosition = localPosition;
}
Math 数学
There are tons of utilities and extensions in files such as Vector3Ext, QuaternionExt, TransformExt, Matrix4x4Ext, MeshExt… There is also the static UxrInterpolator class and curve classes like UxrSpline.
文件中有大量的实用程序和扩展名,例如Vector3Ext,QuaternionExt,TransformExt,Matrix4x4Ext,MeshExt...还有静态的UxrInterpolator类和曲线类,如UxrSpline。
How can I get rotations and positions smoothed over time?
如何随着时间的推移平滑旋转和仓位?
float smooth = 0.1f; // value between range [0.0, 1.0] telling how much to smooth the value

float smoothedValue = UxrInterpolator.SmoothDamp(oldValue, newValue, smooth);
Vector3 smoothedPos = UxrInterpolator.SmoothDamp(oldPos, newPos, smooth);
Quaternion smoothedRotation = UxrInterpolator.SmoothDamp(oldRot, newRot, smooth);
How can I interpolate between 2 values using different easings?
如何使用不同的缓动在 2 个值之间进行插值?
float  interpolatedValue = UxrInterpolator.Interpolate(startValue, endValue, t, UxrEasing.Linear);
Vector3 interpolatedPos = UxrInterpolator.Interpolate(startPos, endPos, t, UxrEasing.EaseOutQuad);
Quaternion interpolatedRot = UxrInterpolator.Interpolate(startRot, endRot, t, UxrEasing.InOutCubic);
How can I interpolate so that I make a ball bounce?
如何插值以使球反弹?
// Wait for 1 second, then start bouncing from top to floor taking 0.5 seconds and keep looping using ping-pong for 10 seconds. Use -1 to keep bouncing indefinitely.
Vector3 pos = UxrInterpolator.Interpolate(topPos, floorPos, 0.5f, 1.0f, Time.time, UxrEasing.EaseInQuart, UxrLoopMode.PingPong, 10.0f);
How can I move and rotate an object A so that if B was a child, it would make B align with C?
如何移动和旋转对象 A,以便如果 B 是孩子,它会使 B 与 C 对齐?
// Uses Transform extensions defined in TransformExt.cs
A.transform.ApplyAlignment(B, C);
How can I mirror an object A using a mirror transform B using its Z axis as mirror normal?
如何使用镜像变换 B 将其 Z 轴镜像为镜像法线的对象 A?
// Uses Transform extensions defined in TransformExt.cs
A.transform.ApplyMirroring(B.position, B.forward, MirrorType.MirrorYZ);
How can I create a spline and interpolate using an arc-length parameter instead of the usual t?
如何创建样条曲线并使用弧长参数而不是通常的 t 进行插值?
UxrCatmullRomSpline spline = new UxrCatmullRomSpline();
spline.Create(1.0f, v1, v2, v3, v4, v5);
float halfLength = spline.ArcLength / 2.0f;

if (spline.EvaluateUsingArcLength(halfLength, out Vector3 position, out Vector3 direction))
{
    Debug.Log($"Interpolation in the middle: Pos={position}, Dir={direction}");
}
Networking 联网
UltimateXR doesn’t provide native networking components, but currently provides ways to easily sync the most significant events: avatar events (hand poses, teleportation…) and manipulation (grabs, releases, placing…).
UltimateXR不提供原生网络组件,但目前提供了轻松同步最重要事件的方法:头像事件(手部姿势,传送...)和操纵(抓取,释放,放置...)。
Synchronization can be done using the IUxrStateSync interface, which provides a generic way to subscribe to a state change event and the other way around, given a state change event be able to execute it. The process would be sending the events received in the source computer (IUxrStateSync.StateChanged) to remote computers and execute them there (IUxrStateSync.SyncState).
可以使用 IUxrStateSync 接口完成同步,该接口提供了一种订阅状态更改事件的通用方法,反之亦然,给定状态更改事件能够执行它。该过程会将源计算机(IUxrStateSync.StateChanged)中收到的事件发送到远程计算机并在那里执行它们(IUxrStateSync.SyncState)。
In addition to the events, we recommend synching the required avatar transforms except for the fingers, which are already taken care of using the avatar hand pose events to leverage bandwidth. Functionality to synchronize transforms is provided by most networking packages.
除了事件之外,我们建议同步所需的头像转换,但手指除外,手指已经使用头像手部姿势事件来利用带宽。大多数网络包都提供了同步转换的功能。
To identify the same component in both PCs, so that events are processed by the same component in source and destination, we provide the UxrComponent.UniqueId property and the static UxrComponent.TryGetComponentById() method.
为了识别两台 PC 中的相同组件,以便事件由源和目标中的同一组件处理,我们提供了 UxrComponent.UniqueId 属性和静态 UxrComponent.TryGetComponentById() 方法。
The IUxrStateSync interface is implemented for now by the local avatar (UxrAvatar.LocalAvatar) and the grab manager (UxrGrabManager.Instance).
IUxrStateSync 接口目前由本地头像 (UxrAvatar.LocalAvatar) 和 grab manager (UxrGrabManager.Instance) 实现。
To synchronize one would need to:
要同步,需要:
- Subscribe to the StateChanged event
订阅 StateChanged 事件 - Serialize all events being generated using UxrComponent.UniqueId for properties that reference components, such as the avatar in UxrAvatar events or the grabber/grabbableObject/anchor in manipulation events)
序列化使用 UxrComponent.UniqueId 生成的所有事件,以获取引用组件的属性,例如 UxrAvatar 事件中的头像或操作事件中的 grabber/grabbableObject/anchor) - Send them to the other client PCs
将它们发送到其他客户端电脑 - Deserialize the events in the client PCs, using UxrComponent.TryGetComponentById() to get the components referenced by the event.
反序列化客户端 PC 中的事件,使用 UxrComponent.TryGetComponentById() 获取事件引用的组件。 - Execute the events using the SyncState method.
使用 SyncState 方法执行事件。
UI
It is often useful to add UxrControlInput components to Unity UI elements such as images and buttons in order to use event handling programatically.
将 UxrControlInput 组件添加到 Unity UI 元素(如图像和按钮)通常很有用,以便以编程方式使用事件处理。
How do I get notified when a button was clicked?
单击按钮时如何收到通知?
[SerializeField] private UxrControlInput _controlInput;

private void OnEnable()
{
    _controlInput.Clicked += Control_Clicked;
}

private void OnDisable()
{
    _controlInput.Clicked -= Control_Clicked;
}

private void Control_Clicked(UxrControlInput controlInput, PointerEventData eventData)
{
    Debug.Log("The button was clicked");
}
Are there any more UxrControlInput events that I can subscribe to?
我还可以订阅更多 UxrControlInput 事件吗?
DragStarted
Dragged
DragEnded
Dropped
Pressed
Released
Clicked
PressHeld
CursorEntered
CursorExited
UpdateSelected
InputSubmitted
Are there any static UxrControlInput events that I can subscribe to so that I get notified whenever any UxrControlInput generated the event?
是否有任何静态 UxrControlInput 事件可供我订阅,以便在任何 UxrControlInput 生成事件时收到通知?
GlobalPressed
GlobalReleased
GlobalClicked
GlobalDragStarted
GlobalDragged
GlobalDragEnded
How can I make a Unity Graphic component (Text, Image…) blink using the alpha value?
如何使用 alpha 值使 Unity 图形组件(文本、图像等)闪烁?
// Blink 8 times per second during 1 second and restore the original color value
UxrColorTween.AnimateBlinkAlpha(textComponent, 8.0f, 1.0f) .SetFinishedActions(UxrTweenFinishedActions.RestoreOriginalValue);
How can I fade in a CanvasGroup using tweening?
如何使用补间在画布组中淡入淡出?
UxrCanvasAlphaTween.FadeIn(canvasGroup, fadeSeconds, delaySeconds).gameObject.SetActive(true);
How can I fade out a CanvasGroup starting with the current alpha and deactivate the GameObject when finished?
如何从当前 Alpha 版开始淡出画布组,并在完成后停用游戏对象?
UxrCanvasAlphaTween.Animate(canvasGroup, canvasGroup.alpha, 0.0f, new UxrInterpolationSettings(fadeSeconds)).SetFinishedActions(UxrTweenFinishedActions.DeactivateGameObject);
How can I move Unity Graphic components (Text, Image…) in using tweening?
如何在使用补间时移动 Unity 图形组件(文本、图像等)?
// Animate from right to left in cascade using an increasing delay

float startHorizontalOffset = 500.0f;

UxrPositionTween.MoveIn(image1, startHorizontalOffset, 0.0f, new UxrInterpolationSettings(durationSeconds, 0.0f, UxrEasing.EaseOutQuad));
UxrPositionTween.MoveIn(image2, startHorizontalOffset, 0.0f, new UxrInterpolationSettings(durationSeconds, 0.1f, UxrEasing.EaseOutQuad));
UxrPositionTween.MoveIn(image3, startHorizontalOffset, 0.0f, new UxrInterpolationSettings(durationSeconds, 0.2f, UxrEasing.EaseOutQuad));
UxrPositionTween.MoveIn(image4, startHorizontalOffset, 0.0f, new UxrInterpolationSettings(durationSeconds, 0.3f, UxrEasing.EaseOutQuad));
How can I create a typewriter effect to print the name of a user in a Unity Text or TextMeshPro component?
如何创建打字机效果以在 Unity Text 或 TextMeshPro 组件中打印用户的名称?
UxrTextContentTween.Animate(textComponent.gameObject, string.Empty, name, new UxrInterpolationSettings(durationSeconds, delaySeconds));
How can I create a text effect to print the score in a Unity Text or TextMeshPro component so that the score is increased numerically and rings a bell when it reaches the end?
如何创建文本效果以在 Unity Text 或 TextMeshPro 组件中打印乐谱,以便乐谱在数字上增加并在结束时敲响铃声?
UxrTextContentTween.Animate(textComponent.gameObject, new UxrInterpolationSettings(durationSeconds, delaySeconds), () => RingBell(), "Final score: {0:000000}", 0, finalScore);
UltimateXR Components 终极XR组件
All UltimateXR components ultimately derive from UxrComponent, which inherits from MonoBehaviour.
所有UltimateXR组件最终都源自UxrComponent,后者继承自MonoBehavior。
How can I iterate over all UxrComponents in the scene? Enabled or not
如何遍历场景中的所有 UxrComponents?启用与否
foreach (UxrComponent component in UxrComponent.AllComponents)
{
    Debug.Log($"{component.name}: {component.GetType().Name}")
}
How can I iterate over all the enabled UxrComponents in the scene?
如何遍历场景中所有已启用的 UxrComponents?
foreach (UxrComponent component in UxrComponent.EnabledComponents)
{
    Debug.Log($"{component.name}: {component.GetType().Name}")
}
How can I iterate over all enabled UxrComponent in the scene? Note: UxrComponent is used when it is interesting to be able to iterate over all components of the same type.
如何遍历场景中所有已启用的 UxrComponent?注意:当能够迭代同一类型的所有组件时,将使用 UxrComponent。
foreach (UxrGrabbableObject grabbableObject in UxrGrabbableObject.EnabledComponents)
{
    Debug.Log($"Found grabbable object {grabbableObject.name}");
}
How can I set up an event so that I get notified every time an UxrComponent is enabled?
如何设置事件,以便在每次启用 UxrComponent 时收到通知?
UxrComponent.GlobalEnabled += UxrComponent_GlobalEnabled;

private void UxrComponent_GlobalEnabled(UxrComponent component)
{
    Debug.Log($"Component {component.name} of type {component.GetType().Name} was enabled");
}
How can I get a unique ID for an object that derives from UxrComponent?
如何获取派生自 UxrComponents 的对象的唯一 ID?
UxrComponent component = ...
Debug.Log(component.UniqueId);
How can I get the UxrComponent with a given unique ID?
如何获取具有给定唯一 ID 的 UxrComponent?
if (UxrComponent.TryGetComponentById(uniqueId, out UxrComponent component))
{
    Debug.Log($"Found {component.name}");
}
How can I get the full path in the scene of a given component? Note: This will work on any Unity component and uses the ComponentExt extension.
如何在给定组件的场景中获取完整路径?注意:这将适用于任何 Unity 组件并使用 ComponentExt 扩展。
Component component = ...
Debug.Log(component.GetPathUnderScene());
How can I get a unique full scene path by including sibling index, type and component index information? Note: This will work on any Unity component and uses the ComponentExt extension.
如何通过包含同级索引、类型和组件索引信息来获取唯一的完整场景路径?注意:这将适用于任何 Unity 组件并使用 ComponentExt 扩展。
Component component = ...
Debug.Log(component.GetUniqueScenePath());

 浙公网安备 33010602011771号