关于个人博客部署所遇到的问题和解决方法
无法获取服务器上的redis可以重装redis可参考文章: (70条消息) Ubuntu安装redis详细教程_普通网友的博客-CSDN博客_ubuntu安装redis
安装redis过程:
sudo apt-get autoremove --purge redis-server #卸载redis
sudo apt-get install -y redis-server
可以设置密码:
sudo vim /etc/redis/redis/redis.conf
service redis restart
![]()

Maven乱码过程:
Maven乱码可参考:Maven发布Jar包中文乱码解决方法_java_脚本之家 (jb51.net)
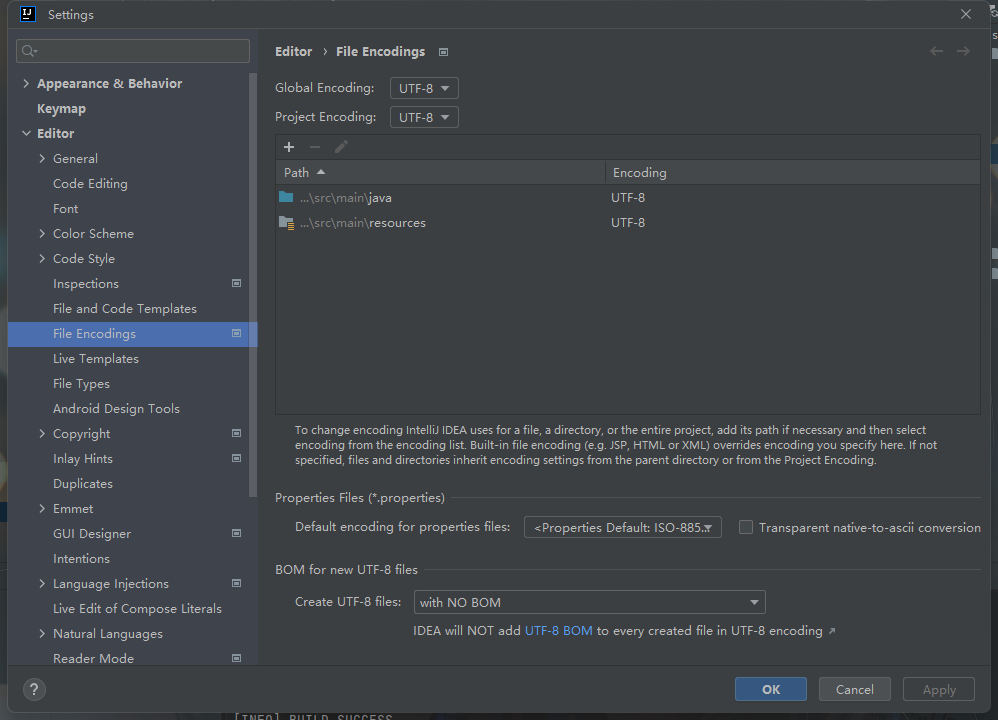
首先看了一下 Idea的文件编码是不是 UTF-8,发现在 Windows 环境下项目中的编码是继承系统的 GBK ,全部修改成 UTF-8 如下:
其次就是Maven
上面的plugin是为了指定java的版本和编码格式防止出现maven编译错误和字节码出现问题
<build>
        <plugins>
            <plugin>
                <groupId>org.apache.maven.plugins</groupId>
                <artifactId>maven-compiler-plugin</artifactId>
                <version>3.1</version>
                <configuration>
                    <source>${java.version}</source>
                    <target>${java.version}</target>
                    <encoding>${project.build.sourceEncoding}</encoding>
                </configuration>
            </plugin>
            <plugin>
                <groupId>org.springframework.boot</groupId>
                <artifactId>spring-boot-maven-plugin</artifactId>
            </plugin>
        </plugins>
    </build>
Nacos:
(70条消息) Ubuntu 环境下安装nacos_走在路上的程序员的博客-CSDN博客_ubuntu安装nacos
cd /home/nacos/bin/

bash startup.sh -m standalone

ps -ef|grep nacos
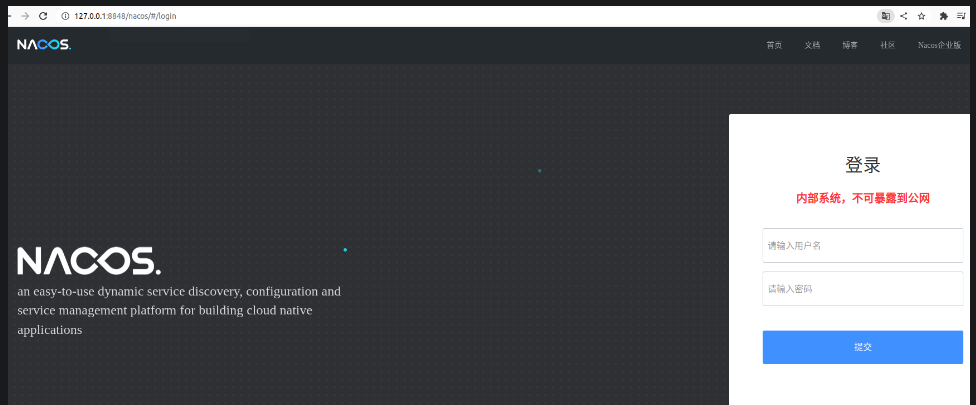
看到 次信息代表服务启动成功,可以在页面访问 http://127.0.0.1:8848/nacos 会出现如下页面:
Java安装:
Ubuntu 安装Java - 知乎 (zhihu.com)
重头戏:Nginx配置Vue:
ubuntu中利用nginx部署vue项目的完整步骤_vue.js_脚本之家 (jb51.net)
Vue项目运行:
npm run build
然后将dist发到Ubantu的指定位置
安装Nginx
sudo apt-get update
sudo apt-get install nginx
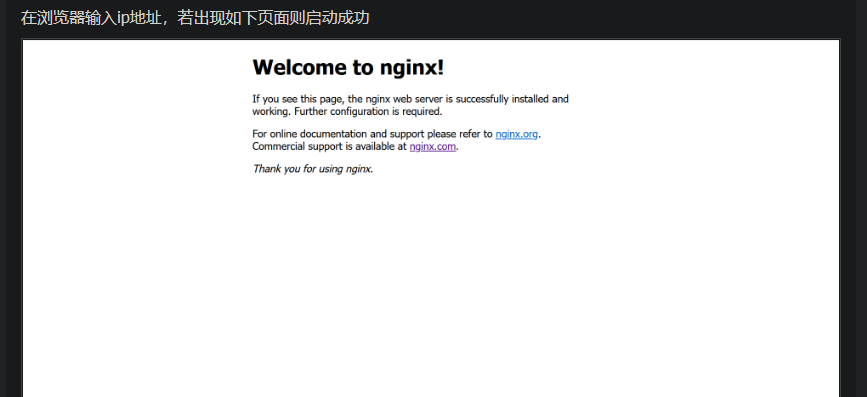
检查是否安装成功
nginx -v
重启Nginx
service nginx restart
配置Nginx
修改nginx.conf
安装nginx后,nginx的默认目录是/etc/nginx
在该目录中有nginx.conf文件,输入如下命令,使用vi打开该文件
vi nginx.conf
原nginx.conf文件:
user www-data;
worker_processes auto;
pid /run/nginx.pid;
include /etc/nginx/modules-enabled/*.conf;

events {
    worker_connections 768;
    # multi_accept on;
}

http {

    ##
    # Basic Settings
    ##

    sendfile on;
    tcp_nopush on;
    tcp_nodelay on;
    keepalive_timeout 65;
    types_hash_max_size 2048;
    # server_tokens off;

    # server_names_hash_bucket_size 64;
    # server_name_in_redirect off;

    include /etc/nginx/mime.types;
    default_type application/octet-stream;

    ##
    # SSL Settings
    ##

    ssl_protocols TLSv1 TLSv1.1 TLSv1.2 TLSv1.3; # Dropping SSLv3, ref: POODLE
    ssl_prefer_server_ciphers on;

    ##
    # Logging Settings
    ##

    access_log /var/log/nginx/access.log;
    error_log /var/log/nginx/error.log;

    ##
    # Gzip Settings
    ##

    gzip on;

    # gzip_vary on;
    # gzip_proxied any;
    # gzip_comp_level 6;
    # gzip_buffers 16 8k;
    # gzip_http_version 1.1;
    # gzip_types text/plain text/css application/json application/javascript text/xml application/xml application/xml+rss text/javascript;

    ##
    # Virtual Host Configs
    ##

    include /etc/nginx/conf.d/*.conf;
    include /etc/nginx/sites-enabled/*;
}


#mail {
#    # See sample authentication script at:
#    # http://wiki.nginx.org/ImapAuthenticateWithApachePhpScript
#
#    # auth_http localhost/auth.php;
#    # pop3_capabilities "TOP" "USER";
#    # imap_capabilities "IMAP4rev1" "UIDPLUS";
#
#    server {
#        listen     localhost:110;
#        protocol   pop3;
#        proxy      on;
#    }
#
#    server {
#        listen     localhost:143;
#        protocol   imap;
#        proxy      on;
#    }
#}
修改后的nginx.conf:
加了一行:
include /etc/nginx/hosts/*.host;
变成:
user www-data;
worker_processes auto;
pid /run/nginx.pid;
include /etc/nginx/modules-enabled/*.conf;

events {
    worker_connections 768;
    # multi_accept on;
}

http {

    ##
    # Basic Settings
    ##

    sendfile on;
    tcp_nopush on;
    tcp_nodelay on;
    keepalive_timeout 65;
    types_hash_max_size 2048;
    # server_tokens off;

    # server_names_hash_bucket_size 64;
    # server_name_in_redirect off;

    include /etc/nginx/mime.types;
    default_type application/octet-stream;

    ##
    # SSL Settings
    ##

    ssl_protocols TLSv1 TLSv1.1 TLSv1.2 TLSv1.3; # Dropping SSLv3, ref: POODLE
    ssl_prefer_server_ciphers on;

    ##
    # Logging Settings
    ##

    access_log /var/log/nginx/access.log;
    error_log /var/log/nginx/error.log;

    ##
    # Gzip Settings
    ##

    gzip on;

    # gzip_vary on;
    # gzip_proxied any;
    # gzip_comp_level 6;
    # gzip_buffers 16 8k;
    # gzip_http_version 1.1;
    # gzip_types text/plain text/css application/json application/javascript text/xml application/xml application/xml+rss text/javascript;

    ##
    # Virtual Host Configs
    ##

    include /etc/nginx/conf.d/*.conf;
    include /etc/nginx/sites-enabled/*;
    include /etc/nginx/hosts/*.host;#新添加的一行
}


#mail {
#    # See sample authentication script at:
#    # http://wiki.nginx.org/ImapAuthenticateWithApachePhpScript
#
#    # auth_http localhost/auth.php;
#    # pop3_capabilities "TOP" "USER";
#    # imap_capabilities "IMAP4rev1" "UIDPLUS";
#
#    server {
#        listen     localhost:110;
#        protocol   pop3;
#        proxy      on;
#    }
#
#    server {
#        listen     localhost:143;
#        protocol   imap;
#        proxy      on;
#    }
#}
创建*.host文件
在/etc/nginx中创建hosts文件夹
mkdir hosts
在host文件中创建hzy.host文件,文件名随便命名
在文件中添加如下内容
server {
        listen       8080;#自己设置端口号
        server_name  hzy;#自己设置项目名称
        #access_log  logs/host.access.log  main;
        location / {
            root   /home/hzy/hzyblog/dist;#这里写vue项目的所在地址
            index  index.html;#这里是vue项目的首页,需要保证dist中有index.html文件
        }
        error_page   500 502 503 504  /50x.html;#错误页面
    }
重启Nginx:
nginx -s reload

 浙公网安备 33010602011771号