序章
序1:TestLink和TestLink-API-Python-client
- 目前TestLink的最新版本是1.9.19
- TestLink-API-Python-client支持的TestLink最高版本是1.9.17
- 如果后期要使用TestLink-API-Python-client和jenkins交互,那么TestLink只能选择1.9.17版本
序2:TestLink部署基本要求
TestLink 1.9.19 环境依赖包括:
| 依赖项 | 版本要求 |
|---|---|
| web服务 | Apache 2.x |
| PHP | 5.5以上,如果使用PHP 7.2.x会更好 |
| 数据库 | MySQL 5.7.x,MariaDB 10.1.x,Postgres 9.x,MS-SQL 201x |
| 浏览器 | Firefox,Chrome |
一、安装Apache
1.1、安装Apache
apt-get update
apt-get install apache2
过程如下:
root@duke:~# apt-get update
Get:1 file:/var/cuda-repo-9-0-local InRelease
Ign:1 file:/var/cuda-repo-9-0-local InRelease
Get:2 file:/var/cuda-repo-9-0-local Release [574 B]
Get:2 file:/var/cuda-repo-9-0-local Release [574 B]
Hit:3 http://mirrors.aliyun.com/ubuntu xenial InRelease
Hit:5 http://mirrors.aliyun.com/ubuntu xenial-updates InRelease
Get:6 http://mirrors.aliyun.com/ubuntu xenial-backports InRelease [107 kB]
Hit:7 http://mirrors.aliyun.com/ubuntu xenial-security InRelease
Hit:8 http://archive.ubuntu.com/ubuntu xenial InRelease
Hit:9 http://ppa.launchpad.net/qameta/allure/ubuntu xenial InRelease
Hit:10 http://archive.canonical.com/ubuntu xenial InRelease
Hit:11 http://ppa.launchpad.net/yandex-qatools/allure-framework/ubuntu xenial InRelease
Hit:12 https://packages.gitlab.com/runner/gitlab-runner/ubuntu xenial InRelease
Fetched 107 kB in 3s (26.8 kB/s)
Reading package lists... Done
root@duke:~# apt-get install apache2
Reading package lists... Done
Building dependency tree
Reading state information... Done
The following additional packages will be installed:
apache2-bin apache2-data apache2-utils libapr1 libaprutil1 libaprutil1-dbd-sqlite3 libaprutil1-ldap liblua5.1-0
Suggested packages:
apache2-doc apache2-suexec-pristine | apache2-suexec-custom
The following NEW packages will be installed:
apache2 apache2-bin apache2-data apache2-utils libapr1 libaprutil1 libaprutil1-dbd-sqlite3 libaprutil1-ldap liblua5.1-0
0 upgraded, 9 newly installed, 0 to remove and 81 not upgraded.
Need to get 1,541 kB of archives.
After this operation, 6,373 kB of additional disk space will be used.
Do you want to continue? [Y/n] y
Get:1 http://mirrors.aliyun.com/ubuntu xenial/main amd64 libapr1 amd64 1.5.2-3 [86.0 kB]
Get:2 http://mirrors.aliyun.com/ubuntu xenial/main amd64 libaprutil1 amd64 1.5.4-1build1 [77.1 kB]
。。。。。。
。。。。。。
Processing triggers for systemd (229-4ubuntu21.21) ...
Processing triggers for ureadahead (0.100.0-19) ...
Processing triggers for ufw (0.35-0ubuntu2) ...
1.2、Apache安装目录信息
/var/www                      #Apache默认文档根目录
/etc/apache2                  #Apache配置存储目录
/etc/apache2/apache2.conf     #Apache配置文件
1.3、配置Apache
1.3.1、将“全局服务器名称”设置为“禁止语法警告”
如果不设置ServerName全球范围内,你会检查语法错误Apache配置时收到以下警告:
apache2ctl configtest #检查语法错误
过程如下:
root@duke:/# apache2ctl configtest
AH00558: apache2: Could not reliably determine the server's fully qualified domain name, using 127.0.1.1. Set the 'ServerName' directive globally to suppress this message
Syntax OK
修改/etc/apache2/apache2.conf配置文件,关闭语法警告
过程如下:
root@duke:~# vi /etc/apache2/apache2.conf
# Include of directories ignores editors' and dpkg's backup files,
# see README.Debian for details.
# Include generic snippets of statements
IncludeOptional conf-enabled/.conf
# Include the virtual host configurations:
IncludeOptional sites-enabled/.conf
# vim: syntax=apache ts=4 sw=4 sts=4 sr noet
ServerName 192.168.0.157 #在最后一行添加,ip是当前主机IP
"/etc/apache2/apache2.conf" 223L, 7141C written
root@duke:~# apache2ctl configtest
Syntax OK
root@duke:~# systemctl restart apache2 重启Apache
1.3.2、调整防火墙以允许Web流量
- 查看防火墙管理列表
ufw app list
过程如下:root@duke:/# ufw app list
可用应用程序:
Apache
Apache Full
Apache Secure
CUPS
OpenLDAP LDAP
OpenLDAP LDAPS
OpenSSH - 查看Apache Full使用的端口
ufw app info "Apache Full"
过程如下:
root@duke:/# ufw app info "Apache Full"
配置: Apache Full
标题:Web Server (HTTP,HTTPS)
描述: Apache v2 is the next generation of the omnipresent Apache web server.
端口:80,443/tcp - 防火墙开放Apache
ufw allow in "Apache Full"
root@duke:/# ufw allow in "Apache Full"
防火墙规则已更新
规则已更新(v6) - 访问Apache
开放防火墙后就可以尝试登陆Apache服务器http://192.168.0.157/
界面如下:
1.3.3、配置apache2.conf文件
修改:/etc/apache2/apache2.conf 配置文件,添加以下内容:
AddType application/x-httpd-php .php .htm .html
AddDefaultCharset UTF-8
ServerName 192.168.0.157
过程如下:
root@duke:~# vi /etc/apache2/apache2.conf
# Include of directories ignores editors' and dpkg's backup files,
# see README.Debian for details.
# Include generic snippets of statements
IncludeOptional conf-enabled/.conf
# Include the virtual host configurations:
IncludeOptional sites-enabled/.conf
# vim: syntax=apache ts=4 sw=4 sts=4 sr noet
AddType application/x-httpd-php .php .htm .html
AddDefaultCharset UTF-8
ServerName 192.168.0.157 #在配置文件最后添加
"/etc/apache2/apache2.conf" 223L, 7141C written
root@duke:~# apache2ctl configtest
Syntax OK
root@duke:~# systemctl restart apache2 重启Apache
1.4、Apache命令
启动命令
/etc/init.d/apache2 start
或
systemctl start apache2
停止命令
/etc/init.d/apache2 stop
或
systemctl stop apache2
重启命令
/etc/init.d/apache2 restart
或
systemctl restart apache2
二、安装PHP和 PHP 扩展模块
- TestLink 支持 MySQL、PostgreSQL 和微软的 SQL Server 数据库,由于采用mysql数据库,所以需要安装基于PHP的MySQL扩展模块
- Ubuntu16.04系统自带了PHP 7.0.X版本,因此PHP5是无法正常安装的
- Ubuntu16.04系统软件库自带了PHP 7.0.X版本,想要安装PHP 7.2.x必须修改软件库
2.1、安装PHP
2.1.1、卸载自带PHP 7.0版本
apt-get purge php
apt-get purge php-common php7.0 php7.0-cli php7.0-common php7.0-fpm php7.0-json php7.0-opcache php7.0-readline
执行过程如下:
root@duke:~# apt-get purge php
Reading package lists... Done
Building dependency tree
Reading state information... Done
The following packages were automatically installed and are no longer required:
php-common php7.0 php7.0-cli php7.0-common php7.0-fpm php7.0-json php7.0-opcache php7.0-readline
Use 'sudo apt autoremove' to remove them.
The following packages will be REMOVED:
php
0 upgraded, 0 newly installed, 1 to remove and 81 not upgraded.
After this operation, 11.3 kB disk space will be freed.
Do you want to continue? [Y/n] y
(Reading database ... 307016 files and directories currently installed.)
Removing php (1:7.0+35ubuntu6.1) ...
root@duke:~# apt-get purge php-common php7.0 php7.0-cli php7.0-common php7.0-fpm php7.0-json php7.0-opcache php7.0-readline
Reading package lists... Done
Building dependency tree
Reading state information... Done
The following packages will be REMOVED:
php-common php7.0 php7.0-cli php7.0-common php7.0-fpm php7.0-json php7.0-opcache php7.0-readline*
0 upgraded, 0 newly installed, 8 to remove and 81 not upgraded.
After this operation, 14.1 MB disk space will be freed.
(Reading database ... 307013 files and directories currently installed.)
Removing php7.0 (7.0.33-0ubuntu0.16.04.4) ...
Removing php7.0-fpm (7.0.33-0ubuntu0.16.04.4) ...
apache2_invoke php7.0-fpm prerm: No action required
Purging configuration files for php7.0-fpm (7.0.33-0ubuntu0.16.04.4) ...
apache2_invoke php7.0-fpm postrm: No action required
dpkg: warning: while removing php7.0-fpm, directory '/etc/php/7.0/fpm/conf.d' not empty so not removed
Removing php7.0-cli (7.0.33-0ubuntu0.16.04.4) ...
Purging configuration files for php7.0-cli (7.0.33-0ubuntu0.16.04.4) ...
dpkg: warning: while removing php7.0-cli, directory '/etc/php/7.0/cli/conf.d' not empty so not removed
Removing php7.0-readline (7.0.33-0ubuntu0.16.04.4) ...
Purging configuration files for php7.0-readline (7.0.33-0ubuntu0.16.04.4) ...
Removing php7.0-opcache (7.0.33-0ubuntu0.16.04.4) ...
Purging configuration files for php7.0-opcache (7.0.33-0ubuntu0.16.04.4) ...
Removing php7.0-json (7.0.33-0ubuntu0.16.04.4) ...
Purging configuration files for php7.0-json (7.0.33-0ubuntu0.16.04.4) ...
Removing php7.0-common (7.0.33-0ubuntu0.16.04.4) ...
Purging configuration files for php7.0-common (7.0.33-0ubuntu0.16.04.4) ...
dpkg: warning: while removing php7.0-common, directory '/etc/php/7.0' not empty so not removed
Removing php-common (1:35ubuntu6.1) ...
Purging configuration files for php-common (1:35ubuntu6.1) ...
Processing triggers for man-db (2.7.5-1) ...
2.1.1、配置PHP 7.x.x版本库
1、使用ppa增加源
apt-get install python-software-properties
add-apt-repository ppa:ondrej/php
apt-get update
执行过程如下:
root@duke:~# apt-get install python-software-properties
Reading package lists... Done
Building dependency tree
Reading state information... Done
The following additional packages will be installed:
python-apt python-pycurl
Suggested packages:
python-apt-dbg python-apt-doc python-pycurl-dbg python-pycurl-doc
The following NEW packages will be installed:
python-apt python-pycurl python-software-properties
0 upgraded, 3 newly installed, 0 to remove and 81 not upgraded.
Need to get 204 kB of archives.
After this operation, 937 kB of additional disk space will be used.
Do you want to continue? [Y/n] y
Get:1 http://mirrors.aliyun.com/ubuntu xenial-updates/main amd64 python-apt amd64 1.1.0~beta1ubuntu0.16.04.4 [140 kB]
Get:2 http://mirrors.aliyun.com/ubuntu xenial/main amd64 python-pycurl amd64 7.43.0-1ubuntu1 [43.3 kB]
Get:3 http://mirrors.aliyun.com/ubuntu xenial-updates/universe amd64 python-software-properties all 0.96.20.8 [20.6 kB]
Fetched 204 kB in 0s (1,188 kB/s)
Selecting previously unselected package python-apt.
(Reading database ... 306870 files and directories currently installed.)
Preparing to unpack .../python-apt_1.1.0~beta1ubuntu0.16.04.4_amd64.deb ...
Unpacking python-apt (1.1.0~beta1ubuntu0.16.04.4) ...
Selecting previously unselected package python-pycurl.
Preparing to unpack .../python-pycurl_7.43.0-1ubuntu1_amd64.deb ...
Unpacking python-pycurl (7.43.0-1ubuntu1) ...
Selecting previously unselected package python-software-properties.
Preparing to unpack .../python-software-properties_0.96.20.8_all.deb ...
Unpacking python-software-properties (0.96.20.8) ...
Setting up python-apt (1.1.0~beta1ubuntu0.16.04.4) ...
Setting up python-pycurl (7.43.0-1ubuntu1) ...
Setting up python-software-properties (0.96.20.8) ...
root@duke:~# add-apt-repository ppa:ondrej/php
Co-installable PHP versions: PHP 5.6, PHP 7.x and most requested extensions are included. Only Supported Versions of PHP (http://php.net/supported-versions.php) for Supported Ubuntu Releases (https://wiki.ubuntu.com/Releases) are provided. Don't ask for end-of-life PHP versions or Ubuntu release, they won't be provided.Debian oldstable and stable packages are provided as well: https://deb.sury.org/#debian-dpa
You can get more information about the packages at https://deb.sury.org
BUGS&FEATURES: This PPA now has a issue tracker:
https://deb.sury.org/#bug-reportingCAVEATS:
- If you are using php-gearman, you need to add ppa:ondrej/pkg-gearman
- If you are using apache2, you are advised to add ppa:ondrej/apache2
- If you are using nginx, you are advise to add ppa:ondrej/nginx-mainline
or ppa:ondrej/nginxPLEASE READ: If you like my work and want to give me a little motivation, please consider donating regularly: https://donate.sury.org/
WARNING: add-apt-repository is broken with non-UTF-8 locales, see
https://github.com/oerdnj/deb.sury.org/issues/56 for workaround:# LC_ALL=C.UTF-8 add-apt-repository ppa:ondrej/php
More info: https://launchpad.net/~ondrej/+archive/ubuntu/php
Press [ENTER] to continue or ctrl-c to cancel adding it
在此处按[ENTER]键
gpg: keyring `/tmp/tmp_6wjtp2o/secring.gpg' created
gpg: keyring `/tmp/tmp_6wjtp2o/pubring.gpg' created
gpg: requesting key E5267A6C from hkp server keyserver.ubuntu.com
gpg: /tmp/tmp_6wjtp2o/trustdb.gpg: trustdb created
gpg: key E5267A6C: public key "Launchpad PPA for Ondřej Surý" imported
gpg: Total number processed: 1
gpg: imported: 1 (RSA: 1)
OK
root@duke:~# apt-get update
Get:1 file:/var/cuda-repo-9-0-local InRelease
Ign:1 file:/var/cuda-repo-9-0-local InRelease
Get:2 file:/var/cuda-repo-9-0-local Release [574 B]
Get:2 file:/var/cuda-repo-9-0-local Release [574 B]
Hit:3 http://mirrors.aliyun.com/ubuntu xenial InRelease
Hit:4 http://mirrors.aliyun.com/ubuntu xenial-updates InRelease
Get:5 http://mirrors.aliyun.com/ubuntu xenial-backports InRelease [107 kB]
Hit:7 http://mirrors.aliyun.com/ubuntu xenial-security InRelease
Hit:8 http://archive.canonical.com/ubuntu xenial InRelease
Hit:9 http://archive.ubuntu.com/ubuntu xenial InRelease
Get:10 http://ppa.launchpad.net/ondrej/php/ubuntu xenial InRelease [23.9 kB]
Hit:11 https://packages.gitlab.com/runner/gitlab-runner/ubuntu xenial InRelease
Hit:12 http://ppa.launchpad.net/qameta/allure/ubuntu xenial InRelease
Hit:13 http://ppa.launchpad.net/yandex-qatools/allure-framework/ubuntu xenial InRelease
Get:14 http://ppa.launchpad.net/ondrej/php/ubuntu xenial/main amd64 Packages [52.3 kB]
Get:15 http://ppa.launchpad.net/ondrej/php/ubuntu xenial/main i386 Packages [52.1 kB]
Get:16 http://ppa.launchpad.net/ondrej/php/ubuntu xenial/main Translation-en [28.2 kB]
Fetched 263 kB in 20s (12.8 kB/s)
Reading package lists... Done
2、查看源中PHP7.3版本
apt list | grep php
不出意外,列表中已经包含PHP 7.3 版本,甚至有PHP 7.2版本
3、安装PHP7.3
apt-get -y install php
执行过程如下:
root@duke:~# apt-get -y install php
Reading package lists... Done
Building dependency tree
Reading state information... Done
The following additional packages will be installed:
libapache2-mod-php7.3 libargon2-0 libpcre2-8-0 libsodium23 php-common php7.3 php7.3-cli php7.3-common php7.3-json php7.3-opcache php7.3-readline
Suggested packages:
php-pear
The following NEW packages will be installed:
libapache2-mod-php7.3 libargon2-0 libpcre2-8-0 libsodium23 php php-common php7.3 php7.3-cli php7.3-common php7.3-json php7.3-opcache php7.3-readline
0 upgraded, 12 newly installed, 0 to remove and 101 not upgraded.
Need to get 4,047 kB/4,226 kB of archives.
After this operation, 18.2 MB of additional disk space will be used.
。。。。。。
。。。。。。
Creating config file /etc/php/7.3/cli/php.ini with new version
Setting up libapache2-mod-php7.3 (7.3.6-1+ubuntu16.04.1+deb.sury.org+1) ...eating config file /etc/php/7.3/apache2/php.ini with new version
apache2_invoke: Enable module php7.3
Setting up php7.3 (7.3.6-1+ubuntu16.04.1+deb.sury.org+1) ...
Setting up php (2:7.3+69+ubuntu16.04.1+deb.sury.org+2+php7.3) ...
Processing triggers for libc-bin (2.23-0ubuntu11) ...
4、安装PHP7.2 扩展模块
apt-get install php7.3-mysql php7.3-ldap php7.3-gd php7.3-curl php-mysql php-ldap php-gd php-curl
执行过程如下:
root@duke:~# apt-get install php7.3-mysql php7.3-ldap php7.3-gd php7.3-curl php-mysql php-ldap php-gd php-curl
Reading package lists... Done
Building dependency tree
Reading state information... Done
The following NEW packages will be installed:
php7.2-ldap php7.2-mysql
0 upgraded, 2 newly installed, 0 to remove and 99 not upgraded.
Need to get 140 kB of archives.
After this operation, 556 kB of additional disk space will be used.
Get:1 http://ppa.launchpad.net/ondrej/php/ubuntu xenial/main amd64 php7.2-ldap amd64 7.2.19-1+ubuntu16.04.1+deb.sury.org+1 [23.1 kB]
Get:2 http://ppa.launchpad.net/ondrej/php/ubuntu xenial/main amd64 php7.2-mysql amd64 7.2.19-1+ubuntu16.04.1+deb.sury.org+1 [117 kB]
Fetched 140 kB in 2s (62.9 kB/s)
Selecting previously unselected package php7.2-ldap.
(Reading database ... 307082 files and directories currently installed.)
Preparing to unpack .../php7.2-ldap_7.2.19-1+ubuntu16.04.1+deb.sury.org+1_amd64.deb ...
Unpacking php7.2-ldap (7.2.19-1+ubuntu16.04.1+deb.sury.org+1) ...
Selecting previously unselected package php7.2-mysql.
Preparing to unpack .../php7.2-mysql_7.2.19-1+ubuntu16.04.1+deb.sury.org+1_amd64.deb ...
Unpacking php7.2-mysql (7.2.19-1+ubuntu16.04.1+deb.sury.org+1) ...
Processing triggers for libapache2-mod-php7.2 (7.2.19-1+ubuntu16.04.1+deb.sury.org+1) ...
Setting up php7.2-ldap (7.2.19-1+ubuntu16.04.1+deb.sury.org+1) ...Creating config file /etc/php/7.2/mods-available/ldap.ini with new version
Setting up php7.2-mysql (7.2.19-1+ubuntu16.04.1+deb.sury.org+1) ...Creating config file /etc/php/7.2/mods-available/mysqlnd.ini with new version
Creating config file /etc/php/7.2/mods-available/mysqli.ini with new version
Creating config file /etc/php/7.2/mods-available/pdo_mysql.ini with new version
Processing triggers for libapache2-mod-php7.2 (7.2.19-1+ubuntu16.04.1+deb.sury.org+1) ...
5、查看PHP安装版本
php -v
执行过程如下:
root@duke:/etc/php/7.2# php -v
PHP 7.3.6-1+ubuntu16.04.1+deb.sury.org+1 (cli) (built: May 31 2019 11:26) ( NTS )
Copyright (c) 1997-2018 The PHP Group
Zend Engine v3.3.6, Copyright (c) 1998-2018 Zend Technologies
with Zend OPcache v7.3.6-1+ubuntu16.04.1+deb.sury.org+1, Copyright (c) 1999-2018, by Zend Technologies
6、PHP性能优化
为使 TestLink 达到最佳性能,建议对 PHP 配置进行优化。
需要修改 PHP 配置文件 /etc/php/7.3/apache2/php.ini 中的参数:
session.gc_maxlifetime
单位为秒。该参数指定的时间间隔之后,存储的数据会被标示为'garbage',进而被垃圾回收进程清理掉。默认为 24 分钟(即 1440 秒)。TestLink 在进行安装之前会检查该参数,如果设置等于小于 10 分钟,TestLink 安装程序会强制用户去扩展该值。如果大 10 分钟,只给出警告信息。如果大于推荐的 30 分钟,安装程序校验为成功。
建议设置为:session.gc_maxlifetime = 1860
-
max_execution_time
每个 php 脚本最大执行时间,单位为秒,默认为 30s,
TestLink 推荐设置为 120s。 -
max_input_vars
从PHP 5.3.9开始提供。默认值:1000
如果测试用例超过100个,那么可能引发TestLink限制执行测试用例个数问题。
建议修改为10000 -
memory_limit
如果要从xml文件导入测试用例或更新用例,默认值 memory_limit = 128M 可能导致导入失败,原因在于系统可能会耗尽内存
建议memory_limit值为256MB
执行过程如下:
root@duke:~#vi /etc/php/7.3/apache2/php.ini
。。。。。。
。。。。。。
; After this number of seconds, stored data will be seen as 'garbage' and
; cleaned up by the garbage collection process.
; http://php.net/session.gc-maxlifetime
#session.gc_maxlifetime = 1440
session.gc_maxlifetime = 1860 ;将1440修改为1860; NOTE: If you are using the subdirectory option for storing session files
; (see session.save_path above), then garbage collection does not
; happen automatically. You will need to do your own garbage
; collection through a shell script, cron entry, or some other method.
; For example, the following script would is the equivalent of
; setting session.gc_maxlifetime to 1440 (1440 seconds = 24 minutes):
; find /path/to/sessions -cmin +24 -type f | xargs rm
; Maximum execution time of each script, in seconds
; http://php.net/max-execution-time
; Note: This directive is hardcoded to 0 for the CLI SAPI
。。。。。。
。。。。。。
;max_execution_time = 30
max_execution_time = 120 ;将30修改为120; Maximum amount of time each script may spend parsing request data. It's a good
; idea to limit this time on productions servers in order to eliminate unexpectedly
; long running scripts.
; Note: This directive is hardcoded to -1 for the CLI SAPI
; Default Value: -1 (Unlimited)
; Development Value: 60 (60 seconds)
; Production Value: 60 (60 seconds)
; http://php.net/max-input-time
max_input_time = 60; Maximum input variable nesting level
; http://php.net/max-input-nesting-level
;max_input_nesting_level = 64; How many GET/POST/COOKIE input variables may be accepted
; max_input_vars = 1000 ;默认情况下是注释掉的,需要取消注释
max_input_vars = 10000 ;将1000改为10000; Maximum amount of memory a script may consume (128MB)
; http://php.net/memory-limit
;memory_limit = 128M ;默认值为128M,需要修改为256M
memory_limit = 256M
三、安装Mysql
3.1、安装Mysql服务
apt-get install mysql-server
执行过程如下:
root@duke:~# apt install mysql-server
Reading package lists... Done
Building dependency tree
Reading state information... Done
The following additional packages will be installed:
libaio1 libevent-core-2.0-5 libhtml-template-perl mysql-client-5.7 mysql-client-core-5.7 mysql-server-5.7 mysql-server-core-5.7
Suggested packages:
libipc-sharedcache-perl mailx tinyca
The following NEW packages will be installed:
libaio1 libevent-core-2.0-5 libhtml-template-perl mysql-client-5.7 mysql-client-core-5.7 mysql-server mysql-server-5.7 mysql-server-core-5.7
0 upgraded, 8 newly installed, 0 to remove and 99 not upgraded.
Need to get 18.7 MB of archives.
After this operation, 161 MB of additional disk space will be used.
Do you want to continue? [Y/n] y
Get:1 http://mirrors.aliyun.com/ubuntu xenial/main amd64 libaio1 amd64 0.3.110-2 [6,356 B]
Get:2 http://mirrors.aliyun.com/ubuntu xenial-updates/main amd64 mysql-client-core-5.7 amd64 5.7.26-0ubuntu0.16.04.1 [6,388 kB]
Get:3 http://mirrors.aliyun.com/ubuntu xenial-updates/main amd64 mysql-client-5.7 amd64 5.7.26-0ubuntu0.16.04.1 [1,834 kB]
Get:4 http://mirrors.aliyun.com/ubuntu xenial-updates/main amd64 mysql-server-core-5.7 amd64 5.7.26-0ubuntu0.16.04.1 [7,471 kB]
Get:5 http://mirrors.aliyun.com/ubuntu xenial-updates/main amd64 libevent-core-2.0-5 amd64 2.0.21-stable-2ubuntu0.16.04.1 [70.6 kB]
Get:6 http://mirrors.aliyun.com/ubuntu xenial-updates/main amd64 mysql-server-5.7 amd64 5.7.26-0ubuntu0.16.04.1 [2,831 kB]
Get:7 http://mirrors.aliyun.com/ubuntu xenial/main amd64 libhtml-template-perl all 2.95-2 [60.4 kB]
Get:8 http://mirrors.aliyun.com/ubuntu xenial-updates/main amd64 mysql-server all 5.7.26-0ubuntu0.16.04.1 [10.8 kB]
Fetched 18.7 MB in 0s (20.4 MB/s)
Preconfiguring packages ...
Selecting previously unselected package libaio1:amd64.
(Reading database ... 307104 files and directories currently installed.)
Preparing to unpack .../libaio1_0.3.110-2_amd64.deb ...
Unpacking libaio1:amd64 (0.3.110-2) ...
Selecting previously unselected package mysql-client-core-5.7.
Preparing to unpack .../mysql-client-core-5.7_5.7.26-0ubuntu0.16.04.1_amd64.deb ...
Unpacking mysql-client-core-5.7 (5.7.26-0ubuntu0.16.04.1) ...
Selecting previously unselected package mysql-client-5.7.
Preparing to unpack .../mysql-client-5.7_5.7.26-0ubuntu0.16.04.1_amd64.deb ...
Unpacking mysql-client-5.7 (5.7.26-0ubuntu0.16.04.1) ...
Selecting previously unselected package mysql-server-core-5.7.
Preparing to unpack .../mysql-server-core-5.7_5.7.26-0ubuntu0.16.04.1_amd64.deb ...
Unpacking mysql-server-core-5.7 (5.7.26-0ubuntu0.16.04.1) ...
Selecting previously unselected package libevent-core-2.0-5:amd64.
Preparing to unpack .../libevent-core-2.0-5_2.0.21-stable-2ubuntu0.16.04.1_amd64.deb ...
Unpacking libevent-core-2.0-5:amd64 (2.0.21-stable-2ubuntu0.16.04.1) ...
Selecting previously unselected package mysql-server-5.7.
Preparing to unpack .../mysql-server-5.7_5.7.26-0ubuntu0.16.04.1_amd64.deb ...
Unpacking mysql-server-5.7 (5.7.26-0ubuntu0.16.04.1) ...
Selecting previously unselected package libhtml-template-perl.
Preparing to unpack .../libhtml-template-perl_2.95-2_all.deb ...
Unpacking libhtml-template-perl (2.95-2) ...
Selecting previously unselected package mysql-server.
Preparing to unpack .../mysql-server_5.7.26-0ubuntu0.16.04.1_all.deb ...
Unpacking mysql-server (5.7.26-0ubuntu0.16.04.1) ...
Processing triggers for libc-bin (2.23-0ubuntu11) ...
Processing triggers for man-db (2.7.5-1) ...
Processing triggers for systemd (229-4ubuntu21.21) ...
Processing triggers for ureadahead (0.100.0-19) ...
Setting up libaio1:amd64 (0.3.110-2) ...
Setting up mysql-client-core-5.7 (5.7.26-0ubuntu0.16.04.1) ...
Setting up mysql-client-5.7 (5.7.26-0ubuntu0.16.04.1) ...
Setting up mysql-server-core-5.7 (5.7.26-0ubuntu0.16.04.1) ...
Setting up libevent-core-2.0-5:amd64 (2.0.21-stable-2ubuntu0.16.04.1) ...
Setting up mysql-server-5.7 (5.7.26-0ubuntu0.16.04.1) ...
update-alternatives: using /etc/mysql/mysql.cnf to provide /etc/mysql/my.cnf (my.cnf) in auto mode
Renaming removed key_buffer and myisam-recover options (if present)
Setting up libhtml-template-perl (2.95-2) ...
Setting up mysql-server (5.7.26-0ubuntu0.16.04.1) ...
Processing triggers for libc-bin (2.23-0ubuntu11) ...
Processing triggers for systemd (229-4ubuntu21.21) ...
Processing triggers for ureadahead (0.100.0-19) ...

3.2、配置Mysql
mysql5.7版本默认配置文件是 /etc/mysql/mysql.conf.d/mysqld.cnf:
mysqladmin -u root -p shutdown
service mysql stop
vi /etc/mysql/mysql.conf.d/mysqld.cnf
修改bind-address配置项
将本地mysql访问
bind-address = 127.0.0.1
修改为远端mysql访问,地址为本机ip地址
#bind-address = 127.0.0.1
3.3、设置Mysql远程root访问
3.2章节只是配置了允许用户访问mysql服务器,但是root还是不能正常访问的
所以要通过修改mysql默认系统配置表,来让root远程访问
mysql -uroot -proot
use mysql
SELECT user, host from mysql.user;
update user set host='%' where user='root';
执行过程如下:
root@duke:/etc/mysql/mysql.conf.d# mysql -uroot -proot
mysql: [Warning] Using a password on the command line interface can be insecure.
Welcome to the MySQL monitor. Commands end with ; or \g.
Your MySQL connection id is 5
Server version: 5.7.26-0ubuntu0.16.04.1 (Ubuntu)Copyright (c) 2000, 2019, Oracle and/or its affiliates. All rights reserved.
Oracle is a registered trademark of Oracle Corporation and/or its
affiliates. Other names may be trademarks of their respective
owners.Type 'help;' or '\h' for help. Type '\c' to clear the current input statement.
mysql> use mysql
Reading table information for completion of table and column names
You can turn off this feature to get a quicker startup with -ADatabase changed
mysql> SELECT user, host from mysql.user;
+------------------+-----------+
| user | host |
+------------------+-----------+
| debian-sys-maint | localhost |
| mysql.session | localhost |
| mysql.sys | localhost |
| root | localhost |
+------------------+-----------+
4 rows in set (0.00 sec)mysql> update user set host='%' where user='root';
Query OK, 1 row affected (0.00 sec)
Rows matched: 1 Changed: 1 Warnings: 0mysql> SELECT user, host from mysql.user;
+------------------+-----------+
| user | host |
+------------------+-----------+
| root | % |
| debian-sys-maint | localhost |
| mysql.session | localhost |
| mysql.sys | localhost |
+------------------+-----------+
4 rows in set (0.00 sec)mysql> quit
Bye
3.4、重启mysql
service mysql restart
3.5、检查mysql启动状态
1、方法一
service mysql status
执行过程如下:
root@duke:~# service mysql status
● mysql.service - MySQL Community Server
Loaded: loaded (/lib/systemd/system/mysql.service; enabled; vendor preset: enabled)
Active: active (running) since 三 2019-06-05 11:26 CST; 4min 8s ago
Process: 28886 ExecStartPost=/usr/share/mysql/mysql-systemd-start post (code=exited, status=0/SUCCESS)
Process: 28877 ExecStartPre=/usr/share/mysql/mysql-systemd-start pre (code=exited, status=0/SUCCESS)
Main PID: 28885 (mysqld)
CGroup: /system.slice/mysql.service
└─28885 /usr/sbin/mysqld6月 05 11:25 duke systemd[1]: Starting MySQL Community Server...
6月 05 11:26 duke systemd[1]: Started MySQL Community Server.
2、方法二
mysql -uroot -proot
执行过程如下:
root@duke:~# mysql -uroot -proot
mysql: [Warning] Using a password on the command line interface can be insecure.
Welcome to the MySQL monitor. Commands end with ; or \g.
Your MySQL connection id is 4
Server version: 5.7.26-0ubuntu0.16.04.1 (Ubuntu)Copyright (c) 2000, 2019, Oracle and/or its affiliates. All rights reserved.
Oracle is a registered trademark of Oracle Corporation and/or its
affiliates. Other names may be trademarks of their respective
owners.Type 'help;' or '\h' for help. Type '\c' to clear the current input statement.
mysql> quit
Bye
四、安装TestLink
4.1、下载版本
1、TestLink
2019-6-5 最新版本是1.9.20,稳定版本是1.9.19,
【TestLink 在 sourceforge下载】:速度比git-hub快点
【TestLink 在 github下载】
2、TestLink-API-Python-client
可以使用pip 直接安装,命令如下
pip install TestLink-API-Python-client
也可以下载源码进行安装:源码下载
3、EX-Converter
用于将excel测试用例转换为xml,方便导入到TestLink中【注意】:要使用TestLink的测试用例模板
【EX-Converter 在 sourceforge下载】
4.2、安装版本
4.2.1、安装TestLink
-
上传版本包
将下载的testlink-1.9.19.tar.gz安装包上传到安装服务器上 -
解压版本包
tar zxvf testlink-1.9.19.tar.gz
-
版本部署
testlink安装是通过web进行,此处步骤是实现在web端可以打开安装页面mv testlink-1.9.19 testlink cp -r testlink /var/www/html chmod -R 777 /var/www/html/testlink
-
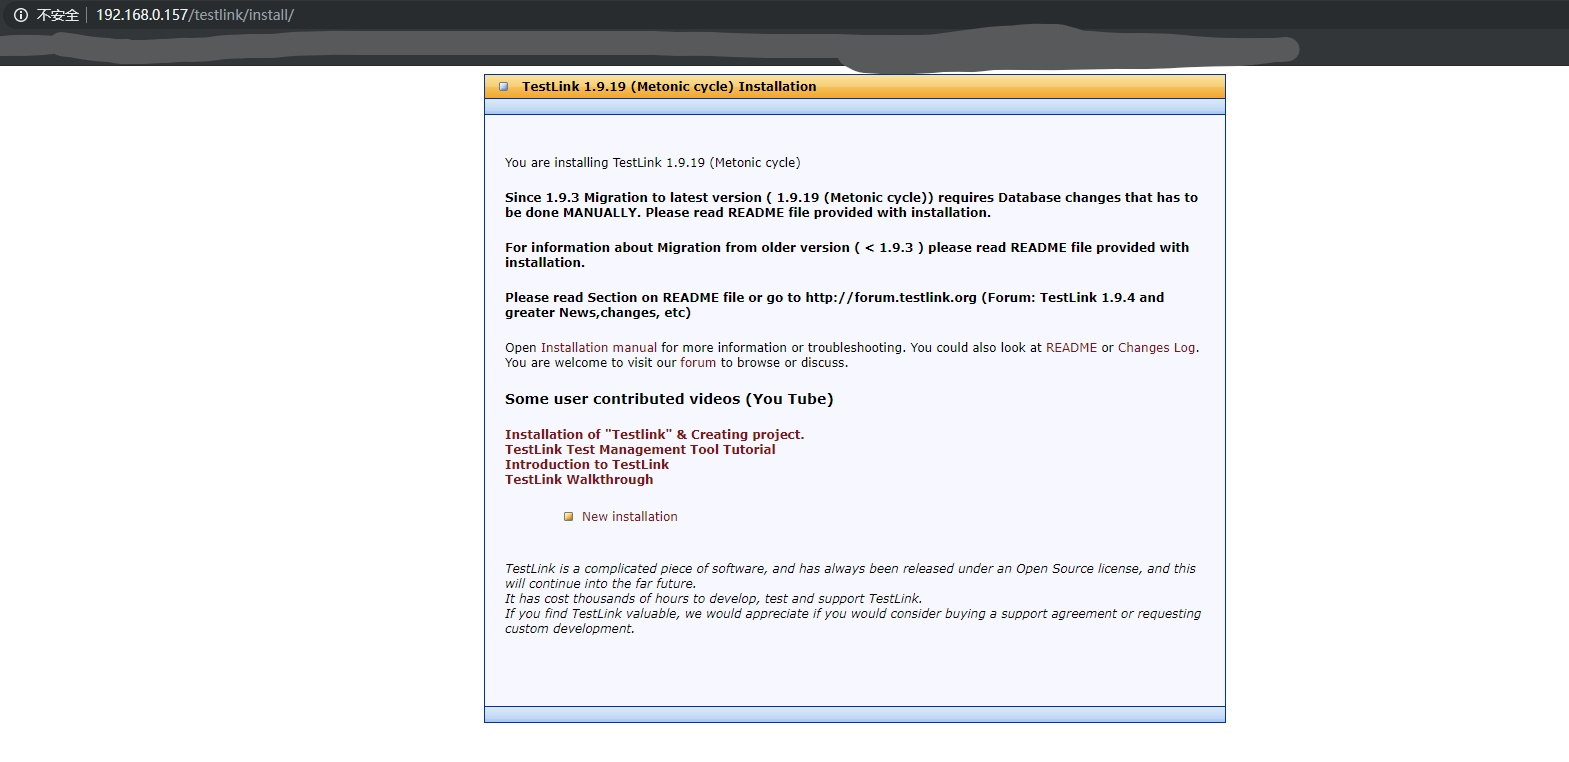
版本安装
打开安装页面,192.168.0.157是实际安装的服务器地址http://192.168.0.157/testlink/install/
打开页面如下:
- 进行新版本安装
点击New installation按钮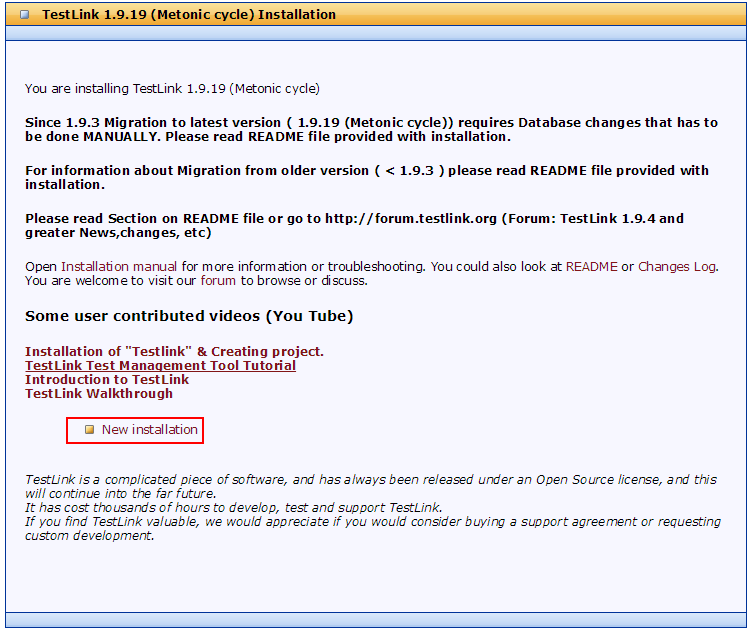
勾选
点击I agree to the terms set out in this license.Continue按钮
-
安装报错
在安装页面会提示,部分数据库和依赖库没有安装,文件目录不存在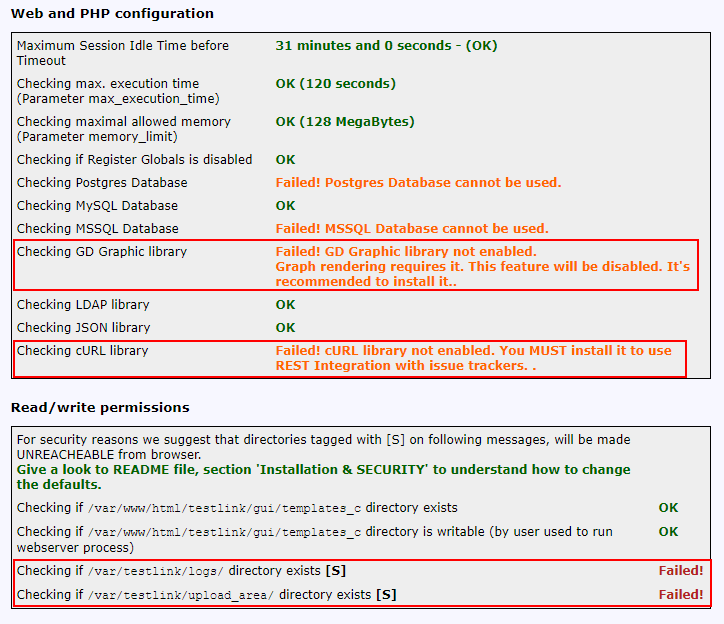
-
解决问题
- 数据库只需要mysql即可,其他的可以不进行安装
- 需要创建
/var/testlink/logs/和/var/testlink/upload_area目录mkdir -p /var/testlink/upload_area /var/testlink/logs chmod -R 777 /var/testlink
-
需要安装
GD的依赖库apt-get install php7.2-gd
-
需要安装
CURL的依赖库
在curl官网网址下载最新的安装包,安装过程可能会出现curl和libcurl不一致的情况,以下给出安装解决方法,以curl-7.65.1版本安装为例:未安装openssl情况wget https://curl.haxx.se/download/curl-7.65.1.tar.gz tar zxvf curl-7.65.1.tar.gz cd curl-7.65.1 ./configure --disable-shared #强制执行静态库编译 make make test (optional) make install apt-get install php7.3-curl php-curl
安装openssl情况wget https://curl.haxx.se/download/curl-7.65.1.tar.gz tar zxvf curl-7.65.1.tar.gz cd curl-7.65.1 ./configure --with-ssl=/opt/OpenSSL #安装openssl的安装目录 make make test (optional) make install apt-get install php7.3-curl php-curl
- 重启apache
service apache2 restart
-
继续安装
经过上面操作后,重新登录安装TestLink页面,继续安装TestLink,已经无报错信息
点击Continue按钮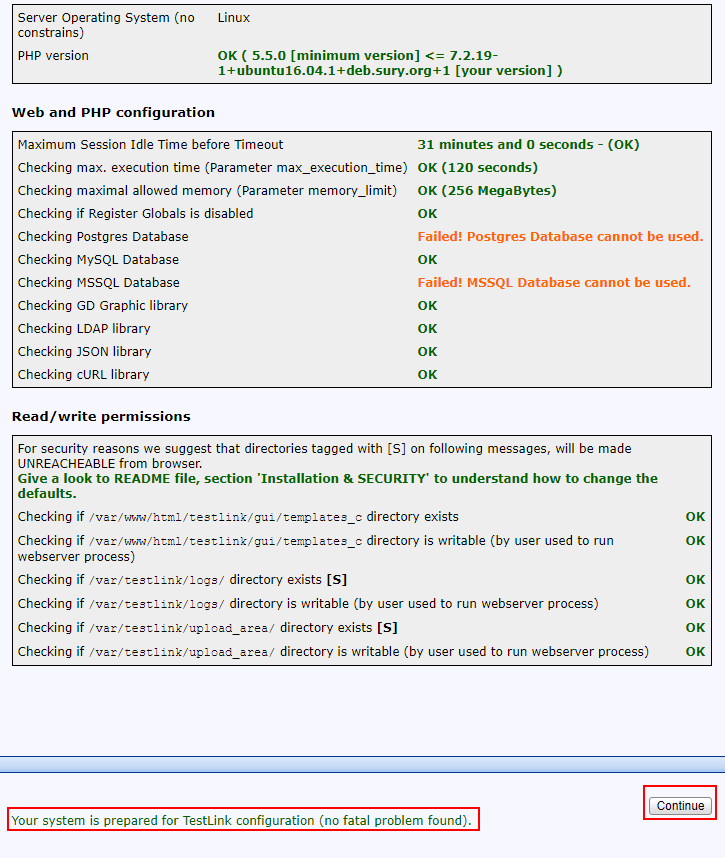
-
配置数据库
进入数据库配置管理页面,按照下图填写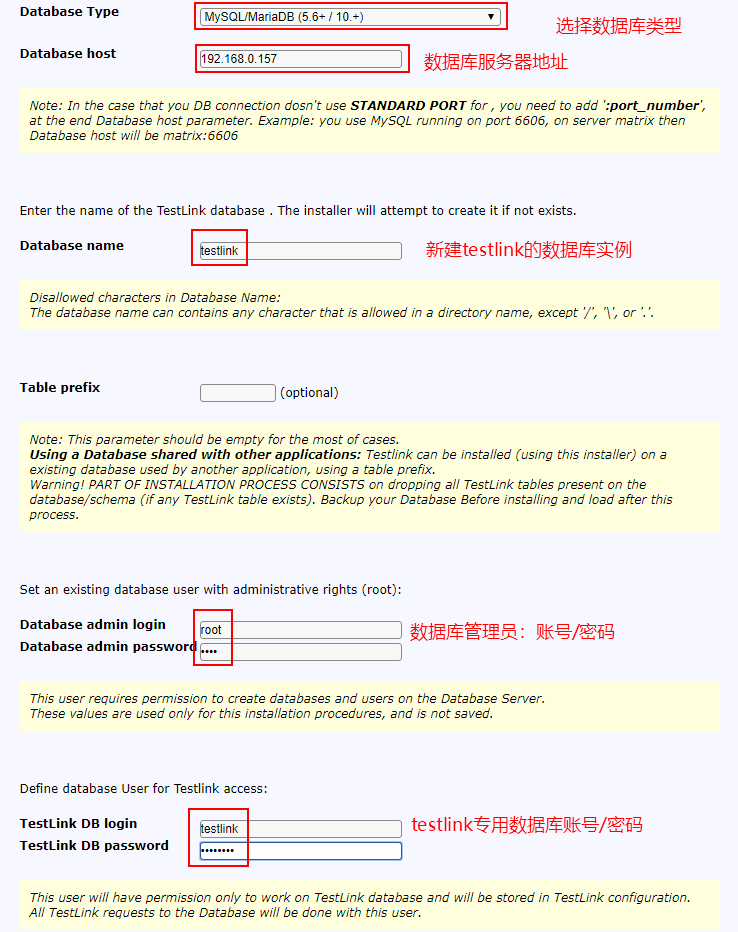
-
确认安装
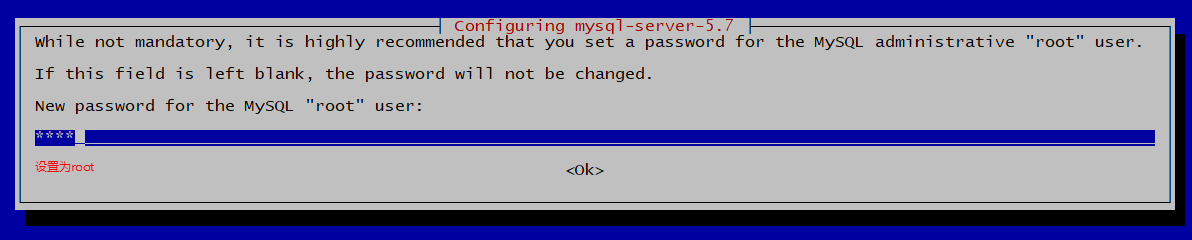
配置网数据库后,在配置页面最下方,会有提示,TestLink的超级管理员账号是admin/admin
点击Process TestLink Setup按钮 -
安装成功

-
数据库testlink用户增加远程访问权限和全部数据库操作权限
mysql -uroot -proot
use mysql
SELECT user, host from mysql.user;
update user set host='%' where user='testlink';
UPDATE mysql.user SET Select_priv='Y',Insert_priv='Y',Update_priv='Y',Delete_priv='Y',Create_priv='Y',Drop_priv='Y',Reload_priv='Y',Shutdown_priv='Y',Process_priv='Y',File_priv='Y',Grant_priv='Y',References_priv='Y',Index_priv='Y',Alter_priv='Y',Show_db_priv='Y',Super_priv='Y',Create_tmp_table_priv='Y',Lock_tables_priv='Y',Execute_priv='Y',Repl_slave_priv='Y',Repl_client_priv='Y',Create_view_priv='Y',Show_view_priv='Y',Create_routine_priv='Y',Alter_routine_priv='Y',Create_user_priv='Y',Event_priv='Y',Trigger_priv='Y',Create_tablespace_priv='Y' WHERE User='testlink';
FLUSH PRIVILEGES;
执行过程如下:
root@duke:/var/www/html# mysql -uroot -proot
mysql: [Warning] Using a password on the command line interface can be insecure.
Welcome to the MySQL monitor. Commands end with ; or \g.
Your MySQL connection id is 3
Server version: 5.7.26-0ubuntu0.16.04.1 (Ubuntu)Copyright (c) 2000, 2019, Oracle and/or its affiliates. All rights reserved.
Oracle is a registered trademark of Oracle Corporation and/or its
affiliates. Other names may be trademarks of their respective
owners.Type 'help;' or '\h' for help. Type '\c' to clear the current input statement.
mysql> use mysql
Reading table information for completion of table and column names
You can turn off this feature to get a quicker startup with -ADatabase changed
mysql> SELECT user, host from mysql.user;
+------------------+-----------+
| user | host |
+------------------+-----------+
| root | % |
| debian-sys-maint | localhost |
| mysql.session | localhost |
| mysql.sys | localhost |
| testlink | localhost |
+------------------+-----------+
5 rows in set (0.01 sec)mysql> update user set host='%' where user='testlink';
Query OK, 1 row affected (0.02 sec)
Rows matched: 1 Changed: 1 Warnings: 0mysql> SELECT user, host from mysql.user;
+------------------+-----------+
| user | host |
+------------------+-----------+
| root | % |
| testlink | % |
| debian-sys-maint | localhost |
| mysql.session | localhost |
| mysql.sys | localhost |
+------------------+-----------+
5 rows in set (0.00 sec)
mysql>UPDATE mysql.user SET Select_priv='Y',Insert_priv='Y',Update_priv='Y',Delete_priv='Y',Create_priv='Y',Drop_priv='Y',Reload_priv='Y',Shutdown_priv='Y',Process_priv='Y',File_priv='Y',Grant_priv='Y',References_priv='Y',Index_priv='Y',Alter_priv='Y',Show_db_priv='Y',Super_priv='Y',Create_tmp_table_priv='Y',Lock_tables_priv='Y',Execute_priv='Y',Repl_slave_priv='Y',Repl_client_priv='Y',Create_view_priv='Y',Show_view_priv='Y',Create_routine_priv='Y',Alter_routine_priv='Y',Create_user_priv='Y',Event_priv='Y',Trigger_priv='Y',Create_tablespace_priv='Y' WHERE User='testlink';
Query OK, 1 row affected (0.00 sec)
Rows matched: 1 Changed: 1 Warnings: 0mysql> FLUSH PRIVILEGES;
Query OK, 0 rows affected (0.00 sec)
mysql> quit
Bye -
后续数据库配置
- 备份testlink_create_udf0.sql文件为init.sql
cp /var/www/html/testlink/install/sql/mysql/testlink_create_udf0.sql /var/www/html/testlink/install/sql/mysql/init.sql
- 修改init.sql
将init.sql文件中的YOUR_TL_DBNAME全部替换为数据库实例名称testlink - 初始化sql文件
mysql -utestlink -ptestlink < /var/www/html/testlink/install/sql/mysql/init.sql
- 备份testlink_create_udf0.sql文件为init.sql
-
配置邮件服务配、安全告警、中文显示
修改vi /var/www/html/testlink/config.inc.php
原生内容为:
/ [LOCALIZATION] /
/ @var string Default localization for users */
// The value must be available in $$tlCfg->locales (see cfg/const.inc.php).
// Note: An attempt will be done to establish the default locale
// automatically using $_SERVER['HTTP_ACCEPT_LANGUAGE']
$tlCfg->default_language = 'en_GB';
/- @var string How to warning user when security weak points exists.
* - 'SCREEN': messages will displayed on login screen, and tl desktop
- 'FILE': a file with a list is created but users are not notified via GUI
- user will receive a message on screen. (default)
- 'SILENT': same that FILE, but user will not receive message on screen.
/
$tlCfg->config_check_warning_mode = 'FILE';
。。。。。。
。。。。。。
/ [SMTP] /
/* - @var string SMTP server name or IP address ("localhost" should work in the most cases)
- Configure using custom_config.inc.php
- @uses lib/functions/email_api.php
**/
$g_smtp_host = '[smtp_host_not_configured]'; # SMTP server MUST BE configured
# Configure using custom_config.inc.php
$g_tl_admin_email = '[testlink_sysadmin_email_not_configured]'; # for problem/error notification
$g_from_email = '[from_email_not_configured]'; # email sender
$g_return_path_email = '[return_path_email_not_configured]';/**
- Email notification priority (low by default)
- Urgent = 1, Not Urgent = 5, Disable = 0
**/
$g_mail_priority = 5;
/**
- Taken from mantis for phpmailer config
- select the method to mail by:
- PHPMAILER_METHOD_MAIL - mail()
- PHPMAILER_METHOD_SENDMAIL - sendmail
- PHPMAILER_METHOD_SMTP - SMTP
/
$g_phpMailer_method = PHPMAILER_METHOD_SMTP; *
/* Configure only if SMTP server requires authentication /
$g_smtp_username = ''; # user
$g_smtp_password = ''; # password/**
- This control the connection mode to SMTP server.
- Can be '', 'ssl','tls'
- @global string $g_smtp_connection_mode
*/
$g_smtp_connection_mode = '';
/**
- The smtp port to use. The typical SMTP ports are 25 and 587. The port to use
- will depend on the SMTP server configuration and hence others may be used.
- @global int $g_smtp_port
*/
$g_smtp_port = 25;
/**
- @see https://github.com/PHPMailer/PHPMailer/wiki/Troubleshooting
- Opportunistic TLS
*/
$g_SMTPAutoTLS = false;
修改为:
/ [LOCALIZATION] /
/ @var string Default localization for users /
// The value must be available in $$tlCfg->locales (see cfg/const.inc.php).
// Note: An attempt will be done to establish the default locale
// automatically using $_SERVER['HTTP_ACCEPT_LANGUAGE']
$tlCfg->default_language = 'zh_CN'; #语言配置
/**- @var string How to warning user when security weak points exists.
* - 'SCREEN': messages will displayed on login screen, and tl desktop
- 'FILE': a file with a list is created but users are not notified via GUI
- user will receive a message on screen. (default)
- 'SILENT': same that FILE, but user will not receive message on screen.
/
$tlCfg->config_check_warning_mode = 'SILENT'; #告警配置
。。。。。。
。。。。。。
/ [SMTP] */
/**
- @var string SMTP server name or IP address ("localhost" should work in the most cases)
- Configure using custom_config.inc.php
- @uses lib/functions/email_api.php
*/
$g_smtp_host = 'smtp.dilu.com'; # SMTP 服务必须配置
# Configure using custom_config.inc.php
$g_tl_admin_email = 'zhiwei.han@dilu.com'; # 问题错误通知邮箱
$g_from_email = 'testlink@dilu.com'; # 收到邮件看到的发送地址
$g_return_path_email = 'zhiwei.han@dilu.com'; # 如果收到邮件的人进行回复的邮件地址/**
- Email notification priority (low by default)
- Urgent = 1, Not Urgent = 5, Disable = 0
**/
$g_mail_priority = 5;
/**
- Taken from mantis for phpmailer config
- select the method to mail by:
- PHPMAILER_METHOD_MAIL - mail()
- PHPMAILER_METHOD_SENDMAIL - sendmail
- PHPMAILER_METHOD_SMTP - SMTP
*/
$g_phpMailer_method = PHPMAILER_METHOD_SMTP;
/* Configure only if SMTP server requires authentication /
$g_smtp_username = 'zhiwei.han@dilu.com'; # smtp发送的用户名
$g_smtp_password = 'hzwHL525'; # 发送用户的密码/**
- This control the connection mode to SMTP server.
- Can be '', 'ssl','tls'
- @global string $g_smtp_connection_mode
*/
$g_smtp_connection_mode = '';
/**
- The smtp port to use. The typical SMTP ports are 25 and 587. The port to use
- will depend on the SMTP server configuration and hence others may be used.
- @global int $g_smtp_port
*/
$g_smtp_port = 465; #公司使用的邮箱smtp端口是465
/**
- @see https://github.com/PHPMailer/PHPMailer/wiki/Troubleshooting
- Opportunistic TLS
*/
$g_SMTPAutoTLS = false;
- @var string How to warning user when security weak points exists.
-
进入testlink
点击Please Clicke ME!,进入testlink登录页面
地址为:http://192.168.0.157/testlink/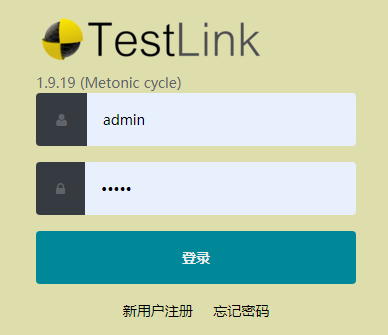
-
设置testlink为中文
- 点击
 图标进入设置页面
 - 设置语言为中文简体,点击保存
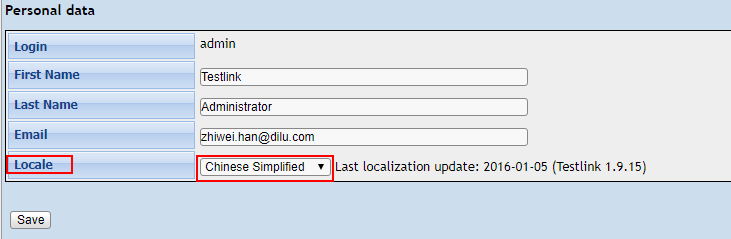
- 点击
-
生成用户密钥(用于和jenkins链接)
- 点击
 图标进入设置页面
 - 在
API接口点击生成新的密钥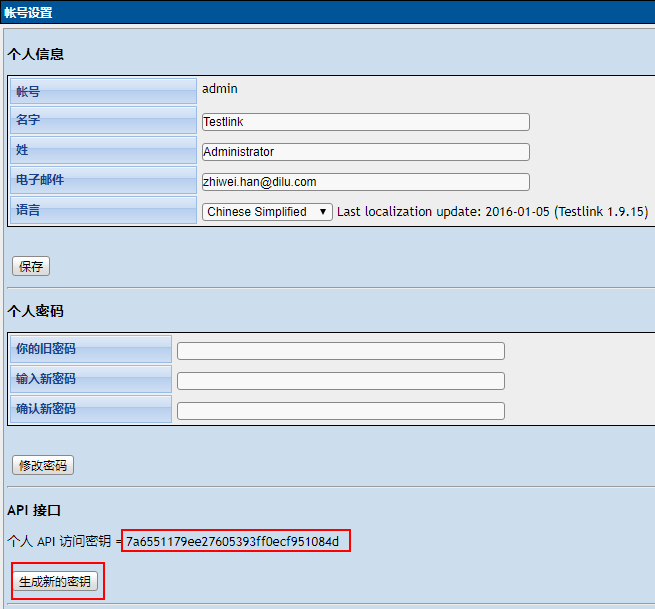
- 点击
五、Jenkins配置
5.1、jenkins安装testlink插件
-
点击
系统管理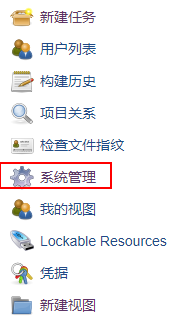
-
点击
插件管理
-
点击
可选插件
-
搜索
testlink
-
勾选
TestLink,点击直接安装
-
勾选
安装完成后重启Jenkins(空闲时),等待重启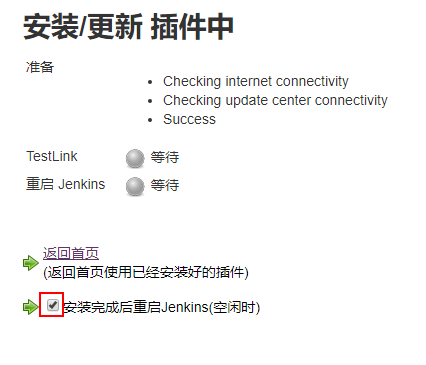
-
重启后,进入
插件管理,点击已安装
-
搜索
TestLink,查看到TestLink Plugin即表示安装完成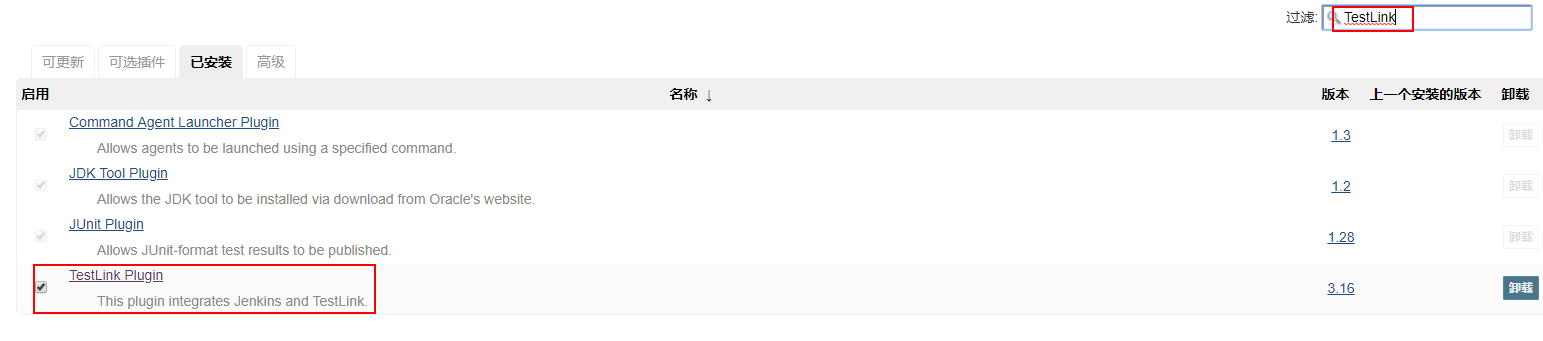
5.2、TestLink Plugin配置
-
点击
系统管理
-
点击
系统设置
-
找到
TestLink,点击新增
-
设置
TestLink Plugin,如下-
名称(TestLink版本):
TestLink-1.9.19 -
URL(TestLink-API的地址):
http://192.168.0.157/testlink/lib/api/xmlrpc/v1/xmlrpc.php -
开发密钥(TestLink 具有权限的用户秘钥):
7a6551179ee27605393ff0ecf951084d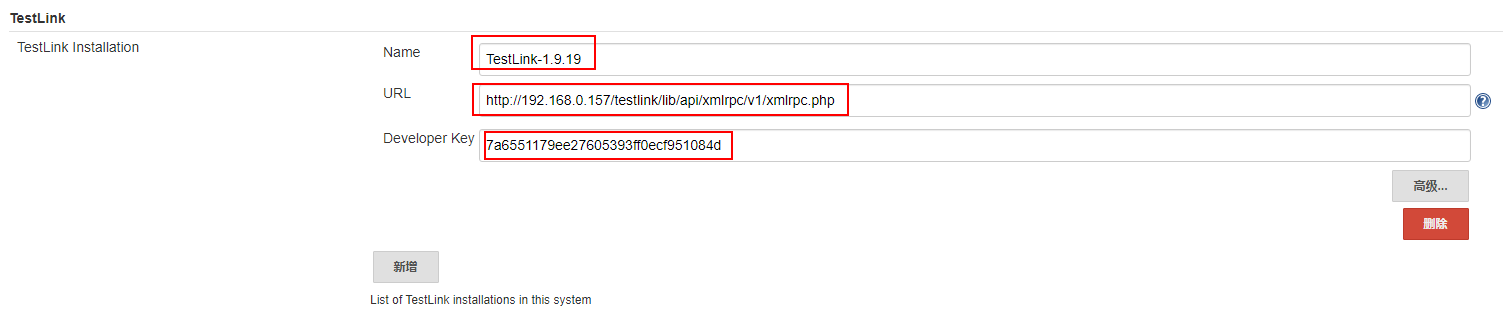
-
- 保存应用

 浙公网安备 33010602011771号