【Spring实战4】10--搭建SpringMVC环境
1、Eclipse创建maven project
创建完成后报错:The superclass "javax.servlet.http.HttpServlet" was not found on the Java Build Path
解决方法:右键项目-->propertites--->Project facets---Run time里勾选配置好的tomcat,点击oK,错误消失
如果没有安装好tomcat,请自行安装后。
如果工程中没有显示maven Dependency,在本地的classpath文件中增加后就会显示
<classpathentry kind="con" path="org.eclipse.m2e.MAVEN2_CLASSPATH_CONTAINER"/>
Cannot change version of project facet Dynamic Web Module to 3.0
Go to your workspace>>Project folder>>.settings >>org.eclipse.wst.common.project.facet.core.xml. Open and edit it as per your convenience. Let me know if it solves the problem.
<?xml version="1.0" encoding="UTF-8"?>
<faceted-project>
<fixed facet="wst.jsdt.web"/>
<installed facet="java" version="1.8"/>
<installed facet="jst.web" version="3.1"/>
<installed facet="wst.jsdt.web" version="1.0"/>
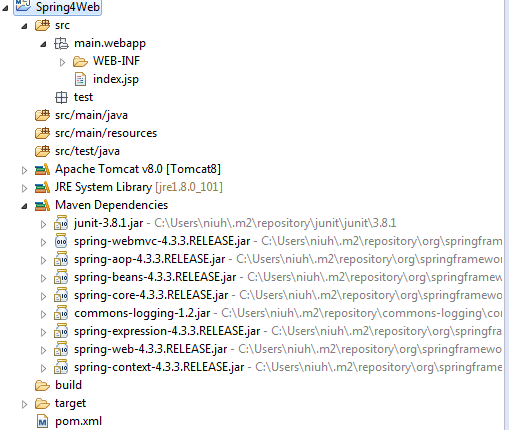
</faceted-project>2、增加springmvc 所需jar 包
两个maven依赖,spring-context;spring-mvc。maven就会自动下载所有关联的jar包,包括
- spring-webmvc
- spring-beans
- spring-core
- spring-expression
- spring-web
- spring-context
- spring-aop
- aopalliance
- commons-logging
所以只需在pom文件里增加如下:
<!-- 配置Spring MVC jar -->
        <!-- https://mvnrepository.com/artifact/org.springframework/spring-webmvc -->
        <dependency>
            <groupId>org.springframework</groupId>
            <artifactId>spring-webmvc</artifactId>
            <version>4.3.3.RELEASE</version>
        </dependency>
        <!-- https://mvnrepository.com/artifact/org.springframework/spring-context -->
        <dependency>
            <groupId>org.springframework</groupId>
            <artifactId>spring-context</artifactId>
            <version>4.3.3.RELEASE</version>
        </dependency>
问题:
maven提示invalid LOC header (bad signature)的解决办法,删除仓库的jar文件,重新update project
在工程中增加3个source folder,分别为src/main/java, src/main/resources,src/test/java. 工程如下所示:
在项目中增加src/main/webapp目录,把source folder中webapp目录下文件copy进去,删除掉自己创建的src。完善webapp目录如下
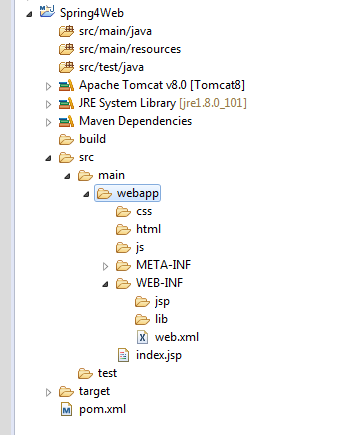
配置webapp目录为webroot目录,

配置完成后,修改web.xml文件,如下:
<?xml version="1.0" encoding="UTF-8"?>
<web-app  version="3.1" xmlns="http://xmlns.jcp.org/xml/ns/javaee"
                        xmlns:xsi="http://www.w3.org/2001/XMLSchema-instance"
                        xsi:schemaLocation="http://xmlns.jcp.org/xml/ns/javaee
                                            http://xmlns.jcp.org/xml/ns/javaee/web-app_3_1.xsd">

     <context-param>
        <param-name>contextConfigLocation</param-name>
        <param-value>/WEB-INF/applicationContext.xml</param-value>
        <!-- 默认是/WEB-INF/applicationContext.xml -->
     </context-param>

     <listener>
        <listener-class>
            org.springframework.web.context.ContextLoaderListener
        </listener-class>
     </listener>

    <servlet>
        <servlet-name>SpringMVC</servlet-name>
        <servlet-class>org.springframework.web.servlet.DispatcherServlet</servlet-class>
        <init-param>
            <param-name>contextConfigLocation</param-name>
            <param-value>/WEB-INF/SpringMVC-servlet.xml</param-value>
            <!-- 默认是/WEB-INF/[servlet名字]-servlet.xml -->
        </init-param>
        <load-on-startup>1</load-on-startup>
    </servlet>

    <servlet-mapping>
        <servlet-name>SpringMVC</servlet-name>
        <url-pattern>/</url-pattern>
    </servlet-mapping>

</web-app>
在WEB-INF目录下创建applicationContext.xml和servletName-servlet.xml
applicationContext.xml
<?xml version="1.0" encoding="UTF-8"?>
<beans xmlns="http://www.springframework.org/schema/beans"
    xmlns:xsi="http://www.w3.org/2001/XMLSchema-instance" xmlns:aop="http://www.springframework.org/schema/aop"
    xmlns:context="http://www.springframework.org/schema/context" xmlns:tx="http://www.springframework.org/schema/tx"
    xsi:schemaLocation="http://www.springframework.org/schema/beans
                           http://www.springframework.org/schema/beans/spring-beans-4.0.xsd
                           http://www.springframework.org/schema/tx
                           http://www.springframework.org/schema/tx/spring-tx-4.0.xsd
                           http://www.springframework.org/schema/aop
                           http://www.springframework.org/schema/aop/spring-aop-4.0.xsd
                           http://www.springframework.org/schema/context
                           http://www.springframework.org/schema/context/spring-context-4.0.xsd">

</beans>
SpringMVC-servlet.xml
<?xml version="1.0" encoding="UTF-8"?>
<beans xmlns="http://www.springframework.org/schema/beans"
    xmlns:xsi="http://www.w3.org/2001/XMLSchema-instance"
    xmlns:mvc="http://www.springframework.org/schema/mvc"
    xmlns:context="http://www.springframework.org/schema/context"
    xmlns:aop="http://www.springframework.org/schema/aop"
    xmlns:tx="http://www.springframework.org/schema/tx"
    xsi:schemaLocation="http://www.springframework.org/schema/beans
                        http://www.springframework.org/schema/beans/spring-beans-4.0.xsd
                        http://www.springframework.org/schema/mvc
                        http://www.springframework.org/schema/mvc/spring-mvc-4.0.xsd
                        http://www.springframework.org/schema/context
                        http://www.springframework.org/schema/context/spring-context-4.0.xsd
                        http://www.springframework.org/schema/aop
                        http://www.springframework.org/schema/aop/spring-aop-4.0.xsd
                        http://www.springframework.org/schema/tx
                        http://www.springframework.org/schema/tx/spring-tx-4.0.xsd">
    <!-- 设置使用注解的类所在的jar包 -->
    <context:component-scan base-package="hello" />
</beans>
增加contorller类
package helloTest;

import org.springframework.stereotype.Controller;
import org.springframework.web.bind.annotation.RequestMapping;
import org.springframework.web.bind.annotation.ResponseBody;

@Controller
public class HelloController {
    @RequestMapping("/hello")
    public @ResponseBody String testHello() {
        return "Hello,spring mvc";
    }

}
在SpringMVC-servlet.xml增加设置使用注解的类所在的jar包
<context:component-scan base-package="helloTest" />
部署tomcat,执行测试

这时已完成所有环境搭建工作,引用 xingoo 的博客总结如下:
1 两个maven依赖,spring-context;spring-mvc。maven就会自动下载所有关联的jar包,包括
- spring-webmvc
- spring-beans
- spring-core
- spring-expression
- spring-web
- spring-context
- spring-aop
- aopalliance
- commons-logging
2 一个web.xml文件,配置了listener和servlet
3 两个spring相关的文件,applicationContext.xml和servletName-servlet.xml
4 一个controller文件,配置了拦截的url处理代码

 浙公网安备 33010602011771号