
K8S三、实战
链接:K8S集群部署
| 控制器类型 | 适用场景 | Pod特点 | 有状态/无状态 | 有序启动 | 持久存储 | 适合场景 |
|---|---|---|---|---|---|---|
| Deployment | 无状态应用 | 随机名称,无序 | 无状态 | ❌ | ❌ | Web服务、API |
| StatefulSet | 有状态应用 | 唯一标识(db-0, db-1) | 有状态 | ✅ | ✅ | 数据库、分布式系统 |
| DaemonSet | 系统级守护进程 | 每节点一个副本 | 无状态 | ❌ | ❌ | 日志收集、监控代理 |
| Job | 一次性任务 | 任务完成后终止 | 无状态 | ❌ | ❌ | 批处理、数据导入 |
| CronJob | 定时任务 | 周期性执行 | 无状态 | ❌ | ❌ | 定时备份、日志清理 |
| HPA | 自动扩缩容 | 动态调整副本数 | 无状态 | ❌ | ❌ | 流量波动大的应用 |
创建pod
vi nginx-pod.yaml
apiVersion: v1
kind: Pod
metadata:
  name: nginx-pod
  namespace: default
spec:
  restartPolicy: Never
  containers:
  - name: nginx
    image: nginx:latest
    imagePullPolicy: IfNotPresent
    lifecycle:  # 生命周期钩子
      postStart:  # 容器启动后执行
        exec:
          command: ["/bin/sh", "-c", "echo 'Hello, postStart' > /usr/share/nginx/html/prestop.html"]
      preStop:  # 容器停止前执行
        exec:
          command: ["/bin/sh", "-c", "echo 'Bye, preStop' >> /usr/share/nginx/html/prestop.html"]
    ports:
    - containerPort: 80
    resources:
      limits:
        cpu: 500m
        memory: 500Mi
      requests:
        cpu: 100m
        memory: 100Mi
    workingDir: /usr/share/nginx/html
    startupProbe:
      tcpSocket:
        port: 80
      initialDelaySeconds: 10
      periodSeconds: 5
      timeoutSeconds: 3
      failureThreshold: 30
    livenessProbe:
      httpGet:
        path: /
        port: 80
      initialDelaySeconds: 30
      periodSeconds: 10
      timeoutSeconds: 3
      failureThreshold: 3
    readinessProbe:
      httpGet:
        path: /index.html  # 实际路径是workingDir/index.html
        port: 80
      initialDelaySeconds: 5
      periodSeconds: 3
      timeoutSeconds: 2
      failureThreshold: 3
kubectl apply -f nginx-pod.yaml
kubectl get pod nginx-pod -o yaml
kubectl get pod nginx-pod -o wide
kubectl describe pods nginx-pod
kubectl exec -it nginx-pod -- sh
kubectl logs nginx-pod

创建Deployment
vi deployment.yaml
apiVersion: apps/v1
kind: Deployment
metadata:
  name: nginx-deploy  # Deployment名称
  labels:
    app: nginx-deploy
spec:
  replicas: 2  # 期望的Pod副本数
  revisionHistoryLimit: 3  # 保留的历史版本数,默认为10
  selector:
    matchLabels:
      app: nginx  # 选择所有包含app=nginx标签的Pod
  minReadySeconds: 2  # Pod准备就绪前需要等待的最小秒数
  strategy:  # 更新策略
    type: RollingUpdate  # 滚动更新
    rollingUpdate:
      maxUnavailable: 1  # 滚动更新期间最多允许1个Pod不可用  /  25%
      maxSurge: 1  # 滚动更新期间最多允许额外创建1个Pod  /  25%
  template:
    metadata:
      labels:
        app: nginx  # Pod的标签!!!
    spec:  # 期望信息
      restartPolicy: Always  # 重启策略,Always表示总是重新启动,OnFailure表示只有在容器退出时才重新启动,Never表示从不自动重启
      terminationGracePeriodSeconds: 30  # Pod优雅终止的时长,默认为30秒
      containers:
      - name: nginx-pod  # 容器名称
        image: nginx:1.13.0  # 使用的镜像
        imagePullPolicy: IfNotPresent  # 优先使用本地镜像,不存在时才拉取
        ports:
        - containerPort: 80  # 容器内部监听的端口,官方的nginx镜像默认配置为监听 80 端口,而非 8080。即使这里配置的是8080,访问的时候仍然需要使用80端口。
        resources:  # 后续HPA会用到资源限制
          limits:
            cpu: "100m"  # CPU限制为100毫核
          requests:
            cpu: "50m"  # CPU请求为50毫核
kubectl apply -f deployment.yaml
kubectl edit deployment nginx-deploy  # 编辑Deployment并保存,相当于kubectl apply -f deployment.yaml
kubectl get deployment nginx-deploy -owide
NAME           READY   UP-TO-DATE   AVAILABLE   AGE    CONTAINERS   IMAGES         SELECTOR
nginx-deploy   2/2     2            2           178m   nginx-pod    nginx:1.13.0   app=nginx

kubectl get rs -owide  # ReplicaSet
NAME                      DESIRED   CURRENT   READY   AGE    CONTAINERS   IMAGES         SELECTOR
nginx-deploy-68ff6f9d47   2         2         2       151m   nginx-pod    nginx:1.13.0   app=nginx,pod-template-hash=68ff6f9d47

创建StatefulSet
---
apiVersion: v1
kind: Service
metadata:
  name: nginx
  labels:
    app: nginx
spec:
  ports:
  - port: 80
    name: web
  clusterIP: None
  selector:
    app: nginx
---
apiVersion: apps/v1
kind: StatefulSet
metadata:
  name: web
spec:
  serviceName: "nginx"
  replicas: 2  # 副本数
  # 添加selector,必须与template.metadata.labels匹配
  selector:
    matchLabels:
      app: nginx
  template:
    metadata:
      labels:
        app: nginx  # 与selector保持一致
    spec:
      containers:
      - name: nginx
        image: nginx:latest
        ports:
        - containerPort: 80
          name: web
创建DaemonSet
apiVersion: apps/v1
kind: DaemonSet
metadata:
  name: fluentd
spec:
  selector:  # 新增selector,DaemonSet必须包含
    matchLabels:
      app: logging
      id: fluentd
  template:
    metadata:
      labels:
        app: logging
        id: fluentd
    spec:
      containers:
      - name: fluentd-es
        image: swr.cn-north-4.myhuaweicloud.com/ddn-k8s/docker.io/mirrorgooglecontainers/fluentd-elasticsearch:v2.4.0
        imagePullPolicy: IfNotPresent
        env:
        - name: FLUENTD_ARGS
          value: -qq
        volumeMounts:
        - name: containers
          mountPath: /var/lib/docker/containers
        - name: varlog
          mountPath: /var/log
      volumes:
      - name: containers
        hostPath:
          path: /var/lib/docker/containers
      - name: varlog
        hostPath:
          path: /var/log
node-exporter
apiVersion: apps/v1
kind: DaemonSet
metadata:
  name: node-exporter
  namespace: monitoring
spec:
  selector:
    matchLabels:
      app: node-exporter
  template:
    metadata:
      labels:
        app: node-exporter
    spec:
      hostNetwork: true          # 使用宿主机网络
      hostPID: true              # 可选,用于更详细的进程信息
      containers:
      - name: node-exporter
        image: swr.cn-north-4.myhuaweicloud.com/ddn-k8s/quay.io/prometheus/node-exporter:v1.9.1
        args:
          - "--path.rootfs=/host"
        ports:
          - containerPort: 9100
            name: metrics
        volumeMounts:
          - name: rootfs
            mountPath: /host
            readOnly: true
      volumes:
        - name: rootfs
          hostPath:
            path: /
      tolerations:
        - effect: NoSchedule
          operator: Exists
prometheus
---
apiVersion: v1  # 资源的 API 版本(core/v1 核心组,命名空间是基础资源)
kind: Namespace  # 资源类型:命名空间(用于资源隔离)
metadata:
  name: monitoring  # 命名空间名称:所有 Prometheus 相关资源都放在这个命名空间下
---
apiVersion: v1  # API 版本(core/v1)
kind: ServiceAccount  # 资源类型:服务账户(Pod 访问集群资源的身份凭证)
metadata:
  name: prometheus  # 服务账户名称
  namespace: monitoring  # 所属命名空间
---
apiVersion: rbac.authorization.k8s.io/v1  # RBAC 相关资源的 API 版本
kind: ClusterRole  # 资源类型:集群角色(集群级别的权限集合,跨命名空间)
metadata:
  name: prometheus  # 集群角色名称
rules:  # 权限规则列表(定义允许操作的资源和动作)
- apiGroups: [""]  # API 组:空字符串表示核心 API 组(如 Pod、Service 等基础资源)
  resources: ["nodes", "services", "endpoints", "pods"]  # 允许操作的资源类型
  verbs: ["get", "list", "watch"]  # 允许执行的动作:查询(get)、列表(list)、监听(watch)
---
apiVersion: rbac.authorization.k8s.io/v1  # RBAC API 版本
kind: ClusterRoleBinding  # 资源类型:集群角色绑定(将 ClusterRole 绑定到 ServiceAccount)
metadata:
  name: prometheus  # 绑定名称
roleRef:  # 引用要绑定的角色
  apiGroup: rbac.authorization.k8s.io  # 角色所属的 API 组
  kind: ClusterRole  # 角色类型(这里是 ClusterRole)
  name: prometheus  # 角色名称(对应上面创建的 ClusterRole)
subjects:  # 绑定的对象(给谁分配这个角色)
- kind: ServiceAccount  # 对象类型:服务账户
  name: prometheus  # 服务账户名称(对应上面创建的 ServiceAccount)
  namespace: monitoring  # 服务账户所属的命名空间
---
apiVersion: v1  # API 版本(core/v1)
kind: ConfigMap  # 资源类型:配置映射(存储非敏感配置数据)
metadata:
  name: prometheus-config  # ConfigMap 名称
  namespace: monitoring  # 所属命名空间
data:  # 核心配置数据(key-value 结构,key 是文件名,value 是文件内容)
  prometheus.yml: |  # 配置文件名称:prometheus.yml(Prometheus 的核心配置文件)
    global:  # 全局配置
      scrape_interval: 15s  # 指标采集间隔:每 15 秒采集一次所有目标
    scrape_configs:  # 采集配置列表(定义要采集哪些目标的指标)
      - job_name: 'prometheus'  # 采集任务名称:采集 Prometheus 自身指标
        static_configs:  # 静态配置(固定采集目标)
          - targets: ['localhost:9090']  # 采集目标:Prometheus 容器内的 9090 端口(自身指标接口)
      - job_name: 'node-exporter'  # 采集任务名称:采集 node-exporter 的节点指标
        kubernetes_sd_configs:  # Kubernetes 服务发现(自动发现集群内的节点)
          - role: node  # 服务发现角色:node(自动发现所有集群节点)
        relabel_configs:  # 标签重写(修改采集目标的地址)
          - source_labels: [__address__]  # 源标签:K8s 自动发现的节点地址(格式:节点IP:443)
            regex: '(.*):.*'  # 正则表达式:匹配「IP:任意端口」,提取 IP 部分(分组 1)
            target_label: __address__  # 目标标签:覆盖采集目标的地址
            replacement: '${1}:9100'  # 替换值:用提取的节点 IP + node-exporter 的默认端口 9100
---
apiVersion: apps/v1  # API 版本(apps/v1,用于部署类资源)
kind: Deployment  # 资源类型:Deployment(管理 Pod 的创建、更新、回滚)
metadata:
  name: prometheus  # Deployment 名称
  namespace: monitoring  # 所属命名空间
spec:  # Deployment 规格
  replicas: 1  # 副本数:1(单实例部署,极简场景够用)
  selector:  # 选择器(匹配要管理的 Pod)
    matchLabels:
      app: prometheus  # 匹配标签为「app: prometheus」的 Pod
  template:  # Pod 模板(定义要创建的 Pod 的规格)
    metadata:
      labels:
        app: prometheus  # Pod 的标签(必须与上面的 selector.matchLabels 一致)
    spec:  # Pod 规格
      serviceAccountName: prometheus  # 关联的服务账户(对应上面创建的 ServiceAccount)
      containers:  # 容器列表(这里只有一个 Prometheus 容器)
      - name: prometheus  # 容器名称
        image: swr.cn-north-4.myhuaweicloud.com/ddn-k8s/docker.io/rancher/mirrored-prometheus-prometheus:v2.50.1  # Prometheus 镜像地址(华为云镜像仓库的镜像,避免拉取失败)
        args:  # 容器启动参数(传递给 Prometheus 程序的参数)
          - '--config.file=/etc/prometheus/prometheus.yml'  # 指定配置文件路径(挂载的 ConfigMap 路径)
          - '--storage.tsdb.path=/prometheus'  # 指标数据存储路径(挂载的 emptyDir 目录)
        ports:  # 容器暴露端口
          - containerPort: 9090  # Prometheus 的默认端口(UI 和指标接口都通过该端口暴露)
        volumeMounts:  # 容器内挂载卷(将 ConfigMap 和 emptyDir 挂载到容器目录)
          - name: config  # 卷名称(对应下面 volumes 中的 config)
            mountPath: /etc/prometheus  # 挂载到容器内的目录(配置文件所在目录)
          - name: data  # 卷名称(对应下面 volumes 中的 data)
            mountPath: /prometheus  # 挂载到容器内的目录(数据存储目录)
      volumes:  # Pod 卷定义(提供存储给容器)
        - name: config  # 卷名称
          configMap:  # 卷类型:ConfigMap(关联上面创建的 Prometheus 配置)
            name: prometheus-config  # 关联的 ConfigMap 名称
        - name: data  # 卷名称
          emptyDir: {}  # 卷类型:emptyDir(临时存储,Pod 重启后数据丢失)
---
apiVersion: v1  # API 版本(core/v1)
kind: Service  # 资源类型:Service(暴露 Pod 访问入口,实现负载均衡)
metadata:
  name: prometheus  # Service 名称
  namespace: monitoring  # 所属命名空间
spec:  # Service 规格
  type: NodePort  # 新增:指定 Service 类型为 NodePort
  selector:  # 选择器(匹配要暴露的 Pod)
    app: prometheus  # 匹配标签为「app: prometheus」的 Pod(对应 Deployment 创建的 Pod)
  ports:  # 端口映射
    - port: 9090  # Service 暴露的端口(集群内可通过该端口访问)
      targetPort: 9090  # 目标端口(Pod 容器暴露的端口,对应上面的 containerPort)
      nodePort: 30090  # 固定 NodePort(可选,不指定则自动分配)
滚动升级和回滚
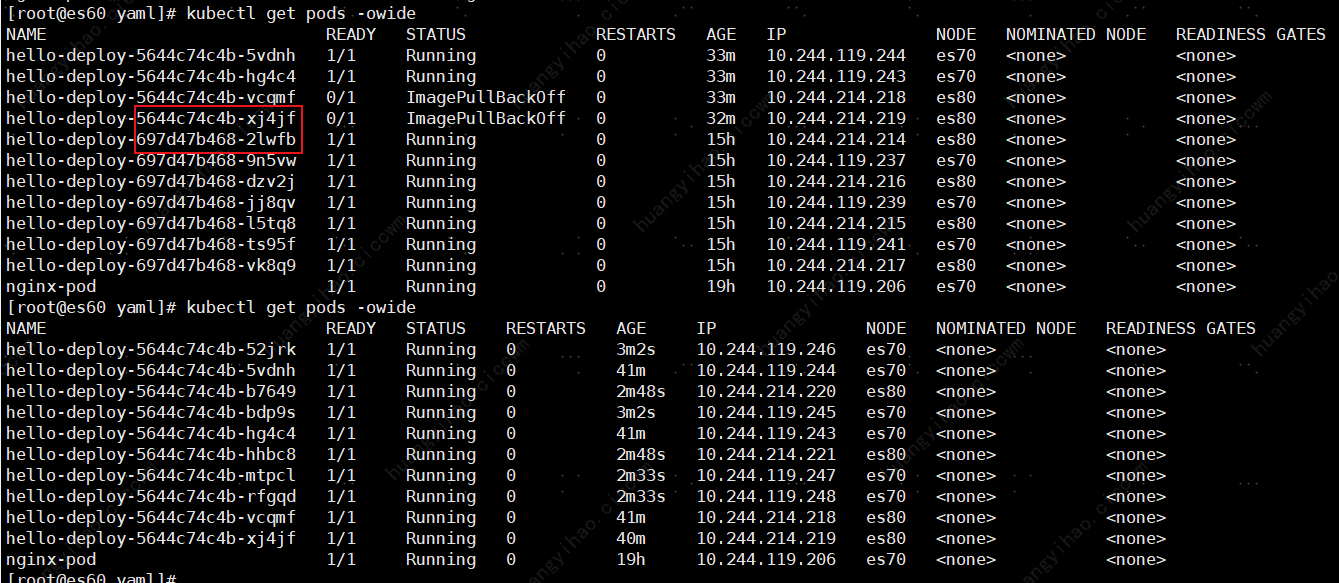
Deployment 是如何利用 ReplicaSet 实现滚动更新的?
当你更新 Deployment 的镜像版本时:

1. Deployment 会创建一个新的 ReplicaSet(对应新版本)。

2. 新 RS 慢慢增加 Pod 数量(扩容)。

3. 旧的 ReplicaSet 慢慢减少 Pod 数量(缩容)。

4. 直到新 RS 的 Pod 数量达到期望值,旧 RS 的 Pod 数量降为 0。

5. 旧 RS 不会被删除,而是保留下来(副本数为 0),方便你随时回滚。
- deployment
vi deployment.yaml
image: nginx:1.13.0  >>  image: nginx:latest  # 修改镜像版本

kubectl annotate deployments.apps nginx-deploy kubernetes.io/change-cause="Update Something"  # 记录此次更新,以便日后回滚
kubectl rollout status deployment nginx-deploy  # 查看滚动升级状态
kubectl rollout history deployment/nginx-deploy  # 查看历史版本
kubectl rollout history deployment/nginx-deploy --revision=3  # 查看指定版本的历史记录

# 回滚到上一个版本(无需指定版本号)
kubectl rollout undo deployment nginx-deploy
# 或回滚到指定版本(需确认版本号存在)
kubectl rollout undo deployment nginx-deploy --to-revision=2
kubectl rollout status deployment nginx-deploy  # 查看回滚状态

kubectl rollout pause deployment <name>  # 暂停滚动升级
kubectl rollout resume deployment <name>  # 恢复滚动升级
- statefulSet
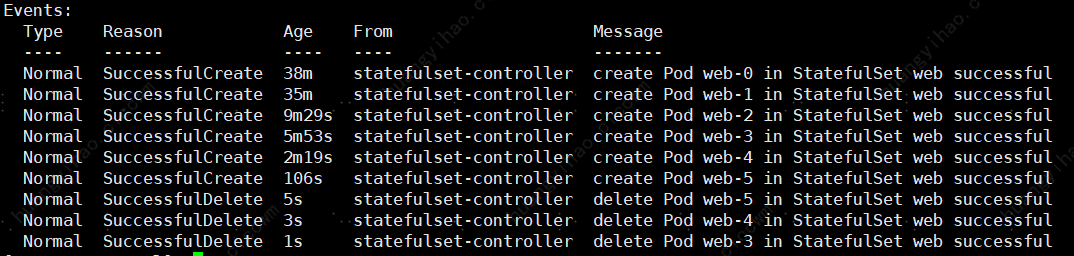
kubectl edit statefulsets.apps web

  updateStrategy:
    rollingUpdate:
      partition: 3  # 滚动更新时,只有序号大于等于3的Pod会被更新
    type: RollingUpdate
kubectl edit statefulsets.apps web

  updateStrategy:
    type: OnDelete  # 设置为 OnDelete,只有在手动删除 Pod 后才会创建新的 Pod
扩缩容、非级联删除
kubectl scale deployment nginx-deploy --replicas=6
kubectl scale statefulset web --replicas=6
非级联删除,删除Deployment或StatefulSet时不会自动删除其管理的Pod
kubectl delete deployment nginx-deploy --cascade=false
kubectl delete statefulset web --cascade=false
创建serivce
vi service.yaml
apiVersion: v1
kind: Service
metadata:
  name: nginx-svc  # Service的名称,在同一个命名空间内必须唯一
  labels:
    app: nginx
spec:
  type: NodePort
  ports:
  - port: 80  # Service 在集群内部的端口(其他 Pod 通过此端口访问该服务)
    nodePort: 30080  # 节点上暴露的端口,外部可通过 <NodeIP>:30080 访问服务,范围是30000-32767。
    protocol: TCP
  selector:
    app: nginx  # selector下的app标签要和Pod的label一致
kubectl apply -f service.yaml

以下两个地方要注意,要保持一致
service.yaml --> spec.selector
deployment.yaml  --> spec.template.metadata.labels

label 和 Selector
  标签(Label)
    配置文件
    kubectl
      kubectl label po <资源名称> app=hello  # 临时创建 label
      kubectl label po <资源名称> app=hello2 --overwrite  # 覆盖原有 label
      kubectl get po -A -l app=hello
      kubectl get po --show-labels
  选择器(Selector)
    配置文件
    kubectl
      kubectl get po -A -l app=hello  # 筛选标签为 app=hello 的 Pod
      kubectl get po -A -l 'k8s-app in (metrics-server, kubernetes-dashboard)'  # 筛选标签为 k8s-app=metrics-server 或 k8s-app=kubernetes-dashboard 的 Pod
      kubectl get po -l version!=1,app=nginx  # 筛选标签为 version!=1 且 app=nginx 的 Pod
      kubectl get po -A -l version!=1,'app in (busybox, nginx)'  # 筛选标签为 version!=1 且 app=busybox 或 app=nginx 的 Pod
kubectl describe svc nginx-svc
Name:                     nginx-svc
Namespace:                default
Labels:                   app=nginx
Annotations:              <none>
Selector:                 app=nginx
Type:                     NodePort
IP Family Policy:         SingleStack
IP Families:              IPv4
IP:                       10.100.160.27
IPs:                      10.100.160.27
Port:                     <unset>  80/TCP
TargetPort:               80/TCP
NodePort:                 <unset>  30080/TCP
Endpoints:                10.240.214.207:80,10.240.214.208:80
Session Affinity:         None
External Traffic Policy:  Cluster
Events:                   <none>
Endpoint 是Service和Pod之间的桥梁,它记录了哪些Pod可以被访问。
访问Service
Service 的网络标识:ClusterIP、DNS 名称
kubectl get svc
NAME         TYPE        CLUSTER-IP      EXTERNAL-IP   PORT(S)        AGE
kubernetes   ClusterIP   10.96.0.1       <none>        443/TCP        43h
nginx-svc    NodePort    10.100.160.27   <none>        80:30080/TCP   18h
NAME: nginx-svc
CLUSTER-IP: 10.100.160.27
PORT:80
NodePort: 30080
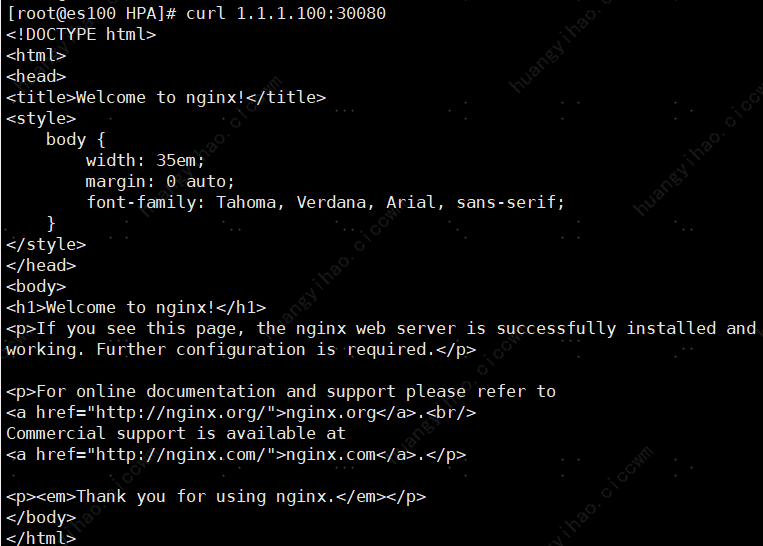
从集群内部,可以通过前3个值(Name、ClusterIP、port)来直接访问
从集群外部,可以通过NodeIP:NodePort来访问
curl 10.100.160.27:80 # 集群内部访问Service
curl nginx-svc:80 # Pod内部通过DNS访问Service
curl 1.1.1.100:30080 # 集群外部访问Service es100:30800
HPA
前提条件:部署nginx,可参考上面的Deployment和Service部分
vi metric-server.yaml
apiVersion: v1
kind: ServiceAccount
metadata:
  labels:
    k8s-app: metrics-server
  name: metrics-server
  namespace: kube-system
---
apiVersion: rbac.authorization.k8s.io/v1
kind: ClusterRole
metadata:
  labels:
    k8s-app: metrics-server
    rbac.authorization.k8s.io/aggregate-to-admin: "true"
    rbac.authorization.k8s.io/aggregate-to-edit: "true"
    rbac.authorization.k8s.io/aggregate-to-view: "true"
  name: system:aggregated-metrics-reader
rules:
- apiGroups:
  - metrics.k8s.io
  resources:
  - pods
  - nodes
  verbs:
  - get
  - list
  - watch
---
apiVersion: rbac.authorization.k8s.io/v1
kind: ClusterRole
metadata:
  labels:
    k8s-app: metrics-server
  name: system:metrics-server
rules:
- apiGroups:
  - ""
  resources:
  - nodes/metrics
  verbs:
  - get
- apiGroups:
  - ""
  resources:
  - pods
  - nodes
  verbs:
  - get
  - list
  - watch
---
apiVersion: rbac.authorization.k8s.io/v1
kind: RoleBinding
metadata:
  labels:
    k8s-app: metrics-server
  name: metrics-server-auth-reader
  namespace: kube-system
roleRef:
  apiGroup: rbac.authorization.k8s.io
  kind: Role
  name: extension-apiserver-authentication-reader
subjects:
- kind: ServiceAccount
  name: metrics-server
  namespace: kube-system
---
apiVersion: rbac.authorization.k8s.io/v1
kind: ClusterRoleBinding
metadata:
  labels:
    k8s-app: metrics-server
  name: metrics-server:system:auth-delegator
roleRef:
  apiGroup: rbac.authorization.k8s.io
  kind: ClusterRole
  name: system:auth-delegator
subjects:
- kind: ServiceAccount
  name: metrics-server
  namespace: kube-system
---
apiVersion: rbac.authorization.k8s.io/v1
kind: ClusterRoleBinding
metadata:
  labels:
    k8s-app: metrics-server
  name: system:metrics-server
roleRef:
  apiGroup: rbac.authorization.k8s.io
  kind: ClusterRole
  name: system:metrics-server
subjects:
- kind: ServiceAccount
  name: metrics-server
  namespace: kube-system
---
apiVersion: v1
kind: Service
metadata:
  labels:
    k8s-app: metrics-server
  name: metrics-server
  namespace: kube-system
spec:
  ports:
  - name: https
    port: 443
    protocol: TCP
    targetPort: https
  selector:
    k8s-app: metrics-server
---
apiVersion: apps/v1
kind: Deployment
metadata:
  labels:
    k8s-app: metrics-server
  name: metrics-server
  namespace: kube-system
spec:
  selector:
    matchLabels:
      k8s-app: metrics-server
  strategy:
    rollingUpdate:
      maxUnavailable: 0
  template:
    metadata:
      labels:
        k8s-app: metrics-server
    spec:
      containers:
      - args:
        - --cert-dir=/tmp
        - --secure-port=4443
        - --kubelet-preferred-address-types=InternalIP,ExternalIP,Hostname
        - --kubelet-use-node-status-port
        - --metric-resolution=15s
        - --kubelet-insecure-tls
        image: swr.cn-north-4.myhuaweicloud.com/ddn-k8s/registry.k8s.io/metrics-server/metrics-server:v0.6.4
        imagePullPolicy: IfNotPresent
        livenessProbe:
          failureThreshold: 3
          httpGet:
            path: /livez
            port: https
            scheme: HTTPS
          periodSeconds: 10
        name: metrics-server
        ports:
        - containerPort: 4443
          name: https
          protocol: TCP
        readinessProbe:
          failureThreshold: 3
          httpGet:
            path: /readyz
            port: https
            scheme: HTTPS
          initialDelaySeconds: 20
          periodSeconds: 10
        resources:
          requests:
            cpu: 100m
            memory: 200Mi
        securityContext:
          allowPrivilegeEscalation: false
          readOnlyRootFilesystem: true
          runAsNonRoot: true
          runAsUser: 1000
        volumeMounts:
        - mountPath: /tmp
          name: tmp-dir
      nodeSelector:
        kubernetes.io/os: linux
      priorityClassName: system-cluster-critical
      serviceAccountName: metrics-server
      volumes:
      - emptyDir: {}
        name: tmp-dir
---
apiVersion: apiregistration.k8s.io/v1
kind: APIService
metadata:
  labels:
    k8s-app: metrics-server
  name: v1beta1.metrics.k8s.io
spec:
  group: metrics.k8s.io
  groupPriorityMinimum: 100
  insecureSkipTLSVerify: true
  service:
    name: metrics-server
    namespace: kube-system
  version: v1beta1
  versionPriority: 100
kubectl apply -f metric-server.yaml

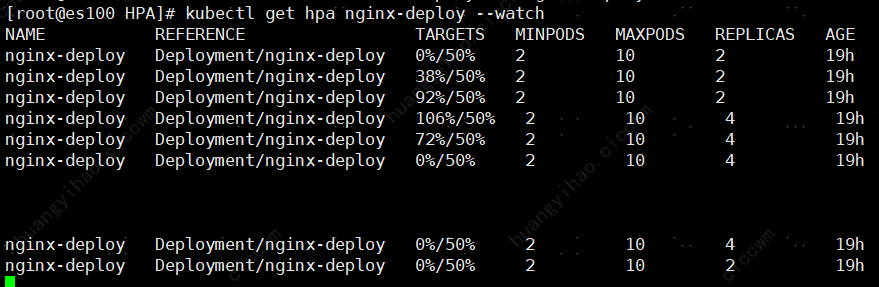
kubectl autoscale deployment nginx-deploy --cpu-percent=50 --min=2 --max=10  # 创建HPA,自动扩容,CPU使用率超过50%,最小2个Pod,最大10个Pod
kubectl delete hpa nginx-deploy  # 删除HPA
horizontalpodautoscaler.autoscaling/nginx-deploy autoscaled  # 查看HPA状态
测试开始:使用一下Python代码进行连接模拟
原本是来模拟http版本请求的,凑合着用吧
import time
import httpx
import ssl

while True:
    with httpx.Client(http2=False, verify=False) as client:  # http2=True则使用 HTTP2,http2=False,则默认采用 HTTP/1.1 协议
        response = client.get('http://1.1.1.100:30080', headers={'Host': url})
        response = client.get('http://1.1.1.80:30080', headers={'Host': url})
        time.sleep(1)  # 这里可以自由调节,间隔越小,CPU使用率越高
观测结果:
kubectl get hpa nginx-deploy --watch  # 观察HPA自动扩容


kubectl get pod
NAME                            READY   STATUS    RESTARTS   AGE
nginx-deploy-74db4c6d6f-65lzx   1/1     Running   0          16h
nginx-deploy-74db4c6d6f-kzwvn   1/1     Running   0          5m11s
nginx-deploy-74db4c6d6f-xf99c   1/1     Running   0          16h
nginx-deploy-74db4c6d6f-xv9hc   1/1     Running   0          5m11s


kubectl get hpa nginx-deploy --watch
NAME           REFERENCE                 TARGETS   MINPODS   MAXPODS   REPLICAS   AGE
nginx-deploy   Deployment/nginx-deploy   0%/50%    2         10        2          19h
nginx-deploy   Deployment/nginx-deploy   38%/50%   2         10        2          19h
nginx-deploy   Deployment/nginx-deploy   92%/50%   2         10        2          19h
nginx-deploy   Deployment/nginx-deploy   106%/50%   2         10        4          19h
nginx-deploy   Deployment/nginx-deploy   72%/50%    2         10        4          19h
nginx-deploy   Deployment/nginx-deploy   0%/50%     2         10        4          19h

nginx-deploy   Deployment/nginx-deploy   0%/50%     2         10        4          19h
nginx-deploy   Deployment/nginx-deploy   0%/50%     2         10        2          19h
不可调度与驱逐POD
-
当前状态
kubectl get pod -owide
NAME READY STATUS RESTARTS AGE IP NODE NOMINATED NODE READINESS GATES
nginx-deploy-74db4c6d6f-65lzx 1/1 Running 0 16h 10.240.214.208 es80
nginx-deploy-74db4c6d6f-xf99c 1/1 Running 0 16h 10.240.214.207 es80 -
配置禁止调度
kubectl cordon es80
继续执行上述的Python脚本,然后观测kubectl get hpa nginx-deploy --watch
观测到新的POD都创建在es90上

脚本停止后,又恢复为2个POD
- 驱逐
修改deployment.yaml,将replicas改为6后apply。
kubectl apply -f deployment.yaml
现在要把es90的POD驱逐到es80上,执行kubectl drain es90 --ignore-daemonsets

排障
镜像无法拉取
方式一:docker拉取再导入
docker pull swr.cn-north-4.myhuaweicloud.com/ddn-k8s/docker.io/nginx:1.13.0  # 华为云镜像仓库拉取镜像

docker tag  swr.cn-north-4.myhuaweicloud.com/ddn-k8s/docker.io/nginx:1.13.0  docker.io/nginx:1.13.0  # 打标签

docker save docker.io/nginx:1.13.0 -o nginx.tar  # 导出镜像

ctr -n k8s.io images import nginx.tar  # 导入镜像

crictl images
报错
crictl images
WARN[0000] image connect using default endpoints: [unix:///var/run/dockershim.sock unix:///run/containerd/containerd.sock unix:///run/crio/crio.sock unix:///var/run/cri-dockerd.sock]. As the default settings are now deprecated, you should set the endpoint instead.
E1127 16:49:36.363810   96670 remote_image.go:119] "ListImages with filter from image service failed" err="rpc error: code = Unavailable desc = connection error: desc = \"transport: Error while dialing dial unix /var/run/dockershim.sock: connect: no such file or directory\"" filter="&ImageFilter{Image:&ImageSpec{Image:,Annotations:map[string]string{},},}"
FATA[0000] listing images: rpc error: code = Unavailable desc = connection error: desc = "transport: Error while dialing dial unix /var/run/dockershim.sock: connect: no such file or directory"

原因:crictl 默认尝试连接多个 CRI(Container Runtime Interface)端点,但你的系统中 没有运行 Docker(或 dockershim),而 /var/run/dockershim.sock 文件不存在,导致连接失败。

修复:
sudo tee /etc/crictl.yaml <<EOF
runtime-endpoint: unix:///run/containerd/containerd.sock
image-endpoint: unix:///run/containerd/containerd.sock
timeout: 10
debug: false
EOF
方式二:使用镜像加速源

BackOff
现象/告警:Warning BackOff 109s (x9 over 3m23s) kubelet Back-off restarting failed container
原因:BackOff 警告,说明启动失败后 kubelet 不断重试 --> 容器启动后立即退出
可能的原因:
- 架构不匹配(最可能!)
kubectl get nodes -o jsonpath='{.items[*].status.nodeInfo.architecture}' # 查看架构
修改镜像的架构
pod访问不通
现象/告警:Error from server: error dialing backend: dial tcp 192.168.248.12:10250: connect: no route to host

 浙公网安备 33010602011771号