CentOS 7 非集群FastDFS文件系统安装
-
libfastcommon
-
fdfs_tracker (依赖Gcc、libevent、perl)
-
fdfs_storage
-
FastDFS-nginx-module
-
nginx (依赖pcre-devel、zlib-devel)
2、依赖环境
yum -y install zlib zlib-devel pcre pcre-devel gcc gcc-c++ openssl openssl-devel libevent libevent-devel perl unzip net-tools wget
3、下载FastDFS
tracker和storage使用相同的安装包,下载地址:http://sourceforge.net/projects/FastDFS/ 或https://github.com/happyfish100/FastDFS
4、Tracker Server安装
4.1、Tracker安装环境准备
FastDFS是C语言开发的,需要gcc环境
yum -y install gcc-c++
FastDFS依赖libevent库
yum -y install libevent
perl库
yum install perl*
libfastcommon是FastDFS官方提供的,libfastcommon包含了FastDFS运行所需要的一些基础库
将libfastcommonV1.0.7.tar.gz解压至/usr/local下,执行shell脚本
cd /usr/local/

tar -zxvf libfastcommonV1.0.7.tar.gz –C /usr/local/

cd libfastcommon-1.0.7

./make.sh

./make.sh install
libfastcommon安装好后会自动将库文件拷贝至/usr/lib64下,FastDFS程序引用usr/lib目录,所以需要将/usr/lib64下的库文件拷贝至/usr/lib下
cp /usr/lib64/libfastcommon.so /usr/lib/
将FastDFS_v5.05.tar.gz解压至/usr/local/src/,然后进入目录/usr/local/FastDFS,编译,安装
tar -zxvf FastDFS_v5.05.tar.gz –C /usr/local/

cd /usr/local/FastDFS

./make.sh

./make.sh instal
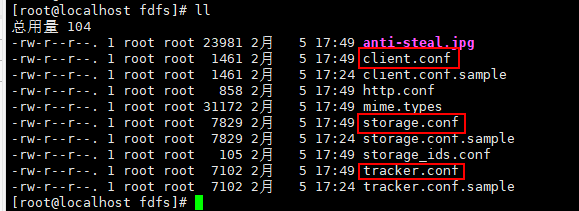
默认的安装方式,配置文件都存储在/etc/fdfs/,命令文件都安装在/usr/bin/
安装成功将安装目录下的conf下的文件拷贝到/etc/fdfs/下。/etc/fdfs/目录是FastDFS配置文件目录
cp ./* /etc/fdfs/
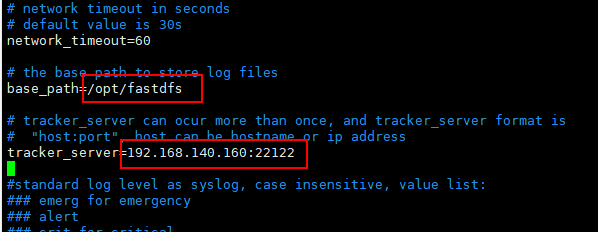
进入/etc/fdfs/目录下,修改复制tracker.conf配置文件(建议备份)
修改内容

其中
Tracker默认的服务端口是22122
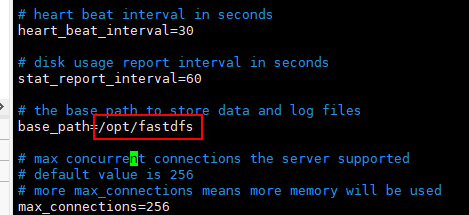
base_path=/opt/fastdfs,tracker的数据文件目录路径,用来存储storage的信息
http.server_port=8088,Http服务端口8088
/usr/bin/fdfs_trackerd /etc/fdfs/tracker.conf

ps -ef|grep fdfs

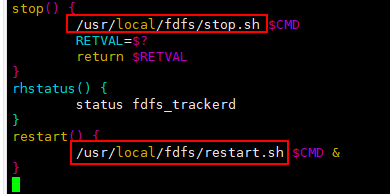
创建文件夹/usr/local/fdfs,拷贝FastDfs目录下stop.sh和restart.sh 到/usr/local/fdfs/,修改启动脚本(建议备份)
mkdir /usr/local/fdfs

cp restart.sh stop.sh  /usr/local/fdfs/

vim /etc/init.d/fdfs_trackerd
修改内容如下

注册服务,启动测试
chkconfig  --add  fdfs_trackerd

service fdfs_trackerd start

tracker和storage使用相同的安装包,所以和Tracker Server一样,单机版就用不管了
5.2、 编译安装Storage
集群,是在另外一台机器上安装Storage。编译安装和Tracker一样,解压tar包,然后make,make install
单机,可不管,tracker和storage使用相同的安装包,所有不需要再解压
进入/etc/fdfs/目录下,修改storage.conf配置文件
vim /etc/fdfs/storage.conf
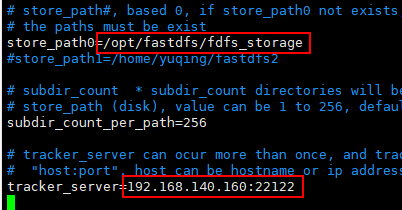
tracker_server=192.168.188.21:22122,配置tracker的IP地址,storage是主动连接tracker的
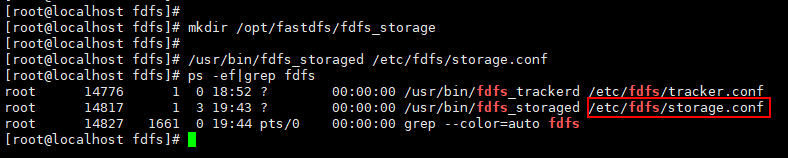
创建目录,storage存储数据的目录
mkdir /opt/fastdfs/fdfs_storage
/usr/bin/fdfs_storaged /etc/fdfs/storage.conf

ps -ef|grep fdfs
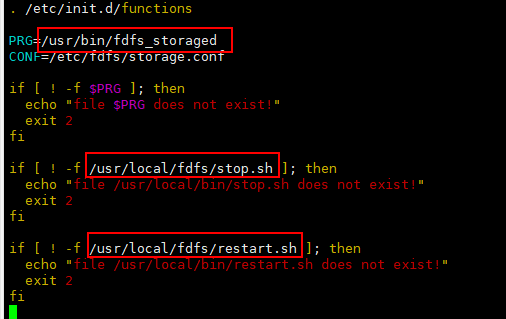
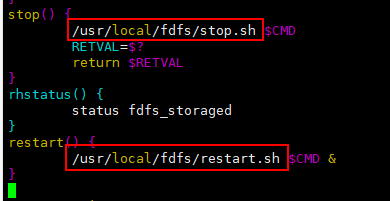
vim /etc/init.d/fdfs_storaged
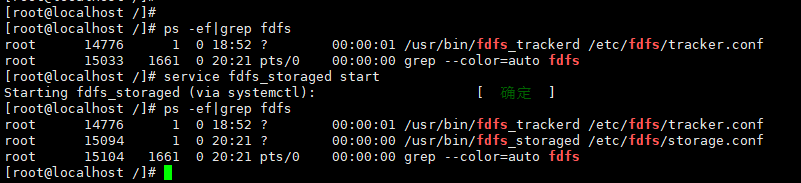
注册服务,启动服务
chkconfig - -add fdfs_storaged

service fdfs_storaged start
通过/usr/bin/fdfs_test测试上传,集群中在tracker上和storage上修改/etc/fdfs/client.conf配置文件
vim /etc/fdfs/client.conf
测试上传格式
/usr/bin/fdfs_test /etc/fdfs/client.conf upload /opt/1.jpg
测试上传成功
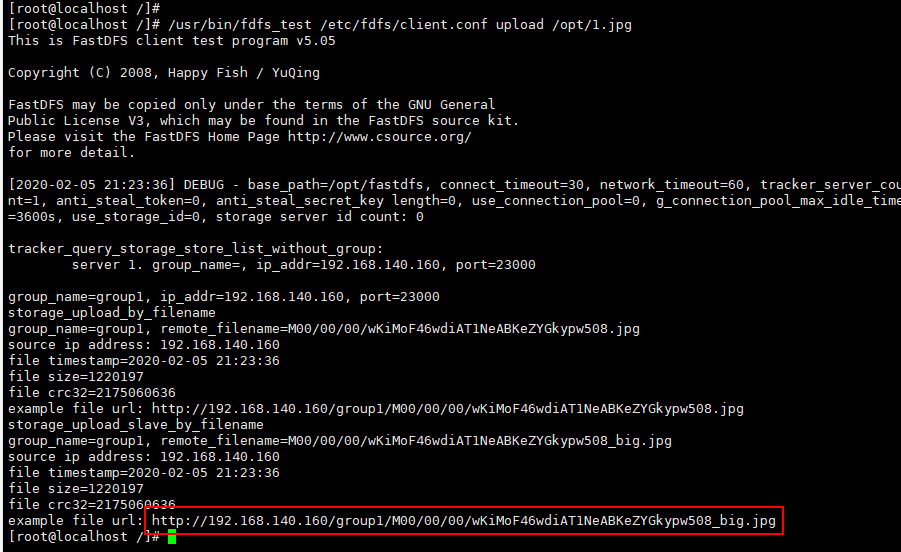
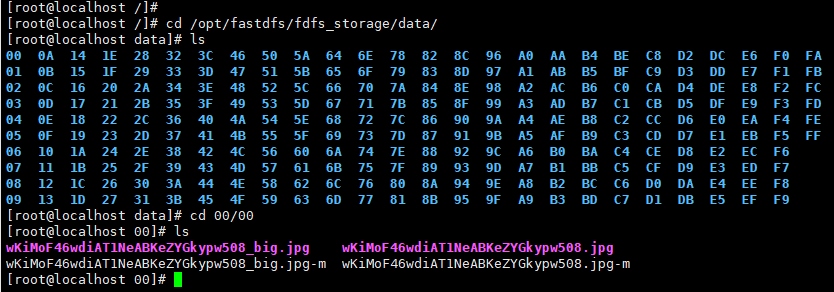
对应的上传路径
/opt/fastdfs/fdfs_storage/data/00/00

/wKiMoF46wdiAT1NeABKeZYGkypw508_big.jpg
7.1、nginx安装前准备
进入http://nginx.org/en/download.html 下载最新稳定版tar包
安装nginx的依赖包
nginx是C语言开发的,需要gcc环境
yum -y install gcc-c++
PCRE(Perl Compatible Regular Expressions) 是一个Perl库,包括 perl 兼容的正则表达式库。nginx的http模块使用pcre来解析正则表达式,pcre-devel是使用pcre开发的一个二次开发库
yum -y install pcre pcre-devel
zlib 提供了很多种压缩和解压缩的方式,nginx使用zlib对http包的内容进行gzip
yum -y install zlib zlib-devel
OpenSSL 是一个安全套接字层密码库,nginx支持https,要用https传数据
yum -y install openssl openssl-devel
7.2、安装FastDFS-nginx-module
FastDFS-nginx-module是FastDFS和Nginx整合的插件,因为nginx需要给Storage提供下载接口,所以在Storage上需要安装
FastDFS-nginx-module.tar.gz作为nginx的一个模块,要随着nginx一起编译,安装,要配置在nginx的安装配置里
将fastdfs-nginx-module_v1.16.tar.gz传至/usr/local/,并修改/usr/local/fastdfs-nginx-module/src/中config文件中的路径(建议备份)
tar -zxvf fastdfs-nginx-module_v1.16.tar.gz –C /usr/local/

cd /usr/local/fastdfs-nginx-module/src

vim config

将FastDFS-nginx-module/src下的mod_FastDFS.conf拷贝至/etc/fdfs/下,并修改mod_FastDFS.conf的内容
cp mod_FastDFS.conf /etc/fdfs/

vim /etc/fdfs/mod_FastDFS.conf
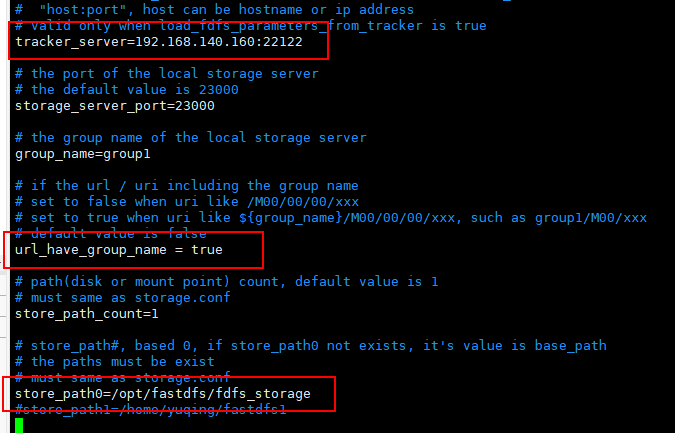
其中
url_have_group_name=true,url中包含group名称
store_path0=/home/FastDFS/fdfs_storage,指定文件存储路径
将libfdfsclient.so拷贝至/usr/lib下
cp /usr/lib64/libfdfsclient.so /usr/lib/
8、 在Storage上安装nginx
8.1、Storage上安装nginx的目的
目的是提供http下载接口,通过访问nginx的服务,来下载文件,静态资源服务器
8.2、安装nginx
创建临时文件目录,解压nginx-1.8.0.tar.gz 到/usr/local/下
mkdir -p /var/temp/nginx/client

tar -zxvf nginx-1.8.0.tar.gz –C /usr/local/

cd /usr/local/nginx-1.8.0
参数配置,配置安装目录和命令文件和配置文件的位置
参数设置如下:设置安装前的设置如安装的位置,添加依赖包
./configure \
--prefix=/usr/local/nginx \
--pid-path=/usr/local/nginx/logs/nginx.pid \
--lock-path=/var/lock/nginx.lock \
--error-log-path=/var/log/nginx/error.log \
--http-log-path=/var/log/nginx/access.log \
--with-http_gzip_static_module \
--http-client-body-temp-path=/var/temp/nginx/client \
--http-proxy-temp-path=/var/temp/nginx/proxy \
--http-fastcgi-temp-path=/var/temp/nginx/fastcgi \
--http-uwsgi-temp-path=/var/temp/nginx/uwsgi \
--http-scgi-temp-path=/var/temp/nginx/scgi \
--add-module=/usr/local/fastdfs-nginx-module/src
其中
--prefix=/usr/local/nginx \,是nginx的安装目录
编译安装
make

make install
8.3、修改nginx的配置文件
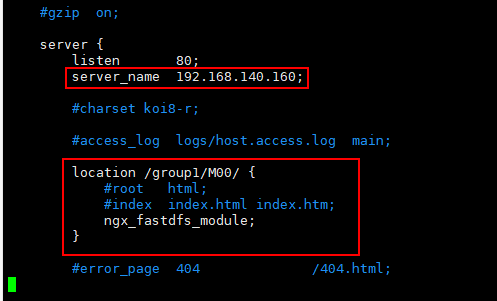
修改/usr/local/nginx安装目录下的conf下的nginx.conf配置文件
vim /usr/local/nginx/conf/nginx.conf
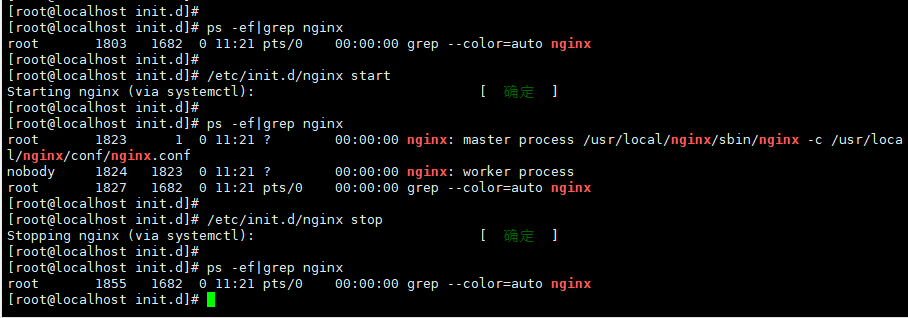
cd /usr/local/nginx/sbin/

./nginx

vim /etc/init.d/nginx
#!/bin/bash
#
# nginx - this script starts and stops the nginx daemon
#
# chkconfig:   - 85 15
# description:  NGINX is an HTTP(S) server, HTTP(S) reverse \
#               proxy and IMAP/POP3 proxy server
# processname: nginx
# config:      /etc/nginx/nginx.conf
# config:      /etc/sysconfig/nginx
# pidfile:     /var/run/nginx.pid

# Source function library.
. /etc/rc.d/init.d/functions

# Source networking configuration.
. /etc/sysconfig/network

# Check that networking is up.
[ "$NETWORKING" = "no" ] && exit 0

nginx="/usr/local/nginx/sbin/nginx"
prog=$(basename $nginx)

NGINX_CONF_FILE="/usr/local/nginx/conf/nginx.conf"

[ -f /etc/sysconfig/nginx ] && . /etc/sysconfig/nginx

lockfile=/var/lock/subsys/nginx

make_dirs() {
  # make required directories
  user=`$nginx -V 2>&1 | grep "configure arguments:.*--user=" | sed 's/[^*]*--user=\([^ ]*\).*/\1/g' -`
  if [ -n "$user" ]; then
    if [ -z "`grep $user /etc/passwd`" ]; then
      useradd -M -s /bin/nologin $user
    fi
    options=`$nginx -V 2>&1 | grep 'configure arguments:'`
    for opt in $options; do
        if [ `echo $opt | grep '.*-temp-path'` ]; then
          value=`echo $opt | cut -d "=" -f 2`
          if [ ! -d "$value" ]; then
            # echo "creating" $value
            mkdir -p $value && chown -R $user $value
          fi
        fi
    done
  fi
}

start() {
  [ -x $nginx ] || exit 5
  [ -f $NGINX_CONF_FILE ] || exit 6
  make_dirs
  echo -n $"Starting $prog: "
  daemon $nginx -c $NGINX_CONF_FILE
  retval=$?
  echo
  [ $retval -eq 0 ] && touch $lockfile
  return $retval
}

stop() {
  echo -n $"Stopping $prog: "
  killproc $prog -QUIT
  retval=$?
  echo
  [ $retval -eq 0 ] && rm -f $lockfile
  return $retval
}

restart() {
  configtest || return $?
  stop
  sleep 1
  start
}

reload() {
  configtest || return $?
  echo -n $"Reloading $prog: "
  killproc $nginx -HUP
  RETVAL=$?
  echo
}

force_reload() {
  restart
}

configtest() {
  $nginx -t -c $NGINX_CONF_FILE
}

rh_status() {
  status $prog
}

rh_status_q() {
  rh_status >/dev/null 2>&1
}

case "$1" in
  start)
    rh_status_q && exit 0
    $1
    ;;
  stop)
    rh_status_q || exit 0
    $1
    ;;
  restart|configtest)
    $1
    ;;
  reload)
    rh_status_q || exit 7
    $1
    ;;
  force-reload)
    force_reload
    ;;
  status)
    rh_status
    ;;
  condrestart|try-restart)
    rh_status_q || exit 0
    ;;
  *)
    echo $"Usage: $0 {start|stop|status|restart|reload|configtest}"
    exit 2
esac
其中nginxd,nginx_config,nginx_pid要与自己安装的位置一致
chmod 777 /etc/init.d/nginx
测试启动
/etc/init.d/nginx start

/etc/init.d/nginx stop
注册服务,开启服务
chkconfig --add /etc/init.d/nginx

service nginx start
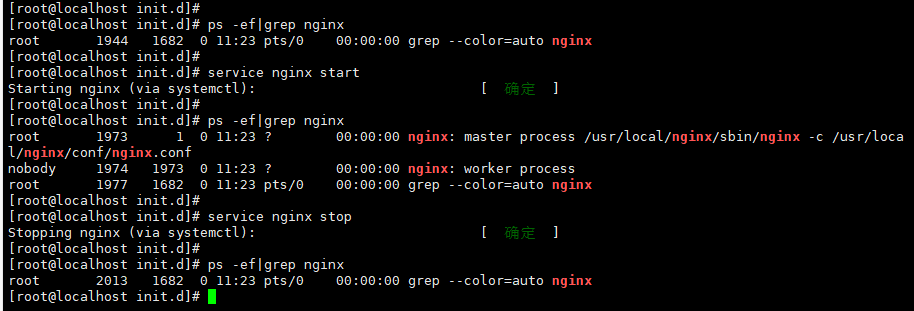
service iptables stop
永久关闭防火墙(不推荐)
chkconfig iptables off
或者
systemctl stop firewalld

systemctl disable firewalld
开放nginx的监听端口80(推荐,依次输入)
firewall-cmd --add-service=http --permanent

firewall-cmd --add-service=https --permanent

firewall-cmd --add-port=80/tcp --permanent

firewall-cmd --reload


//查看开放端口号
firewall-cmd --list-all
/usr/bin/fdfs_test /etc/fdfs/client.conf upload /opt/1.jpg

浏览器中输入之前上传的图片的url
http://192.168.140.160/group1/M00/00/00/wKiMoF467-SAM8_CABKeZYGkypw552_big.jpg
得到图片,测试成功,单机版FastDFS就已经完成了。
10、补充
Tracker上安装nginx的目的是为了做反向代理和负载均衡。Tracker上安装nginx的配置
./configure \
--prefix=/usr/local/nginx \
--pid-path=/usr/local/nginx/logs/nginx.pid \
--lock-path=/var/lock/nginx.lock \
--error-log-path=/var/log/nginx/error.log \
--http-log-path=/var/log/nginx/access.log \
--with-http_gzip_static_module \
--http-client-body-temp-path=/var/temp/nginx/client \
--http-proxy-temp-path=/var/temp/nginx/proxy \
--http-fastcgi-temp-path=/var/temp/nginx/fastcgi \
--http-uwsgi-temp-path=/var/temp/nginx/uwsgi \
--http-scgi-temp-path=/var/temp/nginx/scgi \
--add-module=/usr/local/ngx_cache_purge-2.3
这个添加的是ngx_cache_purge-2.3模块
--add-module=/usr/local/ngx_cache_purge-2.3

 浙公网安备 33010602011771号