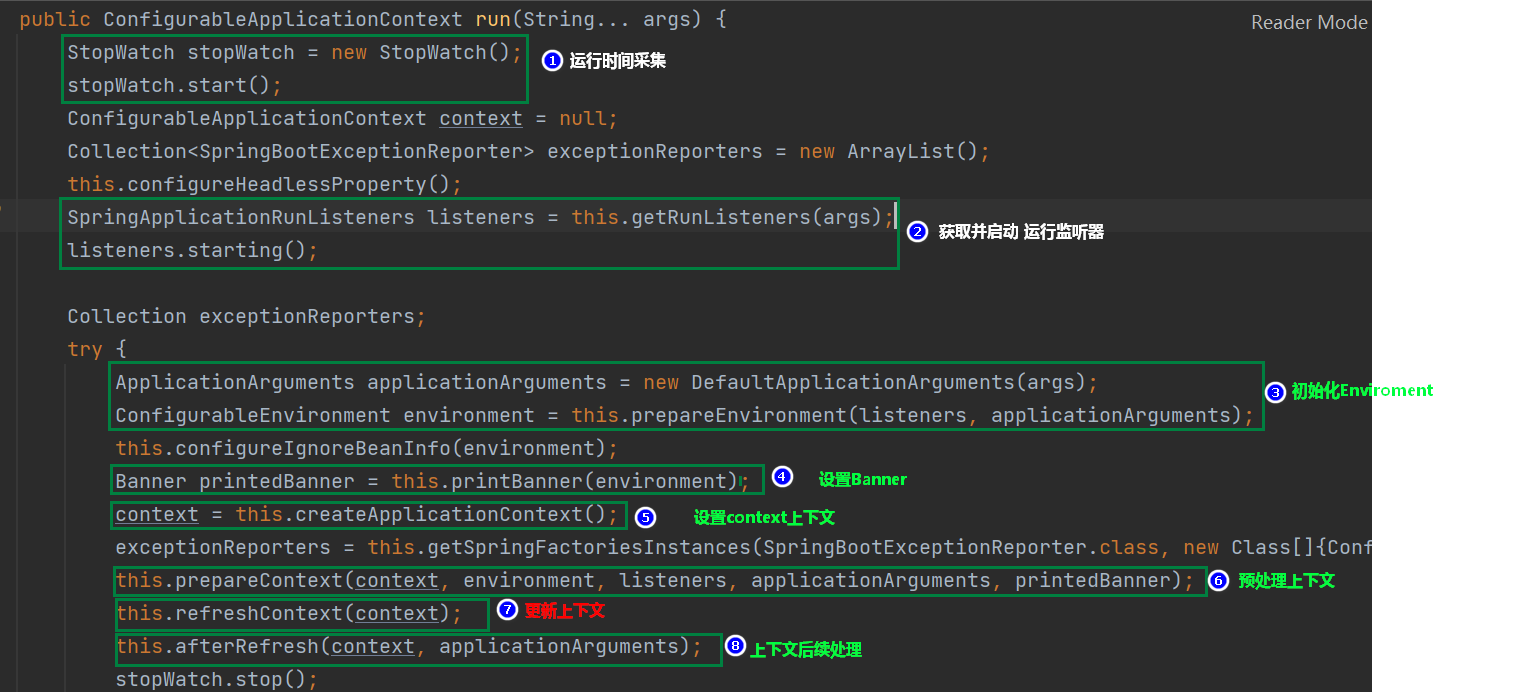
SpringBoot大致启动流程
以main方法为入口进入:

↓

↓

↓

主线流程到此结束,接下来重点看 6,7,8这三个方法中详细的代码流程,首先是prepareContext进行上下文预处理:
private void prepareContext(ConfigurableApplicationContext context, ConfigurableEnvironment environment, SpringApplicationRunListeners listeners, ApplicationArguments applicationArguments, Banner printedBanner) {
        context.setEnvironment(environment);//为上下文设置Environment
        this.postProcessApplicationContext(context);
        this.applyInitializers(context);
        listeners.contextPrepared(context);
        if (this.logStartupInfo) {
            this.logStartupInfo(context.getParent() == null);
            this.logStartupProfileInfo(context);
        }

        ConfigurableListableBeanFactory beanFactory = context.getBeanFactory();
        beanFactory.registerSingleton("springApplicationArguments", applicationArguments);
        if (printedBanner != null) {
            beanFactory.registerSingleton("springBootBanner", printedBanner);//注册banner单例
        }

        if (beanFactory instanceof DefaultListableBeanFactory) {
            ((DefaultListableBeanFactory)beanFactory).setAllowBeanDefinitionOverriding(this.allowBeanDefinitionOverriding);
        }

        if (this.lazyInitialization) {
            context.addBeanFactoryPostProcessor(new LazyInitializationBeanFactoryPostProcessor());
        }

        Set<Object> sources = this.getAllSources();
        Assert.notEmpty(sources, "Sources must not be empty");//断言
        this.load(context, sources.toArray(new Object[0]));
        listeners.contextLoaded(context);
    }
之后是refreshContext进行上下文更新:
 1    private void refreshContext(ConfigurableApplicationContext context) {
 2         this.refresh((ApplicationContext)context);
 3         if (this.registerShutdownHook) {
 4             try {
 5                 context.registerShutdownHook();
 6             } catch (AccessControlException var3) {
 7             }
 8         }
 9
10     }
↓
public void refresh() throws BeansException, IllegalStateException {
        synchronized(this.startupShutdownMonitor) {//使用synchronized对象锁锁住整个方法,strtupShutdownMonitor为Object实例对象
            this.prepareRefresh();//更新前的数据准备,startupDate设置为当前时间,closed设为false,active设为true
            ConfigurableListableBeanFactory beanFactory = this.obtainFreshBeanFactory();
            this.prepareBeanFactory(beanFactory);
//进行大量赋值,最终以执行resetCommonCaches结束
            try {
                this.postProcessBeanFactory(beanFactory);
                this.invokeBeanFactoryPostProcessors(beanFactory);
                this.registerBeanPostProcessors(beanFactory);
                this.initMessageSource();
                this.initApplicationEventMulticaster();
                this.onRefresh();
                this.registerListeners();
                this.finishBeanFactoryInitialization(beanFactory);
                this.finishRefresh();
            } catch (BeansException var9) {
                if (this.logger.isWarnEnabled()) {
                    this.logger.warn("Exception encountered during context initialization - cancelling refresh attempt: " + var9);
                }

                this.destroyBeans();
                this.cancelRefresh(var9);
                throw var9;
            } finally {
                this.resetCommonCaches();
            }

        }
    }
refresh()方法运行是有规律的,总体流程是prepareRefresh()->onRefresh()->finishRefresh(),接下来分别看看这三个方法的具体代码实现:
protected void prepareRefresh() {
        this.startupDate = System.currentTimeMillis();//记录开始时间
        this.closed.set(false);//打开更新
        this.active.set(true);//设置为可更新状态
        if (this.logger.isDebugEnabled()) {
            if (this.logger.isTraceEnabled()) {
                this.logger.trace("Refreshing " + this);
            } else {
                this.logger.debug("Refreshing " + this.getDisplayName());
            }
        }

        this.initPropertySources();
        this.getEnvironment().validateRequiredProperties();
        if (this.earlyApplicationListeners == null) {
            this.earlyApplicationListeners = new LinkedHashSet(this.applicationListeners);
        } else {
            this.applicationListeners.clear();
            this.applicationListeners.addAll(this.earlyApplicationListeners);
        }

        this.earlyApplicationEvents = new LinkedHashSet();
    }
 protected void onRefresh() throws BeansException {//空壳方法,看似是一个空方法,但是对于提高系统扩展性有很重要的地位,如它的实现类中有一个createWebServer()方法,这个方法提供了tomcat/netty等的实现源码
    }
    protected void finishRefresh() {
        this.clearResourceCaches();//清空资源缓存
        this.initLifecycleProcessor();//重置lifecycle执行器
        this.getLifecycleProcessor().onRefresh();
        this.publishEvent((ApplicationEvent)(new ContextRefreshedEvent(this)));//发布上下文更新成功事件
        LiveBeansView.registerApplicationContext(this);
    }
最後是afterRefresh方法:
1     protected void afterRefresh(ConfigurableApplicationContext context, ApplicationArguments args) {
2     }
afterRefresh方法结束,只有一个空壳方法在这里,应该可以进行自定义拓展;


 浙公网安备 33010602011771号