教你学SpringCloud(微服务)
一、为什么需要微服务
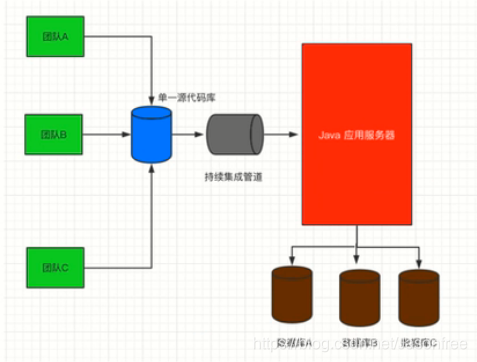
传统开发模式下,绝大部分的Web应用都是采用单体架构的风格来进行构建的,这意味着Web应用是作为单个可部署的软件制品进行交付的,所有的接口、业务逻辑、持久层都被打包在一个Web应用中,并且部署在一台服务器上,这种开发模式会带来诸多不便,多团队协同开发的成本极高。
1.传统开发方式(单体应用)
-
单体应用存在的问题
1.1随着业务的发展,开发变得越来越复杂。
1.2修改、新增某个功能,需要对整个系统进行测试、重新部署。
1.3一个模块出现问题,很可能导致整个系统崩溃。
1.4多个开发团队同时对数据进行管理,容易产生安全漏洞。
1.5各个模块使用同-种技术进行开发,各个模块很难根据实际情况选择更合适的技术框架,局限性很大。
1.6模块内容过于复杂,如果员工离职,可能需要很长时间才能完成工作交接。
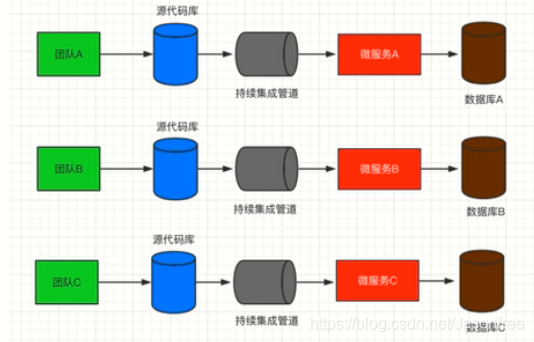
2.微服务架构
3.分布式、集群
- 集群:一台服务器无法负荷高并发的数据访问量,那么就设置十台服务器-起分担压力, 十台不行就设置一百台(物理层面)。很多人干同-件事情,来分摊压力。
- 分布式:将一个复杂问题拆分成若干个简单的小问题,将一个大型的项目架构拆分成若干个微服务来协同完成(软件设计层面)。将一 个庞大的工作拆分成若干个小步骤,分别由不同的人完成这些小步骤,最终将所有的结果进行整合实现大的需求。
4.微服务优点
- 各个服务的开发、测试、部署都相互独立,比如用户服务就可以拆分作为
一个单独的服务,而它的开发也不用依赖于其他服务,如果用户量很大,
我们可以很容易的对其进行负载。 - 当一个新需求出现时,特别是在一一个庞大的项目系统中,你得去考虑各方
的问题,兼容性、影响度等等,而使用微服务则可以直接跳过这些废时又
烧脑的环节。 - 使用微服务将项目进行拆分之后,各服务之间就消除了诸多限制,只需要
保证对外提供的接口正常可用,至于使用什么语言、什么框架通通不用关
心。
5.微服务的缺点
- 上面我们提到微服务的拆分是基于业务的,不是我们随心所欲,想怎么拆
就怎么拆的,那么问题来了,由谁来拆,怎么拆?这就给团队协作沟通带
来了很多挑战。 - 当服务调用方需要使用某服务的接口时,首先需要找到该服务的提供方,
通常在一一个大公司中,这种场景是跨部门的,沟通成本可想而知。同时,
如果服务的提供方需要对某个接口进行修改,也得和各个服务调用方进行
沟通。 - 由于各个服务相互独立,它们的数据也是独立的,这就会带来-一个问题,
当调用多个服务接口来进行操作时,如何保证各个服务的数据- -致性,这
既是问题,也是难点。
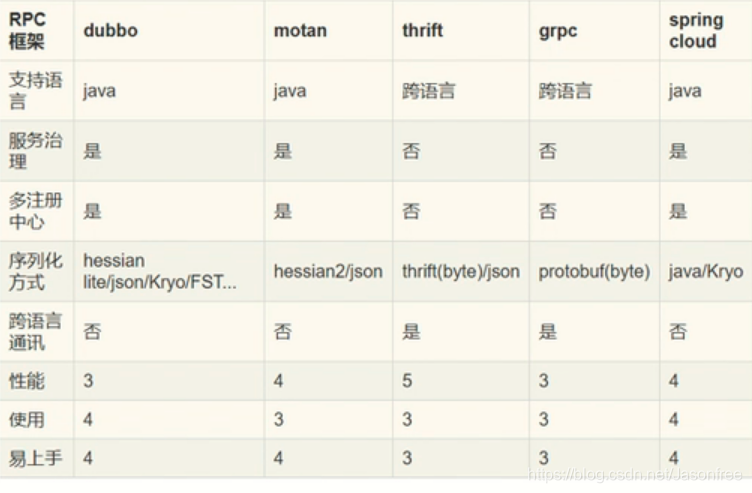
6.微服务框架对比
二、为什么是Spring Cloud
- Spring Cloud完全基于Spring Boot,服务调用方式是基于REST API,整合了
各种成熟的产品和架构,同时基于Spring Boot也使得整体的开发、配置、
部署都非常方便。 - Spring系的产品集功能齐全、简单好用、性能优越、文档规范等等于一身,
因此Spring Cloud还是微服务架构中一个十分优越的实现方案。
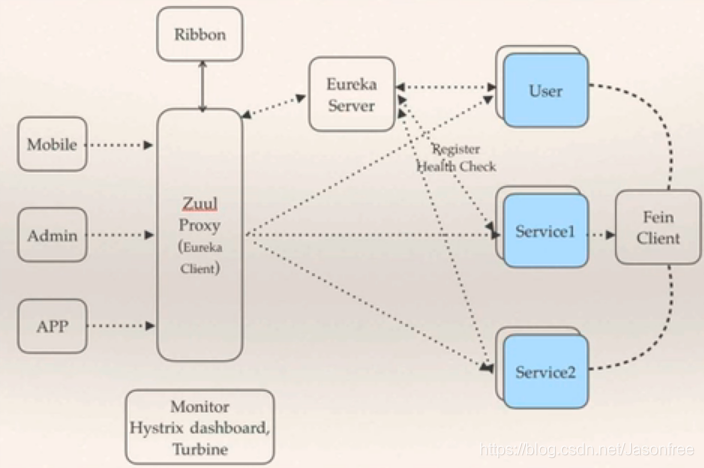
1.Spring Cloud 架构图
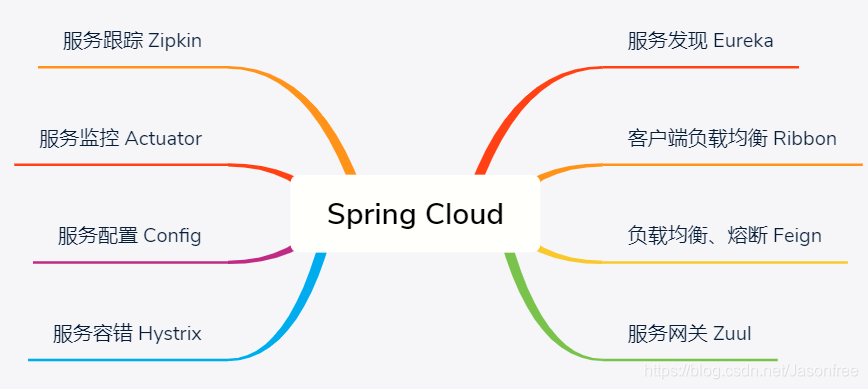
2.Spring Cloud 核心组件
-
服务治理的核心又三部分组成:服务提供者、服务消费者、注册中心。
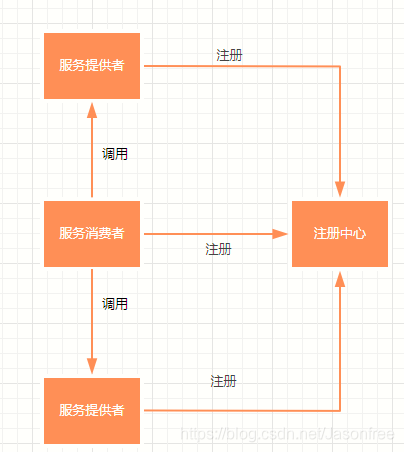
- 在分布式系统架构中,每个微服务在启动时,将自己的信息存储在注册中心,叫做服务注册。
- 服务消费者从注册中心获取服务提供者的网络信息,通过该信息调用服务,叫做服务发现。
- Spring Cloud的服务治理使用Eureka来实现,Eureka 是Netflix开源的基于REST的服务治理解决方案,SpringCloud集成了Eureka, 提供服务注册和服务发现的功能,可以和基于Spring Boot搭建的微服务应用轻松完成整合,开箱即用(Spring Cloud Eureka)。
3.Spring Cloud Eureka
- Eureka Server:注册中心
- Eureka Client:所有要进行注册的微服务通过Eureka Client连接到Eureka Server完成注册(相当于服务消费者和服务提供者都要集成Eureka Client然后把服务注册到Eureka Server中)。
三、Eureka Server代码实现
1.新建项目名为springcloud的Maven父工程
- 父工程pom.xml配置
<?xml version="1.0" encoding="UTF-8"?>
<project xmlns="http://maven.apache.org/POM/4.0.0"
         xmlns:xsi="http://www.w3.org/2001/XMLSchema-instance"
         xsi:schemaLocation="http://maven.apache.org/POM/4.0.0 http://maven.apache.org/xsd/maven-4.0.0.xsd">
    <modelVersion>4.0.0</modelVersion>

    <groupId>org.example</groupId>
    <artifactId>springcloud</artifactId>
    <version>1.0-SNAPSHOT</version>
    <!--springboot父依赖-->
    <parent>
        <groupId>org.springframework.boot</groupId>
        <artifactId>spring-boot-starter-parent</artifactId>
        <version>2.0.6.RELEASE</version>
    </parent>


    <dependencies>
        <!--web依赖-->
        <dependency>
            <groupId>org.springframework.boot</groupId>
            <artifactId>spring-boot-starter-web</artifactId>
        </dependency>

        <!--lombok-->
        <dependency>
            <groupId>org.projectlombok</groupId>
            <artifactId>lombok</artifactId>
            <optional>true</optional>
        </dependency>

        <!--解决JDK9以上没有JAXB API的问题需加入以下四个依赖,9以下可以不加-->
        <!--
        <dependency>
            <groupId>javax.xml.bind</groupId>
            <artifactId>jaxb-api</artifactId>
            <version>2.3.0</version>
        </dependency>
        <dependency>
            <groupId>com.sun.xml.bind</groupId>
            <artifactId>jaxb-impl</artifactId>
            <version>2.3.0</version>
        </dependency>
        <dependency>
            <groupId>com.sun.xml.bind</groupId>
            <artifactId>jaxb-core</artifactId>
            <version>2.3.0</version>
        </dependency>
        <dependency>
            <groupId>javax.activation</groupId>
            <artifactId>activation</artifactId>
            <version>1.1.1</version>
        </dependency>
        -->
    </dependencies>

    <!--springCloud依赖-->
    <dependencyManagement>
        <dependencies>
            <dependency>
                <groupId>org.springframework.cloud</groupId>
                <artifactId>spring-cloud-dependencies</artifactId>
                <version>Finchley.SR2</version>
                <type>pom</type>
                <scope>import</scope>
            </dependency>
        </dependencies>
    </dependencyManagement>
</project>
2.在父工程下创建名为eurekaserver的模块(Module)即注册中心
- eurekaserver模块下pom.xml配置
<?xml version="1.0" encoding="UTF-8"?>
<project xmlns="http://maven.apache.org/POM/4.0.0"
         xmlns:xsi="http://www.w3.org/2001/XMLSchema-instance"
         xsi:schemaLocation="http://maven.apache.org/POM/4.0.0 http://maven.apache.org/xsd/maven-4.0.0.xsd">
    <parent>
        <artifactId>springcloud</artifactId>
        <groupId>org.example</groupId>
        <version>1.0-SNAPSHOT</version>
    </parent>
    <modelVersion>4.0.0</modelVersion>

    <artifactId>eurekaserver</artifactId>

    <!--需要导入的注册中心组件-->
    <dependencies>
        <dependency>
            <groupId>org.springframework.cloud</groupId>
            <artifactId>spring-cloud-starter-netflix-eureka-server</artifactId>
            <version>2.0.2.RELEASE</version>
        </dependency>
    </dependencies>

</project>
3.在包eurekaserver.src.main.resource下创建配置文件application.yml,添加Eureka Server相关的配置
#Eureka Server服务端口号随便配置
server:
  port: 8761

#eureka.register-with-eureka: 是否将当前的Eureka Server服务作为客户端进行注册
eureka:
  client:
    #是否要注册自己
    register-with-eureka: false
    #是否要同步其他注册中心(EurekaServer)的数据
    fetch-registry: false
    #注册中心的访问路径
    service-url:
      defaultZone: http://localhost:8761/eureka/
4.在包eurekaserver.src.main创建包org.example(根据自己的创建),springboot启动类
package org.example;

import org.springframework.boot.SpringApplication;
import org.springframework.boot.autoconfigure.SpringBootApplication;
import org.springframework.cloud.netflix.eureka.server.EnableEurekaServer;

@SpringBootApplication
@EnableEurekaServer   //声明该类是一个EurekaServer微服务,提供服务注册和服务发现功能,即注册中心
public class EurekaServerApplication {
    public static void main(String[] args) {
        SpringApplication.run(EurekaServerApplication.class,args);
    }
}
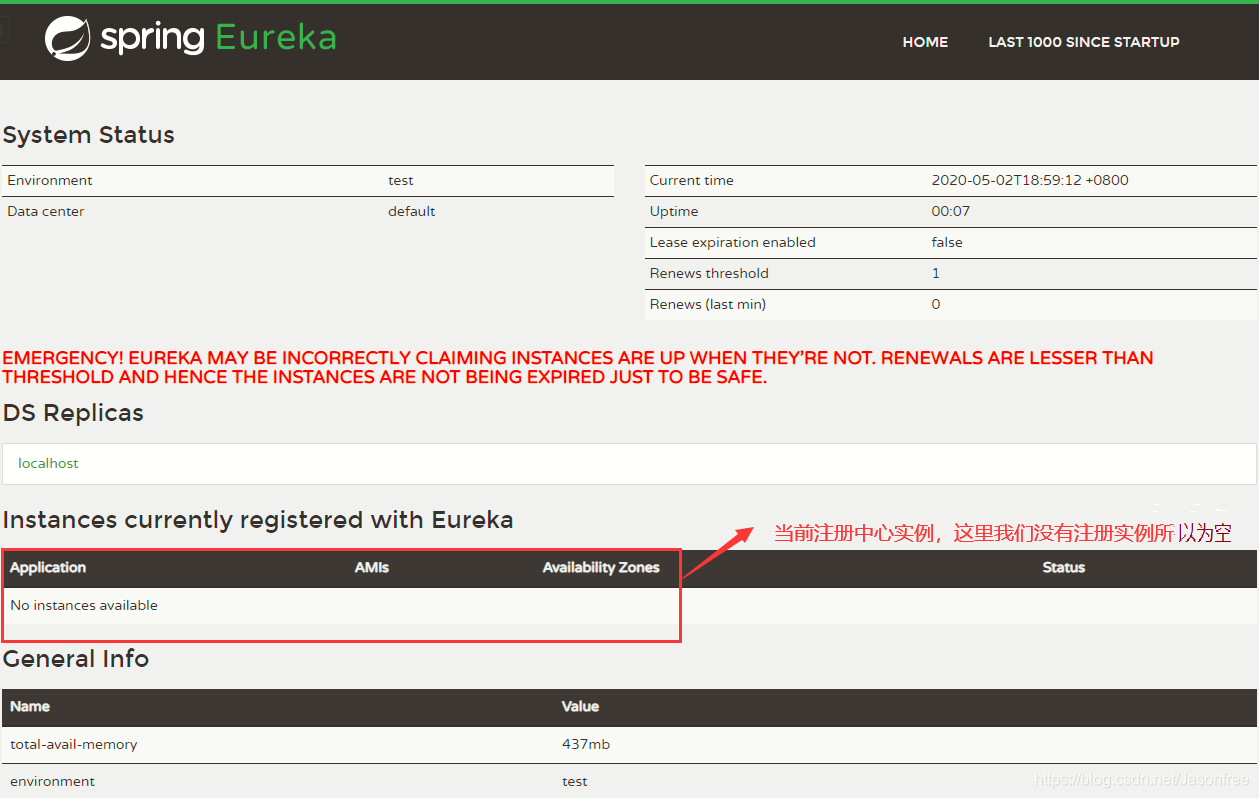
5.启动微服务显示页面(http://localhost:8761)
四、Eureka Client代码实现
1.在父工程下创建子模块eurekaclient
- eurekaclient子模块下pom.xml配置
<?xml version="1.0" encoding="UTF-8"?>
<project xmlns="http://maven.apache.org/POM/4.0.0"
         xmlns:xsi="http://www.w3.org/2001/XMLSchema-instance"
         xsi:schemaLocation="http://maven.apache.org/POM/4.0.0 http://maven.apache.org/xsd/maven-4.0.0.xsd">
    <parent>
        <artifactId>springcloud</artifactId>
        <groupId>org.example</groupId>
        <version>1.0-SNAPSHOT</version>
    </parent>
    <modelVersion>4.0.0</modelVersion>

    <artifactId>eurekaclient</artifactId>

    <!--所需的eureka-client依赖-->
    <dependencies>
        <dependency>
            <groupId>org.springframework.cloud</groupId>
            <artifactId>spring-cloud-starter-netflix-eureka-client</artifactId>
            <version>2.0.2.RELEASE</version>
        </dependency>
    </dependencies>
</project>
2.在包eurekaclient.src.main.resource下创建配置文件application.yml,添加Eureka Client相关的配置
#端口随便配置
server:
  port: 8010

#当前服务注册在Eureka Server上的名称,后面可以直接通过名字访问
spring:
  application:
    name: provider  #假设是服务提供者

#将注册中心的地址配置过来(注册中心访问地址)
eureka:
  client:
    service-url:
      defaultZone: http://localhost:8761/eureka/
  instance:
    prefer-ip-address: true #是否将当前服务的ip注册到EurekaServer
3.在包eurekaclient.src.main创建包org.example(根据自己的创建),springboot启动类
package org.example;


import org.springframework.boot.SpringApplication;
import org.springframework.boot.autoconfigure.SpringBootApplication;

@SpringBootApplication
public class ProviderApplication {
    public static void main(String[] args) {
        SpringApplication.run(ProviderApplication.class,args);
    }
}
4.将服务提供者注册到注册中心,首先启动EurekaServerApplication(注册中心),再启动ProviderApplication(服务提供者),再浏览器地址栏输入注册中心地址:http://localhost:8761/,显示页面如下:
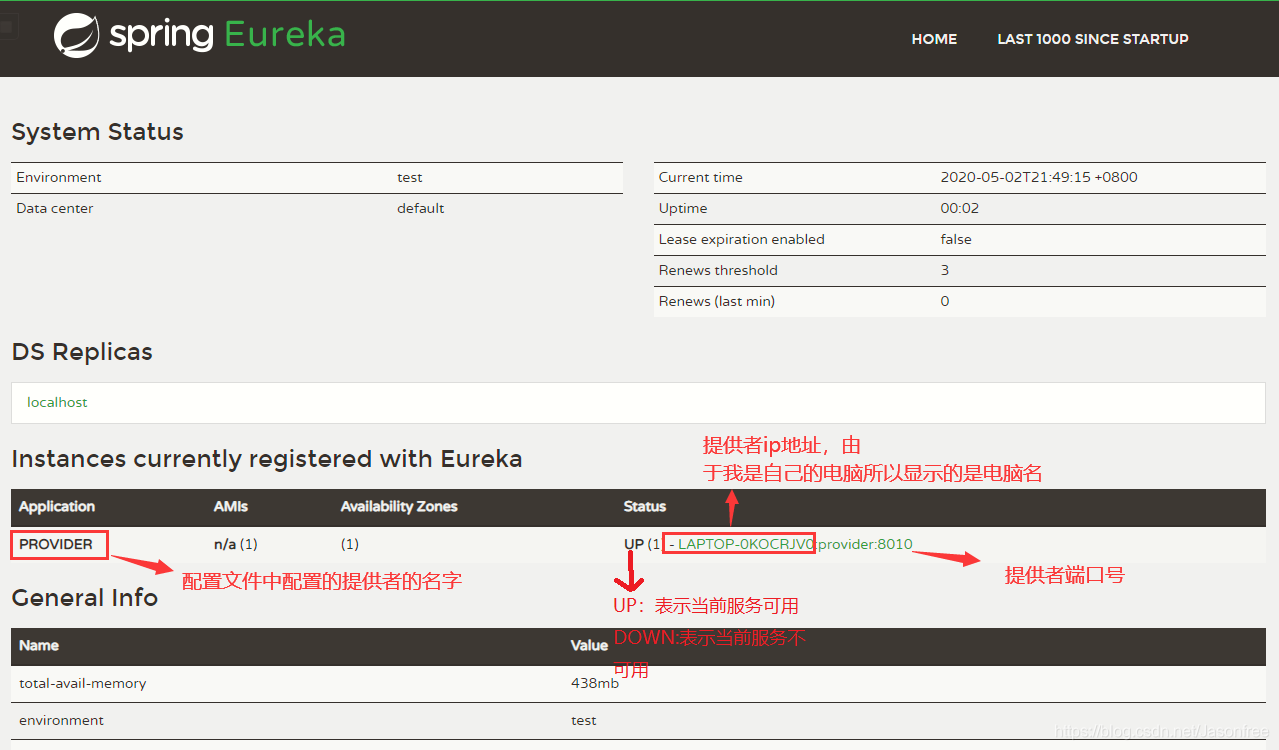
- 如果没有出现如图的情况,查看一下eurekaclient或者eurekaserver的pom.xml依赖,注意不要把eurekaclient的依赖写成spring-cloud-netflix-eureka-client,请仔细观察
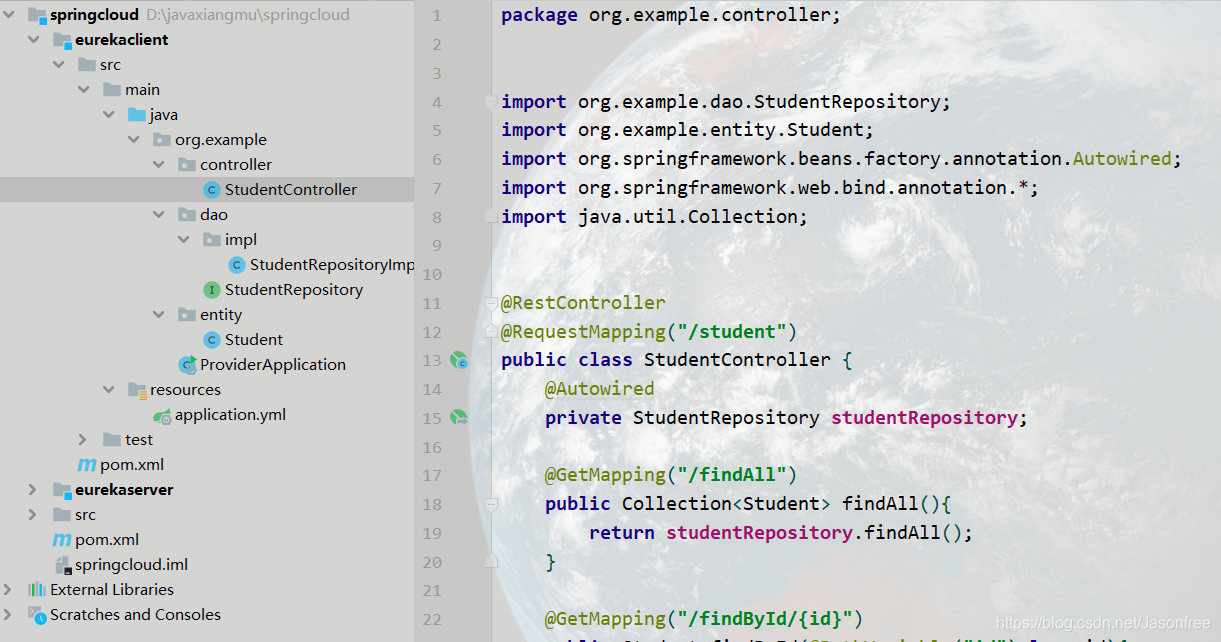
5.我们可以理解为每个服务提供者就充当一个一个的功能模块。这里基于eurekaclient(服务提供者)写个小业务便于理解,首先在eurekaclint(eurekaclient.src.main.java.org.example)目录下分别创建dao层,entity,controller层,这里省略service层
-
entity
package org.example.entity; import lombok.AllArgsConstructor; import lombok.Data; import lombok.NoArgsConstructor; //使用lombok需要下载lombok插件 @Data @AllArgsConstructor @NoArgsConstructor public class Student { private long id; private String name; private int age; } -
Dao层接口
package org.example.dao; import org.example.entity.Student; import java.util.Collection; public interface StudentRepository { //查找 public Collection<Student> findAll(); //查找 public Student findById(long id); //添加或修改 public void saveOrUpdate(Student student); //删除 public void deleteById(long id); } -
Dao层实现类
package org.example.dao.impl; import org.example.dao.StudentRepository; import org.example.entity.Student; import org.springframework.stereotype.Repository; import org.springframework.web.bind.annotation.RequestBody; import java.util.Collection; import java.util.HashMap; import java.util.Map; @Repository public class StudentRepositoryImpl implements StudentRepository { //向Map集合添加数据 private static Map<Long, Student> studentMap; static { studentMap = new HashMap<>(); studentMap.put(1L, new Student(1L, "刘备", 24)); studentMap.put(3L, new Student(3L, "关羽", 23)); studentMap.put(2L, new Student(2L, "张飞", 22)); } @Override public Collection<Student> findAll() { return studentMap.values(); } @Override public Student findById(long id) { return studentMap.get(id); } @Override public void saveOrUpdate(Student student) { studentMap.put(student.getId(), student); } @Override public void deleteById(long id) { studentMap.remove(id); } } -
Controller层
package org.example.controller; import org.example.dao.StudentRepository; import org.example.entity.Student; import org.springframework.beans.factory.annotation.Autowired; import org.springframework.web.bind.annotation.*; import java.util.Collection; @RestController @RequestMapping("/student") public class StudentController { @Autowired private StudentRepository studentRepository; @GetMapping("/findAll") public Collection<Student> findAll(){ return studentRepository.findAll(); } @GetMapping("/findById/{id}") public Student findById(@PathVariable("id") long id){ return studentRepository.findById(id); } @PostMapping("/save") public void save(@RequestBody Student student){ studentRepository.saveOrUpdate(student); } @PutMapping("/update") public void update(@RequestBody Student student){ studentRepository.saveOrUpdate(student); } @DeleteMapping("/deleteById/{id}") public void deleteById(@PathVariable("id") long id){ studentRepository.deleteById(id); } } -
整体项目结构
-
测试eurekaclient功能模块
浏览器输入:http://localhost:8010/student/findAll测试我们刚刚写的查询学生方法,其他接口自行测试,返回结果:
[{"id":1,"name":"刘备","age":24},{"id":2,"name":"张飞","age":22},{"id":3,"name":"关羽","age":23}]
五、RestTemplate组件的使用
1.什么是RestTemplate?
RestTemplate是Spring框架提供的基于REST的服务组件,底层是对HTTP请求及响应进行了封装,提供了很多访问RETS服务的方法,可以简化代码开发。根据上面我们知道的,既然是微服务,那么eurekaclient模块与另外一个模块之间是又是怎么调用的呢?没错就是通过RestTemplate组件来实现的模块与模块之间的调用,这样以来我们就可以通过RestTemplate来调用eurekaclient模块。
2.RestTemplate的使用
-
在父工程下创建resttemplate模块(maven),pom.xml配置
<?xml version="1.0" encoding="UTF-8"?> <project xmlns="http://maven.apache.org/POM/4.0.0" xmlns:xsi="http://www.w3.org/2001/XMLSchema-instance" xsi:schemaLocation="http://maven.apache.org/POM/4.0.0 http://maven.apache.org/xsd/maven-4.0.0.xsd"> <parent> <artifactId>springcloud</artifactId> <groupId>org.example</groupId> <version>1.0-SNAPSHOT</version> </parent> <modelVersion>4.0.0</modelVersion> <artifactId>resttemplate</artifactId> </project> -
创建调用另外一个模块所需的实体类
package org.example.entity; import lombok.AllArgsConstructor; import lombok.Data; import lombok.NoArgsConstructor; @Data @AllArgsConstructor @NoArgsConstructor public class Student { private long id; private String name; private int age; } -
springboot启动类
package org.example; import org.springframework.boot.SpringApplication; import org.springframework.boot.autoconfigure.SpringBootApplication; import org.springframework.context.annotation.Bean; import org.springframework.web.client.RestTemplate; @SpringBootApplication public class RestTemplateApplication { public static void main(String[] args) { SpringApplication.run(RestTemplateApplication.class,args); } //提供RestTemplate实例将其添加到ioc容器 @Bean public RestTemplate restTemplate(){ return new RestTemplate(); } } -
编写Controller层
package org.example.controller; import org.example.entity.Student; import org.springframework.beans.factory.annotation.Autowired; import org.springframework.web.bind.annotation.*; import org.springframework.web.client.RestTemplate; import java.util.Collection; @RestController @RequestMapping("/rest") public class RestTmpController { @Autowired private RestTemplate restTemplate; /** * @return * 调用eurekaclient模块下的Controller里面的接口 * getForEntity中的的get为GET请求,参数一:要调用的地址 参数二:结果集 * restTemplate.getForEntity().getBody()作用与restTemplate.getForObject()作用相同 */ @GetMapping("/findAllR") public Collection<Student> findAll(){ return restTemplate.getForEntity( "http://localhost:8010/student/findAll", Collection.class).getBody(); } @GetMapping("/findAllR2") public Collection<Student> findAll2(){ return restTemplate.getForObject("http://localhost:8010/student/findAll",Collection.class); } //根据id查询 @GetMapping("/findById/{id}") public Student findById(@PathVariable("id") long id){ return restTemplate.getForEntity("http://localhost:8010/student/findById/",Student.class,id).getBody(); } @GetMapping("/findById2/{id}") public Student findById2(@PathVariable("id") long id){ return restTemplate.getForObject("http://localhost:8010/student/findById/",Student.class,id); } //查询 @PostMapping("/save") public void save(@RequestBody Student student){ restTemplate.postForEntity("http://localhost:8010/student/save",student,null).getBody(); } @GetMapping("/save2") public void save2(@RequestBody Student student){ restTemplate.postForObject("http://localhost:8010/student/save",student,null); } //修改 @PutMapping("/update") public void update(@RequestBody Student student){ restTemplate.put("http://localhost:8010/student/update",student); } //删除 @DeleteMapping("//deleteById/{id}") public void update(@PathVariable("id") long id){ restTemplate.delete("http://localhost:8010/student/update",id); } } -
这里没有配置配置文件,所有默认端口号为8080,接着按顺序启动项(eurekaserver注册中心->eurekaclient服务提供者->resttemplate服务消费者)
-
浏览器访问resttemplate地址:http://localhost:8080/rest/findAllR,显示结果:
[{"id":1,"name":"刘备","age":24},{"id":2,"name":"张飞","age":22},{"id":3,"name":"关羽","age":23}]这里通过resttemplate消费者里面的findAll方法成功调用了eurekaclient服务提供者的查询方法,其他方法自行测试,注意:resttemplate并不算是严格的服务消费者,因为并没有向注册中心注册,它与服务消费者的区别就是是否向注册中心注册
六、服务消费者Consumer代码实现
1.在父工程下创建consumer服务消费者模块,pom.xml
<?xml version="1.0" encoding="UTF-8"?>
<project xmlns="http://maven.apache.org/POM/4.0.0"
         xmlns:xsi="http://www.w3.org/2001/XMLSchema-instance"
         xsi:schemaLocation="http://maven.apache.org/POM/4.0.0 http://maven.apache.org/xsd/maven-4.0.0.xsd">
    <parent>
        <artifactId>springcloud</artifactId>
        <groupId>org.example</groupId>
        <version>1.0-SNAPSHOT</version>
    </parent>
    <modelVersion>4.0.0</modelVersion>

    <artifactId>consumer</artifactId>

    <!--添加依赖-->
    <dependencies>
        <dependency>
            <groupId>org.springframework.cloud</groupId>
            <artifactId>spring-cloud-starter-netflix-eureka-client</artifactId>
            <version>2.0.2.RELEASE</version>
        </dependency>
    </dependencies>

</project>
2.创建application.yml配置文件
#端口自定义
server:
  port: 8020
#应用名字
spring:
  application:
    name: consumer
    #注册中心地址
eureka:
  client:
    service-url:
      defaultZone: http://localhost:8761/eureka/
  instance:
    prefer-ip-address: true #进行注册
3.创建启动类
package org.example;

import org.springframework.boot.SpringApplication;
import org.springframework.boot.autoconfigure.SpringBootApplication;
import org.springframework.context.annotation.Bean;
import org.springframework.web.client.RestTemplate;

@SpringBootApplication
public class ConsumerApplication {
    public static void main(String[] args) {
        SpringApplication.run(ConsumerApplication.class, args);
    }

    //提供RestTemplate实例将其添加到ioc容器
    @Bean
    public RestTemplate restTemplate(){
        return new RestTemplate();
    }

}
4.创建实体类,跟resttemplate模块一样
package org.example.entity;
import lombok.AllArgsConstructor;
import lombok.Data;
import lombok.NoArgsConstructor;


@Data
@AllArgsConstructor
@NoArgsConstructor
public class Student {
    private long id;
    private String name;
    private int age;
}
5.创建Controller,跟resttemplate模块一样
package org.example.controller;


import org.example.entity.Student;
import org.springframework.beans.factory.annotation.Autowired;
import org.springframework.web.bind.annotation.*;
import org.springframework.web.client.RestTemplate;

import java.util.Collection;


@RestController
@RequestMapping("/consumer")
public class ConsumerController {

    @Autowired
    private RestTemplate restTemplate;

    /**
     * @return
     * 调用eurekaclient模块下的Controller里面的接口
     * getForEntity中的的get为GET请求,参数一:要调用的地址 参数二:结果集
     * restTemplate.getForEntity().getBody()作用与restTemplate.getForObject()作用相同
     */
    @GetMapping("/findAllR")
    public Collection<Student> findAll(){

       return restTemplate.getForEntity("http://localhost:8010/student/findAll",Collection.class).getBody();
    }

    @GetMapping("/findAllR2")
    public Collection<Student> findAll2(){

        return restTemplate.getForObject("http://localhost:8010/student/findAll",Collection.class);
    }

    //根据id查询
    @GetMapping("/findById/{id}")
    public Student findById(@PathVariable("id") long id){

        return restTemplate.getForEntity("http://localhost:8010/student/findById/",Student.class,id).getBody();
    }

    @GetMapping("/findById2/{id}")
    public Student findById2(@PathVariable("id") long id){

        return restTemplate.getForObject("http://localhost:8010/student/findById/",Student.class,id);
    }


    //查询
    @PostMapping("/save")
    public void save(@RequestBody Student student){

        restTemplate.postForEntity("http://localhost:8010/student/save",student,null).getBody();
    }

    @GetMapping("/save2")
    public void save2(@RequestBody Student student){

       restTemplate.postForObject("http://localhost:8010/student/save",student,null);
    }

    //修改
    @PutMapping("/update")
    public void update(@RequestBody Student student){
        restTemplate.put("http://localhost:8010/student/update",student);
    }

    //删除
    @DeleteMapping("//deleteById/{id}")
    public void update(@PathVariable("id") long id){
        restTemplate.delete("http://localhost:8010/student/update",id);
    }


}
6.按顺序启动服务(eurekaserver注册中心->eurekaclient服务提供者->consumer服务消费者)
注:这里说明下consumer服务消费者在某些时候也可以当成服务提供者,主要区别在于谁调用谁,如果后者调用前者,那么后者就是服务消费者,前者是服务提供者,反之,前者是服务消费者,后者是服务提供者。
7.浏览器输入eurekaserver注册中心地址:http://localhost:8761/
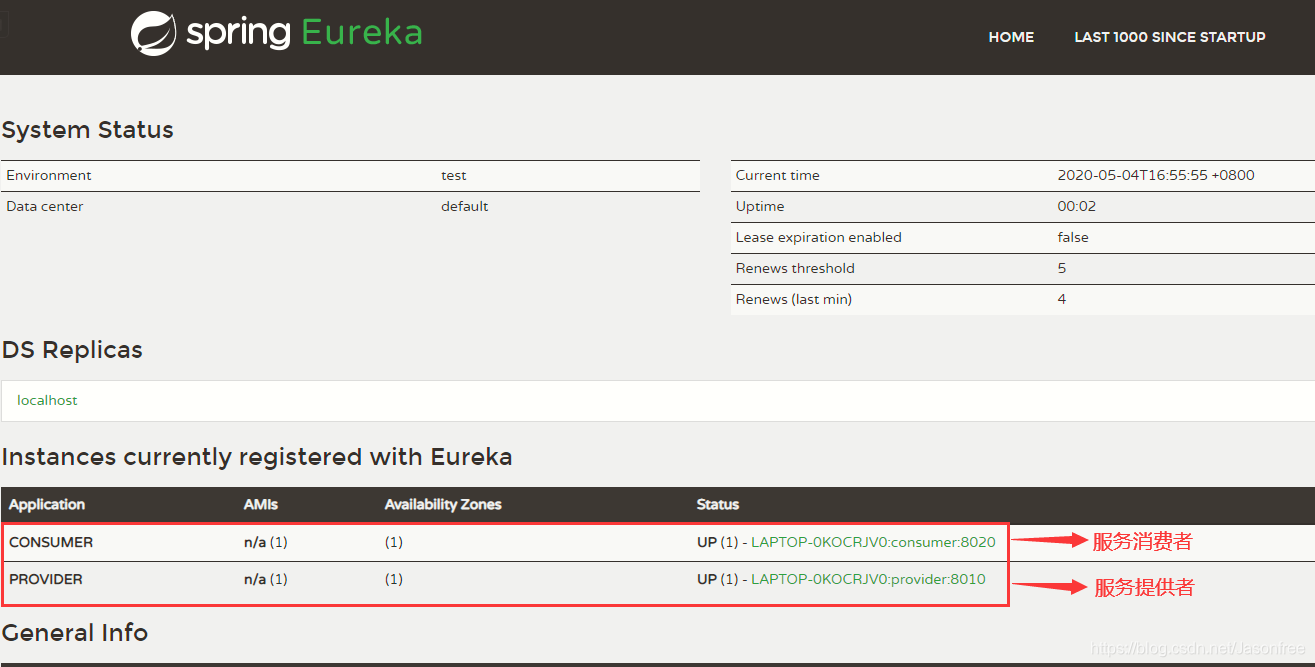
可以看到成功注册了服务消费者和服务提供者,接下来只需要服务消费者调用服务提供者。
8.输入地址调用服务提供者:http://localhost:8020/consumer/findAllR
[{"id":1,"name":"刘备","age":24},{"id":2,"name":"张飞","age":22},{"id":3,"name":"关羽","age":23}]
其他方法自行测试
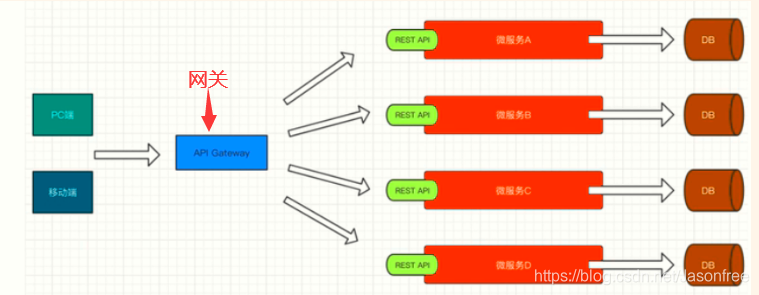
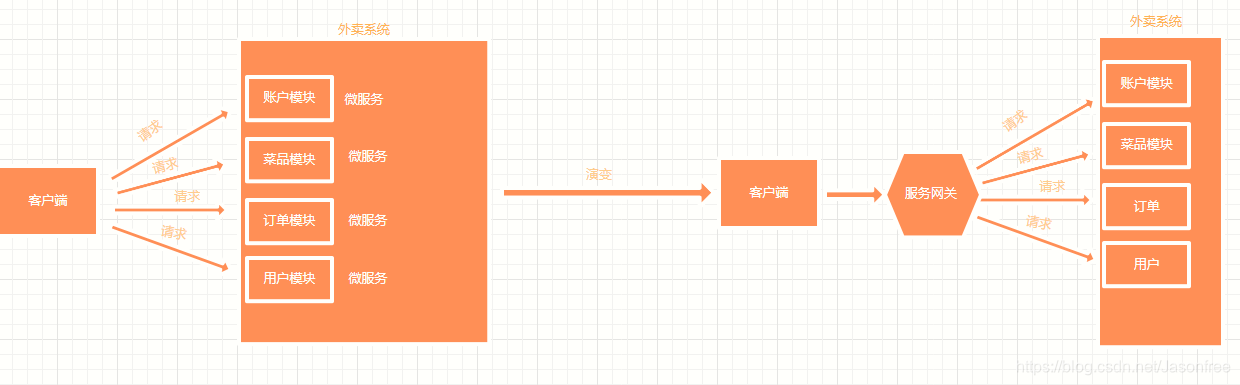
七、服务网关
1.什么是服务网关?
服务网关 = 路由转发 + 过滤器,在一开始也有提到过,当客户端要请求一个系统中的多个微服务时,这时有多个微服务(模块)就要请求几次,明显这样不利于管理,于是出现就加入了服务网关,只需要客户端与网关交互,然后由网关来进行请求转发。
2.Spring Cloud集成了Zuul组件,实现服务网关。
-
什么是Zuul?
Zuul是Netflix提供的一个开源的API网关服务器,是客户端和网站后端所有请求的中间层,对外开放-个API,将所有请求导入统- -的入口, 屏蔽了服务端的具体实现逻辑,Zuul 可以实现反向代理的功能,在网关内部实现动态路由、身份认证、IP 过滤、数据监控等,并且Zuul还自带了负载均衡功能。
3.在父工程下创建maven工程zuul,pom.xml配置
<?xml version="1.0" encoding="UTF-8"?>
<project xmlns="http://maven.apache.org/POM/4.0.0"
         xmlns:xsi="http://www.w3.org/2001/XMLSchema-instance"
         xsi:schemaLocation="http://maven.apache.org/POM/4.0.0 http://maven.apache.org/xsd/maven-4.0.0.xsd">
    <parent>
        <artifactId>springcloud</artifactId>
        <groupId>org.example</groupId>
        <version>1.0-SNAPSHOT</version>
    </parent>
    <modelVersion>4.0.0</modelVersion>

    <artifactId>zuul</artifactId>
   <!--zuul组件也需要注册,引入client-->
    <dependencies>
        <dependency>
            <groupId>org.springframework.cloud</groupId>
            <artifactId>spring-cloud-starter-netflix-eureka-client</artifactId>
            <version>2.0.2.RELEASE</version>
        </dependency>

        <!--zuul依赖-->
        <dependency>
            <groupId>org.springframework.cloud</groupId>
            <artifactId>spring-cloud-starter-netflix-zuul</artifactId>
            <version>2.0.2.RELEASE</version>
        </dependency>


    </dependencies>

</project>
4.创建application.yml配置文件
#自定义端口
server:
  port: 8030
  #名称
spring:
  application:
    name: gateway
#注册到注册中心
eureka:
  client:
    service-url:
      defaulttZone: http://localhost:8761/eureka/
zuul:
  routes:
    provider: /p/** #给服务提供者provider设置映射,后面访问就可以通过/p/**来直接访问而不需要端口号去访问
5.创建启动类
package org.example;


import org.springframework.boot.SpringApplication;
import org.springframework.boot.autoconfigure.EnableAutoConfiguration;
import org.springframework.cloud.netflix.zuul.EnableZuulProxy;

/**
 * @EnableZuulProxy:包含了EnableZuulServer,设置该类是网关的启动类
 * @EnableAutoConfiguration: 可以帮助Spring Boot应用将所有符合条件的@Configuration配置加载到当前Spring Boot创建并使用的loC容器中。
 *
 */
@EnableZuulProxy
@EnableAutoConfiguration
public class ZuulApplication {
    public static void main(String[] args) {
        SpringApplication.run(ZuulApplication.class, args);
    }
}
6.按顺序启动(eurekaserver注册中心->eurekaclient服务提供者->zuul服务网关)
7.浏览器输入:http://localhost:8030/p/student/findAll,通过服务网关的端口去访问任何一个服务提供者,返回结果
[{"id":1,"name":"刘备","age":24},{"id":2,"name":"张飞","age":22},{"id":3,"name":"关羽","age":23}]
八、Ribbon实现负载均衡
1.什么是负载均衡?
将负载(工作任务,访问请求)进行平衡、分摊到多个操作单元(服务器,组件)上进行执行。是解决高性能,单点故障(高可用),扩展性(水平伸缩)的终极解决方案,简单讲就是一个人将每次到来的一个任务随机均衡分配给多个人来完成,这样来达到减轻人的工作压力,这里的"任务"表示请求,"人"表示服务器。
2.什么是Ribbon?
Spring Cloud Ribbon是一个负载均衡解决方案,Ribbon是Netfix公司发布的负载均衡器,而SpringCloud进行了整合,是基于Netfix Ribbon实现的,是一个用于对HTTP请求进行控制的负载均衡客户端。在注册中心对Ribbon进行注册之后,Ribon就可以基于某种均衡算法、如轮询、随机、加权轮询、加权随机等自动帮助服务消费者调用接口,开发者也可以根据需求自定义Ribbon负载均衡算法,实际开发中,Spring Cloud Ribbon需要结合Spring Cloud Eureka来使用,Eureka Server提供所有可以调用的服务提供者列表, Ribbon基于特定的负载均衡算法从这些服务提供者中选择要调用的具体实例。
[外链图片转存失败,源站可能有防盗链机制,建议将图片保存下来直接上传(img-aWigBjcR-1591797304281)(https://i.loli.net/2020/05/06/GJrciZ9xlFKjBwy.png)]
3.在父工程下创建Maven工程,pom.xml配置
<?xml version="1.0" encoding="UTF-8"?>
<project xmlns="http://maven.apache.org/POM/4.0.0"
         xmlns:xsi="http://www.w3.org/2001/XMLSchema-instance"
         xsi:schemaLocation="http://maven.apache.org/POM/4.0.0 http://maven.apache.org/xsd/maven-4.0.0.xsd">
    <parent>
        <artifactId>springcloud</artifactId>
        <groupId>org.example</groupId>
        <version>1.0-SNAPSHOT</version>
    </parent>
    <modelVersion>4.0.0</modelVersion>

    <artifactId>ribbon</artifactId>

    <!--所需的eureka-client依赖-->
    <dependencies>
        <dependency>
            <groupId>org.springframework.cloud</groupId>
            <artifactId>spring-cloud-starter-netflix-eureka-client</artifactId>
            <version>2.0.2.RELEASE</version>
        </dependency>
    </dependencies>
</project>
4.创建application.yml配置文件
#端口
server:
  port: 8040

#当前服务注册在Eureka Server上的名称
spring:
  application:
    name: ribbon

#注册中心访问地址
eureka:
  client:
    service-url:
      defaultZone: http://localhost:8761/eureka/
  instance:
    prefer-ip-address: true #是否将当前服务的ip注册到EurekaServer
5.创建启动类
package org.example;


import org.springframework.boot.SpringApplication;
import org.springframework.boot.autoconfigure.SpringBootApplication;
import org.springframework.cloud.client.loadbalancer.LoadBalanced;
import org.springframework.context.annotation.Bean;
import org.springframework.web.client.RestTemplate;

@SpringBootApplication
public class RibbonApplication {
    public static void main(String[] args) {
        SpringApplication.run(RibbonApplication.class,args);
    }

    @Bean
    @LoadBalanced //开启负载均衡
    public RestTemplate restTemplate(){
        return new RestTemplate();
    }
}
6.修改eurekaclient模块的Ctroller层
package org.example.controller;


import org.example.dao.StudentRepository;
import org.example.entity.Student;
import org.springframework.beans.factory.annotation.Autowired;
import org.springframework.beans.factory.annotation.Value;
import org.springframework.web.bind.annotation.*;
import java.util.Collection;


@RestController
@RequestMapping("/student")
public class StudentController {
    //当前端口号,从配置文件中读取端口号
    @Value("${server.port}")
    private String port;
    @Autowired
    private StudentRepository studentRepository;

    @GetMapping("/findAll")
    public Collection<Student> findAll(){
        return studentRepository.findAll();
    }

    @GetMapping("/findById/{id}")
    public Student findById(@PathVariable("id") long id){
        return studentRepository.findById(id);
    }


    @PostMapping("/save")
    public void save(@RequestBody Student student){
        studentRepository.saveOrUpdate(student);
    }

    @PutMapping("/update")
    public void update(@RequestBody Student student){
        studentRepository.saveOrUpdate(student);
    }

    @DeleteMapping("/deleteById/{id}")
    public void deleteById(@PathVariable("id") long id){
        studentRepository.deleteById(id);
    }

    //测试负载均衡(需要添加的地方)
    @GetMapping("/port")
    public String port(){
        return "当前端口"+this.port;
    }
}
7.创建Ctroller层
package org.example.controller;


import org.example.entity.Student;
import org.springframework.beans.factory.annotation.Autowired;
import org.springframework.beans.factory.annotation.Value;
import org.springframework.web.bind.annotation.*;
import org.springframework.web.client.RestTemplate;

import java.util.Collection;


@RestController
@RequestMapping("/ribbon")
public class RibbonController {

    @Autowired
    private RestTemplate restTemplate;

    /**
     * @return
     * 调用eurekaclient模块下的Controller里面的接口
     * getForEntity中的的get为GET请求,参数一:要调用的地址 参数二:结果集
     * restTemplate.getForEntity().getBody()作用与restTemplate.getForObject()作用相同
     * 用服务提供者名字provider替换localhost:8010
     */

    @GetMapping("/findAll")
    public Collection<Student> findAll2(){

        return restTemplate.getForObject("http://provider/student/findAll",Collection.class);
    }

    //测试负载均衡
    @GetMapping("/port")
    public String port(){
        return restTemplate.getForObject("http://provider/student/port", String.class);
    }
}
8.依次开启服务:eurekaServer注册中心->eurekaclient服务提供者(8080)->eurekaclient服务提供者(8081)->Ribbon
注:这里开启的是两个服务提供者端口号不同
9.浏览器输入:http://localhost:8040/ribbon/port,这里也可以检验查询方法,这里展示的是为了能直观的看到效果
目的是检验负载均衡,这时会显示“当前端口8080”,刷新一次端口号变成了“当前端口8081”,每刷新一次都会在这两个端口相互切换,如果开了n个服务提供者就在n个端口之间相互切换,这样一来就减少了单个服务器的压力。
九、Feign
1.什么是Feign?
与Ribbon -样,Feign 也是由Netflix提供的负载均衡器,是基于ribbon进行封装的,Feign 是一个声明式、模版化的Web Service客户端,它简化了开发者编写Web服务客户端的操作,开发者可以通过简单的接口和注解来调用HTTP API, Spring Cloud Feign,它整合了Ribbon和Hystrix,具有可插拔、基于注解、负载均衡、服务熔断等-系列便捷功能。相比较于Ribbon + RestTemplate的方式,Feign 大大简化了代码的开发,Feign 支持多种注解,包括Feign注解、JAX-RS注解、Spring MVC注解等,Spring Cloud对Feing进行了优化,整合了Ribbon和Eureka,从而让Feign的使用更加方便。
2.Ribbon和Feign的区别
Ribbon是一个通用的HTTP客户端工具,Feign 是基于Ribbon实现的。
3.Feign的特点
- Feign是一个声明式的Web Service客户端。
- 支持Feign注解、Spring MVC注解、JAX-RS注解。
- Feign 基于Ribbon实现,使用起来更加简单。
- Feign 集成了Hystrix,具备服务熔断的功能。
4.代码实现:创建模块,pom.xml配置
<?xml version="1.0" encoding="UTF-8"?>
<project xmlns="http://maven.apache.org/POM/4.0.0"
    xmlns:xsi="http://www.w3.org/2001/XMLSchema-instance"
        xsi:schemaLocation="http://maven.apache.org/POM/4.0.0 http://maven.apache.org/xsd/maven-4.0.0.xsd">
    <parent>
        <artifactId>springcloud</artifactId>
        <groupId>org.example</groupId>
        <version>1.0-SNAPSHOT</version>
    </parent>
    <modelVersion>4.0.0</modelVersion>

    <artifactId>feign</artifactId>

    <!--相关依赖-->
            <dependencies>
        <dependency>
            <groupId>org.springframework.cloud</groupId>
            <artifactId>spring-cloud-starter-netflix-eureka-client</artifactId>
            <version>2.0.2.RELEASE</version>
        </dependency>

        <dependency>
            <groupId>org.springframework.cloud</groupId>
            <artifactId>spring-cloud-starter-openfeign</artifactId>
            <version>2.0.2.RELEASE</version>
        </dependency>
    </dependencies>

</project>
5.创建application.yml
#自定义端口
server:
  port: 8050
  #名称
spring:
  application:
    name: feign
#注册到注册中心
eureka:
  client:
    service-url:
      defaulttZone: http://localhost:8761/eureka/
  instance:
    prefer-ip-address: true
6.启动类
package org.example;


import org.springframework.boot.SpringApplication;
import org.springframework.boot.autoconfigure.SpringBootApplication;
import org.springframework.cloud.openfeign.EnableFeignClients;


@SpringBootApplication
@EnableFeignClients
public class FeignApplication {
    public static void main(String[] args) {
        SpringApplication.run(FeignApplication.class, args);
    }
}
7.创建实体类
package org.example.entity;

import lombok.AllArgsConstructor;
import lombok.Data;
import lombok.NoArgsConstructor;


@Data
@AllArgsConstructor
@NoArgsConstructor
public class Student {
    private long id;
    private String name;
    private int age;
}
8.创建声明式接口
package org.example.Feign;

import org.example.entity.Student;
import org.springframework.cloud.openfeign.FeignClient;
import org.springframework.web.bind.annotation.GetMapping;

import java.util.Collection;


/**
 * @FeignClient: 需要访问服务提供者的名字
 *
 *  @GetMapping("/student/findAll"): 需要访问服务提供者的接口
 *
 */
@FeignClient(value = "provider")
public interface FeignProviderClient {

    @GetMapping("/student/findAll")
    //查询
    public Collection<Student> findAll();


    @GetMapping("/student/port")
    //查询当前接口
    public String port();
}
9.创建Controller层
package org.example.controller;


import org.example.Feign.FeignProviderClient;
import org.example.entity.Student;

import org.springframework.beans.factory.annotation.Autowired;
import org.springframework.web.bind.annotation.GetMapping;
import org.springframework.web.bind.annotation.RequestMapping;
import org.springframework.web.bind.annotation.RestController;

import java.util.Collection;


@RestController
@RequestMapping("/feign")
public class FeignController {

    @Autowired
    private FeignProviderClient feignProviderClient;

    /**
     * feignProviderClient:刚创建的声明式接口
     */

    @GetMapping("/findAll")
    public Collection<Student> findAll2() {

        return feignProviderClient.findAll();
    }

    //测试负载均衡
    @GetMapping("/port")
    public String port() {
        return feignProviderClient.port();
    }
}
10.按顺序启动,类似于Ribbon,只是这里是用Feign去调用服务提供者
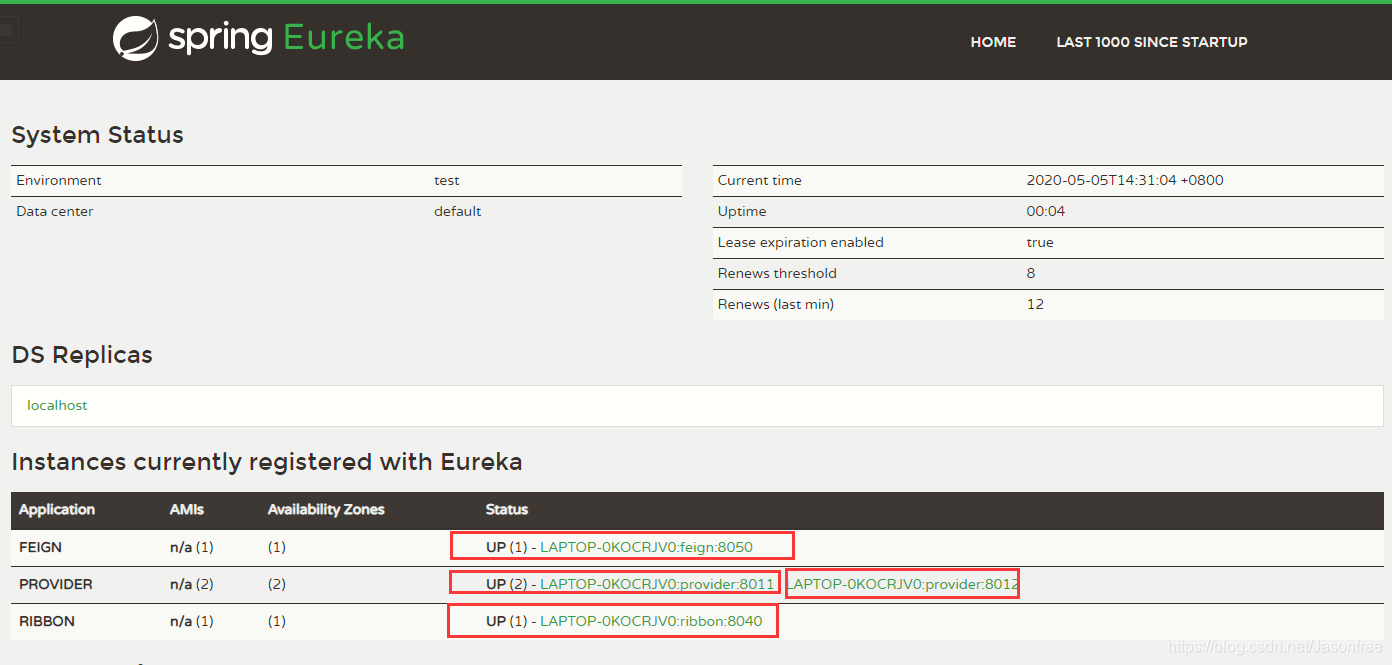
这里注册中心已经注册了四个,分别是一个Feign、两个Provider服务提供者、一个Ribbon,其中Feign和Ribbon都有负载均衡的作用,任何一个都会均衡调用服务提供者。
11.在Feign配置文件中开启Feign熔断机制,application.yml
#自定义端口
server:
  port: 8050
  #名称
spring:
  application:
    name: feign
#注册到注册中心
eureka:
  client:
    service-url:
      defaulttZone: http://localhost:8761/eureka/
  instance:
    prefer-ip-address: true

#是否开启熔断机制
feign:
  hystrix:
    enabled: true
12.创建FeignProviderClient接口的实现类FeignError,定义容错处理逻辑,通过@Component 注解将FeignError实例注入loC容器中。
package org.example.Feign.impl;

import feign.Feign;
import org.example.Feign.FeignProviderClient;
import org.example.entity.Student;
import org.springframework.stereotype.Component;

import java.util.Collection;


@Component
public class FeignError implements FeignProviderClient {
    @Override
    public Collection<Student> findAll() {
        return null;
    }

    @Override
    public String port() {
        return "服务器维护中......";
    }
}
13.在FeignProviderClient定义处通过@FeignClient的fallback属性设置映射。
package org.example.Feign;

import org.example.Feign.impl.FeignError;
import org.example.entity.Student;
import org.springframework.cloud.openfeign.FeignClient;
import org.springframework.web.bind.annotation.GetMapping;

import java.util.Collection;


/**
 * @FeignClient: 需要访问服务提供者的名字
 *
 *  @GetMapping("/student/findAll"): 需要访问服务提供者的接口
 *
 */
@FeignClient(value = "provider",fallback = FeignError.class)//要加入的
public interface FeignProviderClient {

    @GetMapping("/student/findAll")
    //查询
    public Collection<Student> findAll();


    @GetMapping("/student/port")
    //查询当前接口
    public String port();
}
- 这里只启动注册中心和Feigin,然后去调用服务提供者的业务,由于服务提供者我们没有启动,所以浏览器会显示刚刚我们设置的容错机制----“服务器维护中”,如果不设置服务容错机制就会显示404或者500等信息。
十、Hystrix容错机制
1.什么是容错机制?
随着分布式、微服务项目的快速发展,各个服务之间的通讯,难免出现依赖关系,若某一个单元出现故障,就很容易因依赖关系而发生故障的蔓延,为了解决这样的问题,容错作为其中一项很重要的技术也广为人知,类似于电路中的保险丝,如果电路中某处出现故障就会烧断保险丝而防止故障继续蔓延。
2.设计原则
- 服务隔离机制
- 服务降级机制
- 熔断机制
- 提供实时的监控和报警功能
- 提供实时的配置修改功能
3.介绍
Hystrix数据监控需要结合SpringBoot Actuator组件来使用,Actuator 提供了对服务的健康监控、数据统计,可以通过hystrix-stream节点获取监控的请求数据,提供了可视化的监控界面。
4.实例—创建hystrix模块,pom.xml配置
<?xml version="1.0" encoding="UTF-8"?>
<project xmlns="http://maven.apache.org/POM/4.0.0"
         xmlns:xsi="http://www.w3.org/2001/XMLSchema-instance"
         xsi:schemaLocation="http://maven.apache.org/POM/4.0.0 http://maven.apache.org/xsd/maven-4.0.0.xsd">
    <parent>
        <artifactId>springcloud</artifactId>
        <groupId>org.example</groupId>
        <version>1.0-SNAPSHOT</version>
    </parent>
    <modelVersion>4.0.0</modelVersion>

    <artifactId>hystrix</artifactId>


    <dependencies>
        <!--eureka-client依赖-->
        <dependency>
            <groupId>org.springframework.cloud</groupId>
            <artifactId>spring-cloud-starter-netflix-eureka-client</artifactId>
            <version>2.0.2.RELEASE</version>
        </dependency>

        <!--feign依赖-->
        <dependency>
            <groupId>org.springframework.cloud</groupId>
            <artifactId>spring-cloud-starter-openfeign</artifactId>
            <version>2.0.2.RELEASE</version>
        </dependency>

        <!--actuator数据监控依赖-->
        <dependency>
            <groupId>org.springframework.boot</groupId>
            <artifactId>spring-boot-starter-actuator</artifactId>
            <version>2.0.7.RELEASE</version>
        </dependency>

        <!--hystrix依赖-->
        <dependency>
            <groupId>org.springframework.cloud</groupId>
            <artifactId>spring-cloud-starter-netflix-hystrix</artifactId>
            <version>2.0.2.RELEASE</version>
        </dependency>

        <!--数据监控可视化依赖-->
        <dependency>
            <groupId>org.springframework.cloud</groupId>
            <artifactId>spring-cloud-starter-netflix-hystrix-dashboard</artifactId>
            <version>2.0.2.RELEASE</version>
        </dependency>
    </dependencies>


</project>
5.创建配置文件,application.yml
#自定义端口
server:
  port: 8060
  #名称
spring:
  application:
    name: hystrix
#注册到注册中心
eureka:
  client:
    service-url:
      defaulttZone: http://localhost:8761/eureka/
  instance:
    prefer-ip-address: true

#是否开启熔断机制
feign:
  hystrix:
    enabled: true

  #数据监控
management:
  endpoints:
    web:
      exposure:
        include: 'hystrix.stream'
6.创建启动类
package org.example;


import org.springframework.boot.SpringApplication;
import org.springframework.boot.autoconfigure.SpringBootApplication;
import org.springframework.cloud.client.circuitbreaker.EnableCircuitBreaker;
import org.springframework.cloud.netflix.hystrix.dashboard.EnableHystrixDashboard;
import org.springframework.cloud.openfeign.EnableFeignClients;


/**
 * @EnableCircuitBreaker: 声明启用数据监控
 *@EnableHystrixDashboard: 声明启用可视化数据监控
 *
 */


@SpringBootApplication
@EnableFeignClients
@EnableCircuitBreaker
@EnableHystrixDashboard
public class HystrixApplication {
    public static void main(String[] args) {
        SpringApplication.run(HystrixApplication.class, args);
    }

}
7.与Feign一样创建Controller层、实体类、Feign接口与实现类
8.启动:注册中心->服务提供者->hystrix模块
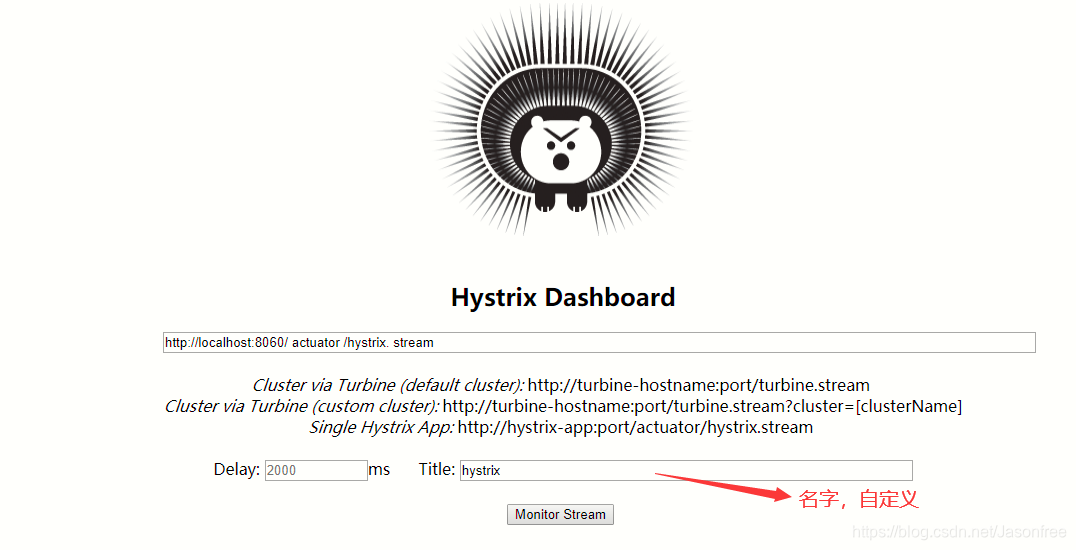
- 启动成功之后,访问http://localhost:8060/actuator/hystrix.stream可以监控到请求数据
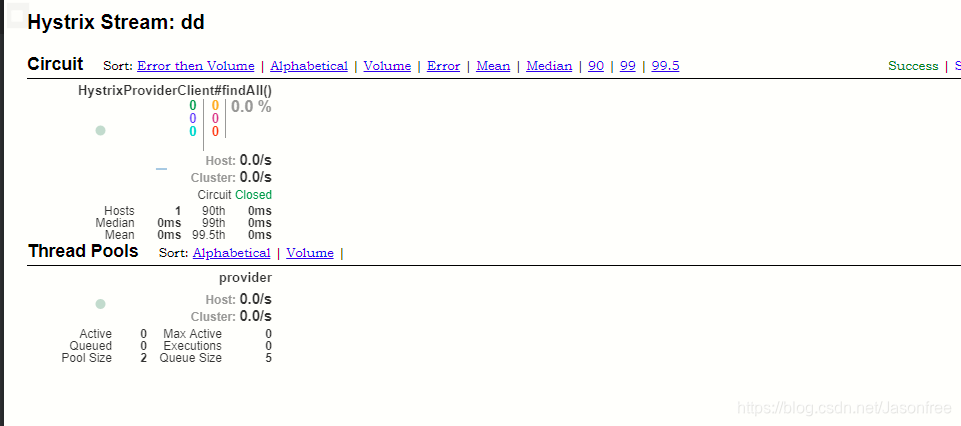
- 访问http://localhost:8060/hystrix,可以看到可视化的监控界面,输入要监控的地址节点即可看到该节点的可视化数据监控。
再新打开一个窗口输入hystrix接口地址调用查询方法findAll便可以看到如下数据监控
十 一、Spring Cloud配置中心
1.为什么要使用配置中心?
由于一个一个微服务都有自己的配置文件,每次修改都需要找到对应的微服务的配置文件修改,然后重新启动,那么如果又上百个或者上千个我们也这样去改吗?显然这样做是不合理的,于是就可以将所有的配置文件整合在一个配置中心,需要修改时直接在配置中心修改。
2.Spring Cloud Config
通过服务端可以为多个客户端提供配置服务。Spring Cloud Config可以将配置文件存储在本地,也可以将配置文件存储在远程Git仓库,创建Config Server,通过它管理所有的配置文件。
3.本地配置中心
-
在父工程下创建Maven工程,pom.xml配置
<?xml version="1.0" encoding="UTF-8"?> <project xmlns="http://maven.apache.org/POM/4.0.0" xmlns:xsi="http://www.w3.org/2001/XMLSchema-instance" xsi:schemaLocation="http://maven.apache.org/POM/4.0.0 http://maven.apache.org/xsd/maven-4.0.0.xsd"> <parent> <artifactId>springcloud</artifactId> <groupId>org.example</groupId> <version>1.0-SNAPSHOT</version> </parent> <modelVersion>4.0.0</modelVersion> <artifactId>nativeconfigserver</artifactId> <dependencies> <!--config依赖--> <dependency> <groupId>org.springframework.cloud</groupId> <artifactId>spring-cloud-config-server</artifactId> <version>2.0.2.RELEASE</version> </dependency> </dependencies> </project> -
创建application.yml
server: port: 8762 spring: application: name: nativeconfigserver profiles: active: native #配置文件的获取方式 cloud: config: server: native: search-locations: calsspath:/shared #本地配置文件路径 -
resources路径下创建shared文件夹,并在此路径下创建configclient-dev.yml
-
创建启动类
package org.example;


import org.springframework.boot.SpringApplication;
import org.springframework.boot.autoconfigure.SpringBootApplication;
import org.springframework.cloud.config.server.EnableConfigServer;

@SpringBootApplication
@EnableConfigServer    //声明配置中心
public class NativeConfigServerApplication {
    public static void main(String[] args) {
        SpringApplication.run(NativeConfigServerApplication.class, args);
    }
}
4.创建本地配置中心客户端读取本地配置中心的配置文件
-
在父工程下创建客户端模块,pom.xml
<?xml version="1.0" encoding="UTF-8"?> <project xmlns="http://maven.apache.org/POM/4.0.0" xmlns:xsi="http://www.w3.org/2001/XMLSchema-instance" xsi:schemaLocation="http://maven.apache.org/POM/4.0.0 http://maven.apache.org/xsd/maven-4.0.0.xsd"> <parent> <artifactId>springcloud</artifactId> <groupId>org.example</groupId> <version>1.0-SNAPSHOT</version> </parent> <modelVersion>4.0.0</modelVersion> <artifactId>nativeconfigclient</artifactId> <dependencies> <!--config依赖--> <dependency> <groupId>org.springframework.cloud</groupId> <artifactId>spring-cloud-starter-config</artifactId> <version>2.0.2.RELEASE</version> </dependency> </dependencies> </project> -
创建bootstrap.yml配置文件,用于配置加载配置中心文件的内容
注:配置文件名必须为bootstrap
spring: application: name: configclient #客户端名字 profiles: active: dev #与客户端名字拼接起来作为文件名字找到与拼接名字一致的配置中心配置文件 cloud: config: uri: http://localhost:8762 #配置中心地址 fail-fast: true #设置客户端优先判断Config Server获取是否正常。 -
创建启动类
package org.example; import org.springframework.boot.SpringApplication; import org.springframework.boot.autoconfigure.SpringBootApplication; @SpringBootApplication public class NativeConfigClientApplication { public static void main(String[] args) { SpringApplication.run(NativeConfigClientApplication.class, args); } } -
创建Controller层
package org.example.controller; import org.springframework.beans.factory.annotation.Value; import org.springframework.web.bind.annotation.GetMapping; import org.springframework.web.bind.annotation.RequestMapping; import org.springframework.web.bind.annotation.RestController; @RestController @RequestMapping("/native") public class NativeConfigClientController { @Value("${server.port}") private String port; @Value("foo") private String foo; //用于返回shared文件下的配置中心文件里面的端口和foo值 @GetMapping("/index") public String index(){ return this.port+"---"+this.foo; } } -
启动:注册中心->本地配置中心->本地配置中心客户端
浏览器输入本地配置中心客户端的地址,结果返回8070—foo version 1,可以看出是调用了本地配置中心的配置文件。
十二、服务跟踪
1.为什么需要服务跟踪
在微服务架构下,往往有成百上千个微小的服务,同时又存在服务与服务之间调用,之间是非常的复杂,所以服务跟踪可以跟踪记录一次用户请求都发起了哪些调用,经过哪些服务处理,并且记录每一次调用所涉及的服务的详细信息,通过日志快速定位是调用失败的环节。
2.Spring Cloud Zipkin
Zipkin是-一个可以采集并且跟踪分布式系统中请求数据的组件,让开发者可以更加直观的监控到请求在各个微服务所耗费的时间等,Zipkin: Zipkin Server. Zipkin Client。
3.创建zipkinserver模块,pom.xml
<?xml version="1.0" encoding="UTF-8"?>
<project xmlns="http://maven.apache.org/POM/4.0.0"
         xmlns:xsi="http://www.w3.org/2001/XMLSchema-instance"
         xsi:schemaLocation="http://maven.apache.org/POM/4.0.0 http://maven.apache.org/xsd/maven-4.0.0.xsd">
    <parent>
        <artifactId>springcloud</artifactId>
        <groupId>org.example</groupId>
        <version>1.0-SNAPSHOT</version>
    </parent>
    <modelVersion>4.0.0</modelVersion>

    <artifactId>zipkinserver</artifactId>

    <dependencies>
          <dependency>
            <groupId>org.springframework.boot</groupId>
            <artifactId>spring-boot-starter-web</artifactId>
            <!--排除这个slf4j-log4j12造成的冲突-->
            <exclusions>
                <exclusion>
                    <groupId>org.slf4j</groupId>
                    <artifactId>slf4j-log4j12</artifactId>
                </exclusion>
            </exclusions>
        </dependency>

        <!--zipkin依赖-->
        <dependency>
            <groupId>io.zipkin.java</groupId>
            <artifactId>zipkin-server</artifactId>
            <version>2.9.4</version>
        </dependency>
        <!--可视化界面-->
        <dependency>
            <groupId>io.zipkin.java</groupId>
            <artifactId>zipkin-autoconfigure-ui</artifactId>
            <version>2.9.4</version>
        </dependency>
    </dependencies>

</project>
4.创建配置文件
server:
  port: 9090

management:
  metrics:
    web:
      server:
        auto-time-requests: false
5.创建启动类
package org.example;


import org.springframework.boot.SpringApplication;
import org.springframework.boot.autoconfigure.SpringBootApplication;
import zipkin.server.internal.EnableZipkinServer;

@SpringBootApplication
@EnableZipkinServer  //声明启动ZipkinServer
public class ZipkinServerApplication {
    public static void main(String[] args) {
        SpringApplication.run(ZipkinServerApplication.class, args);
    }

}
6.创建zipkinclient模块,pom.xml
<?xml version="1.0" encoding="UTF-8"?>
<project xmlns="http://maven.apache.org/POM/4.0.0"
         xmlns:xsi="http://www.w3.org/2001/XMLSchema-instance"
         xsi:schemaLocation="http://maven.apache.org/POM/4.0.0 http://maven.apache.org/xsd/maven-4.0.0.xsd">
    <parent>
        <artifactId>springcloud</artifactId>
        <groupId>org.example</groupId>
        <version>1.0-SNAPSHOT</version>
    </parent>
    <modelVersion>4.0.0</modelVersion>

    <artifactId>zipkinclient</artifactId>

    <dependencies>
        <!--zipkinclient依赖-->
        <dependency>
            <groupId>org.springframework.cloud</groupId>
            <artifactId>spring-cloud-starter-zipkin</artifactId>
            <version>2.0.2.RELEASE</version>
        </dependency>

        <dependency>
            <groupId>org.springframework.cloud</groupId>
            <artifactId>spring-cloud-starter-netflix-eureka-client</artifactId>
            <version>2.0.2.RELEASE</version>
        </dependency>

    </dependencies>

</project>
7.创建配置文件
server:
  port: 8090
spring:
  application:
    name: zipkinclient
  sleuth:
    web:
      client:
        enabled: true #设置开启请求跟踪
    sampler:
      probability: 1.0  #设置采样比例,默认是1.0
  zipkin:
    base-url: http://localhost:9090/  #zipkin Server地址
eureka:
  client:
    service-url:
      defaultZone: http://localhost:8761/eureka/
8.创建启动类
package org.example;


import org.springframework.boot.SpringApplication;
import org.springframework.boot.autoconfigure.SpringBootApplication;

@SpringBootApplication
public class ZipkinApplication {
    public static void main(String[] args) {
        SpringApplication.run(ZipkinApplication.class, args);
    }

}
9.创建Controller层
package org.example.controller;


import org.springframework.beans.factory.annotation.Value;
import org.springframework.web.bind.annotation.GetMapping;
import org.springframework.web.bind.annotation.RequestMapping;
import org.springframework.web.bind.annotation.RestController;


@RestController
@RequestMapping("/zipkin")
public class ZipkinController {
@Value("${server.port}")
    private String port;

@GetMapping("/index")
public String index(){
    return this.port;
}

}
10.启动:注册中心->zipkinserver模块->zipkinclient模块
11.浏览器输入:http://localhost:9090/zipkin/ (可视化图形界面)

我们可以新打开一个窗口输入zipkinclient模块的地址进行调用:http://localhost:8090/zipkin/index,返回图形界面便可以看到跟踪记录。
注:此文章是在bilibili“楠哥教你学java”视频基础之上自己整理的笔记
本文来自博客园,作者:猿大佛,转载请注明原文链接:https://www.cnblogs.com/hushaoz/p/15484119.html

 浙公网安备 33010602011771号