
springmvc+swagger2
一、swagger2依赖
<!--swagger-->
<dependency>
    <groupId>io.springfox</groupId>
    <artifactId>springfox-swagger2</artifactId>
    <exclusions>
        <exclusion>
            <artifactId>spring-aop</artifactId>
            <groupId>org.springframework</groupId>
        </exclusion>
        <exclusion>
            <artifactId>jackson-annotations</artifactId>
            <groupId>com.fasterxml.jackson.core</groupId>
        </exclusion>
    </exclusions>
</dependency>
<dependency>
    <groupId>io.springfox</groupId>
    <artifactId>springfox-swagger-ui</artifactId>
</dependency>
二、springmvc配置文件加入
<mvc:default-servlet-handler />
三、web.xml配置
<welcome-file-list>
    <welcome-file>swagger-ui.html</welcome-file>
</welcome-file-list>
四、swagger2配置
可创建多个Docket,对restful api进行分组管理
import io.swagger.annotations.Api;
import io.swagger.annotations.ApiOperation;
import org.springframework.context.annotation.Bean;
import org.springframework.context.annotation.Configuration;
import org.springframework.web.servlet.config.annotation.EnableWebMvc;
import org.springframework.web.servlet.config.annotation.WebMvcConfigurationSupport;
import springfox.documentation.builders.ApiInfoBuilder;
import springfox.documentation.builders.PathSelectors;
import springfox.documentation.builders.RequestHandlerSelectors;
import springfox.documentation.service.ApiInfo;
import springfox.documentation.service.Contact;
import springfox.documentation.spi.DocumentationType;
import springfox.documentation.spring.web.plugins.Docket;
import springfox.documentation.swagger2.annotations.EnableSwagger2;

@EnableWebMvc
@EnableSwagger2
@Configuration
public class Swagger2Config extends WebMvcConfigurationSupport {

    @Bean
    public Docket docket() {
        return new Docket(DocumentationType.SWAGGER_2)
                .apiInfo(apiInfo())
                .groupName("admin")
                .select()
                .apis(RequestHandlerSelectors.withClassAnnotation(Api.class))
                .apis(RequestHandlerSelectors.withMethodAnnotation(ApiOperation.class))
                .paths(PathSelectors.ant("/**"))
                .build();
    }

//    @Bean
//    public Docket xxx() {
//        return new Docket(DocumentationType.SWAGGER_2)
//                .apiInfo(apiInfo())
//                .groupName("xxx")
//                .select()
//                .apis(RequestHandlerSelectors.withClassAnnotation(Api.class))
//                .apis(RequestHandlerSelectors.withMethodAnnotation(ApiOperation.class))
//                .paths(PathSelectors.ant("/xxx/**"))
//                .build();
//    }

    private ApiInfo apiInfo() {
        return new ApiInfoBuilder()
                .title("shiro 无状态组件")
                .contact(new Contact("胡俊哲个", "", "2570230521@qq.com"))
                .version("1.0")
                .build();
    }
}
五、效果演示
Restful API 访问路径:
 * http://IP:port/{context-path}/swagger-ui.html
六、注意事项
1、如果有拦截器或者过滤器 对项目根路径进行拦截,可能<welcome-file>的配置不生效!
2、如果 配置 <welcome-file>swagger-ui.html</welcome-file>,访问 http://IP:port/{context-path}/,虽然可以看到页面,但是接口内容显示不出来。原因如下:
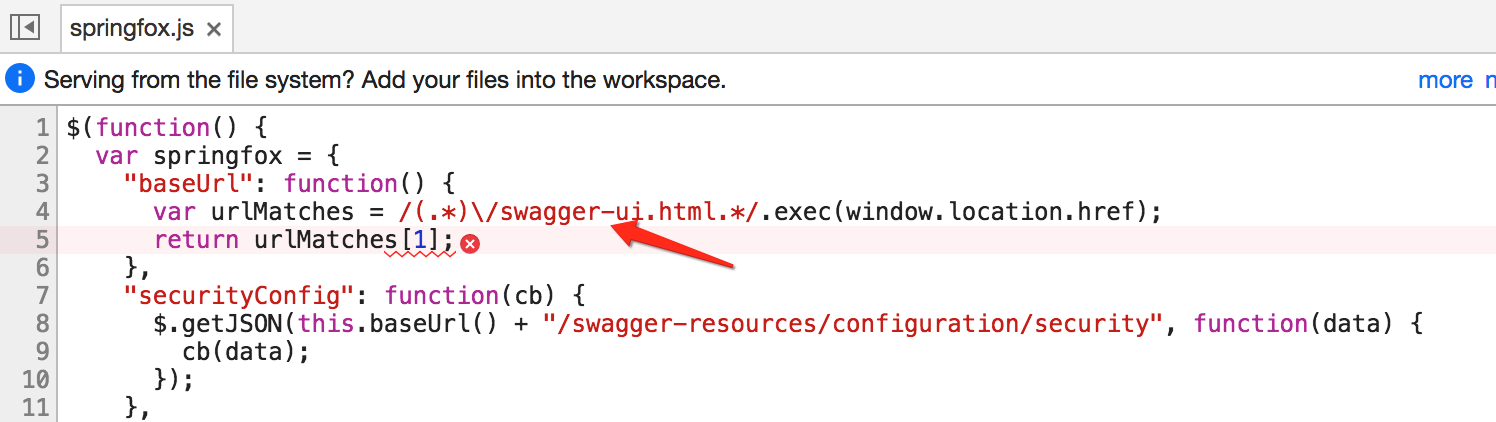
这个js在匹配url的时候 要包含“swagger-ui.html”,所以就出错了。解决方案如下:
(1)修改web.xml
 <welcome-file-list>
     <welcome-file>index.html</welcome-file>
 </welcome-file-list>
(2)新建index.html
<!DOCTYPE html>
<html lang="en">
<head>
    <meta charset="UTF-8">
    <title>首页</title>
</head>
<body>
<script type="application/javascript">
    window.location.href = window.location.origin + "/shiro/swagger-ui.html";
</script>
</body>
</html>
七、swagger2常用注解参考
本文来自博客园,作者:hjzqyx,转载请注明原文链接:https://www.cnblogs.com/hujunzheng/p/7210140.html

 浙公网安备 33010602011771号