
zyUpload+struct2完成文件上传
前言:
最近在写自己的博客网站,算是强化一下自己对s2sh框架的理解。期间遇到了很多问题,这些问题在写之前都考虑过,感觉也就是那样吧。但正真遇到了,也挺让人难受的。就利用zyUpload这个js插件实现文件的上传, 我来谈一谈。
zyUpload下载:
https://github.com/hjzgg/zyUpload ,或者可以在网上,随便就可以下载到,只不过提供的网址中的zyUpload是我改过的。
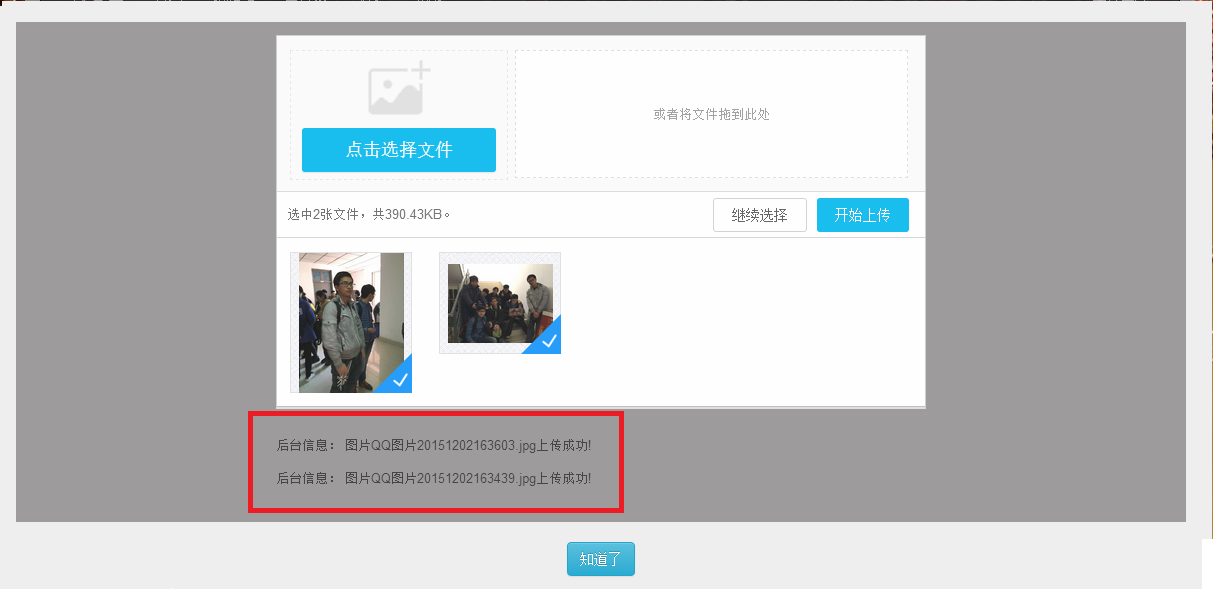
zyUpload界面效果:

zyUpload使用需要注意的几个地方:
说明:zyUpload 配合Strus2实现图片或文件的上传
(1)zyFile.js,lanrenzhijia.js,zyUpload.js设置 url : "fileUploadAction!execute", // 上传文件的路径
(2)文件的上传通过 zyFile.js中的funUploadFile函数,修改formdata.append("upload", file) file对应的name属性值,这里是"upload",保证和后台的name属性值一样!上传的代码如下:
     // 上传多个文件
        funUploadFiles : function(){
            var self = this;  // 在each中this指向没个v  所以先将this保留
            // 遍历所有文件  ,在调用单个文件上传的方法
            $.each(this.uploadFile, function(k, v){
                self.funUploadFile(v);
            });
        },
        // 上传单个个文件
        funUploadFile : function(file){
            var self = this;  // 在each中this指向没个v  所以先将this保留

            var formdata = new FormData();
            formdata.append("upload", file);
            var xhr = new XMLHttpRequest();
            // 绑定上传事件
            // 进度
            xhr.upload.addEventListener("progress",     function(e){
                // 回调到外部
                self.onProgress(file, e.loaded, e.total);
            }, false);
            // 完成
            xhr.addEventListener("load", function(e){
                // 从文件中删除上传成功的文件  false是不执行onDelete回调方法
                self.funDeleteFile(file.index, false);
                // 回调到外部
                self.onSuccess(file, xhr.responseText);
                if(self.uploadFile.length==0){
                    // 回调全部完成方法
                    self.onComplete("全部完成");
                }
            }, false);
            // 错误
            xhr.addEventListener("error", function(e){
                // 回调到外部
                self.onFailure(file, xhr.responseText);
            }, false);
            xhr.open("POST", self.url, true);
            xhr.send(formdata);
        },
(3)缺陷就是只能单个文件上传!用的是FormData对象,利用ajax技术,每次上传都要请求后台。
(4)zyFile.js中的一些接口都是在zyUpload.js中实现!
下面是zyFile.js中的一些接口
     filterFile : function(files){ // 提供给外部的过滤文件格式等的接口,外部需要把过滤后的文件返回

        },
        onSelect : function(selectFile, files){      // 提供给外部获取选中的文件,供外部实现预览等功能  selectFile:当前选中的文件  allFiles:还没上传的全部文件

        },
        onDelete : function(file, files){            // 提供给外部获取删除的单个文件,供外部实现删除效果  file:当前删除的文件  files:删除之后的文件

        },
        onProgress : function(file, loaded, total){  // 提供给外部获取单个文件的上传进度,供外部实现上传进度效果

        },
        onSuccess : function(file, responseInfo){    // 提供给外部获取单个文件上传成功,供外部实现成功效果

        },
        onFailure : function(file, responseInfo){    // 提供给外部获取单个文件上传失败,供外部实现失败效果

        },
        onComplete : function(responseInfo){         // 提供给外部获取全部文件上传完成,供外部实现完成效果

        },
zyFile.js中filterFile给外部提供的函数接口在 zyUpload.js可以找到,用来进行文件的过滤!对于filterFile这个借口,实现如下(当然,你可以根据自己的需求自己来实现,我这里只是想上传图片文件而已):
            this.funFilterEligibleFile = function(files){
                var arrFiles = [];  // 替换的文件数组
                for (var i = 0, file; file = files[i]; i++) {
                    if (file.size >= 51200000) {
                        alert('您这个"'+ file.name +'"文件大小过大');
                    } else {
                        // 在这里需要判断当前所有文件中
                        var fileExt = file.name.substr(file.name.lastIndexOf(".")).toLowerCase();//获得文件后缀名
                        if(fileExt==".png" || fileExt==".gif" || fileExt==".jpg" || fileExt==".jpeg")
                            arrFiles.push(file);//如果文件是图片格式,那么就放入文件的数组
                        else {
                            alert("文件仅限于 png, gif, jpeg, jpg格式 !");
                        }
                    }
                }
                return arrFiles;
            };

       filterFile: function(files) {
                 // 过滤合格的文件
                 return self.funFilterEligibleFile(files);
            },
struct2后台处理:
1.structs.xml中配置文件上传解析器
 <!-- struct2默认使用jakarta的Common-FileUpload的文件上传解析器 -->
  <constant name="struts.multipart.parser" value="jakarta"/>
2.structs.xml中action的配置
  <action name="fileUploadAction" class="fileUploadAction" method="struts-default">
        <param name="savePath">/fileUpload</param>
        <result name="errors" type="redirect">/errorsMessage/fileErrorsTip.jsp</result>
        <result name="operations" type="redirect">/operationsMessage/fileOperationsTip.jsp</result>
   </action>
3.dao层
public class PictureDao implements Serializable{
    private SessionFactory sessionFactory;

    public SessionFactory getSessionFactory() {
        return sessionFactory;
    }

    public void setSessionFactory(SessionFactory sessionFactory) {
        this.sessionFactory = sessionFactory;
    }

    private Session getSession(){
        return sessionFactory.getCurrentSession();
    }

  public PictureGroup pictureJspGetOneGroup(int groupId){//得到相册的分组
        PictureGroup pictureGroup = null;
        Session session = null;
        Transaction tran = null;
        try{
            session = this.getSession();
            tran = session.beginTransaction();
            pictureGroup = (PictureGroup)session.createQuery("from PictureGroup where groupId="+groupId).list().get(0);
            tran.commit();
        } catch(Exception e) {
            System.out.println(e.toString());
            tran.rollback();
            return null;
        }
        return pictureGroup;
    }

    public String newMyPicture(MyPicture myPicture){//持久化图片信息
        Session session = null;
        Transaction tran = null;
        try{
            session = this.getSession();
            tran = session.beginTransaction();
            session.persist(myPicture);
            tran.commit();
        } catch(Exception e){
            System.out.println(e.toString());
            tran.rollback();
            return e.toString();
        }
        return null;
    }

}
4.action部分
public class FileUploadAction extends ActionSupport{
    private PictureDao pictureDao;
    public PictureDao getPictureDao() {
        return pictureDao;
    }
    public void setPictureDao(PictureDao pictureDao) {
        this.pictureDao = pictureDao;
    }

    private List<File>    upload; // 上传的文件
    private List<String> uploadFileName; // 文件名称
    private List<String> uploadContentType; // 文件类型
    private String savePath;

    public List<File> getUpload() {
        return upload;
    }
    public void setUpload(List<File> upload) {
        this.upload = upload;
    }
    public List<String> getUploadFileName() {
        return uploadFileName;
    }
    public void setUploadFileName(List<String> uploadFileName) {
        this.uploadFileName = uploadFileName;
    }
    public List<String> getUploadContentType() {
        return uploadContentType;
    }
    public void setUploadContentType(List<String> uploadContentType) {
        this.uploadContentType = uploadContentType;
    }
    public String getSavePath() {
        return savePath;
    }
    public void setSavePath(String savePath) {
        this.savePath = savePath;
    }

    private String pictureName = null;
    private String picturePath = null;
    private String pictureGroupId = null;
    public String fileUploadSuccess(){//添加一张图片
        try{
            MyPicture myPicture = new MyPicture();
            myPicture.setPictureName(pictureName);
            myPicture.setPicturePath(picturePath);
            myPicture.setPictureBuildTime(new Timestamp(System.currentTimeMillis()));
            PictureGroup pictureGroup = pictureDao.pictureJspGetOneGroup(Integer.parseInt(pictureGroupId));//为了得到持久化的相册分组对象
            if(pictureGroup == null) throw new NullPointerException("分组为空!");
            myPicture.setGroup(pictureGroup);
            String msg = pictureDao.newMyPicture(myPicture);
            ActionContext.getContext().getSession().put("operations", "图片" + pictureName + (msg==null ? "上传成功!" : "上传失败:"+msg));
        } catch (Exception e){
            System.out.println(e.toString());
            ActionContext.getContext().getSession().put("errors", "图片" + pictureName + "添加失败: " + e.toString() + " 异常位置: FileUploadAction!fileUploadSuccess。");
            return "errors";
        }
        return "operations";
    }

    @Override
    public String  execute() throws Exception {
        try{
            // 取得需要上传的文件数组
            List<File> files = getUpload();
            HttpServletRequest request = ServletActionContext.getRequest();
            //得到 到 项目根目录的URL
            String url = request.getScheme() + "://" + request.getServerName() + ":" + request.getServerPort() + request.getContextPath();
            if (files != null && files.size() > 0) {
                String realPath = ServletActionContext.getServletContext().getRealPath(savePath);
                //多个文件的上传
//                for (int i = 0; i < files.size(); i++) {
//                    String fileName = System.currentTimeMillis()+getUploadContentType().get(i).replace("/", ".");
//                    picturesPath.add(url+savePath+"/"+fileName);
//                    FileOutputStream fos = new FileOutputStream(realPath + "\\" + fileName);
//                    FileInputStream fis = new FileInputStream(files.get(i));
//                    byte[] buffer = new byte[1024];
//                    int len = 0;
//                    while ((len = fis.read(buffer)) > 0) {
//                        fos.write(buffer, 0, len);
//                    }
//                    fis.close();
//                    fos.close();
//                }

                if((pictureGroupId=(String)ActionContext.getContext().getSession().get("pictureGroupId")) == null){//未选择分组
                    ActionContext.getContext().getSession().put("operations", "图片"+uploadFileName+"上传失败,分组未选择! <a target='_parent' href='../pictureAction!pictureGroupJspGetAllGroups'>选择分组</a>");
                    return "operations";
                }

                //处理单个文件的上传
                String fileName = System.currentTimeMillis()+getUploadFileName().get(0)+getUploadContentType().get(0).replace("/", ".");
                FileOutputStream fos = new FileOutputStream(realPath + "\\" + fileName);
                FileInputStream fis = new FileInputStream(files.get(0));
                byte[] buffer = new byte[1024];
                int len = 0;
                while ((len = fis.read(buffer)) > 0) {
                    fos.write(buffer, 0, len);
                }
                fis.close();
                fos.close();
                picturePath = url+savePath+"/"+fileName;
                pictureName = getUploadFileName().get(0);
                return fileUploadSuccess();
            } else {
                ActionContext.getContext().getSession().put("errors", "得到文件数目为0! 异常位置:FileUploadAction!execute。");
            }
        } catch (Exception e){
            System.out.println(e.toString());
            ActionContext.getContext().getSession().put("errors",  "图片" + getUploadFileName().get(0) + "上传失败: " + e.toString()+"异常位置:FileUploadAction!execute。");
            return "errors";
        }
        return "errors";
    }
}
5.说一下Action中的一些信息:
String url = request.getScheme() + "://" + request.getServerName() + ":" + request.getServerPort() + request.getContextPath(); 得到请求项目的地址,如http://localhost:8080/myBlog;
String fileName = System.currentTimeMillis()+getUploadFileName().get(0)+
getUploadContentType().get(0).replace("/", "."); 生成唯一文件名称。
String realPath = ServletActionContext.getServletContext().getRealPath(savePath);得到图片的存储地址
picturePath = url+savePath+"/"+fileName;得到图片的src地址
最终效果:
1.上传后,无论是失败还是成功,都可以通过ajax从后台得到!
2.最后从后台得到数据并展示

好了,自己的博客网站算是差不多了,这一个多星期真是累尿了。接下来好好看看书,刷刷题,做做题,准备找工作吧。噢耶!!!
本文来自博客园,作者:hjzqyx,转载请注明原文链接:https://www.cnblogs.com/hujunzheng/p/5084288.html

 浙公网安备 33010602011771号