Spring Security 初步探索
Spring Security 是一个为基于 Spring 的 java 应用提供安全登录与访问的框架。
(本文章的工程是 springboot 工程)
首先,添加 pom 依赖
<dependency>
     <groupId>org.springframework.security</groupId>
     <artifactId>spring-security-web</artifactId>
     <version>4.2.2.RELEASE</version>
</dependency>
数据库连接使用的 hibernate ,可以参见我之前的博客https://www.cnblogs.com/hugystudy/p/8550669.html
准备工作, 数据库以及查询类
数据库表比较简陋,只有两张 : user 和 user_role
CREATE TABLE `user` (
  `id` bigint(20) COLLATE utf8_unicode_ci NOT NULL,
  `user_name` varchar(50) CHARACTER SET utf8 COLLATE utf8_unicode_ci NOT NULL,
  `password` char(50) CHARACTER SET utf8 COLLATE utf8_unicode_ci DEFAULT NULL,
  `time_create` datetime DEFAULT NULL,
  `time_update` datetime DEFAULT NULL,
  PRIMARY KEY (`id`)
) ENGINE=InnoDB DEFAULT CHARSET=utf8 COLLATE=utf8_unicode_ci;

CREATE TABLE `user_role` (
`user_id` bigint(20) NOT NULL,
`role` varchar(20) NOT NULL,
`time_create` datetime DEFAULT NULL,
`time_update` datetime DEFAULT NULL
) ENGINE=InnoDB DEFAULT CHARSET=utf8;
创建与之对应的 bean
User.class
@Data
@AllArgsConstructor
@NoArgsConstructor
public class User {
    private String id;
    private String userName;
    private String password;
    private String timeCreate;
    private String timeUpdate;
}
UserRole.class
@Data
@AllArgsConstructor
@NoArgsConstructor
public class UserRole {
    private String userId;
    private String role;
    private String timeCreate;
    private String timeUpdate;
}
添加数据库表与实体类对应的配置文件 UserQuery.hbm.xml
<?xml version="1.0"?>
<!DOCTYPE hibernate-mapping PUBLIC
        "-//Hibernate/Hibernate Mapping DTD 3.0//EN"
        "http://hibernate.sourceforge.net/hibernate-mapping-3.0.dtd">

<hibernate-mapping>
    <class name="com.learn.hugy.base.domain.User" table="user">
        <id name="id" type="java.lang.String" column="id"/>
        <property name="userName" type="java.lang.String" column="user_name"/>
        <property name="password" type="java.lang.String" column="password"/>
        <property name="time_create" type="java.lang.String" column="time_create"/>
        <property name="time_update" type="java.lang.String" column="time_update"/>
    </class>

    <class name="com.learn.hugy.base.domain.UserRole" table="user_role">
       <id name="userId" type="java.lang.String" column="user_id"/>
       <property name="role" type="java.lang.String" column="role"/>
       <property name="timeCreate" type="java.lang.String" column="time_create"/>
       <property name="timeUpdate" type="java.lang.String" column="time_update"/>
       </class>
</hibernate-mapping>
建立一个查询有关的 Service
public class UserService {
    Configuration cfg = new Configuration().configure();
    SessionFactory factory = cfg.buildSessionFactory();

    public User getUser(String userId) {
        Session session = factory.openSession();
        Transaction transition = session.beginTransaction();
        try {
            transition.begin();
            User user = (User) session.get(User.class, userId);
            transition.commit();
            return user;
        }catch (Exception e) {
            e.printStackTrace();
        } finally {
            transition = null;
            session.close();
        }
        return null;
    }

    public List<UserRole> getUserRole(String userId) {
        Session session = factory.openSession();
        Transaction transition = session.beginTransaction();
        try {
            transition.begin();
            List list = session.createQuery("SELECT role from UserRole WHERE user_id = ?").setParameter(0, userId).list();
            transition.commit();
            return list;
        } catch (Exception e) {
            e.printStackTrace();
        } finally {
            transition = null;
            session.close();
        }
        return  null;
    }
}
好了,准备工作到这里就结束了,下面正式进入 Spring Security 的学习。
Spring Security 实现
Spring Security 最主要的的一个类是 WebSecurityConfigurerAdapter 这个类要重写 3 个方法:configure(WebSecurity web)、configure(HttpSecurity http)、configure(AuthenticationManagerBuilder auth)
其中,HttpSecurity 用来对 http 请求安全进行验证, AuthenticationManagerBuilder 用来对用户登录以及角色安全进行验证
(WebSecurity 以后补充)
下面来看看示例:
@Configuration
@EnableWebSecurity
public class SecurityConfiguration extends WebSecurityConfigurerAdapter {

    @Override
    protected void configure(AuthenticationManagerBuilder auth) throws Exception {
        auth.userDetailsService(new MyUserDetailService());
    }

    @Override
    protected void configure(HttpSecurity http) throws Exception {
        System.out.println(">>>>>>>>>>>>>>http security<<<<<<<<<<<<<");
        http.authorizeRequests()
                .antMatchers("/test").access("hasRole('CUSTOMER')")
                .anyRequest().authenticated()
                .and().logout().permitAll()
                .and().formLogin().successHandler(new MyLoginSuccessHandler());
        http.csrf().disable();
    }
}
首先要看的是 configure(HttpSecurity http),可以看到此方法主要是对 http 请求的 url 验证与否以及访问需要的角色进行了验证;
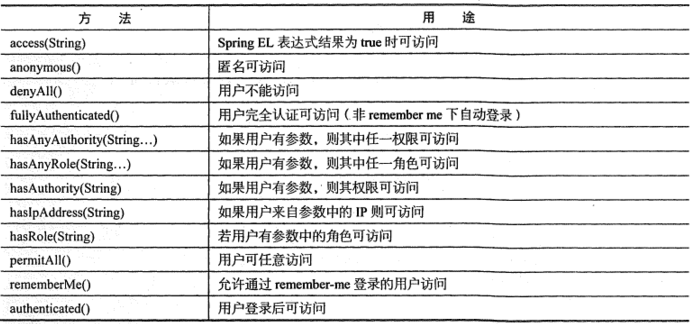
结合上图与示例代码,可以看到规定 访问 "**/test" 路径的时候角色必须拥有权限 ROLE_CUSTOMER, 访问其他的任意请求,必须要经过鉴权,支持表单登录,而且自定义了登录成功后的处理方法 myLoginSuccessHandler。
既然讲到了 myLoginSuccessHandler ,那就先来看看这个类吧,此类继承了 SavedRequestAwareAuthenticationSuccessHandler 类并且重写了 onAuthenticationSuccess(HttpRequest request, HttpResponse response, Authentication authentication) 方法
public class MyLoginSuccessHandler extends SavedRequestAwareAuthenticationSuccessHandler {


    @Override
    public void onAuthenticationSuccess(HttpServletRequest request, HttpServletResponse response, Authentication authentication) throws ServletException, IOException {
//        super.onAuthenticationSuccess(request, response, authentication);

        new DefaultRedirectStrategy().sendRedirect(request, response, "/");
    }
}
这个方法通过 DefaultRedirectStrategy 类将请求成功后地址重定向到了 "/",具体哪个请求局定于 RestController 注解的类中 RequestMapping 注解规定的路径。
接下来, configure(AuthenticationManagerBuilder auth)
此方法主要用来判断用户是否存在,以及给存在的用户赋予角色,他的主要实现是通过一个继承了 UserDetailService 的类(MyUserDetailService)来实现的,实现 loadUserByUsername(String s) 方法
public class MyUserDetailService implements UserDetailsService {

    UserService service = new UserService();

    public UserDetails loadUserByUsername(String s) throws UsernameNotFoundException {
        User user = service.getUser(s);
        List<String> roles = service.getUserRole(s);
        List<GrantedAuthority> list1 = new ArrayList<GrantedAuthority>();
        for (int i = 0; i < roles.size(); i++) {
            list1.add(new SimpleGrantedAuthority(roles.get(i)));
        }
        org.springframework.security.core.userdetails.User user1 = new org.springframework.security.core.userdetails.User(user.getUserName(), user.getPassword(), list1);
        return user1;
    }
}
如果是 Security 提供的登录页面, loadUserByUsername(String s) 中的参数 s 就是登录页面的用户名,通过如上方法,可以将数据库中的记录打包成一个 User 类,并存在 SecurityContextHolder 中。
以上,就是 SpringBoot + Spring Security 实现基本的登录与角色验证实现方式。


 浙公网安备 33010602011771号