
k8s集群从0到1安装部署
文档
两个官方文档,
一个是官方教程:https://kubernetes.io/docs/tutorials/
另一个是生产环境安装手册:https://kubernetes.io/docs/setup/production-environment/tools/kubeadm/
教程里建议用学习环境快速上手,我试了一下发现学习学习环境本身也有学习成本,并且不利于概念和工具学习,因为小白接触k8s
本身就需要接触很多新概念新工具。
所以准备了二个虚拟机,直接进行生产环境安装:ubuntu24 server + ubuntu24 server
准备
apt-get install -y apt-transport-https ca-certificates curl gpg
curl -fsSL https://pkgs.k8s.io/core:/stable:/v1.32/deb/Release.key | sudo gpg --dearmor -o /etc/apt/keyrings/kubernetes-apt-keyring.gpg
echo 'deb [signed-by=/etc/apt/keyrings/kubernetes-apt-keyring.gpg] https://pkgs.k8s.io/core:/stable:/v1.32/deb/ /' | sudo tee /etc/apt/sources.list.d/kubernetes.list
apt-get update
关swap
swapoff -a
装kubeadmin
sudo apt-get install -y kubelet kubeadm kubectl
sudo apt-mark hold kubelet kubeadm kubectl
装docker
sudo apt install docker.io
配置
mkdir /etc/containerd/
containerd config default > /etc/containerd/config.toml
vim /etc/containerd/config.toml # 设置 SystemdCgroup = true
systemctl restart containerd
管理工具
crictl
测试一下
docker run hello-world
查看日志细节
部署阶段docker是底层依赖,好多问题会在这里暴露,养成随手看看docker日志的习惯很重要
journalctl -u docker.service -f
journalctl -u containerd.service -f
控制节点
生成默认配置(不自定义配置的话不需要)
kubeadm config print init-defaults |sudo tee default.yaml
初始化控制面
sudo kubeadm init --pod-network-cidr 192.168.100.0/24
cidr必须配,跟下文calico改配置那地方要写错一致。并且不能与物理网络重叠。
如果不用默认网关的网卡通信,就这样
sudo kubeadm init --apiserver-advertise-address 192.168.100.105
或
kubeadm init --apiserver-advertise-address 192.168.100.105 --pod-network-cidr 192.168.100.0/24
// 不知道为啥 kubelet起不来,swapoff -a 后成功。
如果不是root:
mkdir -p \$HOME/.kube
sudo cp -i /etc/kubernetes/admin.conf \$HOME/.kube/config
sudo chown \$(id -u):\$(id -g) \$HOME/.kube/config
如果是root
export KUBECONFIG=/etc/kubernetes/admin.conf
初始化回退
sudo kubeadm reset
sudo rm -rf /etc/cni/net.d
rm -rf \$HOME/.kube
如果初始化有问题,或者失败了,在重新初始化之前,先reset一下就可以了。
参考:https://kubernetes.io/docs/reference/setup-tools/kubeadm/kubeadm-reset/
安装CNI
CNI有很多,盲选了calico
文档:
https://docs.tigera.io/calico/latest/getting-started/kubernetes/self-managed-onprem/onpremises
https://docs.tigera.io/calico/latest/getting-started/kubernetes/quickstart
https://docs.tigera.io/calico/latest/getting-started/kubernetes/hardway/overview
kubectl create -f https://raw.githubusercontent.com/projectcalico/calico/v3.29.2/manifests/tigera-operator.yaml
curl https://raw.githubusercontent.com/projectcalico/calico/v3.29.2/manifests/custom-resources.yaml -O
编辑custom-resources.yaml,修改cidr为 192.168.100.0/24
kubectl create -f custom-resources.yaml
卸载
kubectl delete -f custom-resources.yaml
kubectl delete -f https://raw.githubusercontent.com/projectcalico/calico/v3.29.2/manifests/tigera-operator.yaml
工作节点
这个命令是上一个init 命令生成的
kubeadm join 192.168.56.105:6443 --token 1fz06v.zsbq4swb0743z6ov \
--discovery-token-ca-cert-hash sha256:8d585c09512dec4d94a08cd3f098d7fbe15c5b2155ddd25fc7c8c54e182de7a8
让控制节点参与工作调度
kubectl taint nodes --all node-role.kubernetes.io/control-plane-
完成
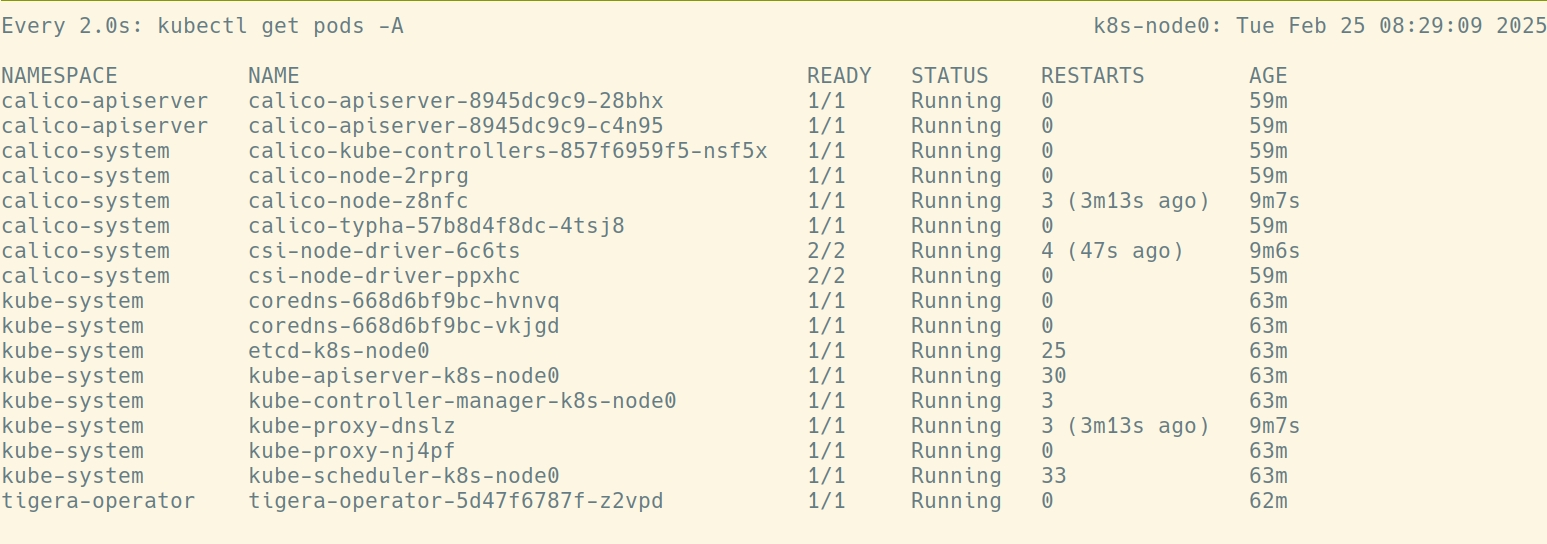
最终效果,跑了这样几个pod,如图:

查看node
kubectl get nodes -o wide
查看容器
crictl ps -a // 可以看见container与pod的对应关系
ctr container list // 这是containerd的另一个底层接口命令
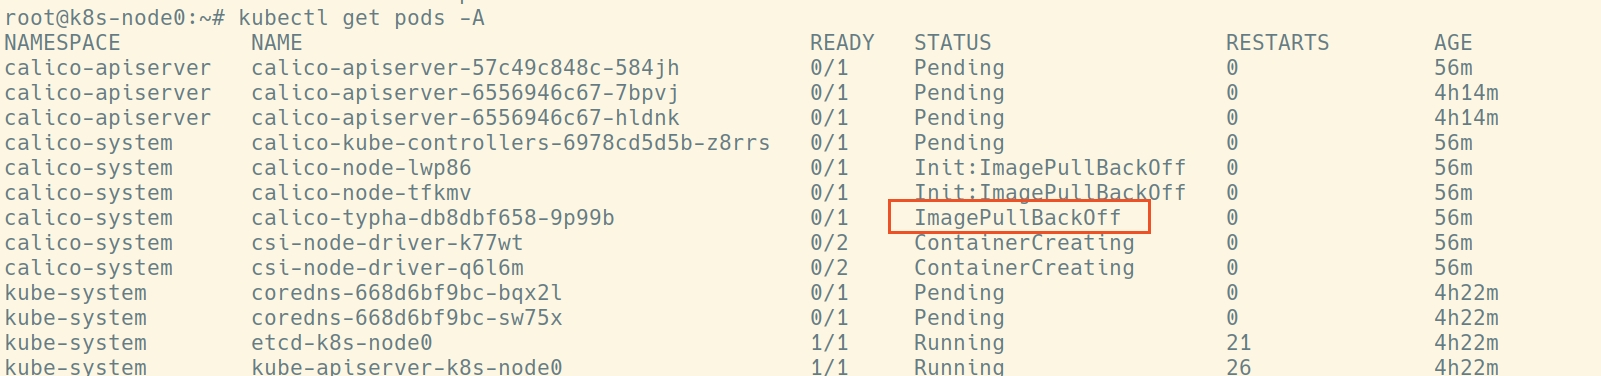
查看pod
kubectl get pods -A
kubectl describe pods -A |less
kubectl describe pods/csi-node-driver-ppxhc -n calico-system
查看日志
journalctl -u kubelet -f
journalctl -u containerd.service -f
kubectl describe pods/csi-node-driver-ppxhc -n calico-system
kubectl logs -f pods/calico-node-2rprg -n calico-system // 这个 -f 要放对地方。
在pod内执行命令
kubectl exec -it calico-node-2rprg -n calico-system -- bash
部署
kubectl create deployment kubernetes-bootcamp --image=gcr.io/google-samples/kubernetes-bootcamp:v1
kubectl get deployments
部署效果

创建服务
kubectl expose deployment/kubernetes-bootcamp --type="NodePort" --port 8080
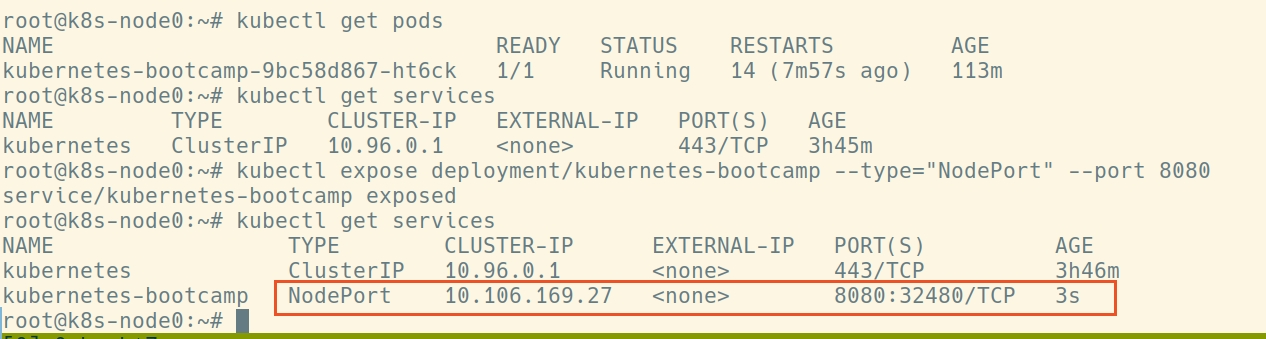
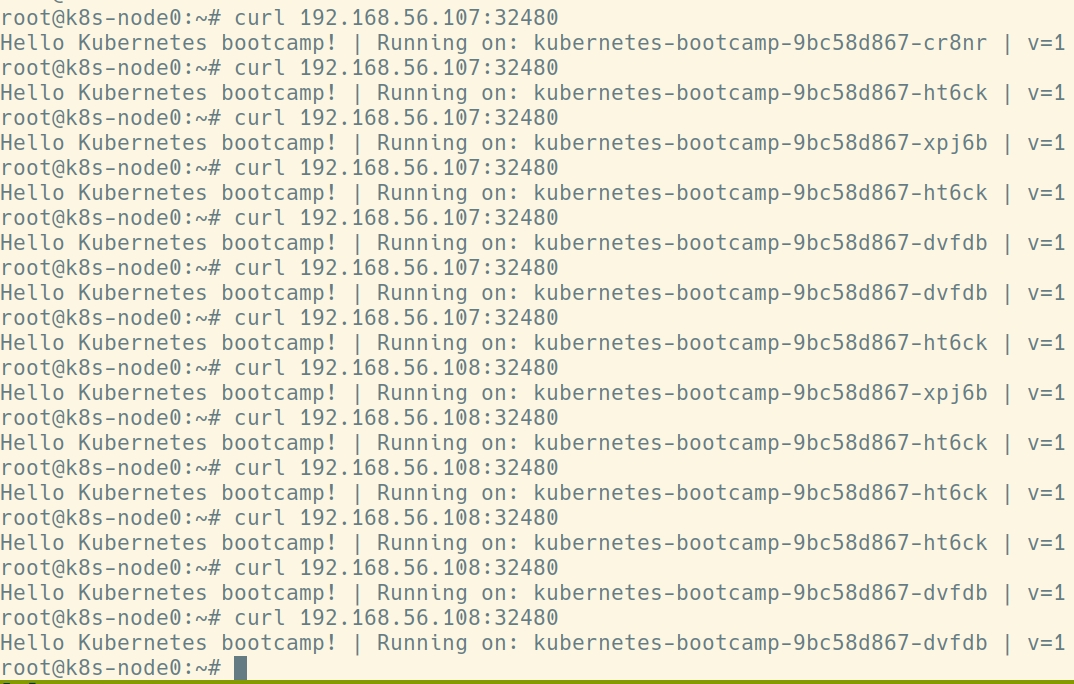
上图的端口32480,可以直接使用node ip进行访问
curl 192.168.56.107:32480

(有趣的是使用netstat看不见这个端口被监听了,应该是被k8s直接在内核截获了,没有到达传输层。)
扩容
kubectl scale deployments/kubernetes-bootcamp --replicas=4
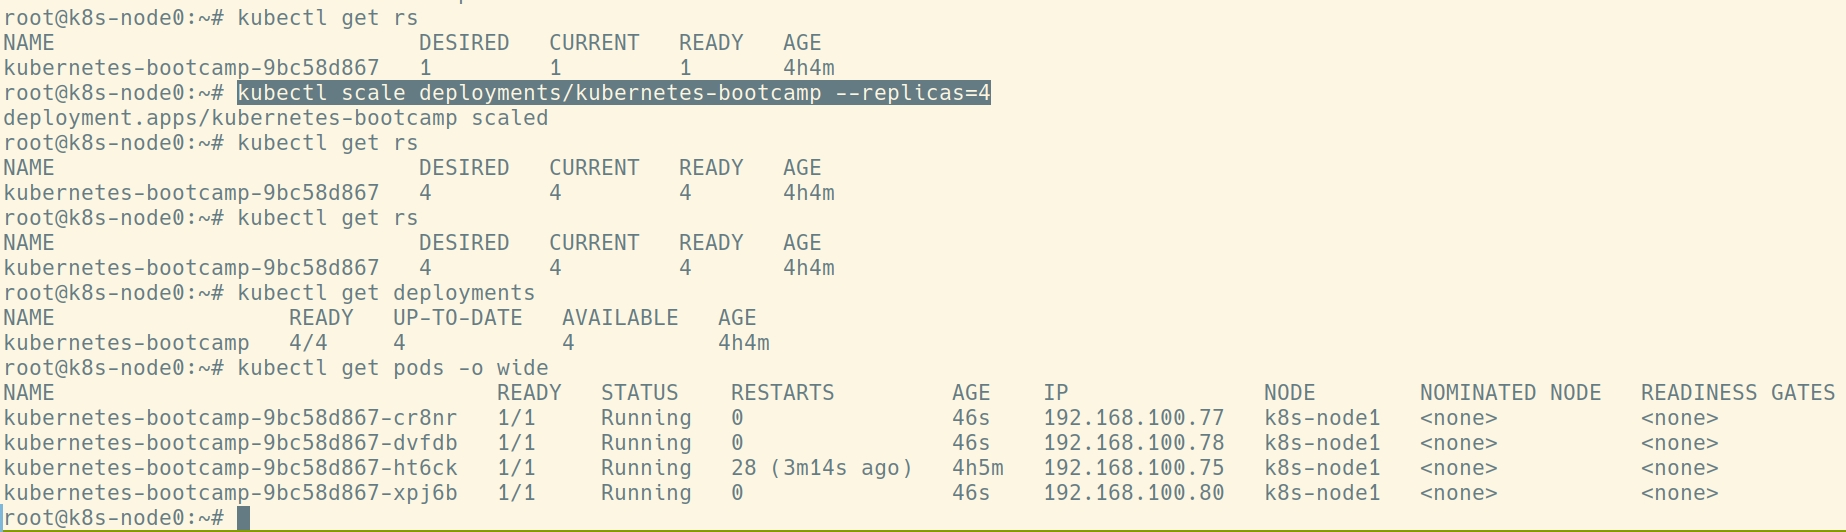
验证一下
节点缩容
kubectl drain --ignore-daemonsets --delete-emptydir-data
kubectl delete node <节点名>
故障排查:
Q:The connection to the server 192.168.56.107:6443 was refused - did you specify the right host or port?
A:container安装配置不对
参考 :
https://blog.csdn.net/ldjjbzh626/article/details/128400797
https://kubernetes.io/docs/setup/production-environment/container-runtimes/
Q: boocamp is always pending

A:
使用命令 kubectl describe pod kubernetes-bootcamp-9bc58d867-hmm4j

0/2 nodes are available:
1 node(s) had untolerated taint {node-role.kubernetes.io/control-plane: },
1 node(s) had untolerated taint {node.kubernetes.io/not-ready: }.
preemption: 0/2 nodes are available: 2 Preemption is not helpful for scheduling.
查看错误:
kubectl get nodes

journalctl -u kubelet -r
r runtime network not ready" networkReady="NetworkReady=false reason:NetworkPluginNotReady message:Network plugin returns error: cni plugin not initialized"
Q:calico运行不起来
因为有墙访问不了registry-1.docker.io

弄通了防火墙之后还是不行,因为用了阿里云的dns:223.5.5.5, 换成8.8.8.8之后就通了。
Q: reset之后 calico create失败
root@k8s-node0:~# kubectl create -f https://raw.githubusercontent.com/projectcalico/calico/v3.29.2/manifests/tigera-operator.yaml
error: error validating "https://raw.githubusercontent.com/projectcalico/calico/v3.29.2/manifests/tigera-operator.yaml": error validating data: failed to download openapi:
Get "https://192.168.56.107:6443/openapi/v2?timeout=32s": tls: failed to verify certificate: x509: certificate signed by unknown authority (possibly
because of "crypto/rsa: verification error" while trying to verify candidate authority certificate "kubernetes"); if you choose to ignore these errors, turn validation off with --validate=false
原因:reset之后要执行这个:rm -rf \$HOME/.kube
Q:装完calico,pod csi-node-driver一直不runing,卡在ContainerCreating上
不知道为什么,但是重启了kubelet,docker,containerd的服务之后,神奇的好了。
Q:运行在node1上的名叫calico-node的pod一直在重启,反复进入crashLoopBackOff状态.
查看发现如下日志
Warning Unhealthy 7s (x6 over 2m22s) kubelet Readiness probe failed: calico/node is not ready: BIRD is not ready: Error querying BIRD: unable to connect to BIRDv4 socket: dial unix
/var/run/calico/bird.ctl: connect: connection refused

 浙公网安备 33010602011771号