Anaconda中Tensorflow和Pytorch环境的搭建
Anaconda 中Tensorflow 和PyTorch 环境的搭建
title: r'Anaconda 中Tensorflow 和PyTorch 环境的搭建'
author: "hugaotuan"
date: "1/13/2022"
output: markdown
Conda 环境
下载与安装
Anaconda 历史版本归档:
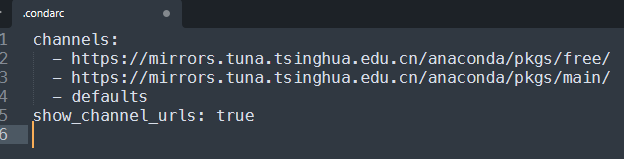
更改Anaconda 的下载源(channel):直接cmd下编辑%userprofile%\.condarc,powershell下编辑$env:userprofile\.condarc添加清华源
https://mirrors.tuna.tsinghua.edu.cn/anaconda/pkgs/free/
https://mirrors.tuna.tsinghua.edu.cn/anaconda/pkgs/main/
或在cmd/powershell 中执行
conda config --add channels https://mirrors.tuna.tsinghua.edu.cn/anaconda/pkgs/free/
conda config --add channels https://mirrors.tuna.tsinghua.edu.cn/anaconda/pkgs/main/
更改PyPi 的下载源
mkdir ~/AppData/Roaming/pip
cd ~/AppData/Roaming/pip
vim pip.ini
将以下配置写入,这里使用的是阿里镜像
[global]
index-url = https://mirrors.aliyun.com/pypi/simple/

[install]
trusted-host = mirrors.aliyun.com
为conda 和PyPi 设置代理,cmd 下%USERPROFILE%\.condarc,powershell 下$env:userprofile\.condarc
proxy_servers:
	http: http://127.0.0.1:8889
	https: http://127.0.0.1:8889
ssl_verify: False
创建环境
建议使用3.6~3.8的环境,避免出现package conflict的状况
创建conda create -n <env name> [python=<python version>]
激活conda activate <env name>(base 环境/shell level=2),activate <env name>(普通shell 环境/shell level=1)
退出激活conda deactivate <env name>
删除conda uninstall -n <env name> --all
克隆conda create -n <new env name> --clone <old env name> && conda uninstall -n <old env name> --all
conda 环境列表conda envs list
conda 环境信息conda info
conda 已安装库列表conda list
conda 库查询conda search <package name>
当出现玄学问题时尝试conda update --all
PyTorch
下载与安装
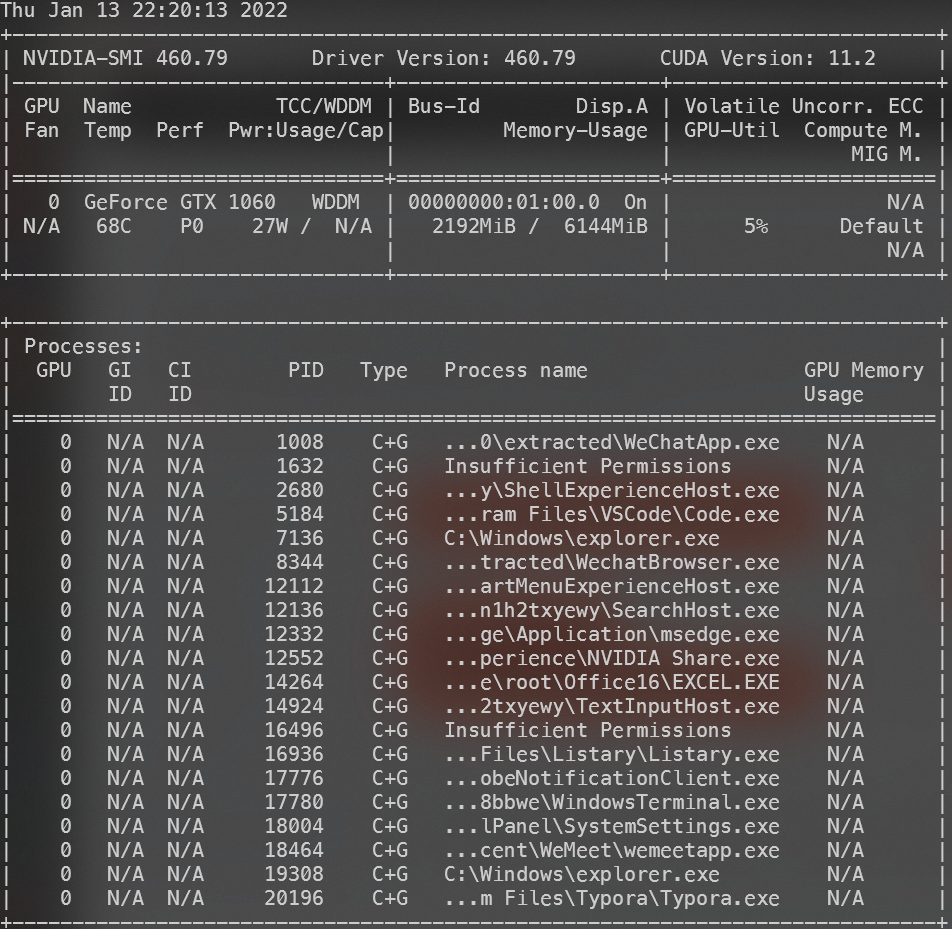
nvidia-smi查询本机驱动和cuda 版本
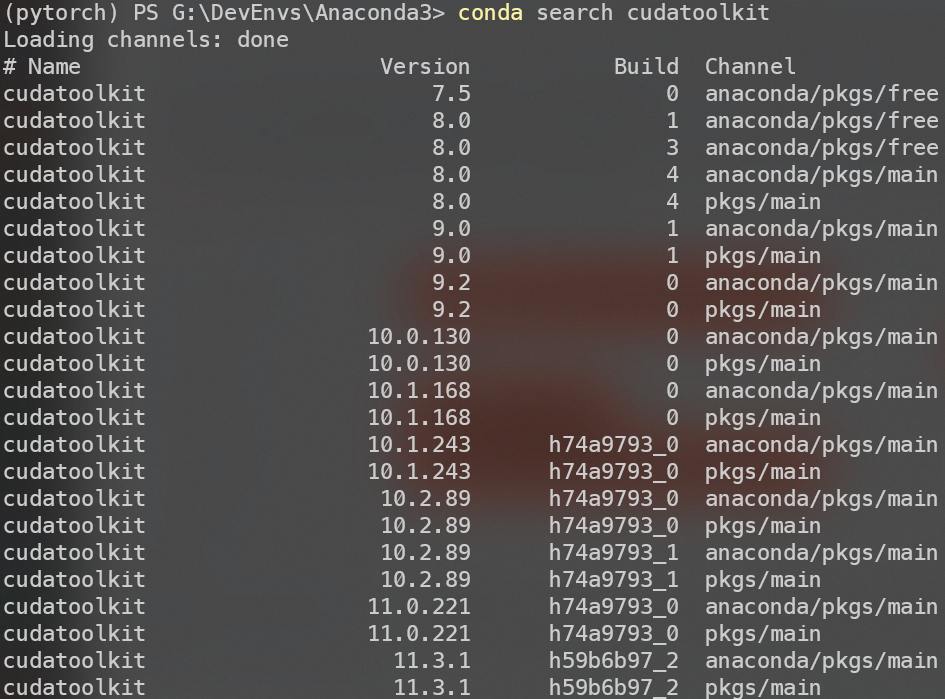
通过conda search cudatoolkit查看支持的版本号,只要cudatoolkit 的版本号第一本机cuda版本。
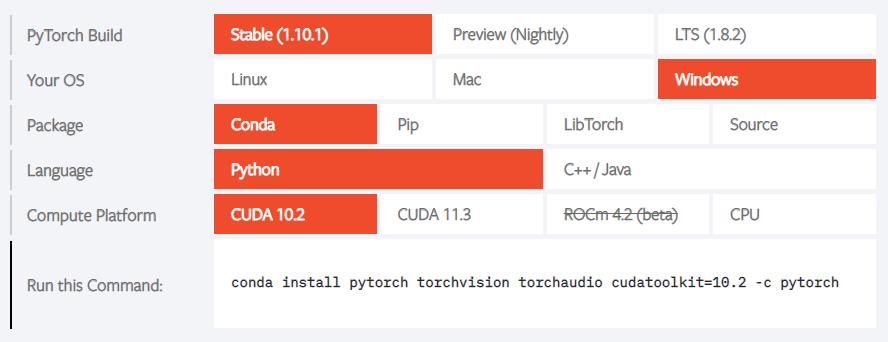
然后参考官网给出的conda 命令安装,-c pytorch使用的是pytorch 官方源不一定稳定,不成功可以删掉-c pytorch使用自己配的源conda install pytorch torchvision torchaudio cudatoolkit=10.2 -c pytorch 。除了torchvision 和torchaudio 必须使用pytorch 的channel ,其他都可以替换。
或直接conda install -c conda-forge pytorch会自动安装conda-forge 组织提供的合适版本及其依赖。
安装完成后进入python 环境。
验证gpu支持
进入python环境
>>> import torch
>>> torch.cuda.is_available()
True
Tensorflow
下载与安装
对比官网cuda版本和python版本conda install tensorflow==<version>或conda install -c conda-forge tensorflow
| Version | Python version | Compiler | Build tools | cuDNN | CUDA |
|---|---|---|---|---|---|
| tensorflow_gpu-2.7.0 | 3.7-3.9 | MSVC 2019 | Bazel 3.7.2 | 8.1 | 11.2 |
| tensorflow_gpu-2.6.0 | 3.6-3.9 | MSVC 2019 | Bazel 3.7.2 | 8.1 | 11.2 |
| tensorflow_gpu-2.5.0 | 3.6-3.9 | MSVC 2019 | Bazel 3.7.2 | 8.1 | 11.2 |
| tensorflow_gpu-2.4.0 | 3.6-3.8 | MSVC 2019 | Bazel 3.1.0 | 8.0 | 11.0 |
| tensorflow_gpu-2.3.0 | 3.5-3.8 | MSVC 2019 | Bazel 3.1.0 | 7.6 | 10.1 |
| tensorflow_gpu-2.2.0 | 3.5-3.8 | MSVC 2019 | Bazel 2.0.0 | 7.6 | 10.1 |
| tensorflow_gpu-2.1.0 | 3.5-3.7 | MSVC 2019 | Bazel 0.27.1-0.29.1 | 7.6 | 10.1 |
| tensorflow_gpu-2.0.0 | 3.5-3.7 | MSVC 2017 | Bazel 0.26.1 | 7.4 | 10 |
| tensorflow_gpu-1.15.0 | 3.5-3.7 | MSVC 2017 | Bazel 0.26.1 | 7.4 | 10 |
| tensorflow_gpu-1.14.0 | 3.5-3.7 | MSVC 2017 | Bazel 0.24.1-0.25.2 | 7.4 | 10 |
| tensorflow_gpu-1.13.0 | 3.5-3.7 | MSVC 2015 update 3 | Bazel 0.19.0-0.21.0 | 7.4 | 10 |
| tensorflow_gpu-1.12.0 | 3.5-3.6 | MSVC 2015 update 3 | Bazel 0.15.0 | 7.2 | 9.0 |
| tensorflow_gpu-1.11.0 | 3.5-3.6 | MSVC 2015 update 3 | Bazel 0.15.0 | 7 | 9 |
| tensorflow_gpu-1.10.0 | 3.5-3.6 | MSVC 2015 update 3 | Cmake v3.6.3 | 7 | 9 |
| tensorflow_gpu-1.9.0 | 3.5-3.6 | MSVC 2015 update 3 | Cmake v3.6.3 | 7 | 9 |
| tensorflow_gpu-1.8.0 | 3.5-3.6 | MSVC 2015 update 3 | Cmake v3.6.3 | 7 | 9 |
| tensorflow_gpu-1.7.0 | 3.5-3.6 | MSVC 2015 update 3 | Cmake v3.6.3 | 7 | 9 |
| tensorflow_gpu-1.6.0 | 3.5-3.6 | MSVC 2015 update 3 | Cmake v3.6.3 | 7 | 9 |
| tensorflow_gpu-1.5.0 | 3.5-3.6 | MSVC 2015 update 3 | Cmake v3.6.3 | 7 | 9 |
| tensorflow_gpu-1.4.0 | 3.5-3.6 | MSVC 2015 update 3 | Cmake v3.6.3 | 6 | 8 |
| tensorflow_gpu-1.3.0 | 3.5-3.6 | MSVC 2015 update 3 | Cmake v3.6.3 | 6 | 8 |
| tensorflow_gpu-1.2.0 | 3.5-3.6 | MSVC 2015 update 3 | Cmake v3.6.3 | 5.1 | 8 |
| tensorflow_gpu-1.1.0 | 3.5 | MSVC 2015 update 3 | Cmake v3.6.3 | 5.1 | 8 |
| tensorflow_gpu-1.0.0 | 3.5 | MSVC 2015 update 3 | Cmake v3.6.3 | 5.1 | 8 |
验证gpu 支持
python 环境
>>> import tensorflow as tf
>>> tf.test.is_gpu_available()
WARNING:tensorflow:From <stdin>:1: is_gpu_available (from tensorflow.python.framework.test_util) is deprecated and will be removed in a future version.
Instructions for updating:
Use `tf.config.list_physical_devices('GPU')` instead.
2022-01-13 22:58:58.198910: I tensorflow/core/platform/cpu_feature_guard.cc:142] This TensorFlow binary is optimized with oneAPI Deep Neural Network Library (oneDNN) to use the following CPU instructions in performance-critical operations:  AVX AVX2
To enable them in other operations, rebuild TensorFlow with the appropriate compiler flags.
2022-01-13 22:58:59.115238: I tensorflow/core/common_runtime/gpu/gpu_device.cc:1510] Created device /device:GPU:0 with 4628 MB memory:  -> device: 0, name: GeForce GTX 1060, pci bus id: 0000:01:00.0, compute capability: 6.1
True
>>> tf.config.list_physical_devices('GPU')
[PhysicalDevice(name='/physical_device:GPU:0', device_type='GPU')]
OpenCV
此时一开始配置的PyPi 镜像派上了用场。
pip install opencv-python
没有做一开始替换源的步骤的通过。
pip install -i https://mirrors.aliyun.com/pypi/simple/ opencv-python
COCO 数据集
目前COCO数据集提供的win-python 接口pycocotools-windows 仅支持python3 的3.5~3.8 版本,导致了我一开始使用py3.9 的环境降级重新安装。
pip install -i https://mirrors.aliyun.com/pypi/simple/ pycocotools-windows
CUDA 独立安装环境
使用Visual Studio 2019通过CMake编译安装,之后调用python-api,完成数据集训练以及验证环节。

 浙公网安备 33010602011771号