
一 什么是nginx
Nginx是一款轻量级的Web 服务器,反向代理服务器及电子邮件(IMAP/POP3)代理服务器
其特点是占有内存少,并发能力强,能够支持高达 50,000 个并发连接数的响应。
事实上nginx的并发能力确实在同类型的网页服务器中表现较好,使用nginx网站用户有:百度、京东、新浪、网易、腾讯、淘宝等
nginx工作原理
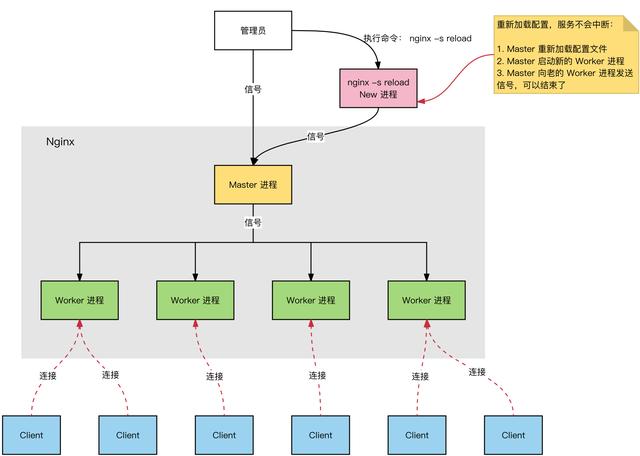
Nginx 服务器,正常运行过程中:
- 多进程:一个 Master 进程、多个 Worker 进程
- Master 进程:管理 Worker 进程,监控 worker 进程的运行状态,worker 进程异常终止后,自动重启 worker 进程
- Worker 进程:所有 Worker 进程都是平等的 实际处理:网络请求,由 Worker 进程处理;
- Worker 进程数量:在 nginx.conf 中配置,一般设置为核心数,充分利用 CPU 资源,同时,避免进程数量过多,避免进程竞争 CPU 资源,增加上下文切换的损耗。
二 环境准备
1 准备一台干净的centos7服务器,或者虚拟机或者购买的VPS。Nginx是C开发的,建议在 Linux上运行,当然,也可以安装Windows 版本。
2 安装依赖,安装需要gcc环境,所以需要安装gcc;zlib是用来对http包的内容进行gzip压缩的;openssl则是支持https的SSL协议;pcre库是用来匹配正则的,rewrite规则需要它
yum install gcc-c++ pcre pcre-devel zlib zlib-devel3.下载最新稳定版的nginx,目前稳定版是1.14.2。官网下载地址:http://nginx.org/en/download.html,下载后将安装包上传到CentOS中。
可以使用wget命令直接下载到CentOS系统中:
wget http://nginx.org/download/nginx-1.14.2.tar.gz
groupadd www
useradd -s /sbin/nologin -g www www
4 编译安装
进入下载的安装包目录,解压nginx,进入nginx解压后的目录,配置安装参数:
tar -zxvf nginx -1.14.2.tar.gz
cd nginx -1.14.2
更改源码修改软件名称和版本号
[root@localhost core]# pwd
/usr/local/src/nginx-1.8.1/src/core
[root@localhost core]# vim nginx.h
#define nginx_version      8008001
#define NGINX_VERSION      "8.12.0"
#define NGINX_VER          "wg007/" NGINX_VERSION

#ifdef NGX_BUILD
#define NGINX_VER_BUILD    NGINX_VER " (" NGX_BUILD ")"
#else
#define NGINX_VER_BUILD    NGINX_VER
#endif

#define NGINX_VAR          "WG007"
#define NGX_OLDPID_EXT     ".oldbin"
./configure --user=www --group=www --prefix=/usr/local/nginx --with-http_stub_status_module --with-http_ssl_module --with-http_v2_module --with-http_gzip_static_module --with-http_sub_module
http_stub_status_module 作用:监控nginx运行状态
http_sub_module 作用:用于替换字符串
http_ssl_module 作用:支持https访问
http_gzip_static_module 作用:实现静态压缩功能,节约带宽
进行编译安装
make && make install
5 管理nginx
编辑nginx 启动脚本
# chkconfig: 2345 99 20
2345表示系统运行级别是2,3,4或者5时都启动此服务,
99,是启动的优先级,
20, 是关闭的优先级
#description: nginx-server
nginx=/usr/local/nginx/sbin/nginx
case $1 in

        start)
              netstat -anptu | grep nginx
              if [ $? -eq 0 ]
                 then
                    echo "nginx-server is already running"
                  else
                     echo "nginx-server begin start"
                    $nginx
                 fi
         ;;

        stop)

                $nginx -s stop
                 if [ $? -eq 0 ]
                 then
                    echo "nginx-server is stoped"
                 else
                    echo "nginx-server stop fail,try again"
                 fi
;;

        status)
             netstat -anlpt | grep nginx
                 if [ $? -eq 0 ]
                 then
                    echo "nginx-server is running"
                 else
                    echo "nginx-server is stoped"
fi

;;

        restart)
                 $nginx -s reload
                 if [ $? -eq 0 ]
                 then
                     echo "nginx-server is begin restart"
                 else
                     echo "nginx-server restart fail"
                 fi
;;


         *)
         echo "please enter {start restart status stop}"
;;
esac
vi /etc/init.d/nginx
chkconfig --add nginx 将nginx 添加为系统服务
chkconfig --list|grep nginx
chmod +x /etc/init.d/nginx
.停止和重新载入nginx配置。
/usr/local/nginx/sbin/nginx –s stop # 停止
/usr/local/nginx/sbin/nginx -s reload # 重载nginx使配置生效
测试配置文件是否正常。
/usr/local/nginx/sbin/nginx –t
关于优化
1 关于系统连接数的优化
linux 默认值 open files 和 max user processes 为 1024
说明 server 只允许同时打开 1024 个文件,处理 1024 个用户进程
#ulimit -n
1024
使用ulimit -a 可以查看当前系统的所有限制值,使用ulimit -n 可以查看当前的最大打开文件数。
新装的linux 默认只有1024 ,当作负载较大的服务器时,很容易遇到error: too many open files 。因此,需要将其改大。
解决方法:
-S 指soft ,-H 指hard
临时修改方法:
ulimit -SHn 65535
永久修改方法:
在/etc/security/limits.conf 最后增加:
* soft nofile 65535
* hard nofile 65535
* soft nproc 65535
* hard nproc 65535
备注:ulimit 命令本身就有分软硬设置,加-H 就是硬,加-S 就是软默认显示的是软限制
soft 限制不能设置的比 hard 限制更高。 只有 root 用户才能够增加 hard 限制值。
2 nginx全局配置优化 nginx.conf:
1 修改nginx运行的用户
user www
2 nginx初始进程数量
worker_processes auto; #cpu核数
3 单进程处理最大请求连接数
worker_connections 65535;
4 IO模型
events {
worker_connections 65535; #每个工作进程允许的最大连接数
use epoll; #使用高性能的 epoll 事件驱动,处理效率高
IO多路复用是指多个描述符的I/O操作都能在一个线程内并发交替地顺序完成,
这里的“复用”指的是复用同一个线程;
Linux 中一切皆文件,比如 C++ 源文件、视频文件、Shell脚本、可执行文件等,就连键盘、显示器、鼠标等硬件设备也都是文件。
一个 Linux 进程可以打开成百上千个文件,为了表示和区分已经打开的文件,Linux 会给每个文件分配一个编号(一个 ID),这个编号就是一个整数,被称为文件描述符(File Descriptor)。
#什么是epoll 名词解释 http://www.mamicode.com/info-detail-2283798.html
}
5 长连接超时时长 :keepalive_timeout 65;
6 压缩: gzip on;
静态数据缓存过期时长
7 隐藏版本号
在http模块中添加
server_tokens off;
验证:curl -I http://127.0.0.1
8 拒绝访问敏感目录
拒绝访问 admin和config目录
location ~ ^/(admin|config)/ {
deny all;
}
9 允许客户端缓存所有图片数据360天
location ~ \.(jpg|gif|png|jpeg)$ {
expires 360d;
}
四 loction 匹配模式及顺序
location = /uri =开头表示精确匹配,只有完全匹配上才能生效。
location ^~ /uri ^~ 开头对URL路径进行前缀匹配,并且在正则之前。
location ~ pattern ~开头表示区分大小写的正则匹配。
location ~* pattern ~*开头表示不区分大小写的正则匹配。
location /uri 不带任何修饰符,也表示前缀匹配,但是在正则匹配之后。
location / 通用匹配,任何未匹配到其它location的请求都会匹配到,相当于switch中的default。
    location ^~ /admin {
                deny all;
        }

        location = /50x.html {
            #root   html;
                return 600;
        }
        location  ~ /helloword {
                return 601;
        }
        location ~* /Helloword {
                return 602;
        }
匹配的顺序是先匹配普通字符串,然后再匹配正则表达式。
五: nginx 防DDos配置防御
DDOS是一个系统工程,攻击花样多,防御的成本高瓶颈多,防御起来即被动又无奈。
DDOS的特点是分布式,针对带宽和服务攻击,也就是四层流量攻击和七层应用攻击,相应的防御瓶颈四层在带宽,七层的多在架构的吞吐量。
对于七层的应用攻击,我们还是可以做一些配置来防御的,例如前端是Nginx,主要使用nginx的http_limit_conn和http_limit_req模块来防御。
ngx_http_limit_conn_module 可以限制单个IP的连接数
ngx_http_limit_req_module 可以限制单个IP每秒请求数,通过限制连接数和请求数能相对有效的防御CC攻击。
下面是配置方法:
http {
    limit_req_zone $binary_remote_addr zone=one:10m rate=10r/s; //触发条件,所有访问ip 限制每秒10个请求
    …
    server {
         location / {
            root   html;
            index  index.html index.htm;
            limit_req zone=one burst=5 nodelay;//执行的动作,通过zone名字对应
        }
     }
nodelay 超过的请求不被延迟处理
验证: ab -n2000 -c 1000 http://127.0.0.1/a.html
[root@localhost html]# pwd
/usr/local/nginx/html
[root@localhost html]# ll
total 12
-rw-r--r--. 1 root root 537 Nov  5 22:24 50x.html
-rw-r--r--. 1 root root   4 Nov  6 01:57 a.html
-rw-r--r--. 1 root root 612 Nov  5 22:24 index.html
[root@localhost ~]# tailf /usr/local/nginx/logs/access.log
127.0.0.1 - - [06/Nov/2019:02:26:17 -0800] "GET /a.html HTTP/1.0" 503 537 "-" "ApacheBench/2.3" "-"
127.0.0.1 - - [06/Nov/2019:02:26:17 -0800] "GET /a.html HTTP/1.0" 503 537 "-" "ApacheBench/2.3" "-"
127.0.0.1 - - [06/Nov/2019:02:26:17 -0800] "GET /a.html HTTP/1.0" 503 537 "-" "ApacheBench/2.3" "-"


[root@localhost ~]# tailf /usr/local/nginx/logs/error.log
2019/11/06 02:26:17 [error] 27170#0: *4021 limiting requests, excess: 5.910 by zone "one", client: 127.0.0.1, server: localhost, request: "GET /a.html HTTP/1.0", host: "127.0.0.1"
2019/11/06 02:26:17 [error] 27170#0: *4022 limiting requests, excess: 5.910 by zone "one", client: 127.0.0.1, server: localhost, request: "GET /a.html HTTP/1.0", host: "127.0.0.1"
2019/11/06 02:26:17 [error] 27170#0: *4023 limiting requests, excess: 5.910 by zone "one", client: 127.0.0.1, server: localhost, request: "GET /a.html HTTP/1.0", host: "127.0.0.1"
2019/11/06 02:26:17 [error] 27170#0: *4024 limiting requests, excess: 5.910 by zone "one", client: 127.0.0.1, server: localhost, request: "GET /a.html HTTP/1.0", host: "127.0.0.1"
2019/11/06 02:26:17 [error] 27170#0: *4025 limiting requests, excess: 5.910 by zone "one", client: 127.0.0.1, server: localhost, request: "GET /a.html HTTP/1.0", host: "127.0.0.1"
二.限制IP连接数
http {
    limit_conn_zone $binary_remote_addr zone=addr:10m; //触发条件
    …
    server {
        …
        location /download/ {
            limit_conn addr 1;    // 限制同一时间内1个连接,超出的连接返回503
                }
           }
     }
使用ab命令进行测试
yum -y install httpd-tools
测试:ab -n 请求数 -c 并发数 http://172.18.47.92:8080/admin
并发数不能大于请求数
