
HTML布局排版5 测试某段html页面1
除了div,常见的还有用table布局,这里直接用前面博文的页头页尾,如下面的页面的部分,是个简单的table。
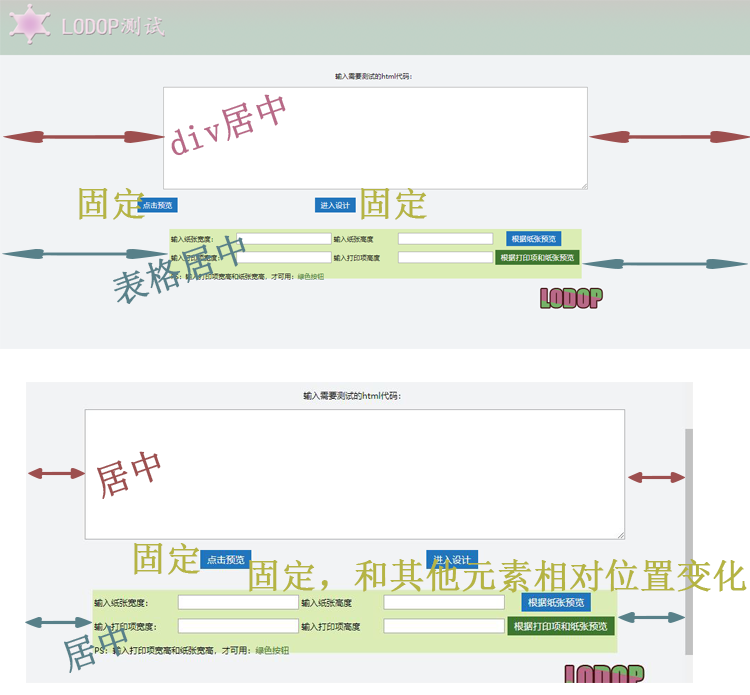
该页面样式,如果拖动浏览器,可以看到table和文本框总是居中,但是文本框下方那两个按钮没有设置居中,根据浏览器大小宽度拖动,按钮也会有变化。如果想按钮也随着浏览器变动而有较好的位置,也可以放div或table里进行居中。
如果一个页面设计了居中,中间区块最好都是居中的,虽然一般人浏览器页面都是浏览器最大化,但是由于电脑显示器等不同,或浏览器拖动等,有不居中的元素显示位置就会有差异。
所用css样式:(有前面博文用到的样式,放在一起了)
body{margin:0px;font-size:12px;}
#body{width:100%;}
#bodyleft{background-image:url(../images/t1.png);width:790px;height:25px;margin:auto;}
#bodymiddle{background-image:url(../images/t2.png);width:790px;text-align:center;margin:auto;}
#bodyright{background-image:url(../images/t3.png);width:790px;height:25px;margin:auto;}
.btn1{background-color: #5ff6ed;font-size: 12px;}
.btn2 {background-color:#2175bd;border:none;color:white;padding:5px 10px;text-align:center;text-decoration:none;margin-left:250px;}
.btn3 {background-color:#2175bd;border:none;color:white;padding:5px 10px;text-align:center;text-decoration:none;margin-left:20px;}
.btn4 {background-color:#3f7730;border:none;color:white;padding:5px 10px;text-align:center;text-decoration:none;margin-left:0px;}
.next{color:blue;}
#header{background-image:url(../images/topbg.png);width:100%;height:100px;}
#head1{background-image:url(../images/lodoptest.png);width:400px;height:100px;}
#footer{width:790px;height:100px;margin:auto;text-align:right;}

#bodyA1{background-color:#f1f3f5;}
#testhtmDiv{margin:auto;text-align:center;padding-top:30px;}

#tableD1{background:#dbedb4;width:750px;height:90px;margin:30px auto;}
页面html代码
<head>
<meta http-equiv="Content-Type" content="text/html; charset=utf-8" />
<title>WEB打印控件LODOP</title>
<script language="javascript" src="LodopFuncs.js"></script>
 <link href="css/stylecss1.css" type='text/css' rel="stylesheet">
</head>
<body id="bodyA1">
<div id="header">
<div id="head1"></div>
</div>

<div id="testhtmDiv">
输入需要测试的html代码:
 <p><textarea rows="12" id="S1" cols="107" ></textarea><br>
 </div>
 <input type="button" class="btn2" value="点击预览" onclick="TestHtmPre()"><input type="button" class="btn2" value="进入设计" onclick="TestHtmDes()">

 <div id="tableD1">
<table width="750px" height="90px">
<tr>
    <td width="150px" height="30px">输入纸张宽度:</td>
    <td width="150px" height="30px"><input type="text" id="PZ_W"></td>
    <td width="150px" height="30px">输入纸张高度</td>
    <td width="150px" height="30px"><input type="text" id="PZ_H"></td>
    <td width="150px" height="30px"> <input type="button" class="btn3" value="根据纸张预览" onclick="prndiypage()"></td>
</tr>
<tr>
    <td width="150px" height="30px">输入打印项宽度:</td>
    <td width="150px" height="30px"><input type="text" id="item_W"></td>
    <td width="150px" height="30px">输入打印项高度</td>
    <td width="150px" height="30px"><input type="text" id="item_H"></td>
    <td width="150px" height="30px"> <input type="button" class="btn4" value="根据打印项和纸张预览" onclick="prndiypage2()"></td>
</tr>
<tr>
    <td colspan=5 height="30px">PS:输入打印项宽高和纸张宽高,才可用:<font color="#3f7730">绿色按钮</font></td>
</tr>
</table>
<div>

<div id="footer"><img src="./images/lodopfoot.png"></div>
<script language="javascript" type="text/javascript">
        var LODOP; //声明为全局变量
        function TestHtmDes(){
        LODOP=getLodop();
        LODOP.PRINT_INIT("");
        LODOP.ADD_PRINT_HTM(0,0,"100%","100%",document.getElementById("S1").value);
        LODOP.PRINT_DESIGN();
    };
        function TestHtmPre(){
        LODOP=getLodop();
        LODOP.PRINT_INIT("");
        LODOP.ADD_PRINT_HTM(0,0,"100%","100%",document.getElementById("S1").value);
        LODOP.PREVIEW();
    };
        function prndiypage2() {
        LODOP=getLodop();
        LODOP.PRINT_INIT("");
        LODOP.SET_PRINT_PAGESIZE(1, document.getElementById("PZ_W").value, document.getElementById("PZ_H").value,"");
        LODOP.ADD_PRINT_HTM(0,0,"100%","100%",document.getElementById("S1").value);
        LODOP.PREVIEW();
    };
          function prndiypage2() {
        LODOP=getLodop();
        LODOP.PRINT_INIT("");
        LODOP.SET_PRINT_PAGESIZE(1, document.getElementById("PZ_W").value, document.getElementById("PZ_H").value,"");
        LODOP.ADD_PRINT_HTM(0,0,document.getElementById("item_W").value,document.getElementById("item_H").value,document.getElementById("S1").value);
        LODOP.PREVIEW();
    };
</script>
</body>
图示:
效果如图,浏览器最大化,两个按钮的位置是第一个图,第一个按钮已经在上面文本框的左侧。
浏览器缩小,div和table都随着浏览器的变化左右边距发生了变化,还是保持居中,中间的按钮已经到了文本框中间位置。

 浙公网安备 33010602011771号