

基于华为开发者空间从0实现一个MCP Server
1 概述
1.1 案例介绍
MCP (Model Context Protocol) 是一个开放协议,用于标准化应用程序如何向 LLM 提供上下文。可以将 MCP 想象成 AI 应用程序的 USB-C 接口。就像 USB-C 为设备连接各种外设和配件提供标准化方式一样,MCP 为 AI 模型连接不同的数据源和工具提供了标准化的方式。
MCP 的核心遵循客户端-服务器架构,其中主机应用程序可以连接到多个服务器:
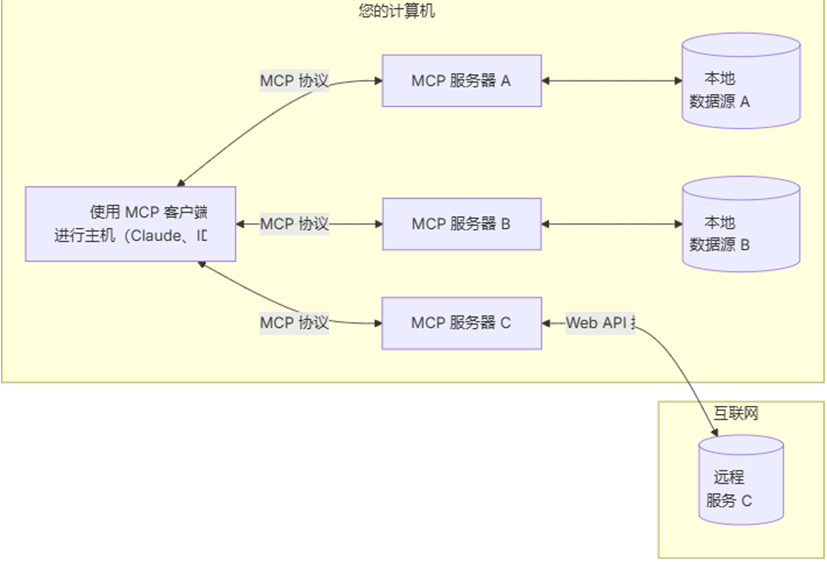
l MCP 主机:希望通过 MCP 访问数据的 Claude Desktop、IDE 或 AI 工具等程序;
l MCP 客户端:与服务器保持 1:1 连接的协议客户端;
l MCP 服务器:轻量级程序,每个程序都通过标准化的 Model Context Protocol 公开特定功能;
l 本地数据源:MCP 服务器可以安全访问的计算机文件、数据库和服务;
l 远程服务:MCP 服务器可以连接到的 Internet 上可用的外部系统(例如,通过 API)。
本案例选择云主机本地搭建MCP Server服务作为示例,在华为开发者空间云主机部署MCP Server服务,基于MaaS提供的免费DeepSeek-R1大模型调用MCP Server提供的工具来进行功能实现。
通过实际操作,让大家深入了解如何利用云主机完成MCP Server开发和部署,如何通过大模型调用MCP Server服务。
1.2 适用对象
l 企业
l 个人开发者
l 高校学生
1.3 案例时间
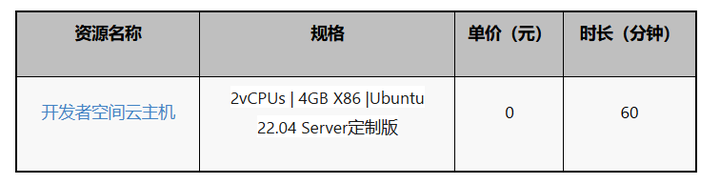
本案例总时长预计60分钟。
1.4 案例流程
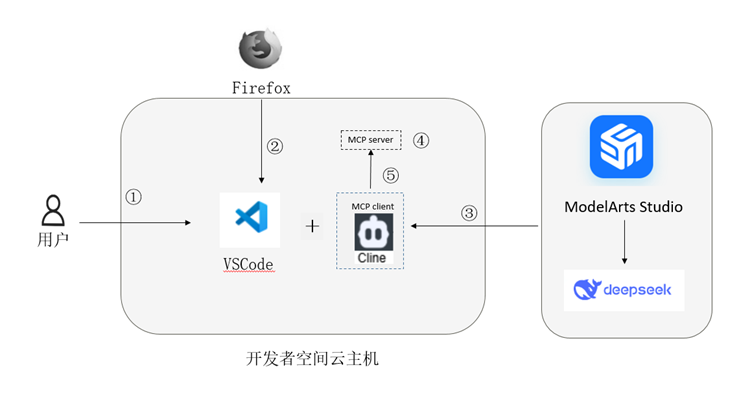
说明:
① 用户打开华为开发者空间云主机;
② 浏览器下载VSCode,完成安装配置;
③ VSCode中使用cline插件配置MaaS提供免费版DeepSeek-R1模型;
④ MCP Server服务开发及部署;
⑤ Cline插件配置MCP Server服务并调用MCP Server提供的工具。
1.5 资源总览
本案例预计花费0元。
2 环境配置
2.1 开发者空间配置
面向广大开发者群体,华为开发者空间提供一个随时访问的“开发桌面云主机”、丰富的“预配置工具集合”和灵活使用的“场景化资源池”,开发者开箱即用,快速体验华为根技术和资源。
如果还没有领取开发者空间云主机,可以参考免费领取云主机文档领取。
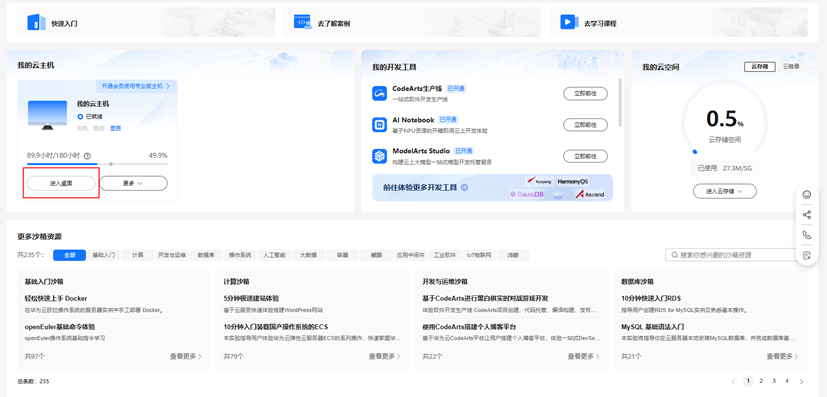
领取云主机后可以直接进入华为开发者空间工作台界面,点击进入桌面连接云主机。

2.2 免费领取DeepSeek-R1满血版
详细步骤请参考案例中步骤2.1
2.3 安装VSCode
详细步骤请参考案例中步骤2.2
2.4 安装并配置Cline插件
详细步骤请参考案例中步骤2.3
3 项目构建
3.1 Server环境设置
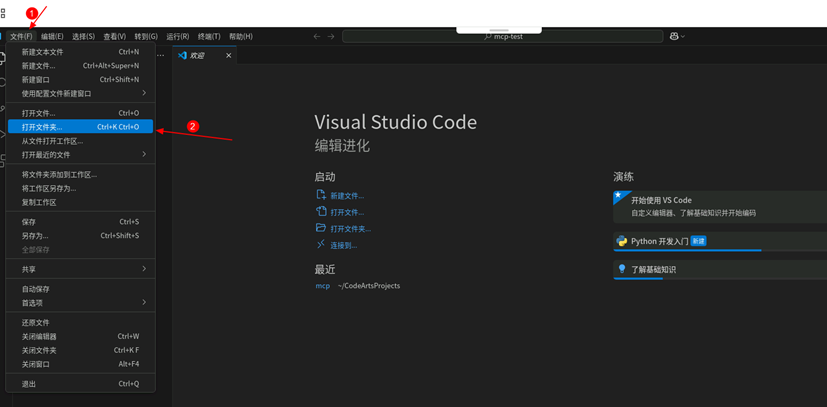
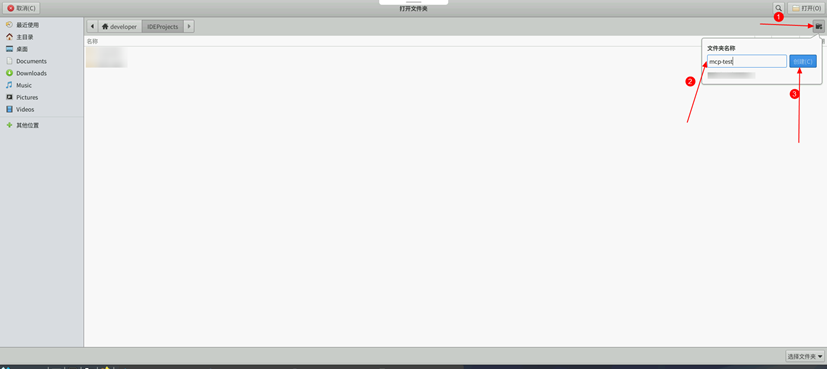
1.在VSCode中,左上角点击文件->打开文件夹,在截图目录下创建文件mcp-test,点击左上角打开。
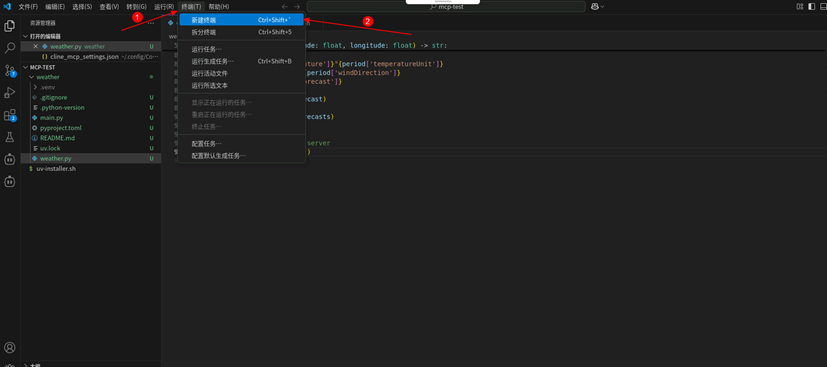
通过Ctrl + `键打开终端,安装并设置运行脚本所需的Python所需的环境和配置。
也可以点击顶部终端->新建终端打开。
curl -fsSL https://dtse-mirrors.obs.cn-north-4.myhuaweicloud.com/case/0037/uv-installer.sh -o uv-installer.sh | sh

sudo snap install astral-uv --classic

安装完毕后,在终端输入uv --version,查看uv版本。
2. 通过Ctrl + `键打开终端,执行如下命令完成工程初始化,运行成功后,左侧目录下会出现weather文件夹。
uv init weather

cd weather
3. 初始化完毕后,进行虚拟环境创建并激活,将以下命令复制到终端中。
uv venv

source .venv/bin/activate

4. 激活完成后,在终端前方会出现(weather)字样,代表激活成功。

5. 执行以下命令安装MCP Server开发所需要的依赖包。
uv add "mcp[cli]" httpx -i https://mirrors.tuna.tsinghua.edu.cn/pypi/web/simple

6. 创建weather.py文件,创建完毕后,在weather文件夹下会出现weather.py文件,表示文件创建成功。
touch weather.py

3.2 MCP Server功能实现
注意:此步骤中所有代码统一复制到weather.py文件中。
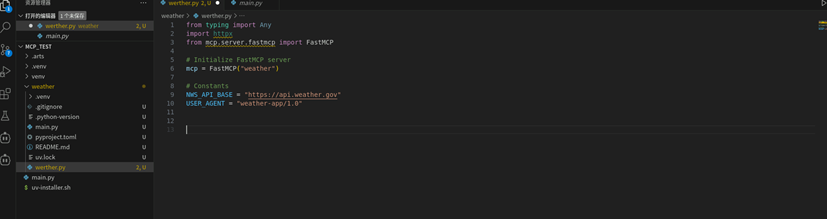
1. 初始化Server实例,并定义API变量。将以下代码复制到创建的weather.py文件中。
FastMCP类使用Python类型提示和文档字符串自动生成工具定义,从而轻松创建和维护MCP工具。
from typing import Any

import httpx

from mcp.server.fastmcp import FastMCP


# Initialize FastMCP server

mcp = FastMCP("weather")


# Constants

NWS_API_BASE = "https://api.weather.gov"

USER_AGENT = "weather-app/1.0"
2. 定义用于查询和格式化Weather Service API中的数据的帮助函数:
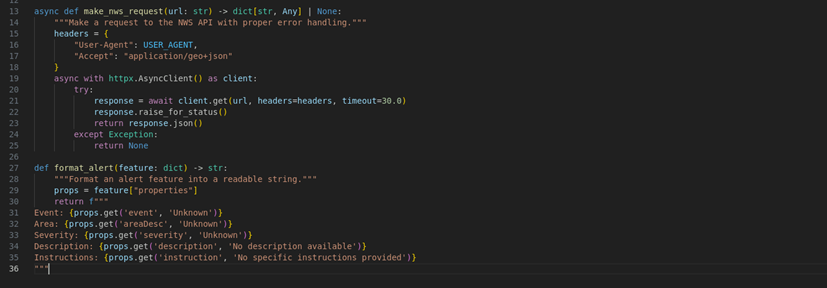
async def make_nws_request(url: str) -> dict[str, Any] | None:

    """Make a request to the NWS API with proper error handling."""

    headers = {

        "User-Agent": USER_AGENT,

        "Accept": "application/geo+json"

    }

    async with httpx.AsyncClient() as client:

        try:

            response = await client.get(url, headers=headers, timeout=30.0)

            response.raise_for_status()

            return response.json()

        except Exception:

            return None


def format_alert(feature: dict) -> str:

    """Format an alert feature into a readable string."""

    props = feature["properties"]

    return f"""

Event: {props.get('event', 'Unknown')}

Area: {props.get('areaDesc', 'Unknown')}

Severity: {props.get('severity', 'Unknown')}

Description: {props.get('description', 'No description available')}

Instructions: {props.get('instruction', 'No specific instructions provided')}

"""
3. 定义MCP Server工具函数get_alerts和get_forecast,工具函数用来执行查询天气情况的逻辑,将以下代码复制到weather.py文件中
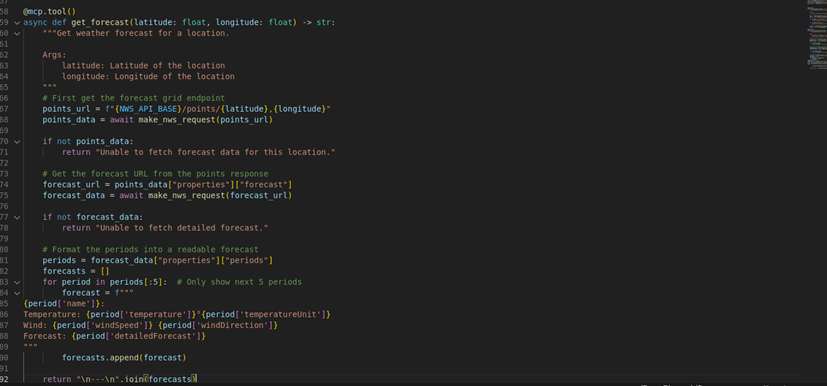
@mcp.tool()

async def get_alerts(state: str) -> str:

    """Get weather alerts for a US state.


    Args:

        state: Two-letter US state code (e.g. CA, NY)

    """

    url = f"{NWS_API_BASE}/alerts/active/area/{state}"

    data = await make_nws_request(url)


    if not data or "features" not in data:

        return "Unable to fetch alerts or no alerts found."


    if not data["features"]:

        return "No active alerts for this state."


    alerts = [format_alert(feature) for feature in data["features"]]

    return "\n---\n".join(alerts)


@mcp.tool()

async def get_forecast(latitude: float, longitude: float) -> str:

    """Get weather forecast for a location.


    Args:

        latitude: Latitude of the location

        longitude: Longitude of the location

    """

    # First get the forecast grid endpoint

    points_url = f"{NWS_API_BASE}/points/{latitude},{longitude}"

    points_data = await make_nws_request(points_url)


    if not points_data:

        return "Unable to fetch forecast data for this location."


    # Get the forecast URL from the points response

    forecast_url = points_data["properties"]["forecast"]

    forecast_data = await make_nws_request(forecast_url)


    if not forecast_data:

        return "Unable to fetch detailed forecast."


    # Format the periods into a readable forecast

    periods = forecast_data["properties"]["periods"]

    forecasts = []

    for period in periods[:5]:  # Only show next 5 periods

        forecast = f"""

{period['name']}:

Temperature: {period['temperature']}°{period['temperatureUnit']}

Wind: {period['windSpeed']} {period['windDirection']}

Forecast: {period['detailedForecast']}

"""

        forecasts.append(forecast)


    return "\n---\n".join(forecasts)
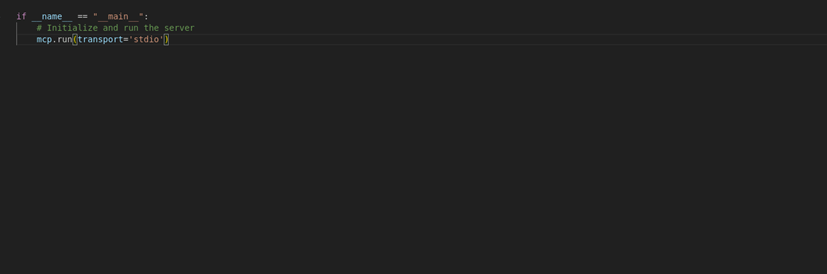
4. 定义主函数,在云主机部署MCP Server,将以下代码复制到weather.py文件中,进行服务器部署。
if __name__ == "__main__":

    # Initialize and run the server

    mcp.run(transport='stdio')
5. 在终端输入以下命令,运行脚本,如果能查询到Server进程表示部署成功。
uv run weather.py
3.3 Cline插件上配置MCP Server
1. 配置Server。点击之前安装的Cline插件,随后点击上方MCP Server->Installed->Configure MCP Servers。
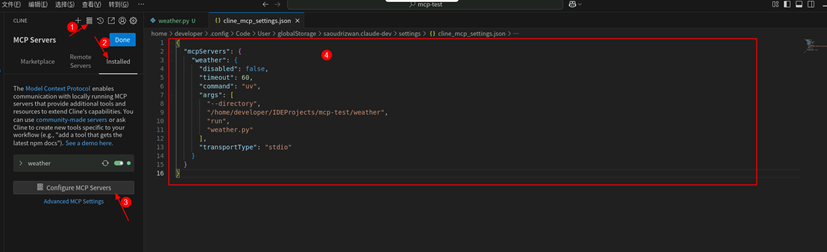
将以下代码替换到cline_mcp_settings.json文件中。
{

  "mcpServers": {

    "weather": {

      "disabled": false,

      "timeout": 60,

      "command": "uv",

      "args": [

        "--directory",

        "/home/developer/IDEProjects/mcp-test/weather",

        "run",

        "weather.py"

      ],

      "transportType": "stdio"

    }

  }

}
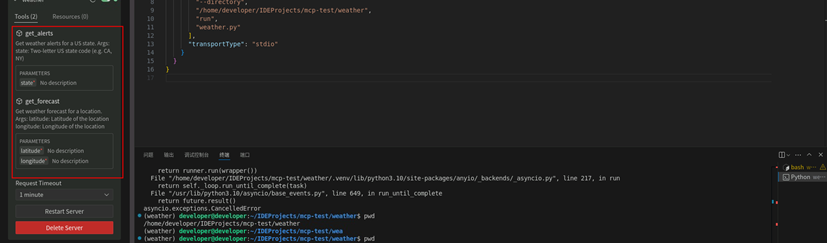
2. 替换关键参数。args中的地址需要根据自身实际地址进行替换。
在终端输入pwd,获取路径,对args中的路径参数进行替换。


3. 将json文件中的路径参数替换之后ctrl+s进行保存,可以看到,MCP Server提供两个工具,分别为get_alerts和get_forecast,至此MCP Server配置完成。
3.4 Cline插件调用MCP Server工具查询天气
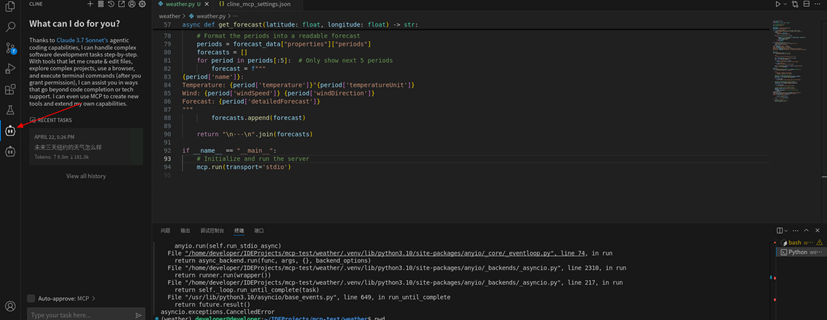
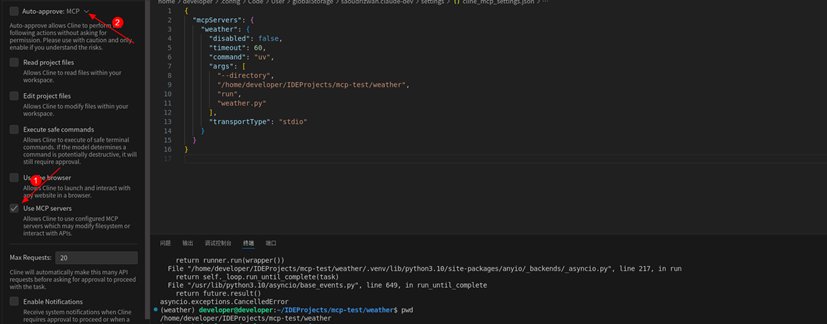
1. cline新建会话,点击Auto-approve,设置MCP服务开关配置。
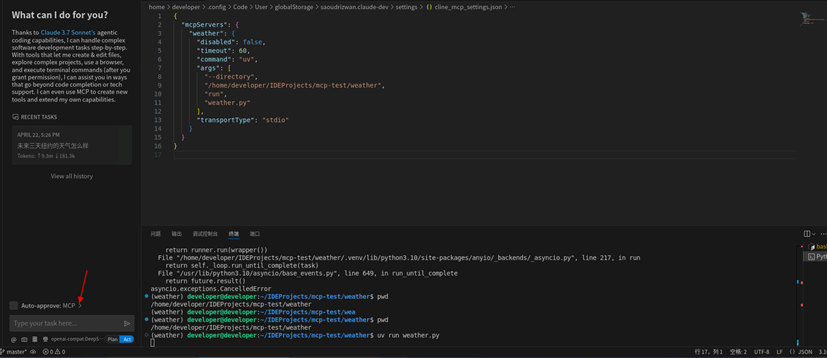
2. 选择Use MCP Servers,打开调用开关。再点击上放三角缩放页面。
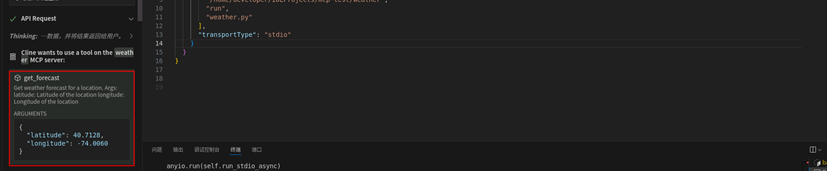
3. 由于本地搭建的Server服务使用的是美国天气服务API,所以这里我们提问:未来三天纽约天气怎么样?点击右侧三角符进行提问。

首次提问会询问经纬度坐标,选择默认坐标运行即可。稍等片刻后,返回纽约天气

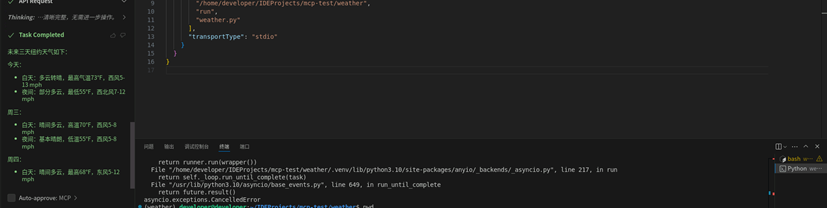
4. 在服务运行过程中可以看到成功调用本地MCP Server提供的工具,表示大模型可以成功自动调用MCP提供的工具,并能根据工具进行结果返回。
至此,基于华为开发者空间云主机搭建MCP Server服务到此结束。

 浙公网安备 33010602011771号