SpringBoot系列——admin服务监控
前言
springboot项目部署起来后,如何实时监控项目的运行状况呢?本文记录使用springboot-admin对服务进行监控。
springboot-admin介绍:https://codecentric.github.io/spring-boot-admin/current/#_what_is_spring_boot_admin
工程结构
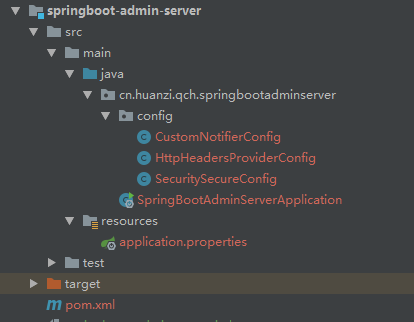
服务端
server服务端
客户端
client客户端
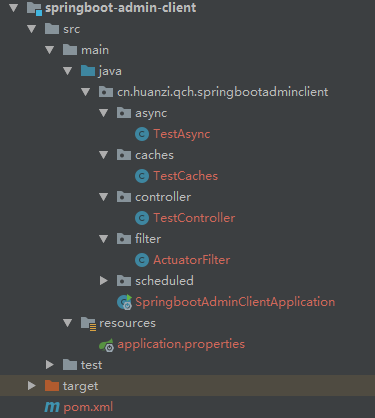
服务端、客户端都是独立的web项目,服务端是监控程序,客户端是被监控的程序,本文只测试了一个客户端接入
代码编写
服务端
server服务端引入相关依赖
2.2.0后admin的管理页面支持中文,因此我们引入此版本(parent不再是引入我们的父工程pom了,直接引入springboot的2.2.0)
        <!-- 引入admin相关依赖 2.2.0页面支持中文显示,需要springboot 2.2.0 -->
        <dependency>
            <groupId>de.codecentric</groupId>
            <artifactId>spring-boot-admin-starter-server</artifactId>
            <version>2.2.0</version>
        </dependency>
为了安全性,引入security
       <!--springboot security 安全相关-->
        <dependency>
            <groupId>org.springframework.boot</groupId>
            <artifactId>spring-boot-starter-security</artifactId>
        </dependency>
解决控制台报错,移除tomcat,改用jetty
        <!--
            报错:java.lang.IllegalStateException: Calling [asyncError()] is not valid for a request with Async state [MUST_DISPATCH]
            解决:移除tomcat,换成jetty
        -->
        <dependency>
            <groupId>org.springframework.boot</groupId>
            <artifactId>spring-boot-starter-web</artifactId>
            <exclusions>
                <exclusion>
                    <groupId>org.springframework.boot</groupId>
                    <artifactId>spring-boot-starter-tomcat</artifactId>
                </exclusion>
            </exclusions>
        </dependency>
        <dependency>
            <groupId>org.springframework.boot</groupId>
            <artifactId>spring-boot-starter-jetty</artifactId>
        </dependency>
监控系统,直接配置账号、密码,不用搞那么麻烦接入数据库
#配置一个账号和密码
spring.security.user.name=admin
spring.security.user.password=123456
做好security配置
/**
 * Security安全配置
 */
@Configuration
public class SecuritySecureConfig extends WebSecurityConfigurerAdapter {
    //项目应用路径
    private final String adminContextPath;

    public SecuritySecureConfig(AdminServerProperties adminServerProperties) {
        this.adminContextPath = adminServerProperties.getContextPath();
    }

    @Override
    protected void configure(HttpSecurity http) throws Exception {
        SavedRequestAwareAuthenticationSuccessHandler successHandler = new SavedRequestAwareAuthenticationSuccessHandler();
        successHandler.setTargetUrlParameter("redirectTo");
        successHandler.setDefaultTargetUrl(adminContextPath + "/");

        http.authorizeRequests()
                //无需登录即可访问
                .antMatchers(adminContextPath + "/assets/**").permitAll()
                .antMatchers(adminContextPath + "/login").permitAll()
                .anyRequest().authenticated()
                .and()

                //登录和登出路径
                .formLogin().loginPage(adminContextPath + "/login").successHandler(successHandler).and()
                .logout().logoutUrl(adminContextPath + "/logout").and()

                //开启http basic支持,admin-client注册时需要使用
                .httpBasic().and()
                .csrf()

                //开启基于cookie的csrf保护
                .csrfTokenRepository(CookieCsrfTokenRepository.withHttpOnlyFalse())
                //忽略这些路径的csrf保护以便admin-client注册
                .ignoringAntMatchers(
                        adminContextPath + "/instances",
                        adminContextPath + "/actuator/**"
                );
    }
}
客户端是要暴露actuator的web端口的,为了安全,客户端只允许服务端请求actuator的web接口,为了方便客户端区分请求来源,我们在请求头注入自定义参数
/**
 * 注入额外的请求头,方便客户端区分请求来源
 */
@Component
public class HttpHeadersProviderConfig implements HttpHeadersProvider {
    @Value("${server.port}")
    private String port;

    @Override
    public HttpHeaders getHeaders(Instance instance) {
        HttpHeaders httpHeaders = new HttpHeaders();
        //设置约定好的请求头参数
        httpHeaders.add("spring-boot-admin-service", port);
        return httpHeaders;
    }
}
我们不可能整天上系统看监控数据,做好自定义通知,当实例状态发生改变,及时通知(发邮件、企业微信、钉钉都可以,自己实现)
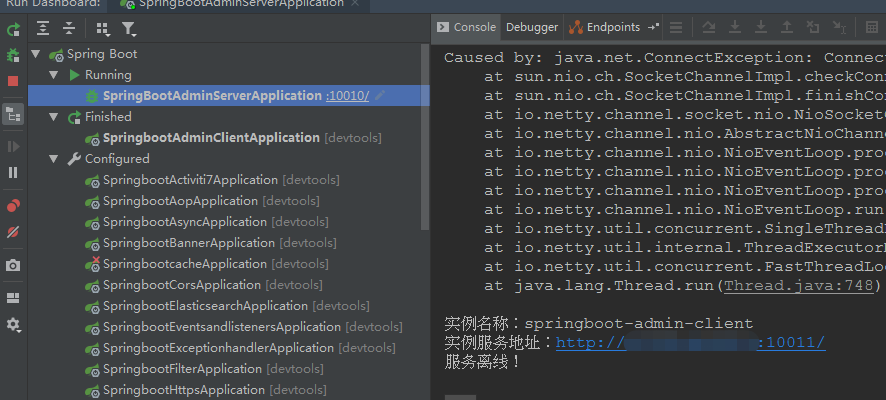
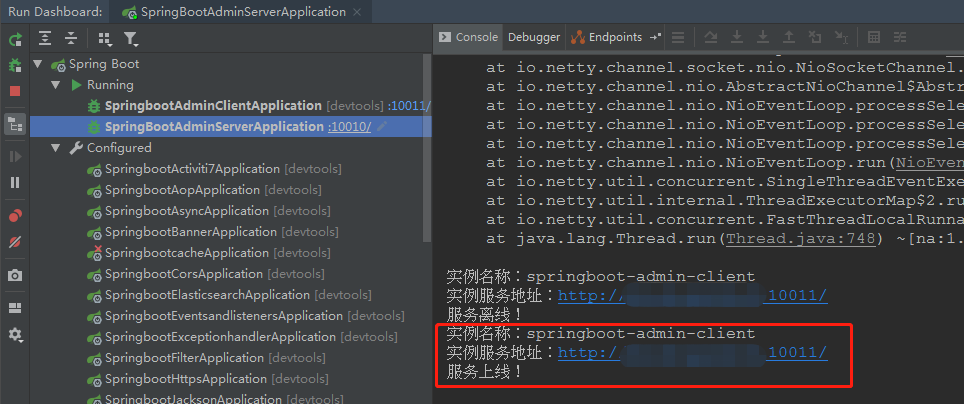
/**
 * 自定义通知
 * 继承 AbstractStatusChangeNotifier 类,实现了 doNotify 方法,
 * 当应用状态改变的时候会回调 doNotify 方法。
 */
@Component
public class CustomNotifierConfig extends AbstractStatusChangeNotifier {

    public CustomNotifierConfig(InstanceRepository repository) {
        super(repository);
    }

    @Override
    protected Mono<Void> doNotify(InstanceEvent event, Instance instance) {
        return Mono.fromRunnable(() -> {
            if (event instanceof InstanceStatusChangedEvent) {
                System.out.println("实例名称:"+instance.getRegistration().getName());
                System.out.println("实例服务地址:"+instance.getRegistration().getServiceUrl());
                String status = ((InstanceStatusChangedEvent) event).getStatusInfo().getStatus();
                switch (status) {
                    case "DOWN":
                        System.out.println("健康检查没通过!");
                        break;
                    case "OFFLINE":
                        System.out.println("服务离线!");
                        break;
                    case "UP":
                        System.out.println("服务上线!");
                        break;
                    case "UNKNOWN":
                        System.out.println("服务未知异常!");
                        break;
                    default:
                        System.out.println(status);
                        break;
                }

            }
        });
    }
}
最后在启动打上@EnableAdminServer注解,开启服务监控
@EnableAdminServer//开启AdminServer功能
@SpringBootApplication
public class SpringBootAdminServerApplication {
    public static void main(String[] args) {
        SpringApplication.run(SpringBootAdminServerApplication.class, args);
    }

    /**
     * 启动成功
     */
    @Bean
    public ApplicationRunner applicationRunner() {
        return applicationArguments -> {
            System.out.println("启动成功!");
        };
    }
}
客户端
服务端引入了2.2.0版本的依赖,因此客户端也要引入2.2.0依赖
        <!-- 引入admin相关依赖 -->
        <dependency>
            <groupId>de.codecentric</groupId>
            <artifactId>spring-boot-admin-starter-client</artifactId>
            <version>2.2.0</version>
        </dependency>
在配置文件中,开启端口、配置admin的server地址,以及账号、密码
#启用端点,默认情况下,除shutdown以外的所有端点均已启用
management.endpoint.shutdown.enabled=true

#显示db、redis、rabbti连接情况等
management.endpoint.health.show-details=always

#公开所有端点web接口
management.endpoints.web.exposure.include=*

#admin-server地址,以及登录账号、密码
spring.boot.admin.client.port=10010
spring.boot.admin.client.url=http://localhost:${spring.boot.admin.client.port}
spring.boot.admin.client.username=admin
spring.boot.admin.client.password=123456
为了方便测试其他东西
        <!--添加springdata-cache依赖 -->
        <dependency>
            <groupId>org.springframework.boot</groupId>
            <artifactId>spring-boot-starter-cache</artifactId>
        </dependency>

        <!--添加MySQL驱动依赖 -->
        <dependency>
            <groupId>mysql</groupId>
            <artifactId>mysql-connector-java</artifactId>
        </dependency>
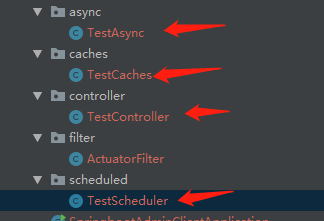
同时创建测试接口、定时器、cache缓存、异步任务,就是为了看服务端能否监控到
客户端是要暴露actuator的web端口的,为了安全,客户端只允许服务端请求actuator的web接口(通过约定好的请求头来判断)
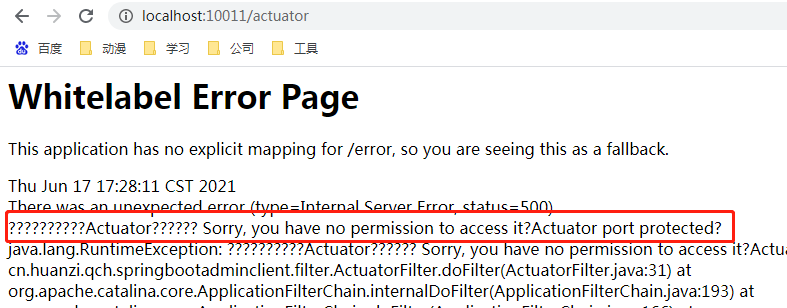
/**
 * 针对actuator接口做安全限制,只允许服务端调用
 */
@WebFilter
@ServletComponentScan
@Component
public class ActuatorFilter implements Filter {
    @Value("${spring.boot.admin.client.port}")
    private String adminServicePort;

    @Override
    public void doFilter(ServletRequest servletRequest, ServletResponse servletResponse, FilterChain filterChain) throws IOException, ServletException {
        HttpServletRequest request = (HttpServletRequest) servletRequest;

        //判断约定好的请求头参数
        if (request.getRequestURI().contains("/actuator") && !adminServicePort.equals(request.getHeader("spring-boot-admin-service"))){
            throw new RuntimeException("抱歉,你无权限访问,Actuator端口受保护! Sorry, you have no permission to access it,Actuator port protected!");
        }

        filterChain.doFilter(servletRequest, servletResponse);
    }
}
效果演示
安全配置生效
首先先看安全配置都生效了没有
访问服务端,需要登录

登录上去,客户端已经注册成功

正常监控客户端中...
浏览器直接访问客户端的actuator接口,直接抛出异常
http://localhost:10011/actuator

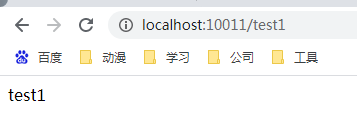
其他接口正常访问
自定义通知
注:客户端首次在服务端注册,并没有触发自定义通知
再看下自定义通知
停掉客户端服务、重启启动客户端,触发服务端自定义通知
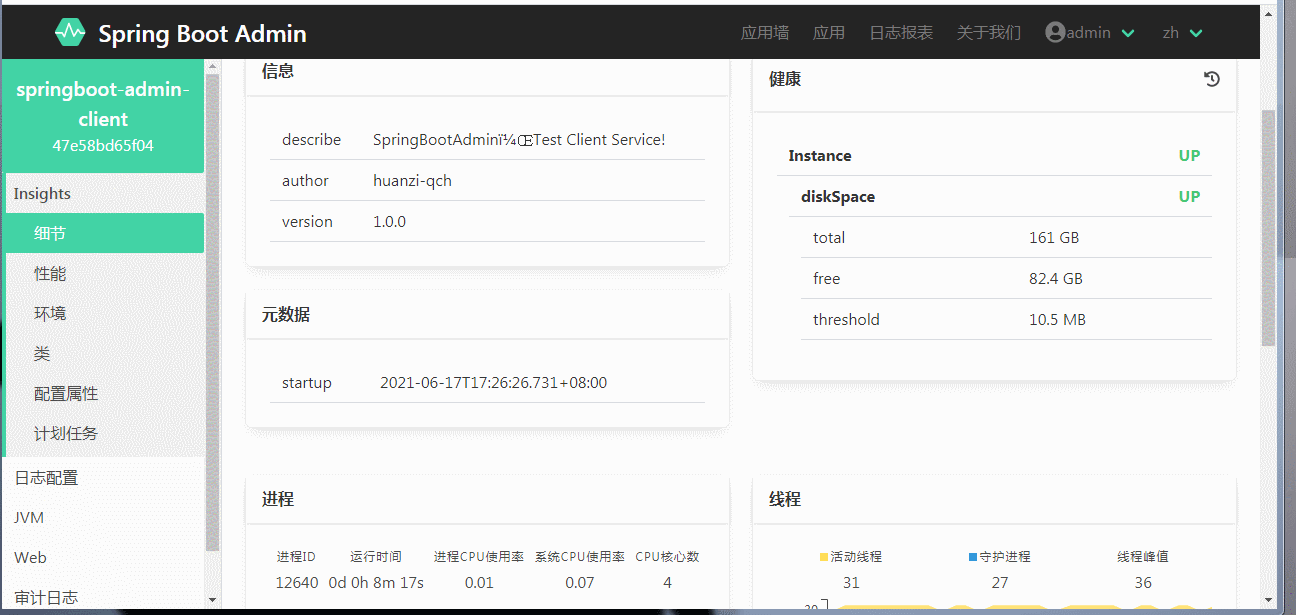
具体监控项
具体客户端的监控首页,有我们在客户端写的info信息、磁盘监控、堆、非堆内存监控、进程、线程监控、垃圾回收监控
#添加描述
info.describe=SpringBootAdmin,Test Client Service!
info.author=huanzi-qch
info.version=1.0.0


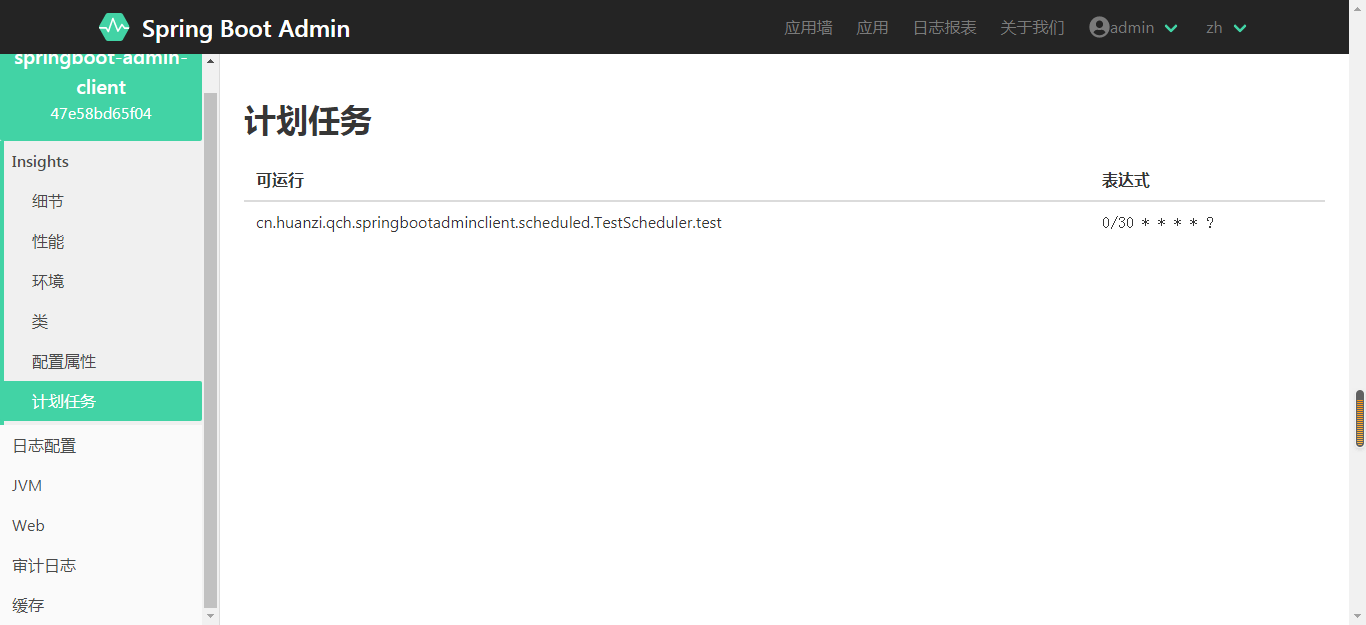
计划任务这里可以看到我们配置的定时器
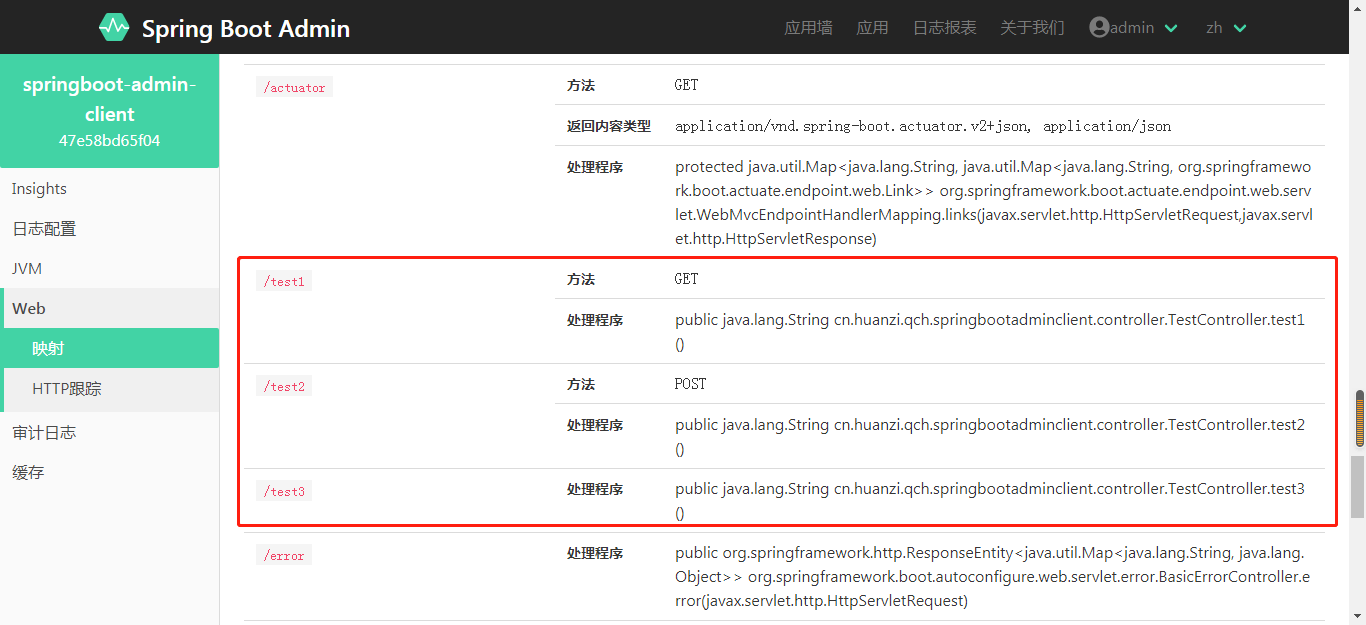
web映射可以看到所有的web接口
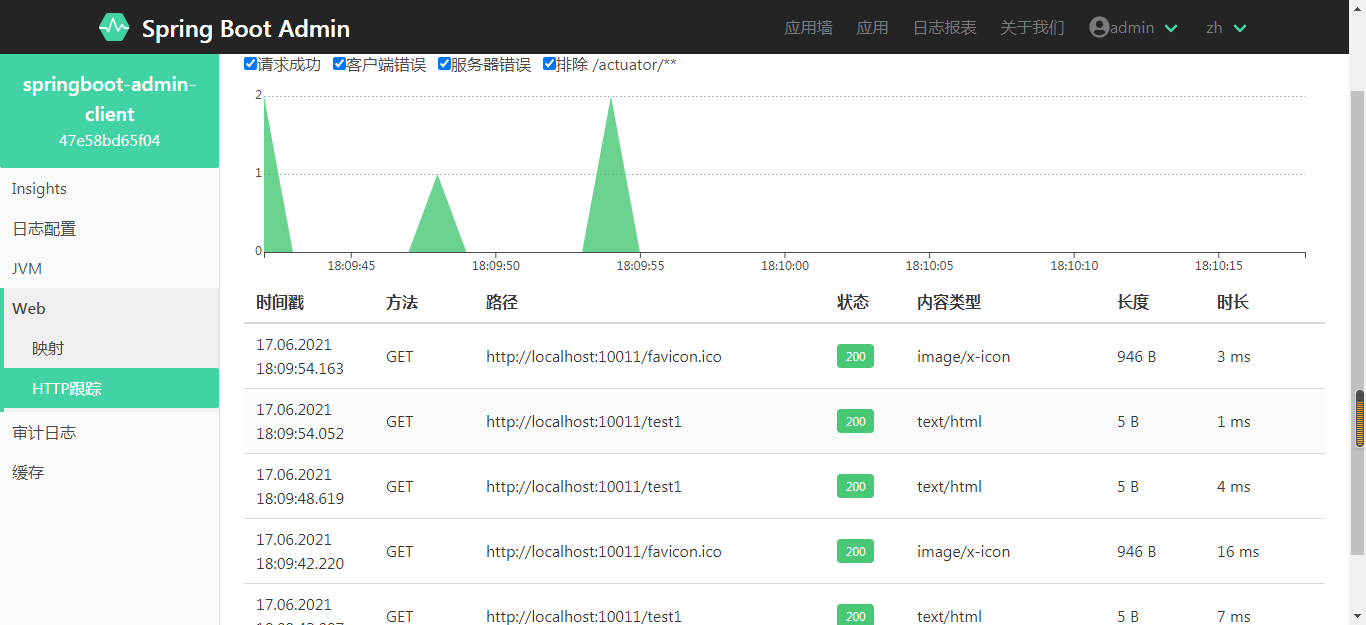
http跟踪,可以查看具体请求的响应情况

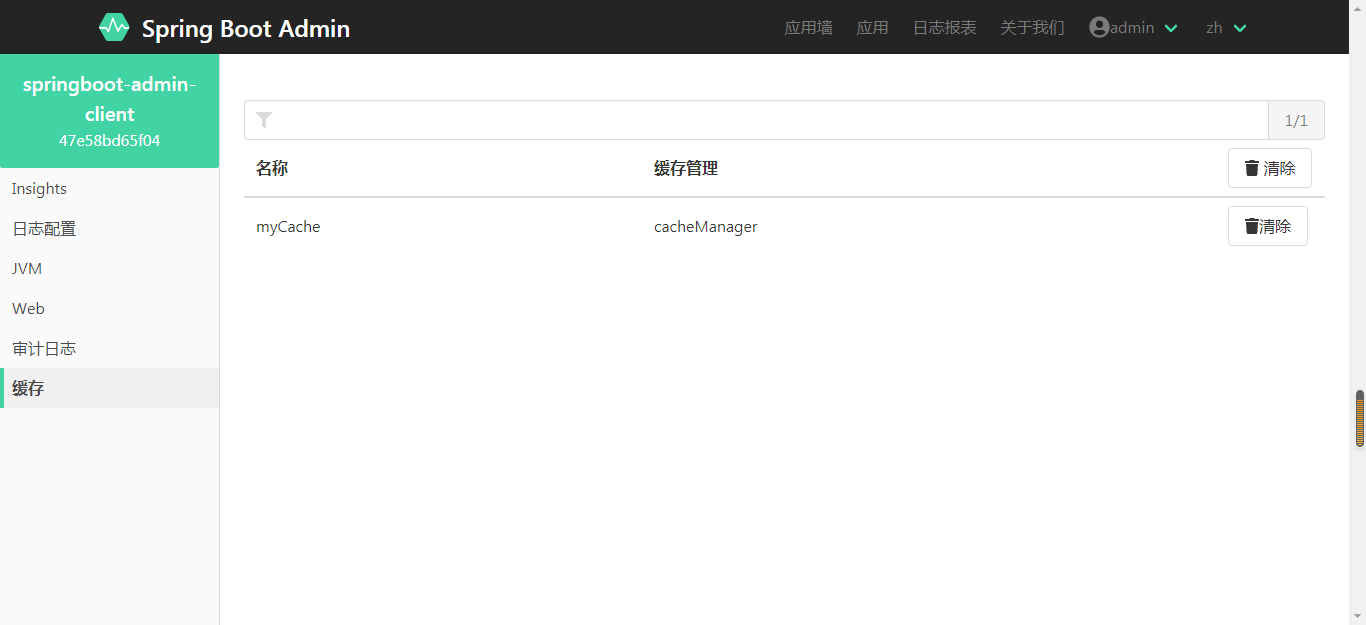
缓存菜单,可以看到我们使用到的缓存空间
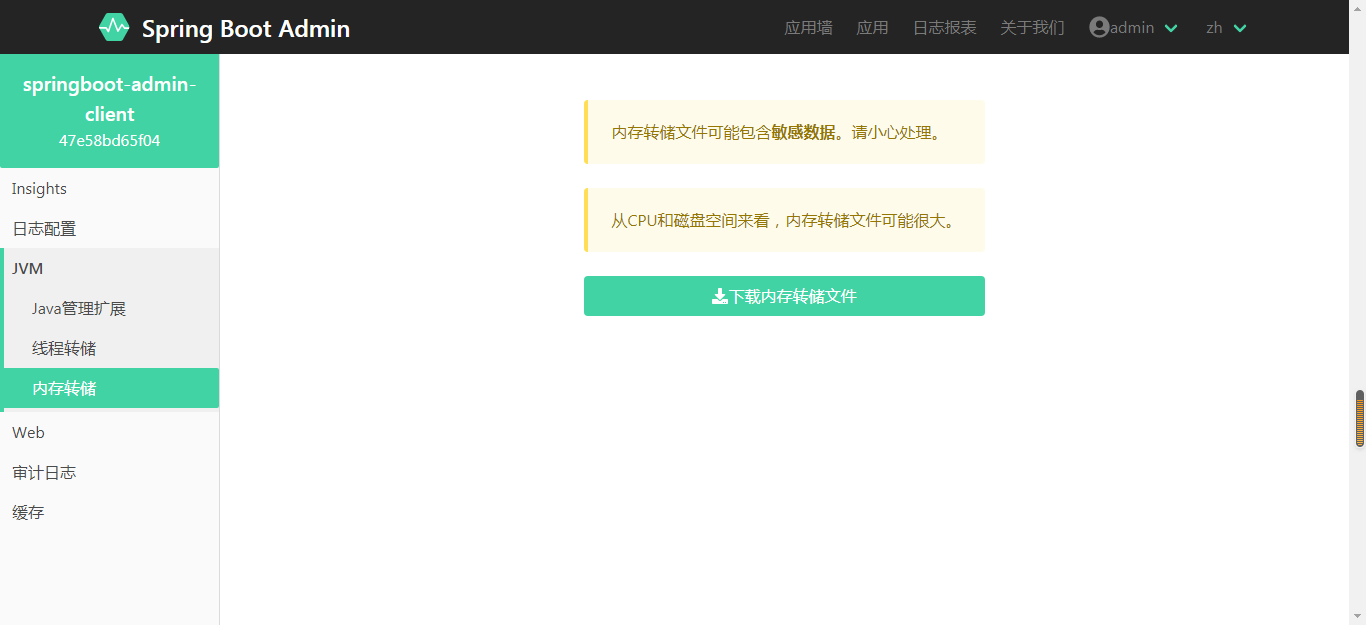
还可以下载jvm dump文件
其他就不一一列举,自己把项目跑起来再看
另外,这个版本好像不能查看异步任务?我并没有找到相关页面
后记
SpringBoot-Admin监控Client有两种模式:
一种是在Client端引入spring-boot-admin-starter-client依赖,配置好Server的相关信息。
另一种模式是将所有Client端注册到服务发现(Eureka)组件中去,同时把Server端也注册,这样Server端就可以监控所有Client端了,不用对Client都添加依赖。
SpringBoot系列——admin服务监控暂时先记录到这,后续有空再进行补充
更新
2021-08-12更新
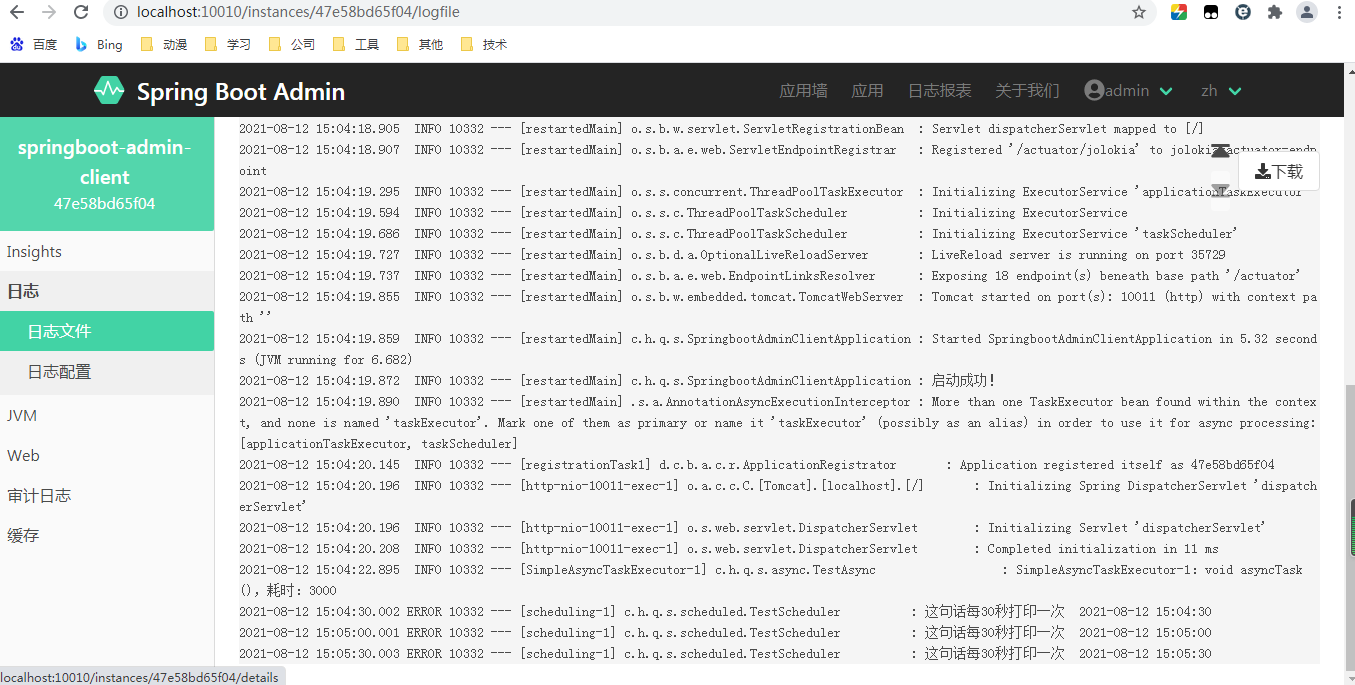
springboot-admin,查看被监控的应用的服务日志
在client客户端配置日志(logback),这里直接拿base-admin的日志配置过来
<?xml version="1.0" encoding="UTF-8"?>
<configuration debug="false">
    <!--日志文件主目录:这里${user.home}为当前服务器用户主目录-->
    <property name="LOG_HOME" value="${user.home}/log"/>
    <!--日志文件名称:这里spring.application.name表示工程名称-->
    <springProperty scope="context" name="APP_NAME" source="spring.application.name"/>

    <!--引入默认配置-->
    <include resource="org/springframework/boot/logging/logback/defaults.xml"/>

    <!--引入配置控制台(CONSOLE)-->
    <include resource="org/springframework/boot/logging/logback/console-appender.xml"/>

    <!--配置日志文件(File)-->
    <appender name="FILE" class="ch.qos.logback.core.rolling.RollingFileAppender">
        <!--设置策略-->
        <rollingPolicy class="ch.qos.logback.core.rolling.TimeBasedRollingPolicy">
            <!--日志文件路径:这里%d{yyyyMMdd}表示按天分类日志-->
            <FileNamePattern>${LOG_HOME}/%d{yyyyMMdd}/${APP_NAME}.log</FileNamePattern>
            <!--日志保留天数-->
            <MaxHistory>15</MaxHistory>
        </rollingPolicy>
        <!--设置格式-->
        <encoder class="ch.qos.logback.classic.encoder.PatternLayoutEncoder">
            <!--格式化输出:%d表示日期,%thread表示线程名,%-5level:级别从左显示5个字符宽度%msg:日志消息,%n是换行符-->
            <pattern>%d{yyyy-MM-dd HH:mm:ss.SSS} [%thread] %-5level %logger{50} - %msg%n</pattern>
            <!-- 或者使用默认配置 -->
            <!--<pattern>${FILE_LOG_PATTERN}</pattern>-->
            <charset>utf8</charset>
        </encoder>
    </appender>

    <!-- 将文件输出设置成异步输出 -->
    <appender name="ASYNC-FILE" class="ch.qos.logback.classic.AsyncAppender">
        <!-- 不丢失日志.默认的,如果队列的80%已满,则会丢弃TRACT、DEBUG、INFO级别的日志 -->
        <discardingThreshold>0</discardingThreshold>
        <!-- 更改默认的队列的深度,该值会影响性能.默认值为256 -->
        <queueSize>256</queueSize>
        <!-- 添加附加的appender,最多只能添加一个 -->
        <appender-ref ref="FILE"/>
    </appender>

    <!-- 将控制台输出设置成异步输出 -->
    <appender name="ASYNC-CONSOLE" class="ch.qos.logback.classic.AsyncAppender">
        <!-- 不丢失日志.默认的,如果队列的80%已满,则会丢弃TRACT、DEBUG、INFO级别的日志 -->
        <discardingThreshold>0</discardingThreshold>
        <!-- 更改默认的队列的深度,该值会影响性能.默认值为256 -->
        <queueSize>256</queueSize>
        <!-- 添加附加的appender,最多只能添加一个 -->
        <appender-ref ref="CONSOLE"/>
    </appender>

    <!-- 多环境配置 按照active profile选择分支 -->
    <springProfile name="dev">
        <!--root节点 全局日志级别,用来指定最基础的日志输出级别-->
        <root level="INFO">
            <appender-ref ref="FILE"/>
            <appender-ref ref="CONSOLE"/>
        </root>

        <!-- 子节点向上级传递 局部日志级别-->
        <logger level="WARN" name="org.springframework"/>
        <logger level="WARN" name="com.netflix"/>
    </springProfile>
    <springProfile name="prod">

    </springProfile>
</configuration>
在配置文件中配置
#配置文件分支选择
spring.profiles.active=dev


#可在线查看日志,PS:好像不能按日期来存放了,直接指定一个死位置
log-file-path=${user.home}/log/20210812/${spring.application.name}.log
management.endpoint.logfile.enabled=true
#生成日志的路径跟暴露给服务端的路径要一致
management.endpoint.logfile.external-file=${log-file-path}
logging.file=${log-file-path}
效果
实时刷新被监控的应用的服务日志,效果奈斯!
代码开源
代码已经开源、托管到我的GitHub、码云:
版权声明
捐献、打赏

支付宝

微信
交流群


 浙公网安备 33010602011771号