SpringBoot系列——ElasticSearch
前言
本文记录安装配置ES环境,在SpringBoot项目中使用SpringData-ElasticSearch对ES进行增删改查通用操作
ElasticSearch官网:https://www.elastic.co/cn/products/elasticsearch
SpringData-ElasticSearch官网:https://spring.io/projects/spring-data-elasticsearch
安装配置ES环境
过程参考这篇文章:https://blog.csdn.net/chen_2890/article/details/83757022
下载ES
链接:https://www.elastic.co/cn/downloads/elasticsearch
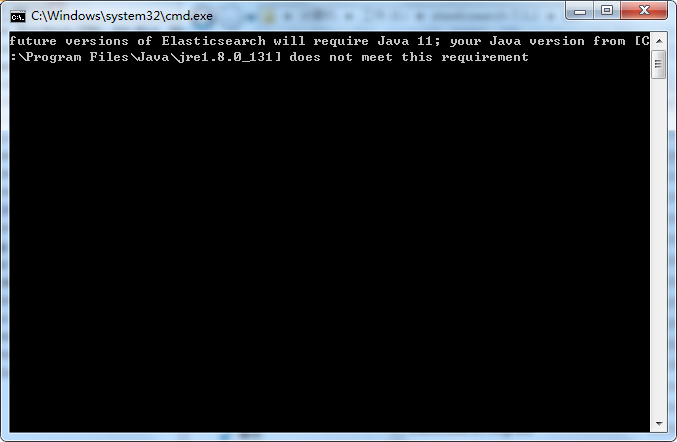
选择最新版下载即可,Elasticsearch无需安装,解压即用,直接双击 elasticsearch.bat 运行
PS:下载下来后发现,最新版需要java jdk11,我的是jdk1.8,所有还是下载回6.X版本吧....
安装Head插件
下载地址:https://github.com/mobz/elasticsearch-head
PS:个人觉得,这个插件就类似PLSQL、Navicat工具,作用差不多
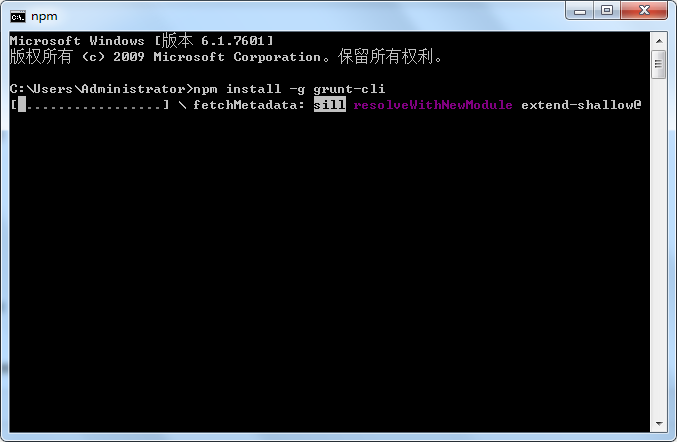
注意:es5以上版本安装head需要安装node和grunt,执行 npm install -g grunt-cli 安装grunt
第一步:进入Elasticsearch安装目录下的config目录,修改elasticsearch.yml文件.在文件的末尾加入以下代码
http.cors.enabled: true
http.cors.allow-origin: "*"
node.master: true
node.data: true
然后去掉network.host: 192.168.0.1的注释并改为network.host: 0.0.0.0,去掉cluster.name;node.name;http.port的注释(也就是去掉#)忽略所有注释,最终的配置是
cluster.name: springboot-es
node.name: node-1
network.host: 0.0.0.0
http.port: 9200

http.cors.enabled: true
http.cors.allow-origin: "*"
node.master: true
node.data: true
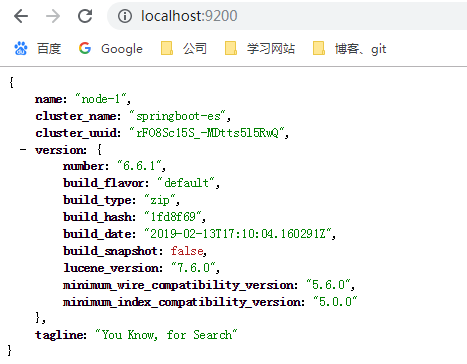
第二步:双击elasticsearch.bat启动Elasticsearch,浏览器访问9200端口
第三步:在https://github.com/mobz/elasticsearch-head中下载head插件,选择下载zip
第四步:解压到指定文件夹下,修改Gruntfile.js 在对应的位置加上 hostname:'*'


第五步:打开cmd命令行窗口 ,在解压目录下执行npm install 安装,完成后执行grunt server 或者 npm run start 运行head插件,如果运行不成功建议重新安装grunt


打开浏览器访问9100端口

配置IK分词器
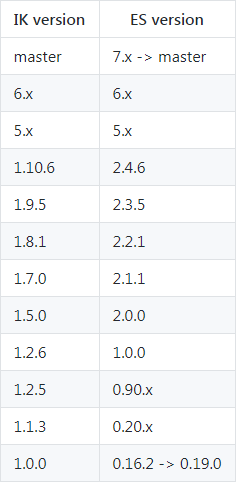
注意:你的Elasticsearch和IK分词器必须版本统一
GitHub地址:https://github.com/medcl/elasticsearch-analysis-ik
下载地址:https://github.com/medcl/elasticsearch-analysis-ik/releases
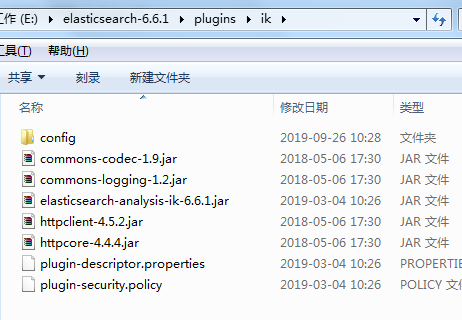
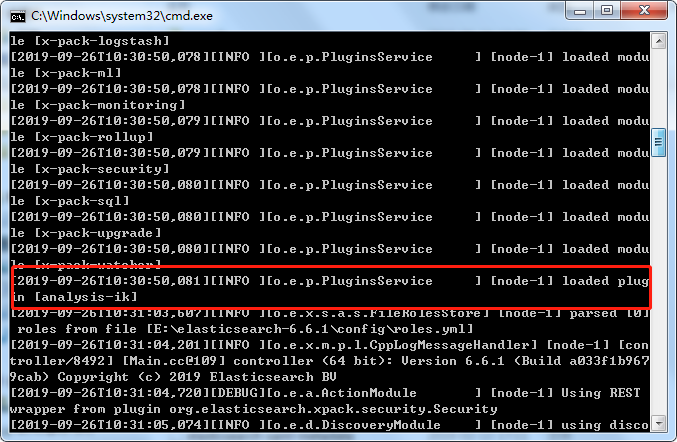
解压后把文件夹复制到ES的的plugins目录下面,然后重启ES
使用postman测试分词效果
如果是ik分词插件是6.x版本的,只能用postman测试,而且查询条件要放在body体内,如果直接在url加上查询条件会报错
http://localhost:9200/_analyze?analyzer=ik_max_word&text=我爱中华人民共和国
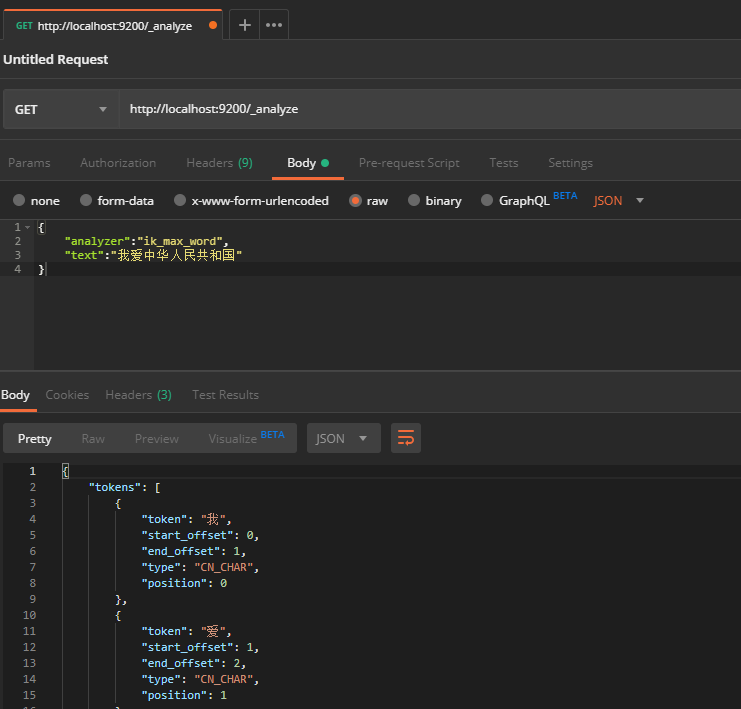
{
    "tokens": [
        {
            "token": "我",
            "start_offset": 0,
            "end_offset": 1,
            "type": "CN_CHAR",
            "position": 0
        },
        {
            "token": "爱",
            "start_offset": 1,
            "end_offset": 2,
            "type": "CN_CHAR",
            "position": 1
        },
        {
            "token": "中华人民共和国",
            "start_offset": 2,
            "end_offset": 9,
            "type": "CN_WORD",
            "position": 2
        },
        {
            "token": "中华人民",
            "start_offset": 2,
            "end_offset": 6,
            "type": "CN_WORD",
            "position": 3
        },
        {
            "token": "中华",
            "start_offset": 2,
            "end_offset": 4,
            "type": "CN_WORD",
            "position": 4
        },
        {
            "token": "华人",
            "start_offset": 3,
            "end_offset": 5,
            "type": "CN_WORD",
            "position": 5
        },
        {
            "token": "人民共和国",
            "start_offset": 4,
            "end_offset": 9,
            "type": "CN_WORD",
            "position": 6
        },
        {
            "token": "人民",
            "start_offset": 4,
            "end_offset": 6,
            "type": "CN_WORD",
            "position": 7
        },
        {
            "token": "共和国",
            "start_offset": 6,
            "end_offset": 9,
            "type": "CN_WORD",
            "position": 8
        },
        {
            "token": "共和",
            "start_offset": 6,
            "end_offset": 8,
            "type": "CN_WORD",
            "position": 9
        },
        {
            "token": "国",
            "start_offset": 8,
            "end_offset": 9,
            "type": "CN_CHAR",
            "position": 10
        }
    ]
}
到这里,ES环境算是搭建成功了
正常情况下,直接启动ES就可以跑项目了,如果想要直观的看到数据,就启动head插件
整合通用代码
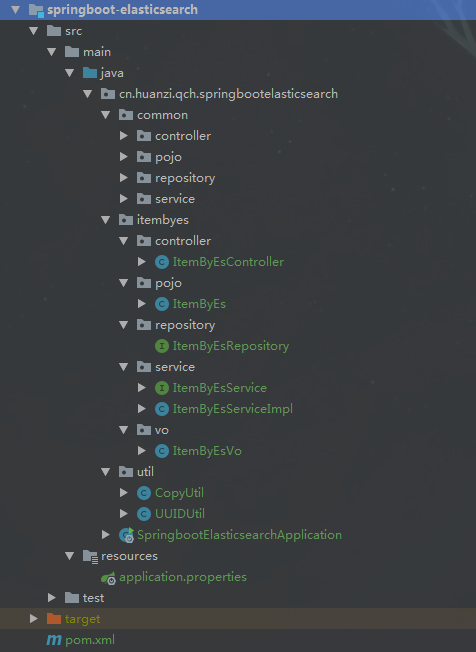
工程结构
与我们之前的通用JPA差不多,风格统一,也是直接单表基础通用增删改查,一人挖井,全村喝水
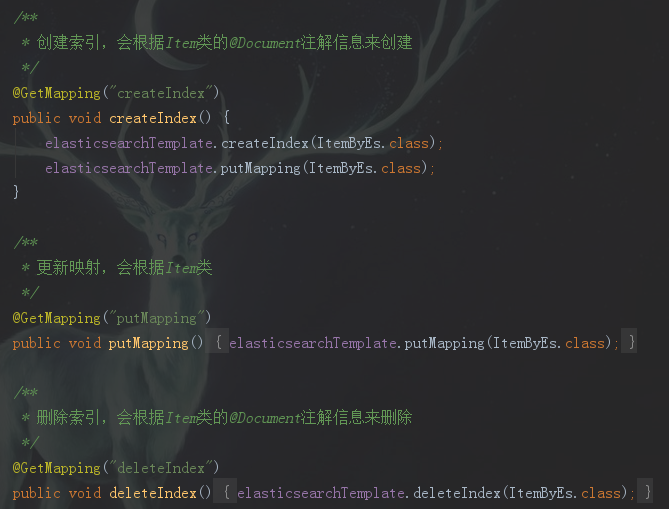
创建索引、映射
相当于数据库、数据表
save接口
无id,新增

有id,更新,可局部更新

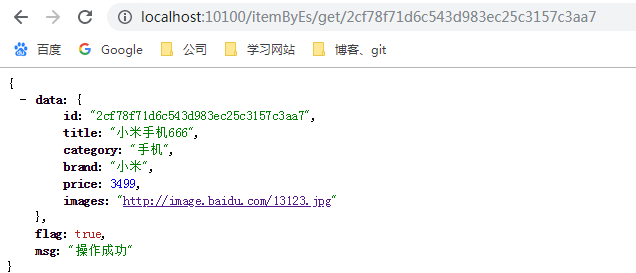
get接口
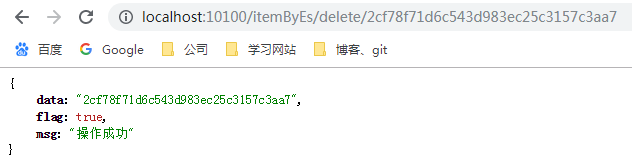
delete接口
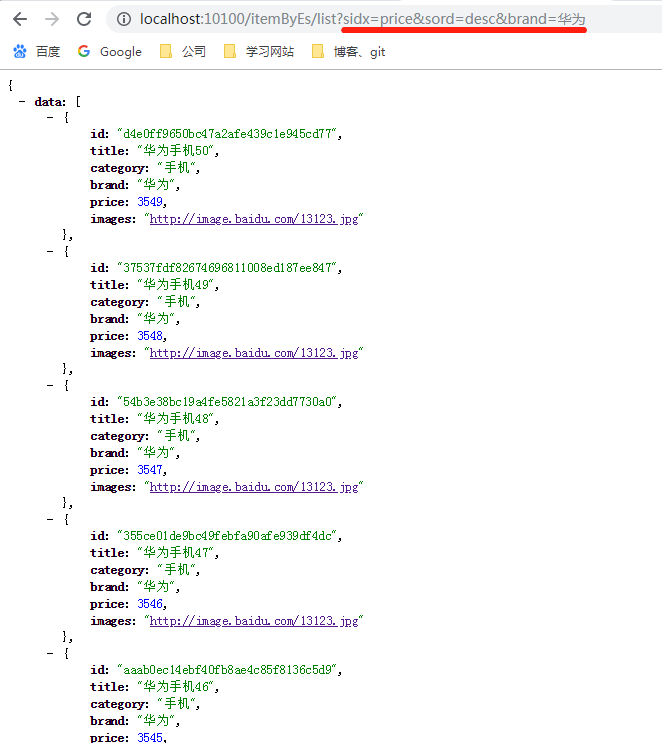
list接口
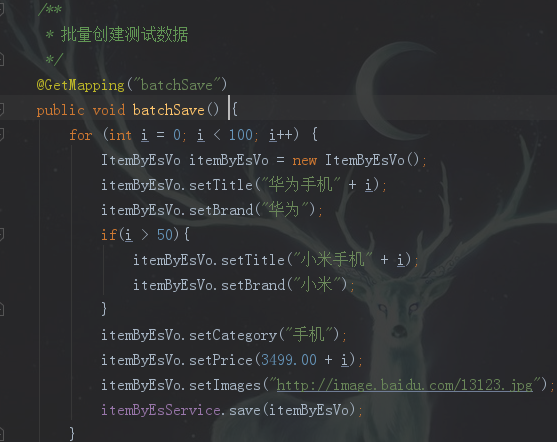
测试list、page接口前,先调用batchSave生成测试数据

可支持排序跟多条件等值查询

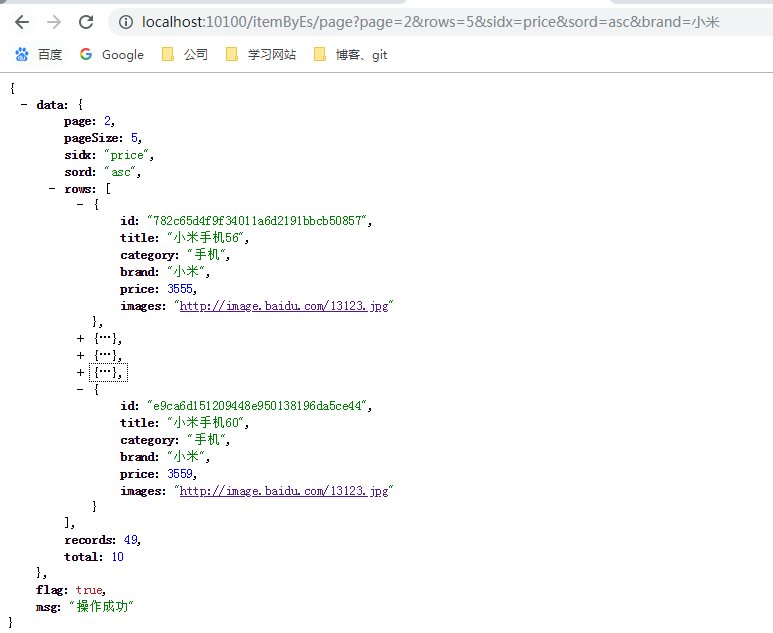
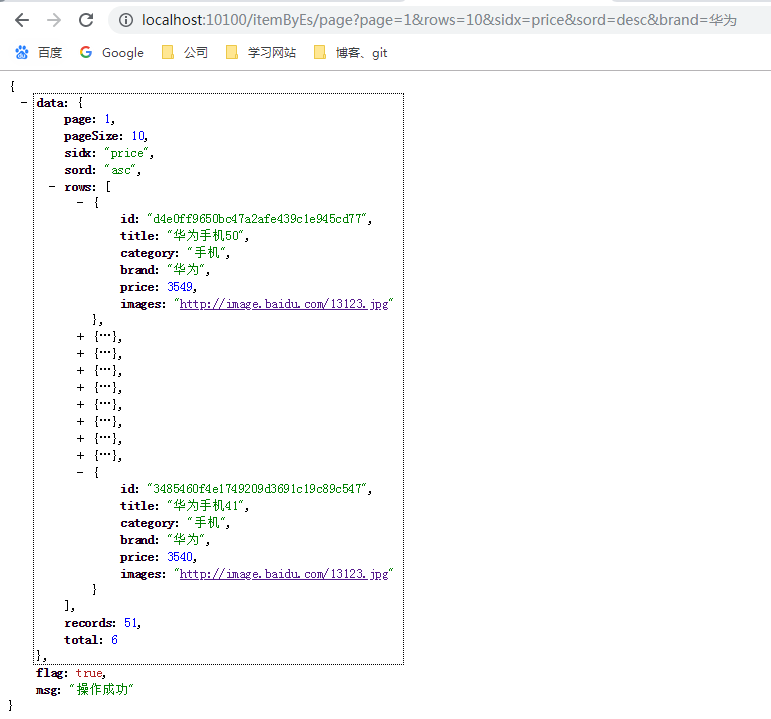
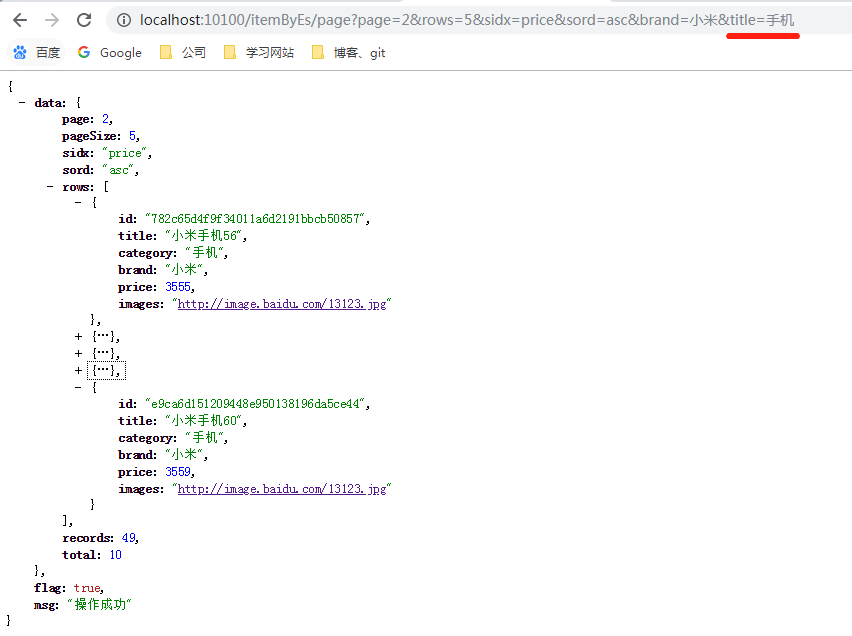
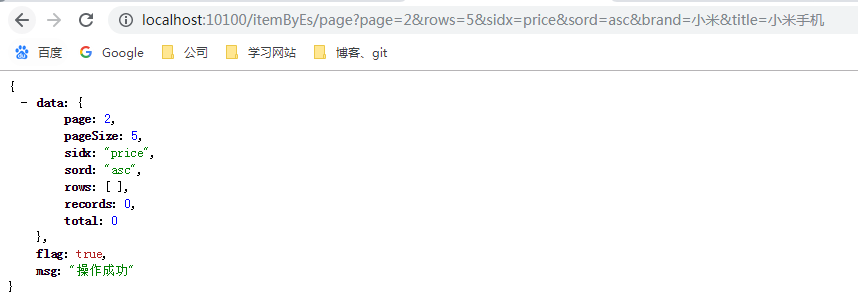
page接口
测试list、page接口前,先调用batchSave生成测试数据
page与list相似,但多了分页条件
bug记录
ik分词我发现了一个bug,不知道是不是我没设置对的原因,用title分词去查询的时候,小米、手机单独查是没问题,小米手机查就查不到数据

后记
springboot整合springdata-es就到这里,还差一个高亮显示设置了没见有效果,后面再查一下资料,实在不行就查询回来后收到设置高亮算了,这些后面再补充吧
代码开源
代码已经开源、托管到我的GitHub、码云:
版权声明
捐献、打赏

支付宝

微信
交流群


 浙公网安备 33010602011771号