

vue.js 是一个构建数据驱动的 web 界面 渐进式驱动框架。
引用的话,直接使用script标签引入就可以了;
<script src="./lib/vue.js"></script>
最简单的,创建一个vue对象,怎样引入到页面中呢?
1. 在调用vue对象时,要先创建对象,然后才调用,下面window.onload 使用的是es6的箭头函数
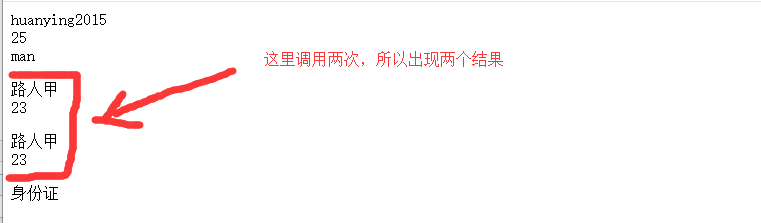
 1 <!DOCTYPE html>
 2 <html lang="en">
 3
 4 <head>
 5     <meta charset="UTF-8">
 6     <meta name="viewport" content="width=device-width, initial-scale=1.0">
 7     <meta http-equiv="X-UA-Compatible" content="ie=edge">
 8     <title>Document</title>
 9     <script src="./lib/vue.js"></script>
10     <script>
11
12         window.onload = () => {
13             // 创建第一个vue对象
14             new Vue({
15                 el: '#box',
16                 data: {
17                     name: 'huanying2015',
18                     age: 25,
19                     sex: 'man'
20                 }
21             });
22             // 创建第二个vue对象
23             new Vue({
24                 el: '#box1',
25                 data: {
26                     name: '路人甲',
27                     age: 23,
28                 }
29             });
30             new Vue({
31                 el: '.box',
32                 data: {
33                     card: '身份证',
34                 }
35             });
36
37         }
38     </script>
39 </head>
40
41 <body>
42     <!-- 调用第一个Vue对象中的数据 -->
43     <div id="box">
44         {{name}} <br/> {{age}} <br/> {{sex}}
45     </div>
46     <!-- 调用第二个vue对象中的数据 -->
47     <div id="box1">
48         <p>
49             {{name}}<br/> {{age}}
50         </p>
51         <p>
52             {{name}}<br/> {{age}}
53         </p>
54     </div>
55     <!-- 调用第三个vue对象中的数据 -->
56     <div class="box">
57         {{card}}
58     </div>
59 </body>
60
61 </html>
运行结果:
2. vue 中绑定事件:在new Vue 中增加一个methods 属性,在methods 属性中增加方法,这样就可以在html行间增加行间事件,进行事件绑定了
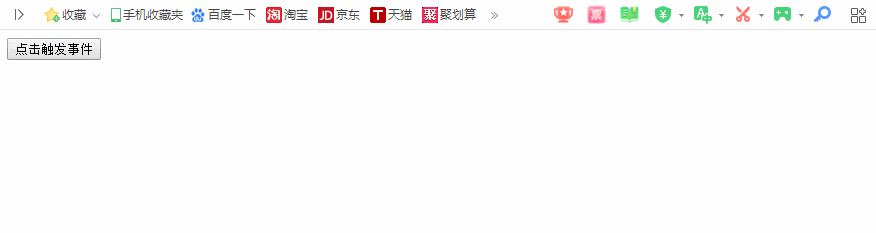
 1 <!DOCTYPE html>
 2 <html lang="en">
 3
 4 <head>
 5     <meta charset="UTF-8">
 6     <meta name="viewport" content="width=device-width, initial-scale=1.0">
 7     <meta http-equiv="X-UA-Compatible" content="ie=edge">
 8     <title>Document</title>
 9     <script src="./lib/vue.js"></script>
10     <script>
11         window.onload = () => {
12             new Vue({
13                 el: 'body',
14                 methods: {
15                     show2() {
16                         alert('hello,你已经调用过vue了');
17                     },
18                     show() {
19                         alert("显示使用的函数是es6 的简写方式");
20                         this.show2();
21                     }
22                 }
23             });
24         }
25     </script>
26 </head>
27
28 <body>
29     <!-- 绑定vue 的点击事件,使用的是在行间添加 行间事件 ,关键字 v-on:click  -->
30     <input type="button" value="点击触发事件" v-on:click="show();">
31 </body>
32
33 </html>
运行结果:
3. vue中属性,事件的调用:
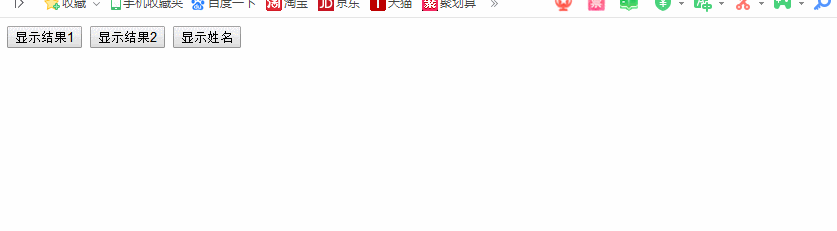
 1 <!DOCTYPE html>
 2 <html lang="en">
 3
 4 <head>
 5     <meta charset="UTF-8">
 6     <meta name="viewport" content="width=device-width, initial-scale=1.0">
 7     <meta http-equiv="X-UA-Compatible" content="ie=edge">
 8     <title>Document</title>
 9     <script src="./lib/vue.js"></script>
10     <script>
11         window.onload = () => {
12             new Vue({
13                 el: 'body',
14                 data: {
15                     name: 'huanying2015',
16                 },
17                 methods: {
18                     show1(n1, n2) {
19                         alert(n1 + n2);
20                     },
21                     show2(n1 = 100, n2 = 200) {
22                         alert(n1 + n2);
23                     },
24                     showName() {
25                         alert(this.name);
26                     }
27                 }
28             });
29         }
30     </script>
31 </head>
32
33 <body>
34     <!-- 绑定vue 的点击事件,使用的是在行间添加 行间事件 ,关键字 v-on:click  -->
35     <input type="button" value="显示结果1" v-on:click="show1(100,200)">
36     <input type="button" value="显示结果2" v-on:click="show2(10,20)">
37     <input type="button" value="显示姓名" v-on:click="showName()">
38 </body>
39
40 </html>
运行结果:
4. vue 中data属性中的其他数据格式:
 1 <!DOCTYPE html>
 2 <html lang="en">
 3 <head>
 4     <meta charset="UTF-8">
 5     <meta name="viewport" content="width=device-width, initial-scale=1.0">
 6     <meta http-equiv="X-UA-Compatible" content="ie=edge">
 7     <title>Document</title>
 8     <script src="./lib/vue.js"></script>
 9     <script>
10         window.onload = () => {
11             new Vue({
12                 el: 'body',
13                 data: {
14                     name: 'huanying2015',
15                     age: 25,
16                     userlist: ['zhangsan', 'lisi', 'wanger'],
17                     colorlist: {
18                         0: 'red',
19                         1: 'blue',
20                         2: 'yellow'
21                     },
22                     flag: true,
23                 },
24
25             });
26         }
27     </script>
28 </head>
29 <body>
30     <div id="box">
31         {{name}}<br>
32         {{age}}<br>
33         {{userlist}}<br>
34         {{colorlist}}<br>
35         {{flag}}<br>
36     </div>
37 </body>
38 </html>
运行结果:

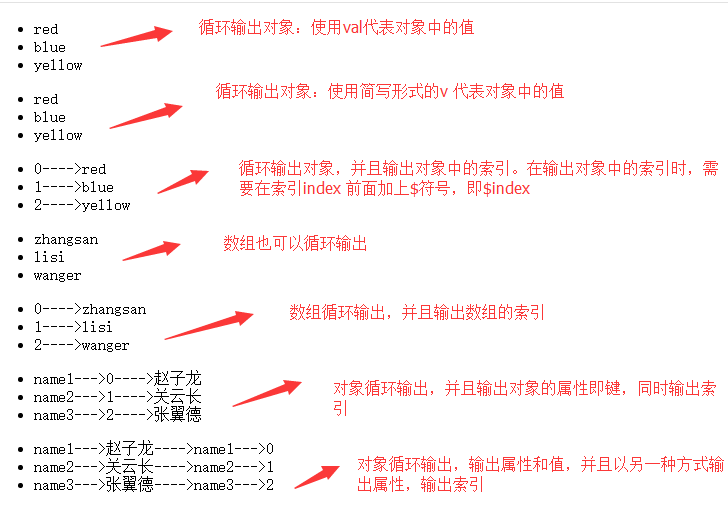
5. vue 中输出对象的时候,需要使用 v-for 进行循环,才能输出
 1 <!DOCTYPE html>
 2 <html lang="en">
 3 <head>
 4     <meta charset="UTF-8">
 5     <meta name="viewport" content="width=device-width, initial-scale=1.0">
 6     <meta http-equiv="X-UA-Compatible" content="ie=edge">
 7     <title>Document</title>
 8     <script src="./lib/vue.js"></script>
 9     <script>
10         window.onload = () => {
11             new Vue({
12                 el: 'body',
13                 data: {
14                     name: 'huanying2015',
15                     age: 25,
16                     userlist: ['zhangsan', 'lisi', 'wanger'],
17                     colorlist: {
18                         0: 'red',
19                         1: 'blue',
20                         2: 'yellow'
21                     },
22                     persons: {
23                         name1: '赵子龙',
24                         name2: '关云长',
25                         name3: '张翼德'
26                     },
27                     flag: true,
28                 },
29
30             });
31         }
32     </script>
33 </head>
34 <body>
35     <div id="box">
36         <ul>
37             <li v-for="val in colorlist">{{val}}</li>
38         </ul>
39         <ul>
40             <li v-for="v in colorlist">{{v}}</li>
41         </ul>
42         <ul>
43             <li v-for="v in colorlist">{{$index}}---->{{v}}</li>
44         </ul>
45         <ul>
46             <li v-for="v in userlist">{{v}}</li>
47         </ul>
48         <ul>
49             <li v-for="v in userlist">{{$index}}---->{{v}}</li>
50         </ul>
51         <ul>
52             <li v-for="p in persons">{{$key}}--->{{$index}}---->{{p}}</li>
53         </ul>
54         <ul>
55             <li v-for="(k,v) in persons">{{k}}--->{{v}}---->{{$key}}--->{{$index}}</li>
56         </ul>
57
58     </div>
59 </body>
60 </html>
运行结果:数组和对象
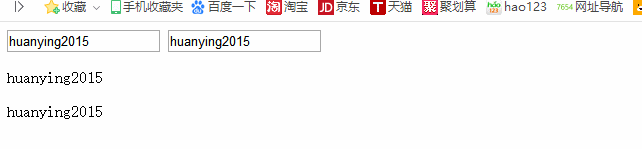
6. v-model 同步改变vue的data 值:
 1 <!DOCTYPE html>
 2 <html lang="en">
 3
 4 <head>
 5     <meta charset="UTF-8">
 6     <meta name="viewport" content="width=device-width, initial-scale=1.0">
 7     <meta http-equiv="X-UA-Compatible" content="ie=edge">
 8     <title>Document</title>
 9     <script src="./lib/vue.js"></script>
10     <script>
11         window.onload = () => {
12             new Vue({
13                 el: '#box',
14                 data: {
15                     name: 'huanying2015',
16                     age: 25,
17                 },
18
19             });
20         }
21     </script>
22 </head>
23
24 <body>
25     <div id="box">
26         <input type="text" v-model="name">
27         <input type="text" v-model="name">
28         <br>
29         <p>{{name}}</p>
30         <p>{{name}}</p>
31     </div>
32 </body>
33
34 </html>
运行结果:改变输入框的内容,可以同步显示在网页上
7. 修改数组的值:
 1 <!DOCTYPE html>
 2 <html lang="en">
 3 <head>
 4     <meta charset="UTF-8">
 5     <meta name="viewport" content="width=device-width, initial-scale=1.0">
 6     <meta http-equiv="X-UA-Compatible" content="ie=edge">
 7     <title>Document</title>
 8     <script src="./lib/vue.js"></script>
 9     <script>
10         window.onload = () => {
11             new Vue({
12                 el: '#box',
13                 data: {
14                     userList: ['zhangsan', 'lisi', 'wanger']
15                 },
16                 methods: {
17                     add() {
18                         this.userList.push("mazi");
19                     }
20                 }
21             });
22         }
23     </script>
24 </head>
25 <body>
26     <div id="box">
27         <input type="button" value="点击添加" v-on:click="add();">
28         <ul>
29             <li v-for="v in userList" track-by="$index">{{$index}}---->{{v}}</li>
30             <hr>
31             <hr>
32
33             <li v-for="v in userList">{{$index}}---->{{v}}</li>
34         </ul>
35     </div>
36 </body>
37 </html>
运行结果:可以看出,点击添加的时候,循环输出是,没有加入track-by="$index"的循环,会把原来前面添加的覆盖,不再输出

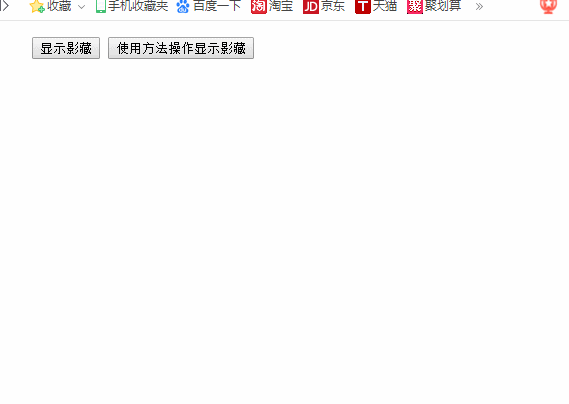
8. vue中显示影藏的实现
 1 <!DOCTYPE html>
 2 <html lang="en">
 3 <head>
 4     <meta charset="UTF-8">
 5     <meta name="viewport" content="width=device-width, initial-scale=1.0">
 6     <meta http-equiv="X-UA-Compatible" content="ie=edge">
 7     <title>Document</title>
 8     <script src="./lib/vue.js"></script>
 9     <style>
10         div {
11             width: 300px;
12             height: 300px;
13             background: red;
14         }
15         [v-cloak] {
16             display: none;
17         }
18     </style>
19     <script>
20         window.onload = () => {
21             new Vue({
22                 el: '#box',
23                 data: {
24                     flag: false
25                 },
26                 methods: {
27                     tooglebg() {
28                         this.flag = !this.flag;
29                     }
30                 }
31             });
32         }
33     </script>
34 </head>
35 <body>
36     <ul id="box">
37         <input type="button" value="显示影藏" v-on:click="flag=!flag;">
38         <input type="button" value="使用方法操作显示影藏" v-on:click="tooglebg();">
39         <div v-show="flag" v-cloak> zheli </div>
40     </ul>
41 </body>
42 </html>
运行结果:在这里 v- show 是一个显示隐藏的开关,为false是隐藏,为true时显示
而 v-cloak 没有太多的作用,主要是为了预防闪动而增加的,预防在加载时出现闪动
http://www.cnblogs.com/huanying2015 博客随笔大多数文章均属原创,欢迎转载,但未经作者同意必须保留此段声明,且在文章页面明显位置给出原文连接,否则保留追究法律责任的权利

 浙公网安备 33010602011771号