Android View 绘制流程之 DecorView 与 ViewRootImpl
一年多以前,曾经以为自己对 View 的添加显示逻辑已经有所了解了,事后发现也只是懂了些皮毛而已。经过一年多的实战,Android 和 Java 基础都有了提升,是时候该去看看 DecorView 的添加显示。
View 的绘制系列文章:
-
Android View 绘制流程之 DecorView 与 ViewRootImpl
-
Android View 的绘制流程之 Measure 过程详解 (一)
-
Android View 的绘制流程之 Layout 和 Draw 过程详解 (二)
-
Android View 的事件分发原理解析
概论
Android 中 Activity 是作为应用程序的载体存在,代表着一个完整的用户界面,提供了一个窗口来绘制各种视图,当 Activity 启动时,我们会通过 setContentView 方法来设置一个内容视图,这个内容视图就是用户看到的界面。那么 View 和 activity 是如何关联在一起的呢 ?
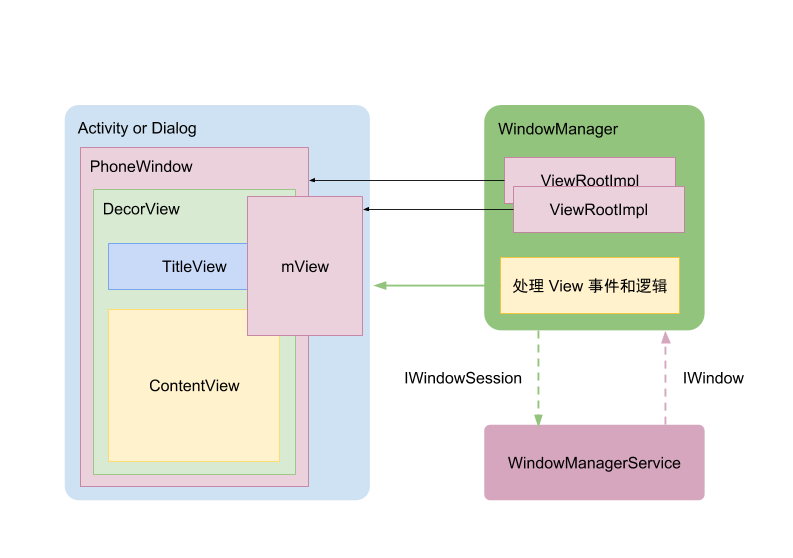
上图是 View 和 Activity 之间的关系。先解释图中一些类的作用以及相关关系:
-
Activity : 对于每一个 activity 都会有拥有一个 PhoneWindow。
- PhoneWindow :该类继承于 Window 类,是 Window 类的具体实现,即我们可以通过该类具体去绘制窗口。并且,该类内部包含了一个 DecorView 对象,该 DectorView 对象是所有应用窗口的根 View。
-
DecorView 是一个应用窗口的根容器,它本质上是一个 FrameLayout。DecorView 有唯一一个子 View,它是一个垂直 LinearLayout,包含两个子元素,一个是 TitleView( ActionBar 的容器),另一个是 ContentView(窗口内容的容器)。
-
ContentView :是一个 FrameLayout(android.R.id.content),我们平常用的 setContentView 就是设置它的子 View 。
- WindowManager : 是一个接口,里面常用的方法有:添加View,更新View和删除View。主要是用来管理 Window 的。WindowManager 具体的实现类是WindowManagerImpl。最终,WindowManagerImpl 会将业务交给 WindowManagerGlobal 来处理。
- WindowManagerService (WMS) : 负责管理各 app 窗口的创建,更新,删除, 显示顺序。运行在 system_server 进程。
ViewRootImpl :拥有 DecorView 的实例,通过该实例来控制 DecorView 绘制。ViewRootImpl 的一个内部类 W,实现了 IWindow 接口,IWindow 接口是供 WMS 使用的,WSM 通过调用 IWindow 一些方法,通过 Binder 通信的方式,最后执行到了 W 中对应的方法中。同样的,ViewRootImpl 通过 IWindowSession 来调用 WMS 的 Session 一些方法。Session 类继承自 IWindowSession.Stub,每一个应用进程都有一个唯一的 Session 对象与 WMS 通信。
DecorView 的创建
先从 Mainactivity 中的代码看起,首先是调用了 setContentView;
protected void onCreate(Bundle savedInstanceState) {
    super.onCreate(savedInstanceState);
    setContentView(R.layout.activity_main);
}
该方法是父类 AppCompatActivity 的方法,最终会调用 AppCompatDelegateImpl 的 setContentView 方法:
// AppCompatDelegateImpl
public void setContentView(int resId) {
        this.
ensureSubDecor()
; ViewGroup contentParent = (ViewGroup)this.mSubDecor.findViewById(16908290); contentParent.removeAllViews(); LayoutInflater.from(this.mContext).inflate(resId, contentParent); this.mOriginalWindowCallback.onContentChanged(); }
ensureSubDecor 从字面理解就是创建 subDecorView,这个是根据主题来创建的,下文也会讲到。创建完以后,从中获取 contentParent,再将从 activity 传入的 id xml 布局添加到里面。不过大家注意的是,在添加之前先调用 removeAllViews() 方法,确保没有其他子 View 的干扰。
    private void ensureSubDecor() {
        if (!this.mSubDecorInstalled) {
            this.mSubDecor = this.createSubDecor();
            ......
        }
        ......
    }
最终会调用 createSubDecor() ,来看看里面的具体代码逻辑:
 private ViewGroup createSubDecor() {
        // 1、获取主题参数,进行一些设置,包括标题,actionbar 等
        TypedArray a = this.mContext.obtainStyledAttributes(styleable.AppCompatTheme);
        if (!a.hasValue(styleable.AppCompatTheme_windowActionBar)) {
            a.recycle();
            throw new IllegalStateException("You need to use a Theme.AppCompat theme (or descendant) with this activity.");
        } else {
            if (a.getBoolean(styleable.AppCompatTheme_windowNoTitle, false)) {
                this.requestWindowFeature(1);
            } else if (a.getBoolean(styleable.AppCompatTheme_windowActionBar, false)) {
                this.requestWindowFeature(108);
            }

            if (a.getBoolean(styleable.AppCompatTheme_windowActionBarOverlay, false)) {
                this.requestWindowFeature(109);
            }

            if (a.getBoolean(styleable.AppCompatTheme_windowActionModeOverlay, false)) {
                this.requestWindowFeature(10);
            }

            this.mIsFloating = a.getBoolean(styleable.AppCompatTheme_android_windowIsFloating, false);
            a.recycle();
            // 2、确保优先初始化 DecorView
            this.mWindow.getDecorView();
            LayoutInflater inflater = LayoutInflater.from(this.mContext);
            ViewGroup subDecor = null;
            // 3、根据不同的设置来对 subDecor 进行初始化
            if (!this.mWindowNoTitle) {
                if (this.mIsFloating) {
                    subDecor = (ViewGroup)inflater.inflate(layout.abc_dialog_title_material, (ViewGroup)null);
                    this.mHasActionBar = this.mOverlayActionBar = false;
                } else if (this.mHasActionBar) {
                    TypedValue outValue = new TypedValue();
                    this.mContext.getTheme().resolveAttribute(attr.actionBarTheme, outValue, true);
                    Object themedContext;
                    if (outValue.resourceId != 0) {
                        themedContext = new ContextThemeWrapper(this.mContext, outValue.resourceId);
                    } else {
                        themedContext = this.mContext;
                    }

                    subDecor = (ViewGroup)LayoutInflater.from((Context)themedContext).inflate(layout.abc_screen_toolbar, (ViewGroup)null);
                    this.mDecorContentParent = (DecorContentParent)subDecor.findViewById(id.decor_content_parent);
                    this.mDecorContentParent.setWindowCallback(this.getWindowCallback());
                    if (this.mOverlayActionBar) {
                        this.mDecorContentParent.initFeature(109);
                    }

                    if (this.mFeatureProgress) {
                        this.mDecorContentParent.initFeature(2);
                    }

                    if (this.mFeatureIndeterminateProgress) {
                        this.mDecorContentParent.initFeature(5);
                    }
                }
            } else {
                if (this.mOverlayActionMode) {
                    subDecor = (ViewGroup)inflater.inflate(layout.abc_screen_simple_overlay_action_mode, (ViewGroup)null);
                } else {
                    subDecor = (ViewGroup)inflater.inflate(layout.abc_screen_simple, (ViewGroup)null);
                }

                if (VERSION.SDK_INT >= 21) {
                    ViewCompat.setOnApplyWindowInsetsListener(subDecor, new OnApplyWindowInsetsListener() {
                        public WindowInsetsCompat onApplyWindowInsets(View v, WindowInsetsCompat insets) {
                            int top = insets.getSystemWindowInsetTop();
                            int newTop = AppCompatDelegateImpl.this.updateStatusGuard(top);
                            if (top != newTop) {
                                insets = insets.replaceSystemWindowInsets(insets.getSystemWindowInsetLeft(), newTop, insets.getSystemWindowInsetRight(), insets.getSystemWindowInsetBottom());
                            }

                            return ViewCompat.onApplyWindowInsets(v, insets);
                        }
                    });
                } else {
                    ((FitWindowsViewGroup)subDecor).setOnFitSystemWindowsListener(new OnFitSystemWindowsListener() {
                        public void onFitSystemWindows(Rect insets) {
                            insets.top = AppCompatDelegateImpl.this.updateStatusGuard(insets.top);
                        }
                    });
                }
            }

            if (subDecor == null) {
                throw new IllegalArgumentException("AppCompat does not support the current theme features: { windowActionBar: " + this.mHasActionBar + ", windowActionBarOverlay: " + this.mOverlayActionBar + ", android:windowIsFloating: " + this.mIsFloating + ", windowActionModeOverlay: " + this.mOverlayActionMode + ", windowNoTitle: " + this.mWindowNoTitle + " }");
            } else {
                if (this.mDecorContentParent == null) {
                    this.mTitleView = (TextView)subDecor.findViewById(id.title);
                }

                ViewUtils.makeOptionalFitsSystemWindows(subDecor);
                ContentFrameLayout contentView = (ContentFrameLayout)subDecor.findViewById(id.action_bar_activity_content);
                ViewGroup windowContentView = (ViewGroup)this.mWindow.findViewById(16908290);
                if (windowContentView != null) {
                    while(windowContentView.getChildCount() > 0) {
                        View child = windowContentView.getChildAt(0);
                        windowContentView.removeViewAt(0);
                        contentView.addView(child);
                    }

                    windowContentView.setId(-1);
                    contentView.setId(16908290);
                    if (windowContentView instanceof FrameLayout) {
                        ((FrameLayout)windowContentView).setForeground((Drawable)null);
                    }
                }
                // 将 subDecor 添加到 DecorView 中
                this.mWindow.setContentView(subDecor);
                contentView.setAttachListener(new OnAttachListener() {
                    public void onAttachedFromWindow() {
                    }

                    public void onDetachedFromWindow() {
                        AppCompatDelegateImpl.this.dismissPopups();
                    }
                });
                return subDecor;
            }
        }
    }
上面的代码总结来说就是在做一件事,就是创建 subDecor。摊开来说具体如下:
1、根据用户选择的主题来设置一些显示特性,包括标题,actionbar 等。
2、根据不同特性来初始化 subDecor;对 subDecor 内部的子 View 进行初始化。
3、最后添加到 DecorView中。
添加的具体代码如下:此处是通过调用
  // AppCompatDelegateImpl
  this.mWindow.getDecorView();

   // phoneWindow
   public final View getDecorView() {
        if (mDecor == null || mForceDecorInstall) {
            installDecor();
        }
        return mDecor;
    }


private void installDecor() {
        mForceDecorInstall = false;
        if (mDecor == null) {
            // 生成 DecorView
            mDecor = generateDecor(-1);
            mDecor.setDescendantFocusability(ViewGroup.FOCUS_AFTER_DESCENDANTS);
            mDecor.setIsRootNamespace(true);
            if (!mInvalidatePanelMenuPosted && mInvalidatePanelMenuFeatures != 0) {
                mDecor.postOnAnimation(mInvalidatePanelMenuRunnable);
            }
        } else {
            // 这样 DecorView 就持有了window
            mDecor.setWindow(this);
        }
      ......
}


   protected DecorView generateDecor(int featureId) {
        // System process doesn't have application context and in that case we need to directly use
        // the context we have. Otherwise we want the application context, so we don't cling to the
        // activity.
        Context context;
        if (mUseDecorContext) {
            Context applicationContext = getContext().getApplicationContext();
            if (applicationContext == null) {
                context = getContext();
            } else {
                context = new DecorContext(applicationContext, getContext());
                if (mTheme != -1) {
                    context.setTheme(mTheme);
                }
            }
        } else {
            context = getContext();
        }
        return new DecorView(context, featureId, this, getAttributes());
   }
到此,DecorView 的创建就讲完了。可是我们似乎并没有看到 DecorView 是被添加的,什么时候对用户可见的。
WindowManager
View 创建完以后,那 Decorview 是怎么添加到屏幕中去的呢?当然是 WindowManager 呢,那么是如何将 View 传到 WindowManager 中呢。
看 ActivityThread 中的 handleResumeActivity 方法:
// ActivityThread
public void handleResumeActivity(IBinder token, boolean finalStateRequest, boolean isForward,
            String reason) {
        ......
final ActivityClientRecord r = performResumeActivity(token, finalStateRequest, reason);
final int forwardBit = isForward
                ? WindowManager.LayoutParams.SOFT_INPUT_IS_FORWARD_NAVIGATION : 0;

        // If the window hasn't yet been added to the window manager,
        // and this guy didn't finish itself or start another activity,
        // then go ahead and add the window.
        boolean willBeVisible = !a.mStartedActivity;
        if (!willBeVisible) {
            try {
                willBeVisible = ActivityManager.getService().willActivityBeVisible(
                        a.getActivityToken());
            } catch (RemoteException e) {
                throw e.rethrowFromSystemServer();
            }
        }
        if (r.window == null && !a.mFinished && willBeVisible) {
            r.window = r.activity.getWindow();
            View decor = r.window.getDecorView();
            decor.setVisibility(View.INVISIBLE);
            ViewManager wm = a.getWindowManager();
            WindowManager.LayoutParams l = r.window.getAttributes();
            a.mDecor = decor;
            l.type = WindowManager.LayoutParams.TYPE_BASE_APPLICATION;
            l.softInputMode |= forwardBit;
            ......
            if (a.mVisibleFromClient) {
                if (!a.mWindowAdded) {
                    a.mWindowAdded = true;
                    wm.addView(decor, l);
                } else {
                    // The activity will get a callback for this {@link LayoutParams} change
                    // earlier. However, at that time the decor will not be set (this is set
                    // in this method), so no action will be taken. This call ensures the
                    // callback occurs with the decor set.
                    a.onWindowAttributesChanged(l);
                }
            }

            // If the window has already been added, but during resume
            // we started another activity, then don't yet make the
            // window visible.
        } else if (!willBeVisible) {
            if (localLOGV) Slog.v(TAG, "Launch " + r + " mStartedActivity set");
            r.hideForNow = true;
        }

        // Get rid of anything left hanging around.
        cleanUpPendingRemoveWindows(r, false /* force */);

        // The window is now visible if it has been added, we are not
        // simply finishing, and we are not starting another activity.
        if (!r.activity.mFinished && willBeVisible && r.activity.mDecor != null && !r.hideForNow) {
            if (r.newConfig != null) {
                performConfigurationChangedForActivity(r, r.newConfig);
                if (DEBUG_CONFIGURATION) {
                    Slog.v(TAG, "Resuming activity " + r.activityInfo.name + " with newConfig "
                            + r.activity.mCurrentConfig);
                }
                r.newConfig = null;
            }
            if (localLOGV) Slog.v(TAG, "Resuming " + r + " with isForward=" + isForward);
            WindowManager.LayoutParams l = r.window.getAttributes();
            if ((l.softInputMode
                    & WindowManager.LayoutParams.SOFT_INPUT_IS_FORWARD_NAVIGATION)
                    != forwardBit) {
                l.softInputMode = (l.softInputMode
                        & (~WindowManager.LayoutParams.SOFT_INPUT_IS_FORWARD_NAVIGATION))
                        | forwardBit;
                if (r.activity.mVisibleFromClient) {
                    ViewManager wm = a.getWindowManager();
                    View decor = r.window.getDecorView();
                    wm.updateViewLayout(decor, l);
                }
            }

            r.activity.mVisibleFromServer = true;
            mNumVisibleActivities++;
            if (r.activity.mVisibleFromClient) {
          // 这里也会调用addview
                r.activity.makeVisible();
            }
        }

        r.nextIdle = mNewActivities;
        mNewActivities = r;
        if (localLOGV) Slog.v(TAG, "Scheduling idle handler for " + r);
        Looper.myQueue().addIdleHandler(new Idler());
    }
上面的代码主要做了以下几件事:
1、获取到 DecorView,设置不可见,然后通过 wm.addView(decor, l) 将 view 添加到 WindowManager;
2、在某些情况下,比如此时点击了输入框调起了键盘,就会调用 wm.updateViewLayout(decor, l) 来更新 View 的布局。
3、这些做完以后,会调用 activity 的 makeVisible ,让视图可见。如果此时 DecorView 没有添加到 WindowManager,那么会添加。
// Activity
 void makeVisible() {
        if (!mWindowAdded) {
            ViewManager wm = getWindowManager();
            wm.addView(mDecor, getWindow().getAttributes());
            mWindowAdded = true;
        }
        mDecor.setVisibility(View.VISIBLE);
    }
接下来,看下 addview 的逻辑。 WindowManager 的实现类是 WindowManagerImpl,而它则是通过 WindowManagerGlobal 代理实现 addView 的,我们看下 addView 的方法:
// WindowManagerGlobal
 public void addView(View view, ViewGroup.LayoutParams params,
            Display display, Window parentWindow) {
           // ......

            root = new ViewRootImpl(view.getContext(), display);
            view.setLayoutParams(wparams);

            mViews.add(view);
            mRoots.add(root);
            mParams.add(wparams);
           // do this last because it fires off messages to start doing things
            try {
                root.setView(view, wparams, panelParentView);
            } catch (RuntimeException e) {
                // BadTokenException or InvalidDisplayException, clean up.
                if (index >= 0) {
                    removeViewLocked(index, true);
                }
                throw e;
            }
}
在这里,实例化了 ViewRootImpl 。同时调用 ViewRootImpl 的 setView 方法来持有了 DecorView。此外这里还保存了 DecorView ,Params,以及 ViewRootImpl 的实例。
现在我们终于知道为啥 View 是在 OnResume 的时候可见的呢。
ViewRootImpl
实际上,View 的绘制是由 ViewRootImpl 来负责的。每个应用程序窗口的 DecorView 都有一个与之关联的 ViewRootImpl 对象,这种关联关系是由 WindowManager 来维护的。
先看 ViewRootImpl 的 setView 方法,该方法很长,我们将一些不重要的点注释掉:
   /**
     * We have one child
     */
    public void setView(View view, WindowManager.LayoutParams attrs, View panelParentView) {
        synchronized (this) {
            if (mView == null) {
                mView = view;
                ......

                mAdded = true;
                int res; /* = WindowManagerImpl.ADD_OKAY; */

                // Schedule the first layout -before- adding to the window
                // manager, to make sure we do the relayout before receiving
                // any other events from the system.

                requestLayout();
                ......
            }
        }
    }
这里先将 mView 保存了 DecorView 的实例,然后调用 requestLayout() 方法,以完成应用程序用户界面的初次布局。
 public void requestLayout() {
        if (!mHandlingLayoutInLayoutRequest) {
            checkThread();
            mLayoutRequested = true;
            scheduleTraversals();
        }
    }
因为是 UI 绘制,所以一定要确保是在主线程进行的,checkThread 主要是做一个校验。接着调用 scheduleTraversals 开始计划绘制了。
void scheduleTraversals() {
        if (!mTraversalScheduled) {
            mTraversalScheduled = true;
            mTraversalBarrier = mHandler.getLooper().getQueue().postSyncBarrier();
            mChoreographer.postCallback(
                    Choreographer.CALLBACK_TRAVERSAL, mTraversalRunnable, null);
            if (!mUnbufferedInputDispatch) {
                scheduleConsumeBatchedInput();
            }
            notifyRendererOfFramePending();
            pokeDrawLockIfNeeded();
        }
    }
这里主要关注两点:
mTraversalBarrier : Handler 的同步屏障。它的作用是可以拦截 Looper 对同步消息的获取和分发,加入同步屏障之后,Looper 只会获取和处理异步消息,如果没有异步消息那么就会进入阻塞状态。也就是说,对 View 绘制渲染的处理操作可以优先处理(设置为异步消息)。
mChoreographer: 编舞者。统一动画、输入和绘制时机。也是这章需要重点分析的内容。
mTraversalRunnable :TraversalRunnable 的实例,是一个Runnable,最终肯定会调用其 run 方法:
final class TraversalRunnable implements Runnable {
        @Override
        public void run() {
            doTraversal();
        }
    }
doTraversal,如其名,开始绘制了,该方法内部最终会调用 performTraversals 进行绘制。
  void doTraversal() {
        if (mTraversalScheduled) {
            mTraversalScheduled = false;
            mHandler.getLooper().getQueue().removeSyncBarrier(mTraversalBarrier);

            if (mProfile) {
                Debug.startMethodTracing("ViewAncestor");
            }

            performTraversals();

            if (mProfile) {
                Debug.stopMethodTracing();
                mProfile = false;
            }
        }
    }
到此,DecorView 与 activity 之间的绑定关系就讲完了,下一章,将会介绍 performTraversals 所做的事情,也就是 View 绘制流程。
附上一张流程图:
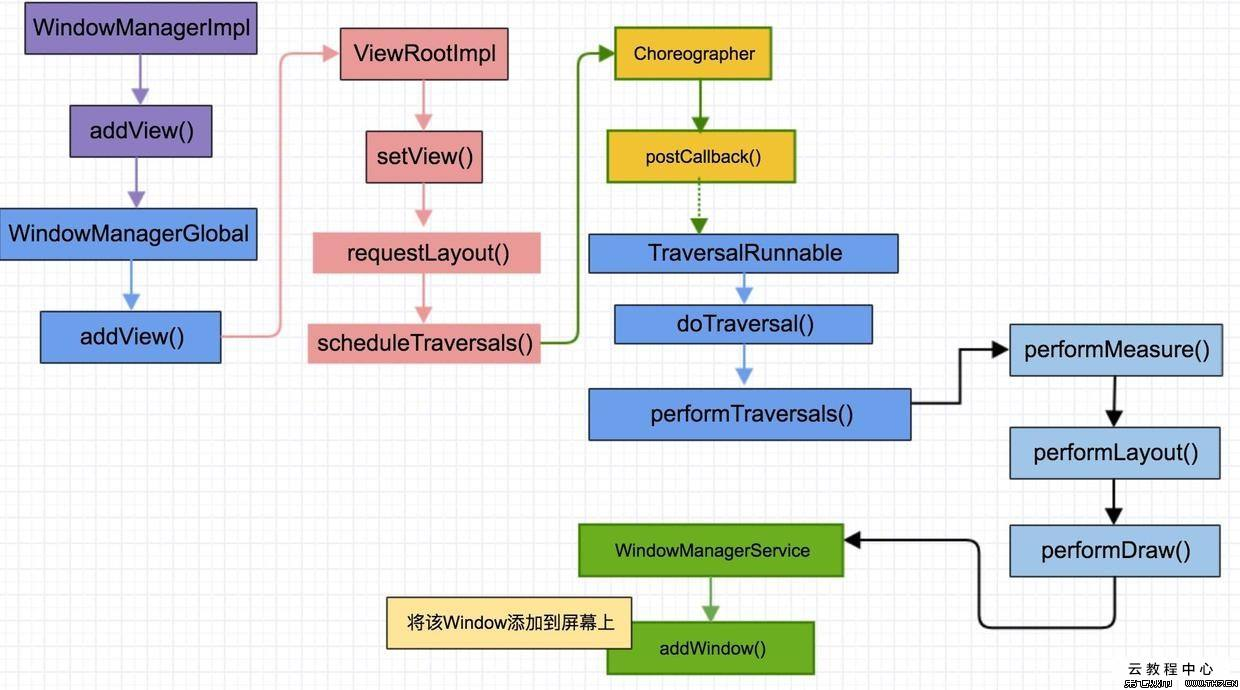
到此,DecorView 与 ViewRootImpl 之间的关系就讲的很清楚了。
问题
1. 首次 View 的绘制流程是在什么时候触发的?
既然开始说到了 View 的绘制流程,那整个流程是什么时候触发的呢?
答案是在 ActivityThread.handleResumeActivity 里触发的。
ActivityThread.handleResumeActivity 里会调用 wm.addView 来添加 DecorView,wm 是 WindowManagerImpl;
最终通过 WindowManagerImpl.addView -> WindowManagerGlobal.addView -> ViewRootImpl.setView -> ViewRootImpl.requestLayout 就触发了第一次 View 的绘制。
2. ViewRootImpl 创建的时机?
从上面流程里可以看到,ViewRootImpl 也是在 ActivityThread.handleResumeActivity 里创建的。具体是在 WindowManagerGlobal.addView 中创建的。这时候主要是为了把 DecorView 添加到页面中(ViewRootImpl.setView )。具体可以看第一问
3. ViewRootImpl 和 DecorView 的关系是什么?
是在 PhoneWindow.installDecor -> generateLayout 中设置的。在 ViewRootImpl.setView 里,通过 DecorView.assignParent 把 ViewRootImpl 设置为 DecorView 的 parent。
所以 ViewRootImpl 和 DecorView 的关系就是 ViewRootImpl 是 DecorView 的 parent。因为 DecorView 是我们布局的顶层,现在我们就知道层层调用 requestLayout 等方法是怎么调用到 ViewRootImpl 里的了。
4. DecorView 的布局是什么样的?
当我们在调用 serContentView 的时候,这时候就需要保证 DecorView 已经初始化了。所以有个 ensureSubDecor() 方法,里面会有个 getDecorView,这时候会去初始化 decorView ,方面后面的使用。
对于 Activity 的层级,大家应该都看过一张图的描述,Activity -> PhoneWindow -> DecorView -> [title_bar, content],其中 DecorView 里包括了 title_bar 和 content 两个 View,不过这个是默认的布局,实际上根据不同的主题样式,DecorView 对应有不同的布局。
图中所包含的 title_bar 和 content 对应的是 R.layout.screen_simple 布局。
那么这么多布局,是在什么时候设置的呢?
5. DecorView 的创建时机?
上面说 DecorView 布局的时候,其实我们也看到了,在 PhoneWindow.installDecor -> generateDecor 其实就是创建 DecorView。
那 installDecor 是什么时候调用的呢?
调用链是 Activity.setContentView -> PhoneWindow.setContentView -> installDecor说到这里那就继续会想到,Activity.setContentView 的流程是什么呢?
6. setContentView 的流程
setContentView 流程比较简单,会调用 PhoneWindow.setContentView。
其中做的事情是两个:
-
创建 DecorView
-
根据 layoutResId 创建 View 并添加到 DecorView 中
7. Activity、PhoneWindow、DecorView、ViewRootImpl 的关系?
其实上面的问题中,我们经常会说到 PhoneWindow 这个角色,PhoneWindow 其实是 Window 的唯一子类,是 Activity 和 View 交互系统的中间层,而 DecorView 是整个 View 层级的最顶层,ViewRootImpl 是 DecorView 的 parent,但是他并不是一个真正的 View,只是继承了 ViewParent 接口,用来掌管 View 的各种事件,包括 requestLayout、invalidate、dispatchInputEvent 等等。8. PhoneWindow 的创建时机?
既然上面又提到了 PhoneWindow,那么 PhoneWindow 是什么时候创建的呢?是在 Activity.attach 里创建的,而 Activity.attach 又是在 ActivityThread.performLaunchActivity 里创建的。
这里就又能引申出 Activity 的启动流程,这里就先不讲了。
9. 如何触发重新绘制?
既然上面说到 View 的绘制流程,那我们怎么触发 View 的重新绘制呢?就是调用 requestLayout 和 invalidate。

 浙公网安备 33010602011771号