改造继续之eclipse集成tomcat开发spring mvc项目配置一览
在上一篇的环境配置中,你还只能基于maven开发一个javase的项目,如果要开发一个web项目,还得配置一下tomcat和spring mvc,集成一览表如下。
一:Tomcat安装
在.net web开发中,微软再一次向你展示了一站式马赛克配置,你只需要轻轻一点按钮,发射。。。一个带有bootstrap框架的页面就呈现在你的面前,在
java中就没有这么好的事情了,基本都是高清无码。
1. 下载地址
http://mirrors.hust.edu.cn/apache/tomcat/tomcat-8/v8.5.20/bin/apache-tomcat-8.5.20.zip,目前tomcat最新版是 9.0 ,这里我选择的8.5版本。

2. 配置环境变量
<1> 在windows平台下,一般会默认安装在:C:\Program Files\Apache Software Foundation\Tomcat 8.5 目录下,在你的windows服务列表中会有一个
Apache Tomcat 8.5 Tomcat8服务项,这样就算安装完成了。
<2> centos平台下,因为项目需要部署在linux上,wget url,解压,最后执行startup.sh。
[root@localhost myapp]# cd tomcat
[root@localhost tomcat]# ls
bin  conf  lib  LICENSE  logs  NOTICE  RELEASE-NOTES  RUNNING.txt  temp  webapps  work
[root@localhost tomcat]# cd bin
[root@localhost bin]# ls
bootstrap.jar       commons-daemon.jar            daemon.sh         setclasspath.sh  startup.sh            tool-wrapper.sh
catalina.bat        commons-daemon-native.tar.gz  digest.bat        shutdown.bat     tomcat-juli.jar       version.bat
catalina.sh         configtest.bat                digest.sh         shutdown.sh      tomcat-native.tar.gz  version.sh
catalina-tasks.xml  configtest.sh                 setclasspath.bat  startup.bat      tool-wrapper.bat
[root@localhost bin]# ./startup.sh
Using CATALINA_BASE:   /usr/myapp/tomcat
Using CATALINA_HOME:   /usr/myapp/tomcat
Using CATALINA_TMPDIR: /usr/myapp/tomcat/temp
Using JRE_HOME:        /usr/mysoft/java/jdk1.8
Using CLASSPATH:       /usr/myapp/tomcat/bin/bootstrap.jar:/usr/myapp/tomcat/bin/tomcat-juli.jar
Tomcat started.
[root@localhost bin]#
从上面可以看到,tomcat已经启动了,对了,汤姆猫的默认端口是8080,可以通过netstat -tln 验证一下,最后检查一下是否启动正常。
 1 [root@localhost bin]# netstat -tln
 2 Active Internet connections (only servers)
 3 Proto Recv-Q Send-Q Local Address           Foreign Address         State
 4 tcp        0      0 0.0.0.0:111             0.0.0.0:*               LISTEN
 5 tcp        0      0 0.0.0.0:80              0.0.0.0:*               LISTEN
 6 tcp        0      0 192.168.122.1:53        0.0.0.0:*               LISTEN
 7 tcp        0      0 0.0.0.0:22              0.0.0.0:*               LISTEN
 8 tcp        0      0 127.0.0.1:631           0.0.0.0:*               LISTEN
 9 tcp        0      0 127.0.0.1:25            0.0.0.0:*               LISTEN
10 tcp6       0      0 :::8009                 :::*                    LISTEN
11 tcp6       0      0 :::111                  :::*                    LISTEN
12 tcp6       0      0 :::8080                 :::*                    LISTEN
13 tcp6       0      0 :::22                   :::*                    LISTEN
14 tcp6       0      0 ::1:631                 :::*                    LISTEN
15 tcp6       0      0 ::1:25                  :::*                    LISTEN
16 tcp6       0      0 127.0.0.1:8005          :::*                    LISTEN

二: eclipse 和 tomcat 的集成
两者集成起来,相对还是比较简单的,一般来说做下面三件事情就基本可以搞定了。
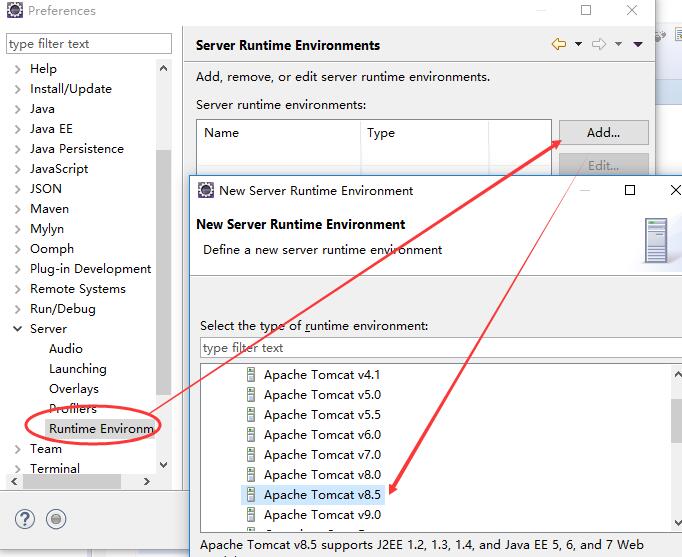
1. 在eclipse 的 windows -> references -> server -> enveriment runtime 中先指定你的tomcat版本,比如下图中的
apache tomcat 8.5版本,点击‘next’后指定一下tomcat的安装路径,指定你的jre运行版本即可。

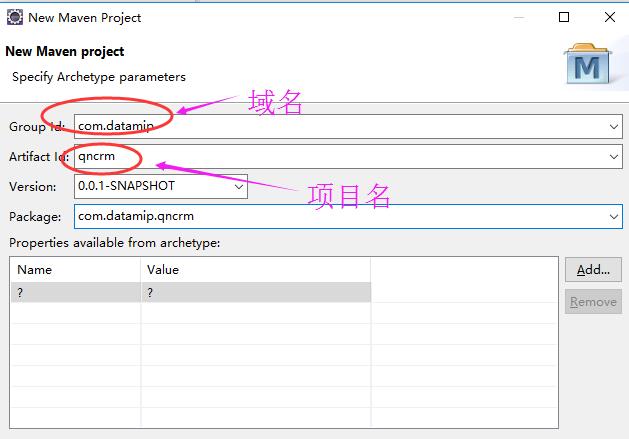
好了,接下来你可以新建一个 maven project -> 选择模式为:’‘maven-archetype-webapp’ ,然后填写好公司的域名和项目名称,最后就完成一个
web项目的创建,详细如下图:

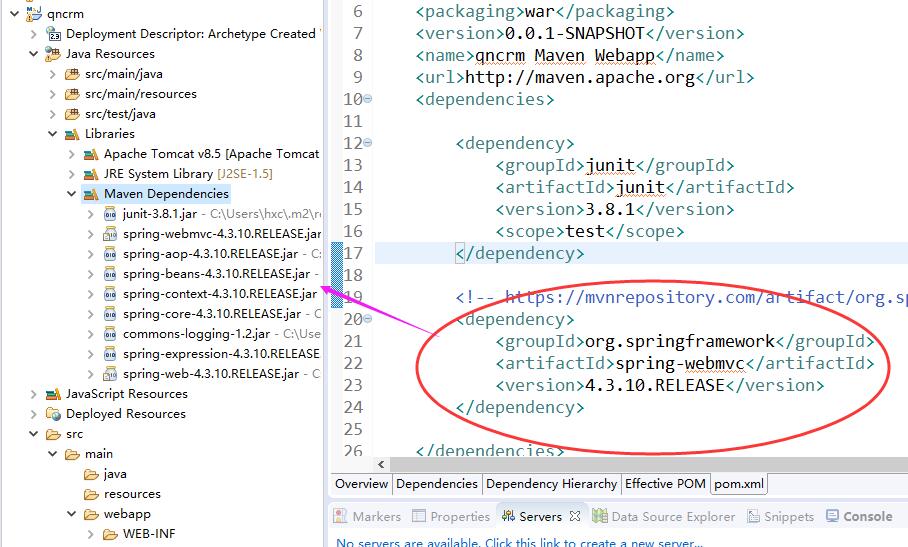
2. 右击web工程 -> Properties -> Java Build Path -> Libraries-> Add Library -> Server Runtime -> 添加tomcat ->
切到order and export 勾选tomcat。
当你终于创建好web工程之后,你会发现项目有‘错误信息’:The superclass "javax.servlet.http.HttpServlet" was not found on the Java Build Path。
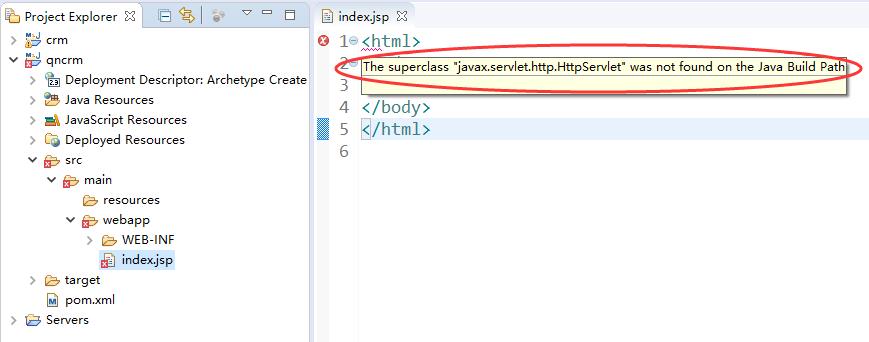
这是因为你的web工程还没有感知到jsp容器tomcat,这个时候你需要在 右击Web工程,在Properties面板中的Java Build Path添加tomcat的library。
详细步骤看一下标题即可,当一切做完之后,就能解决这个问题了。

3. 添加jstl模板引擎
这个是可选项,如果你创建的 spring mvc工程运行的时候如果报错说缺少jstl模板,那么在pom.xml引用一下即可。
1         <!-- https://mvnrepository.com/artifact/javax.servlet/jstl -->
2         <dependency>
3             <groupId>javax.servlet</groupId>
4             <artifactId>jstl</artifactId>
5             <version>1.1.2</version>
6         </dependency>
三:安装spring mvc
到目前为止,tomcat和eclipse的集成算是告一段落了,接下来要做的就是安装配置spring mvc。大家可以在maven仓库去拉一下即可,像
spring-core,spring-aop 这些必备依赖jar包会全部给你安装完毕。

1. web.xml的配置
在src-> main -> webapp -> WEB-INF 下有一个web.xml文件,这个就相当于.net 中的web.config,在asp.net mvc 中最后是通过mvchandler进行了
请求接管,这种模式在spring mvc中同样适用,比如:接管的Servlet是DispatcherServlet,web.xml的详细配置如下:
 1 <?xml version="1.0" encoding="UTF-8"?>
 2 <web-app version="3.0" xmlns="http://java.sun.com/xml/ns/javaee"
 3     xmlns:xsi="http://www.w3.org/2001/XMLSchema-instance"
 4     xsi:schemaLocation="http://java.sun.com/xml/ns/javaee http://java.sun.com/xml/ns/javaee/web-app_3_0.xsd">
 5     <display-name>Archetype Created Web Application</display-name>
 6
 7     <!-- url请求拦截器 -->
 8     <servlet>
 9         <servlet-name>spring</servlet-name>
10         <servlet-class>org.springframework.web.servlet.DispatcherServlet</servlet-class>
11     </servlet>
12
13     <servlet-mapping>
14         <servlet-name>spring</servlet-name>
15         <url-pattern>/</url-pattern>
16     </servlet-mapping>
17
18     <!-- 字符集过滤器 -->
19     <filter>
20         <filter-name>encodingFilter</filter-name>
21         <filter-class>org.springframework.web.filter.CharacterEncodingFilter</filter-class>
22         <init-param>
23             <param-name>encoding</param-name>
24             <param-value>UTF-8</param-value>
25         </init-param>
26         <init-param>
27             <param-name>forceEncoding</param-name>
28             <param-value>true</param-value>
29         </init-param>
30     </filter>
31     <filter-mapping>
32         <filter-name>encodingFilter</filter-name>
33         <url-pattern>/*</url-pattern>
34     </filter-mapping>
35
36 </web-app>
2. spring-servlet.xml 配置
我们知道spring其实就是一个bean的大容器,类的配置和管理都可以丢给spring,由于这里spring mvc采用的是‘注解模式’,所以要定义一下‘包‘
扫描的范围。这里文件名的定义要清楚一下:<$>-servlet.xml,其中的$就是web.xm中的<servlet-name>spring</servlet-name>的名称spring,最后把
此文件放置在WEB-INF文件夹下,方便tomcat容器加载的时候进行合并读取,详细配置如下:
 1 <?xml version="1.0" encoding="UTF-8"?>
 2 <beans xmlns="http://www.springframework.org/schema/beans"
 3     xmlns:xsi="http://www.w3.org/2001/XMLSchema-instance" xmlns:context="http://www.springframework.org/schema/context"
 4     xmlns:tx="http://www.springframework.org/schema/tx" xmlns:mvc="http://www.springframework.org/schema/mvc"
 5     xsi:schemaLocation="http://www.springframework.org/schema/beans
 6        http://www.springframework.org/schema/beans/spring-beans.xsd
 7        http://www.springframework.org/schema/context
 8        http://www.springframework.org/schema/context/spring-context.xsd
 9        http://www.springframework.org/schema/tx
10        http://www.springframework.org/schema/tx/spring-tx.xsd
11        http://www.springframework.org/schema/mvc
12        http://www.springframework.org/schema/mvc/spring-mvc.xsd">
13
14     <!-- 配置扫描的包 -->
15     <context:component-scan base-package="com.datamip.qncrm.controller"></context:component-scan>
16
17     <!-- 视图解析器 -->
18     <bean
19         class="org.springframework.web.servlet.view.InternalResourceViewResolver">
20         <property name="viewClass" value="org.springframework.web.servlet.view.JstlView" />
21         <property name="prefix" value="/WEB-INF/views/"></property>
22         <property name="suffix" value=".jsp"></property>
23     </bean>
24
25 </beans>
3. 新建mvc的views文件夹存放所有view页面
在spring-servlet.xml文件配置节的‘视图解析器’的时候,可以看到所有的jsp页面都要放在views文件夹下,这里我新建一个index.jsp文件,详细内容如下:
 1 <%@ page language="java" contentType="text/html; charset=UTF-8"
 2     pageEncoding="UTF-8"%>
 3 <!DOCTYPE html PUBLIC "-//W3C//DTD HTML 4.01 Transitional//EN" "http://www.w3.org/TR/html4/loose.dtd">
 4 <html>
 5 <head>
 6 <meta http-equiv="Content-Type" content="text/html; charset=UTF-8">
 7 <title>首页</title>
 8 </head>
 9 <body>
10     <h1> SpringMVC 配置成功啦。。。。。</h1>
11 </body>
12 </html>
4. 新建mvc的controller控制器
在Java Resources 中的src/main/java 目录下,我可以新建一个HomeController.java,详细信息如下:
 1 package com.datamip.qncrm.controller;
 2
 3 import org.springframework.stereotype.Controller;
 4 import org.springframework.web.bind.annotation.RequestMapping;
 5 import org.springframework.web.bind.annotation.RequestMethod;
 6
 7 @Controller
 8 public class HomeController {
 9
10     //路由匹配,使用index.jsp进行页面渲染
11     @RequestMapping(value="/home/index",method=RequestMethod.GET)
12     public String Index() {
13         return "index";
14     }
15 }
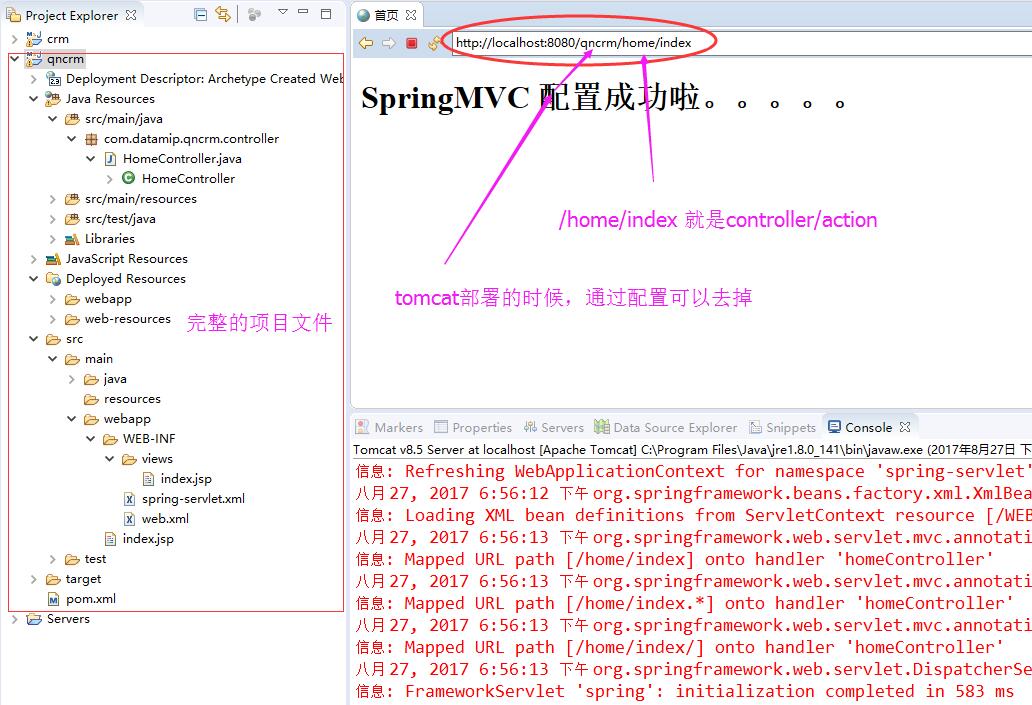
好了,基本上spring mvc配置算是结束了,接下来我们在qncrm工程目录上 Run As -> Run As Server 执行,终于成功啦,也不容易哈~~~,相比.net 中的一站
式配置,确实难度上升了不少,不过有一句话说的好,硬是把一个做技术的程序员做成了没技术。如果大家理解asp.net mvc的urlRoutingModule 和MvcHandler,
原理都是一样的,希望本篇对你有帮助。ZIP文件下载

 浙公网安备 33010602011771号