8天入门docker系列 —— 第二天 通过一个aspnetcore程序加深对容器的理解
我们知道容器是一个打包了应用和相关依赖的盒子,那怎么去操控这个盒子呢? 这一篇我通过一个简单的aspnetcore程序来加深对盒子的理解,使用之前先
安装一下Docker的环境。
一:Docker的安装
官方下载地址:https://docs.docker.com/install/linux/docker-ce/centos/ ,跟着文档执行完下面2个大步骤即可。
1. SET UP THE REPOSITORY
sudo yum install -y yum-utils \
  device-mapper-persistent-data \
  lvm2

sudo yum-config-manager \
    --add-repo \
    https://download.docker.com/linux/centos/docker-ce.repo
2. INSTALL DOCKER CE
sudo yum install docker-ce docker-ce-cli containerd.io
3. 启动docker 服务
[root@localhost ~]# service docker start
Redirecting to /bin/systemctl start  docker.service
4. 查看docker版本
[root@localhost ~]# docker -v
Docker version 18.09.2, build 6247962
二:新建asp.net core 网站
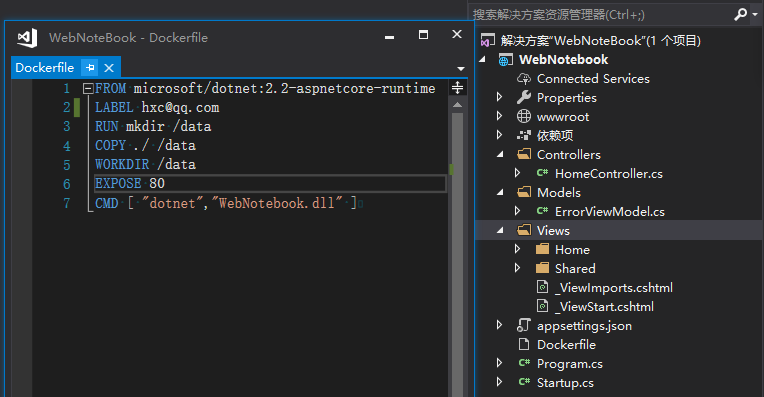
docker已经有了,接下来新建一个website,采用vs默认的mvc模板即可,有了网站之后新建一个Dockerfile文件,内容如下,目的就是为了制作镜像,
关于dockerfile的更多内容我会放到后面的文章中去说,本篇关注点在容器上。
FROM microsoft/dotnet:2.2-aspnetcore-runtime
LABEL hxc@qq.com
RUN mkdir /data
COPY ./ /data
WORKDIR /data
EXPOSE 80
CMD [ "dotnet","WebNotebook.dll" ]
然后点击vs的发布功能,把发布后的内容通过ftp push 到虚拟机中/data/publish文件夹下,具体内容如下:
[root@localhost publish]# ls
appsettings.Development.json  web.config             WebNotebook.pdb                 WebNotebook.Views.pdb
appsettings.json              WebNotebook.deps.json  WebNotebook.runtimeconfig.json  wwwroot
Dockerfile                    WebNotebook.dll        WebNotebook.Views.dll
[root@localhost publish]#
接下来通过 docker build 的方式构建出webnotebook的镜像。
[root@localhost publish]# docker build -f ./Dockerfile -t huangxincheng/webnodebook:v1 .
Sending build context to Docker daemon  4.201MB
Step 1/7 : FROM microsoft/dotnet:2.2-aspnetcore-runtime
2.2-aspnetcore-runtime: Pulling from microsoft/dotnet
6ae821421a7d: Already exists
8a3a416e6dac: Already exists
ed82f21723d8: Already exists
4f77997e649d: Already exists
Digest: sha256:988829fbff8cde8b431d045d2dd2e3ea54d69abf5c61c69794c523535ce382e7
Status: Downloaded newer image for microsoft/dotnet:2.2-aspnetcore-runtime
 ---> dad26d192ae6
Step 2/7 : MAINTAINER hxc@qq.com
 ---> Running in 89b9a2c5bec6
Removing intermediate container 89b9a2c5bec6
 ---> 2d6c5ecba6d2
Step 3/7 : RUN mkdir /data
 ---> Running in 08e8d316c3da
Removing intermediate container 08e8d316c3da
 ---> 7d28be2a2bc1
Step 4/7 : COPY ./ /data
 ---> 9f603790a8a2
Step 5/7 : WORKDIR /data
 ---> Running in 85fbed40b4f7
Removing intermediate container 85fbed40b4f7
 ---> 8c18eaadc85b
Step 6/7 : EXPOSE 80
 ---> Running in 0eaa5046ee1d
Removing intermediate container 0eaa5046ee1d
 ---> 9b6ee99c1875
Step 7/7 : CMD [ "dotnet","WebNotebook.dll" ]
 ---> Running in 7c0d2fa1eb46
Removing intermediate container 7c0d2fa1eb46
 ---> 513950255443
Successfully built 513950255443
Successfully tagged huangxincheng/webnodebook:v1
最后可以通过 docker images 查看一下镜像是否构建成功,从下图中可以看到,当前有一个我的应用镜像,还有一个runtime镜像。
[root@localhost publish]# docker images
REPOSITORY                  TAG                      IMAGE ID            CREATED             SIZE
huangxincheng/webnodebook   v1                       513950255443        38 seconds ago      264MB
microsoft/dotnet            2.2-aspnetcore-runtime   dad26d192ae6        4 days ago          260MB
三:容器操作
1. 启动容器
通常启动容器的方式有两种,第一种为docker create, 还有一种是docker run,更多的情况我们使用docker run 方式,比如下面的命令。
[root@localhost publish]# docker run --name webnotebook -d huangxincheng/webnodebook:v1
51ded69fce15fb912ab167c4dea26535a17b0f2147a5571aaa411a974ab95b11
《1》 --name: 这个就是给你当前运行的容器取一个名字,如果不取的话就采用系统给你的默认名字。
《2》 -d: 表示脱离shell终端采用deamon形式的后台运行,在生产环境中必须要这么处理,没毛病吧。
《3》 huangxincheng/webnodebook:v1 : huangxincheng表示仓库名,当然你也可以不需要这个。webnodebook 表示镜像名, v1表示镜像的版本。
容器运行成功后,会返回一个容器的标识码,这里要注意的是,如果镜像在本地不存在,docker 默认会到官方的 hub.docker.com上进行拉取。
2. 查看容器
既然你说容器启动了,那我怎么判别是否真的启动了呢? 这里你就可以用 docker ps命令鉴别。
[root@localhost publish]# docker ps
CONTAINER ID        IMAGE                          COMMAND                  CREATED             STATUS              PORTS               NAMES
51ded69fce15        huangxincheng/webnodebook:v1   "dotnet WebNotebook.…"   6 minutes ago       Up 6 minutes        80/tcp              webnotebook
从上图中可以看到,容器的ID为 51ded69fce15 ,而这个刚好是你docker run 返回的前12个字符,然后Status= Up 6 minutes ,说明容器是启动的没毛病。
3. 查看容器内应用程序是否启动
容器启动了不代表我的webnotebook没问题,对吧,那接下来怎么去鉴别容器内的程序是否正常启动呢? 这里就可以用到下面两种方式。
《1》 docker top xxx 查看容器运行的进程。
xxx 就是你的容器名或者容器ID,如下图可以看到确实我的WebNoteBook的进程号是5323,说明是启动的。
[root@localhost publish]# docker top webnotebook
UID                 PID                 PPID                C                   STIME               TTY                 TIME                CMD
root                5323                5306                0                   00:09               ?                   00:00:01            dotnet WebNotebook.dll
《2》 直接在宿主机上通过ps -ef 查看指定的程序。
从下图中你也看到了,WebNotebook的PID果然是5323,说明启动了无疑。
[root@localhost publish]# ps -ef | grep dotnet
root       5323   5306  0 00:09 ?        00:00:01 dotnet WebNotebook.dll
root       6235   3499  0 00:23 pts/1    00:00:00 grep --color=auto dotnet
4. 如何查看容器的ip和port
既然容器和容器内程序都是启动的,那接下来我怎么访问这个webnotebook呢? 要想访问,你肯定是要知道这个容器的ip+port,不然怎么访问呢? 通常有
两种做法可以获取到容器的ip和port端口。
《1》 使用docker exec 直接进入容器内
[root@localhost publish]# docker exec -it webnotebook /bin/bash
root@51ded69fce15:/data# ifconfig
bash: ifconfig: command not found
root@51ded69fce15:/data#
-it 表示给当前的容器分配一个终端,由于容器是ubuntu环境,为了精简并没有把ifconfig打包进来,所以你需要使用apt-get 安装一下net包即可。
root@51ded69fce15:/data# apt-get update &&  apt-get install net-tools -y
Ign:1 http://cdn-fastly.deb.debian.org/debian stretch InRelease
Get:3 http://cdn-fastly.deb.debian.org/debian stretch-updates InRelease [91.0 kB]
Get:4 http://cdn-fastly.deb.debian.org/debian stretch Release [118 kB]
Get:2 http://security-cdn.debian.org/debian-security stretch/updates InRelease [94.3 kB]
Get:5 http://cdn-fastly.deb.debian.org/debian stretch-updates/main amd64 Packages [7748 B]
Get:6 http://cdn-fastly.deb.debian.org/debian stretch Release.gpg [2434 B]
Get:7 http://cdn-fastly.deb.debian.org/debian stretch/main amd64 Packages [7084 kB]
Get:8 http://security-cdn.debian.org/debian-security stretch/updates/main amd64 Packages [474 kB]
Fetched 7871 kB in 1min 52s (69.8 kB/s)
Reading package lists... Done
Reading package lists... Done
Building dependency tree
Reading state information... Done
The following NEW packages will be installed:
  net-tools
0 upgraded, 1 newly installed, 0 to remove and 5 not upgraded.
Need to get 248 kB of archives.
After this operation, 963 kB of additional disk space will be used.
Get:1 http://cdn-fastly.deb.debian.org/debian stretch/main amd64 net-tools amd64 1.60+git20161116.90da8a0-1 [248 kB]
Fetched 248 kB in 4s (56.4 kB/s)
debconf: delaying package configuration, since apt-utils is not installed
Selecting previously unselected package net-tools.
(Reading database ... 6953 files and directories currently installed.)
Preparing to unpack .../net-tools_1.60+git20161116.90da8a0-1_amd64.deb ...
Unpacking net-tools (1.60+git20161116.90da8a0-1) ...
Setting up net-tools (1.60+git20161116.90da8a0-1) ...
root@51ded69fce15:/data# ifconfig
eth0: flags=4163<UP,BROADCAST,RUNNING,MULTICAST>  mtu 1500
        inet 172.17.0.2  netmask 255.255.0.0  broadcast 172.17.255.255
        ether 02:42:ac:11:00:02  txqueuelen 0  (Ethernet)
        RX packets 4133  bytes 8350979 (7.9 MiB)
        RX errors 0  dropped 0  overruns 0  frame 0
        TX packets 3452  bytes 189039 (184.6 KiB)
        TX errors 0  dropped 0 overruns 0  carrier 0  collisions 0

lo: flags=73<UP,LOOPBACK,RUNNING>  mtu 65536
        inet 127.0.0.1  netmask 255.0.0.0
        loop  txqueuelen 0  (Local Loopback)
        RX packets 0  bytes 0 (0.0 B)
        RX errors 0  dropped 0  overruns 0  frame 0
        TX packets 0  bytes 0 (0.0 B)
        TX errors 0  dropped 0 overruns 0  carrier 0  collisions 0

root@51ded69fce15:/data#
当你安装完net包后,通过ifconfig你就可以看到 172.17.0.2 这个ip地址了,然后通过netstat 来查看webnotebook的端口号。
root@51ded69fce15:/data# netstat -tlnp
Active Internet connections (only servers)
Proto Recv-Q Send-Q Local Address           Foreign Address         State       PID/Program name
tcp6       0      0 :::80                   :::*                    LISTEN      1/dotnet
root@51ded69fce15:/data#
《2》 使用 docker inspect 查看容器各方面的底层信息。
[root@localhost ~]# docker inspect webnotebook
[
   ..."NetworkSettings": {
            "Bridge": "",
            "SandboxID": "cc8d9e678ef1137d992f3c8d019d81300c2b5f379bc8b746b08fe233d06ffb02",
            "HairpinMode": false,
            "LinkLocalIPv6Address": "",
            "LinkLocalIPv6PrefixLen": 0,
            "Ports": {
                "80/tcp": null
            },
            "SandboxKey": "/var/run/docker/netns/cc8d9e678ef1",
            "SecondaryIPAddresses": null,
            "SecondaryIPv6Addresses": null,
            "EndpointID": "e37e565a26af790ce156dc957beab5182cd136215d61b655be26e5c31362b4ae",
            "Gateway": "172.17.0.1",
            "GlobalIPv6Address": "",
            "GlobalIPv6PrefixLen": 0,
            "IPAddress": "172.17.0.2",
            "IPPrefixLen": 16,
            "IPv6Gateway": "",
            "MacAddress": "02:42:ac:11:00:02",
            "Networks": {
                "bridge": {
                    "IPAMConfig": null,
                    "Links": null,
                    "Aliases": null,
                    "NetworkID": "d234a2cc0ff52b802e846d12530e41d886ec780f2344cf601f022ff1c434afe4",
                    "EndpointID": "e37e565a26af790ce156dc957beab5182cd136215d61b655be26e5c31362b4ae",
                    "Gateway": "172.17.0.1",
                    "IPAddress": "172.17.0.2",
                    "IPPrefixLen": 16,
                    "IPv6Gateway": "",
                    "GlobalIPv6Address": "",
                    "GlobalIPv6PrefixLen": 0,
                    "MacAddress": "02:42:ac:11:00:02",
                    "DriverOpts": null
                }
            }
        }
   ...
]
从NetworkSettings节点中,你可以找到一个"IPAddress": "172.17.0.2" 的信息,这个ip就是你的容器IP,很简单吧,而且从"Ports": { "80/tcp": null } 上
你也看到,当前暴露的是80端口。
5. 查看容器内程序日志
容器和程序都启动起来了,不代表程序运行就正常,为了保险起见,还是要看一下程序打印到终端的一些操作日志,这样我才放心一些不是吗? 那现在
我可以通过 docker logs xxx 来查看指定容器的日志输出,从下面可以看到,一点问题都没有。
[root@localhost ~]# docker logs webnotebook
warn: Microsoft.AspNetCore.DataProtection.KeyManagement.XmlKeyManager[35]
      No XML encryptor configured. Key {8199b0ea-afae-4586-8e6d-aae75aa91db2} may be persisted to storage in unencrypted form.
Hosting environment: Production
Content root path: /data
Now listening on: http://[::]:80
Application started. Press Ctrl+C to shut down.
6. 关闭和启动容器
容器运行这一块基本上就是这样了,由于项目不断的迭代升级,你的旧版本程序的容器就该停止了,接下来你有 docker stop 和 docker kill 两种方式,
两者的区别在于,前者是给你的程序 sigterm信号,后者是sigkill信号,如果不明白两者的区别,可以看我的这篇博文:
https://www.cnblogs.com/huangxincheng/p/9576795.html
[root@localhost ~]# docker stop webnotebook
webnotebook
[root@localhost ~]# docker ps -a
CONTAINER ID        IMAGE                          COMMAND                  CREATED             STATUS                     PORTS               NAMES
51ded69fce15        huangxincheng/webnodebook:v1   "dotnet WebNotebook.…"   35 minutes ago      Exited (0) 2 seconds ago                       webnotebook
[root@localhost ~]#
可以看到,当我执行了stop之后再 ps -a 发现,当前的容器已经退出了,然后你可以通过 docker start 重启,再用 docker kill 关闭。
[root@localhost ~]# docker start webnotebook
webnotebook
[root@localhost ~]# docker ps -a
CONTAINER ID        IMAGE                          COMMAND                  CREATED             STATUS              PORTS               NAMES
51ded69fce15        huangxincheng/webnodebook:v1   "dotnet WebNotebook.…"   37 minutes ago      Up 2 seconds        80/tcp              webnotebook
[root@localhost ~]# docker kill webnotebook
webnotebook
[root@localhost ~]# docker ps -a
CONTAINER ID        IMAGE                          COMMAND                  CREATED             STATUS                      PORTS               NAMES
51ded69fce15        huangxincheng/webnodebook:v1   "dotnet WebNotebook.…"   37 minutes ago      Exited (137) 1 second ago                       webnotebook
[root@localhost ~]#
既然ip+port都知道了,接下来网站你就可以访问啦。访问之前确保你的容器是start状态哦( docker webnotebook start )。

好了,本篇就说到这里,希望对你有帮助。

 浙公网安备 33010602011771号