redis其它操作,redis管道,django中使用redis,django缓存,celery介绍,补充
1 redis其它操作💜
'''
delete(*names)
exists(name)
keys(pattern='*')
expire(name ,time)
rename(src, dst)
move(name, db))
randomkey()
type(name)
'''
# redis的key值,最大可以是多少? 最大不超过512M  一般 1KB
# redis的value值,最大可以是多少? 最大不超过512M
1.1 练习:
import redis

conn=redis.Redis()
# delete(*names)
# conn.delete('userinfo2')

# exists(name)
# print(conn.exists('name'))

# keys(pattern='*')
# print(conn.keys('user*'))
# print(conn.keys('*'))
# print(conn.keys())


# expire(name ,time)
# conn.expire('name',5)


# rename(src, dst)
# conn.rename('userinfo3','us')

# move(name, db))
# conn.move('us',3)

# randomkey()
# print(conn.randomkey())


# type(name)
# print(conn.type('hash2'))
print(conn.type('us'))


conn.close()
2 redis管道💜
# 事务四大特性
	-原子性:要么都成功,要么都失败
    -一致性:数据前后要一致
    -隔离性:多个事务之间相互不影响
    -持久性:事务一旦完成,数据永久改变

# 关系型数据库,支持事务

# redis 有没有事务?没有专门的事物,但是通过别的方式,可以实现事务的几个特性,所以咱们认为它具备事务
	-redis要支持事务,要完成事务的几大特性,需要使用管道来支持
    -单实例redis是支持管道的
    -集群模式下,不支持管道,就不支持事务


#####  redis通过管道实现事务
import redis

#### 没有管道的情况,一旦失败,之前执行的 不会回退
# conn = redis.Redis()
#
# conn.decrby('my_money', 10)
# # 我的钱扣了,写了点别的逻辑--》有可能抛异常
# l = [0, 2, 3]
# print(l[9])
#
# conn.incrby('zs_money', 10)
#
# # conn.set('my_money',90)
# # conn.incrby('zs_money',110)
#
# conn.close()


### 通过管道实现事务
conn = redis.Redis()
pipline = conn.pipeline(transaction=True)
## 创建了一个管道,把命令都一个个放到管道中,先不执行,当执行execute,才执行管道中所有的命令
pipline.decrby('my_money', 10)
# 我的钱扣了,写了点别的逻辑--》有可能抛异常
l = [0, 2, 3]
print(l[0])

pipline.incrby('zs_money', 10)

pipline.execute()

conn.close()
3 django中使用redis💜
3.1 通用方案
# 写一个池
import redis

POOL = redis.ConnectionPool(max_connections=20)

# 在要使用的地方,导入使用即可
def redis_demo(requset):
    conn = redis.Redis(connection_pool=POOL, decode_responses=True)
    res = conn.incrby('count')
    print(res)

    return HttpResponse(f'您是我们第:{res}个用户')
3.2 第三方模块
# django-redis ---》配置文件中配置即可
pip install django-redis

# 配置文件配置
CACHES = {
    "default": {
        "BACKEND": "django_redis.cache.RedisCache",
        "LOCATION": "redis://127.0.0.1:6379",
        "OPTIONS": {
            "CLIENT_CLASS": "django_redis.client.DefaultClient",
            "CONNECTION_POOL_KWARGS": {"max_connections": 100}
            # "PASSWORD": "123",
        }
    },
}

# 在使用的位置,导入使用
from django_redis import get_redis_connection
def redis_demo(requset):
    conn = get_redis_connection()
    res = conn.incrby('count')
    print(res)

    return HttpResponse(f'您是我们第:{res}个用户')
4 django缓存💜
# redis数据存在内存中,取放速度快---》非常适合做缓存
	本来数据在mysql中,每次都查询,速度慢---》把查询出来的数据,暂时存储到redis(缓存),下次请求再来,直接从redis中拿,速度就会很快


# django中如何使用缓存
	-配置文件配置(缓存位置:内存,文件中,redis中)
        CACHES = {
        "default": {
            "BACKEND": "django_redis.cache.RedisCache",
            "LOCATION": "redis://127.0.0.1:6379",
            "OPTIONS": {
                "CLIENT_CLASS": "django_redis.client.DefaultClient",
                "CONNECTION_POOL_KWARGS": {"max_connections": 100}
                # "PASSWORD": "123",
            }
 	-把数据放到缓存中(放到redis中)
      from django.core.cache import cache
      cache.set(key,value可以是任意类型,过期时间)
         -redis只支持5大数据类型,可以放python的任意类型
         -本质:pickle序列化---》bytes格式---》以redis字符串的形式放在了redis中
      cache.get(key)


# 后期咱么在项目中,使用redis作为django的缓存,多一些,尽量不使用原生redis操作


# 前后端分离中,使用 cache.set   cache.get
# 前后端混合中
     可以整站缓存
     可以要缓存一个页面
     可以缓存页面中的某个位置
# 可以缓存的位置:
     内存中
     本地文件中
     数据库中
     reids中 (咱们用的多)
5 celery介绍💜
# celery是什么?
分布式异步任务框架:第三方框架,celery翻译过来是芹菜,吉祥物就是芹菜
项目中使用异步任务的场景,可以使用它
之前做异步,如何做? 异步发送短信---》开启多线程---》不便于管理
# celery有什么作用?
-执行异步任务
-执行延迟任务
-执行定时任务
# celery原理
1)可以不依赖任何服务器,通过自身命令,启动服务
2)celery服务为为其他项目服务提供异步解决任务需求的
注:会有两个服务同时运行,一个是项目服务,一个是celery服务,项目服务将需要异步处理的任务交给celery服务,celery就会在需要时异步完成项目的需求
人是一个独立运行的服务 | 医院也是一个独立运行的服务
正常情况下,人可以完成所有健康情况的动作,不需要医院的参与;但当人生病时,就会被医院接收,解决人生病问题
人生病的处理方案交给医院来解决,所有人不生病时,医院独立运行,人生病时,医院就来解决人生病的需求
django如果不用异步,正常运行即可,如果想做异步,就借助于 celery来完成
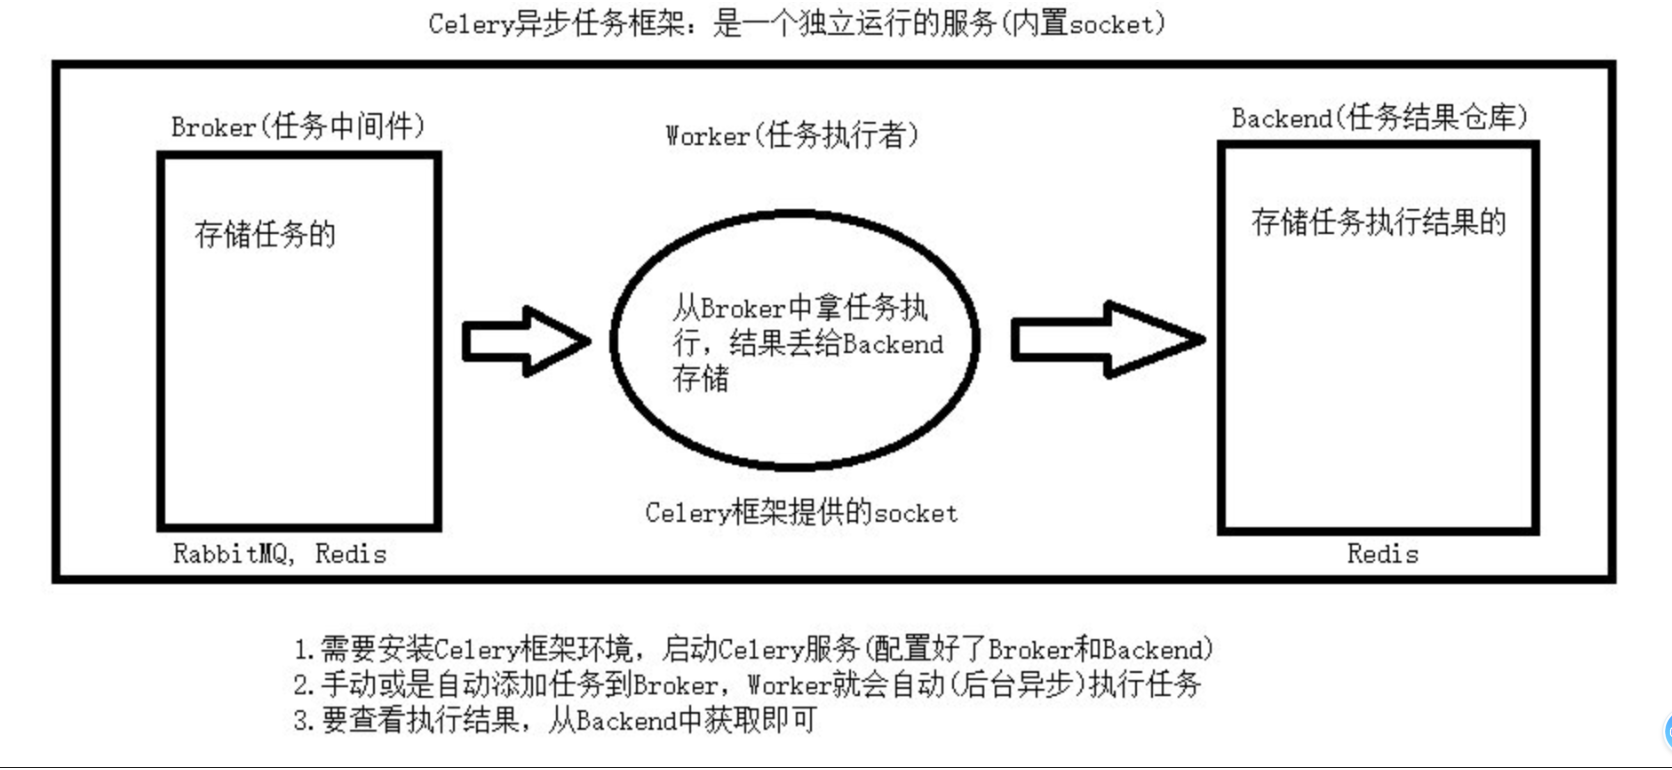
# celery架构
-broker:消息中间件,任务中间件(消息队列:redis,rabbitmq)
django要做异步,提交任务到 任务中间件中(redis),存储起来
Celery本身不提供消息服务,但是可以方便的和第三方提供的消息中间件集成。包括,RabbitMQ, Redis等等
-worker:任务执行者,任务执行单元
不停的从任务中间件中取任务,执行
Worker是Celery提供的任务执行的单元,worker并发的运行在分布式的系统节点中
-banckend:结果存储,任务结果存储
把任务执行结果(函数返回值),存放到结果存储中(redis)
用来存储Worker执行的任务的结果,Celery支持以不同方式存储任务的结果,包括AMQP, redis等
### 任务中间件:redis
### 结果存储:redis
5.1 celery的快速使用
# 0 开源的,小组织,不支持win,不要就win的问题展开讨论了
	win上:需要借助于第三方

##### 1 安装:
 pip install celery  # 最新 5.3.4
###### 2 写代码 main.py
import time
from celery import Celery
# 1 实例化得到对象
broker = 'redis://127.0.0.1:6379/1'  # 消息中间件 redis
backend = 'redis://127.0.0.1:6379/2'  # 结果存,用redis
app = Celery('app', broker=broker, backend=backend)

# 编写任务,必须用app.task 装饰,才变成了celery的任务
@app.task
def send_sms():
    time.sleep(1)
    print('短信发送成功')
    return '手机号短信发送成功'


#### 3 提交任务,使用别的进程
from main import send_sms
res=send_sms.delay()
print(res)


### 4 启动worker---》可以在3之前
# windows:
pip3 install eventlet
celery  -A main worker -l info -P eventlet
# mac  linux
# celery -A main worker -l info


### 5 worker就会执行任务,把执行的结果,放到结果存储中

### 6 查看结果
from celery.result import AsyncResult
from main import app
id = '92987636-ae9e-4be9-828b-8c2d10fe066a'
if __name__ == '__main__':
    a = AsyncResult(id=id, app=app)
    if a.successful():
        result = a.get()
        print(result)
    elif a.failed():
        print('任务失败')
    elif a.status == 'PENDING':
        print('任务等待中被执行')
    elif a.status == 'RETRY':
        print('任务异常后正在重试')
    elif a.status == 'STARTED':
        print('任务已经开始被执行')
补充单例💜
什么是单例模式?单例模式是指:保证一个类仅有一个实例,并提供一个访问它的全局访问点
# 线程1 执行:
cursor.excute('select * from user')

# 线程2执行
cursor.excute('select * from books')

# 线程1 执行
cursor.fetchAll() # 拿出查询到的数据

# django ,每个线程,一个连接对象---》 连接池
1.使用模块
其实,Python 的模块就是天然的单例模式,因为模块在第一次导入时,会生成 .pyc 文件,当第二次导入时,就会直接加载 .pyc 文件,而不会再次执行模块代码。因此,我们只需把相关的函数和数据定义在一个模块中,就可以获得一个单例对象了。如果我们真的想要一个单例类,可以考虑这样做:
mysingleton.py
class Singleton(object):
    def foo(self):
        pass
singleton = Singleton()
将上面的代码保存在文件 mysingleton.py 中,要使用时,直接在其他文件中导入此文件中的对象,这个对象即是单例模式的对象
from a import singleton
2.使用装饰器
def Singleton(cls):
    instance = None

    def _singleton(*args, **kargs):
        nonlocal instance
        if not instance:
            instance = cls(*args, **kargs)
        return instance

    return _singleton


@Singleton
class A(object):
    def __init__(self, x=0):
        self.x = x


a1 = A(2)
a2 = A(3)
print(a1.x)
print(a2.x)

print(a1 is a2)
3.使用类方法
class Singleton(object):
    _instance=None
    def __init__(self):
        pass
    @classmethod
    def instance(cls, *args, **kwargs):
        if not cls._instance:
            cls._instance=cls(*args, **kwargs)
        return cls._instance

a1=Singleton.instance()
a2=Singleton().instance()

print(a1 is a2)
4.基于new方法实现
class Singleton(object):
    _instance=None
    def __init__(self):
        pass


    def __new__(cls, *args, **kwargs):
        if not cls._instance:
            cls._instance = object.__new__(cls)
        return cls._instance

obj1 = Singleton()
obj2 = Singleton()
print(obj1 is obj2)
5.基于metaclass方式实现
class SingletonType(type):
    _instance=None
    def __call__(cls, *args, **kwargs):
        if not cls._instance:
            # cls._instance = super().__call__(*args, **kwargs)
            cls._instance = object.__new__(cls)
            cls._instance.__init__(*args, **kwargs)
        return cls._instance

class Foo(metaclass=SingletonType):
    def __init__(self,name):
        self.name = name


obj1 = Foo('name')
obj2 = Foo('name')
print(obj1.name)
print(obj1 is obj2)
补充问题💜
from django.contrib import admin
from django.urls import path, include
from home import views  # pycharm报错,但实际上不报错 ,只需要把加入到环境变量的路径都做成source root即可
from django.views.static import serve
from django.conf import settings
import os
from django.shortcuts import HttpResponse

class Foo():
    url = 'http://www.baidu.com'

    def demo(self,request):
        # self 就不是Foo的对象了,它是request对象
        print(type(self)) # django.core.handlers.wsgi.WSGIRequest
        print(self.url) # 'WSGIRequest' object has no attribute 'url'
        return HttpResponse('sdfa')


urlpatterns = [


    path('demo/', Foo().demo),  # Foo.demo(request)
]

 浙公网安备 33010602011771号