
ssm整合开发
基本知识:
标准的可以分为三层(MVC模式:model view control)
(1)数据访问层(dao持久层):主要是对原始数据(数据库或者文本文件等存放数据的形式)的操作层,是对数据的操作,具体为业务逻辑层或表示层提供数据服务。
(2)业务逻辑层(service):主要是对数据层的操作,对数据业务逻辑处理,对数据的操作进行组合。
(3)表示层(web):主要表示WEB方式,如果逻辑层相当强大和完善,无论表现层如何定义和更改,逻辑层都能完善地提供服务。主要对用户的请求接受,以及数据的返回,为客户端提供应用程序的访问。
一、项目解析图
项目搭建基本图和一些jar包的解析。
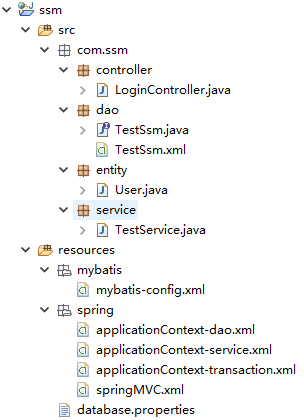
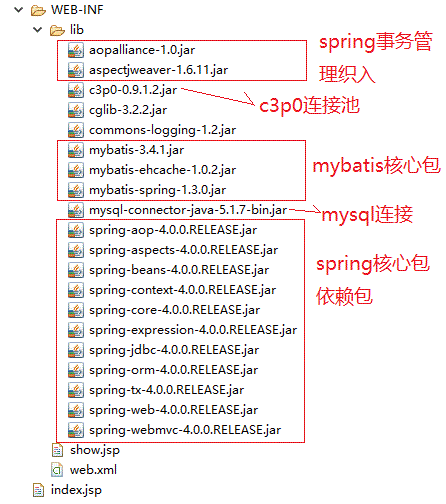
注意: 导入的jar包和各种配置文件中的约束需要对应。要不然很容易会出错。
二、配置mybatis-config.xml配置文件
在整合的开发中,不需要配置太多的东西。可以配置一下别名。
<?xml version="1.0" encoding="UTF-8"?>
<!DOCTYPE configuration
PUBLIC "-//mybatis.org//DTD Config 3.0//EN"
"http://mybatis.org/dtd/mybatis-3-config.dtd">

<configuration>

    <typeAliases>    <!-- 进行别名控制 -->
        <package name="com.ssm.entity"/>
    </typeAliases>

    <!-- 后面使用mapper扫描包的方式,这里就不作配置了 -->
</configuration>
三、配置applicationContext-dao.xml
主要是用来整合dao层。把数据库连接池交给spring来管理,并且配置好SqlSession工厂、mapper扫描器。
mapper扫描器,扫描操作dao层的文件。包括 方法接口、sql.xml映射文件。
dao层是对原始数据的操作。为service层提供服务。
<beans xmlns="http://www.springframework.org/schema/beans"
    xmlns:xsi="http://www.w3.org/2001/XMLSchema-instance" xmlns:mvc="http://www.springframework.org/schema/mvc"
    xmlns:context="http://www.springframework.org/schema/context"
    xmlns:aop="http://www.springframework.org/schema/aop" xmlns:tx="http://www.springframework.org/schema/tx"
    xsi:schemaLocation="http://www.springframework.org/schema/beans
        http://www.springframework.org/schema/beans/spring-beans-3.2.xsd
        http://www.springframework.org/schema/mvc
        http://www.springframework.org/schema/mvc/spring-mvc-3.2.xsd
        http://www.springframework.org/schema/context
        http://www.springframework.org/schema/context/spring-context-3.2.xsd
        http://www.springframework.org/schema/aop
        http://www.springframework.org/schema/aop/spring-aop-3.2.xsd
        http://www.springframework.org/schema/tx
        http://www.springframework.org/schema/tx/spring-tx-3.2.xsd ">

    <!-- 外部连接properties文件 -->
    <context:property-placeholder location="classpath:database.properties"/>

    <!-- 配置数据库连接池 这里使用c3p0数据库连接池-->
    <bean id="datasource" class="com.mchange.v2.c3p0.DriverManagerDataSource">
        <property name="driverClass" value="${jdbc.driver}" />
        <property name="jdbcUrl" value="${jdbc.url}" />
        <property name="user" value="${jdbc.username}" />
        <property name="password" value="${jdbc.password}"/>
    </bean>

    <!-- 配置SqlSession工厂 -->
    <bean name="SqlSessionFactory" class="org.mybatis.spring.SqlSessionFactoryBean">
        <property name="dataSource" ref="datasource"></property>
        <property name="configLocation" value="classpath:mybatis/mybatis-config.xml"></property>
    </bean>

    <!-- 配置mapper扫描器 -->
    <bean class="org.mybatis.spring.mapper.MapperScannerConfigurer">
        <!-- 扫描包路径,如果需要扫描多个包,中间使用半角逗号隔开 -->
         <property name="basePackage" value="com.ssm.dao"></property> //com.ssm.dao是接口方法和sql映射文件的包
         <property name="sqlSessionFactoryBeanName" value="SqlSessionFactory"/>
    </bean>

</beans>
四、配置database.properties文件
主要用来配置连接数据库的代码。也可以在这里设置一些编码的格式。
jdbc.driver=com.mysql.jdbc.Driver
jdbc.url=jdbc:mysql:///chat  //填写数据库名称
jdbc.username= 省略      //数据库权限名称
jdbc.password= 省略  //数据库权限密码
五、配置applicationContext-service.xml配置文件
主要是对service的整合管理,就是业务逻辑层,对具体的业务进行操作,对数据层进行操作。
<beans xmlns="http://www.springframework.org/schema/beans"
    xmlns:xsi="http://www.w3.org/2001/XMLSchema-instance" xmlns:mvc="http://www.springframework.org/schema/mvc"
    xmlns:context="http://www.springframework.org/schema/context"
    xmlns:aop="http://www.springframework.org/schema/aop" xmlns:tx="http://www.springframework.org/schema/tx"
    xsi:schemaLocation="http://www.springframework.org/schema/beans
        http://www.springframework.org/schema/beans/spring-beans-3.2.xsd
        http://www.springframework.org/schema/mvc
        http://www.springframework.org/schema/mvc/spring-mvc-3.2.xsd
        http://www.springframework.org/schema/context
        http://www.springframework.org/schema/context/spring-context-3.2.xsd
        http://www.springframework.org/schema/aop
        http://www.springframework.org/schema/aop/spring-aop-3.2.xsd
        http://www.springframework.org/schema/tx
        http://www.springframework.org/schema/tx/spring-tx-3.2.xsd ">


<!-- 打开Spring的Annotation支持 -->
<context:annotation-config />

<!-- 设定Spring 去哪些包中找Annotation -->
<context:component-scan base-package="com.ssm.service"/> //com.ssm.service 是业务逻辑层

</beans>
六、配置applicationContext-transaction.xml (扩展)
进行事务管理操作。保持数据的一致性和统一性。根据业务需要来进行搭建。这里使用了基于注解的aop配置
<?xml version="1.0" encoding="UTF-8"?>
<beans xmlns="http://www.springframework.org/schema/beans"
    xmlns:xsi="http://www.w3.org/2001/XMLSchema-instance"
    xmlns:mvc="http://www.springframework.org/schema/mvc"
    xmlns:context="http://www.springframework.org/schema/context"
    xmlns:aop="http://www.springframework.org/schema/aop"
    xmlns:tx="http://www.springframework.org/schema/tx"
    xsi:schemaLocation="http://www.springframework.org/schema/beans
        http://www.springframework.org/schema/beans/spring-beans-3.2.xsd
        http://www.springframework.org/schema/mvc
        http://www.springframework.org/schema/mvc/spring-mvc-3.2.xsd
        http://www.springframework.org/schema/context
        http://www.springframework.org/schema/context/spring-context-3.2.xsd
        http://www.springframework.org/schema/aop
        http://www.springframework.org/schema/aop/spring-aop-3.2.xsd
        http://www.springframework.org/schema/tx
        http://www.springframework.org/schema/tx/spring-tx-3.2.xsd ">

    <!-- 事务管理器 对mybatis操作数据库事务控制,spring使用jdbc的事务控制类 -->

    <bean id="transactionManager"
        class="org.springframework.jdbc.datasource.DataSourceTransactionManager">

        <!--配置 数据源 datasource在applicationContext-dao.xml中配置了 -->
        <property name="dataSource" ref="datasource" />
    </bean>

    <!--使用基于注解方式配置事务 -->
    <tx:annotation-driven
        transaction-manager="transactionManager" proxy-target-class="true"/>

</beans>
七、配置springMVC.xml配置文件
主要是对view表现层的视图的管理。也可以配置一些信息校验、图片上传等。
<?xml version="1.0" encoding="UTF-8"?>
<beans xmlns="http://www.springframework.org/schema/beans"
    xmlns:xsi="http://www.w3.org/2001/XMLSchema-instance"
    xmlns:context="http://www.springframework.org/schema/context"
    xmlns:mvc="http://www.springframework.org/schema/mvc"
    xsi:schemaLocation="http://www.springframework.org/schema/beans http://www.springframework.org/schema/beans/spring-beans.xsd
        http://www.springframework.org/schema/context http://www.springframework.org/schema/context/spring-context-3.1.xsd
        http://www.springframework.org/schema/mvc http://www.springframework.org/schema/mvc/spring-mvc-3.1.xsd">

    <!-- 配置mvc支持 annotation-->
    <mvc:annotation-driven/>
    <mvc:default-servlet-handler/>

    <!--包扫描的方式,找到controller-->
    <context:component-scan base-package="com.ssm.controller"></context:component-scan>

     <bean class="org.springframework.web.servlet.view.InternalResourceViewResolver">
        <property name="prefix" value="/WEB-INF/"/>
        <property name="suffix" value=".jsp"/>
    </bean>

</beans>
八、配置web.xml
主要配置一些spring的监听器、前端控制器和访问方式。也可以配置过滤器等。
<?xml version="1.0" encoding="UTF-8"?>
<web-app xmlns:xsi="http://www.w3.org/2001/XMLSchema-instance"
xmlns="http://java.sun.com/xml/ns/javaee"
xsi:schemaLocation="http://java.sun.com/xml/ns/javaee
http://java.sun.com/xml/ns/javaee/web-app_3_0.xsd" id="WebApp_ID" version="3.0">

<!--监听器-->
<listener>
<listener-class>org.springframework.web.context.ContextLoaderListener</listener-class>
</listener>
<context-param>
<param-name>contextConfigLocation</param-name>
<param-value>classpath:spring/applicationContext-*.xml</param-value>
</context-param>

<!--前端控制器-->
<servlet>
     <servlet-name>springmvc</servlet-name>
     <servlet-class>org.springframework.web.servlet.DispatcherServlet</servlet-class>
     <init-param>
         <param-name>contextConfigLocation</param-name>
         <param-value>classpath:spring/springMVC.xml</param-value>
     </init-param>
</servlet>
<servlet-mapping>
     <servlet-name>springmvc</servlet-name>
     <url-pattern>*.action</url-pattern> //设置访问方式
</servlet-mapping>

</web-app>
九、创建对应的实体类
实体类中的属性名称的设置,设置为和数据库中的字段的名称一致。方便后期的调用,而且不需要指定resultMap
public class User {

    private String name;
    private String password;

//补全get、set、方法
}
十、配置dao层
是对原始的数据进行操作。因为这里用了mapper扫描包的方式。并且使用了mapper动态开发。所以,需要把方法接口和sql映射文件放到统一包里面。并且需要名称相同。
//(1)接口方法//创建实体类的时候,创建的属性名称和mysql的表对应
public interface TestSsm {
  public User testing(String name);
}

//(2) sql映射文件
<?xml version="1.0" encoding="UTF-8"?>
<!DOCTYPE mapper
PUBLIC "-//mybatis.org//DTD Mapper 3.0//EN"
"http://mybatis.org/dtd/mybatis-3-mapper.dtd">

<mapper namespace="com.ssm.dao.TestSsm">
    <select id="testing" parameterType="String" resultType="user">
        select * from user where name = #{name}
    </select>
</mapper>
十一、配置service层
针对具体的问题的操作,也可以理解成对数据层的操作,对数据业务逻辑处理。
@Service //标记了service层
@Transactional //注解事务管理
public class TestService {

    @Resource
    TestSsm test; //引入mapper中的接口。进行操作

    @Transactional(propagation=Propagation.NOT_SUPPORTED)
    public User getUser(String name) {

        User user = test.testing(name);
        return user;
    }
}
十二、配置controller层
controller是对service层中方法的调用、用户访问的url管理,并有返回view的功能等。
@Controller
@RequestMapping("/login")
public class LoginController {

    @Resource
    TestService test; //引入service层的方法。

    @RequestMapping(value="/getways")
    public String getWays(HttpServletRequest request) {

        //查找后台数据库用户名称是 huang的信息
        User user = test.getUser("huang");

        request.setAttribute("user", user);

        return "show"; //返回视图
    }
}
十三、配置显示的页面
//show.jsp
用户名:${user.getName()}
密码:${user.getPassword()}

//index.jsp
<jsp:forward page="/login/getways.action"></jsp:forward>
最后打开浏览器。输入http://localhost:8080/ssm/index.jsp 则可以显示用户名和密码。

 浙公网安备 33010602011771号