
Swift图形和绘画
重写UIView的draw方法,画背景色

class CustomView: UIView {
    override func draw(_ rect: CGRect) {
        let p = UIBezierPath.init(rect: rect)
        UIColor.white.setFill()
        p.fill()
    }
}
绘制文本

    override func draw(_ rect: CGRect) {
        let fontName = "HelveticaNeue-Bold"
        let helveticaBold = UIFont(name: fontName, size: 40.0)
        let string = "Some String" as NSString
        string.draw(at: CGPoint.init(x: 40, y: 0), withAttributes: [NSAttributedString.Key.font : helveticaBold!,NSAttributedString.Key.foregroundColor:UIColor.red ])
    }
绘制图像
    override func draw(_ rect: CGRect) {
        let img = UIImage.init(named: "a")
//        img!.draw(at: CGPoint.init(x: 0, y: 0 ))//这里是绘制的起始点,会根据图片的大小绘制
        img!.draw(in: CGRect.init(x: 0, y: 0, width: 100, height: 100))//这里指定绘制的起始点和大小,可以自行查看区别

    }
构造可变尺寸图像
        let button:UIButton = UIButton.init(type: .custom)
        button.frame = CGRect.init(x: 100, y: 100, width: 200, height: 200)
        let img = UIImage.init(named: "chat")!.resizableImage(withCapInsets: UIEdgeInsets.init(top: 10, left: 40, bottom: 30, right: 10))//指定被拉伸的区域,如果有渐变的图像,建议使用这个拉伸效果比较好
        button.setBackgroundImage(img, for: .normal)
        view.addSubview(button)
        let button:UIButton = UIButton.init(type: .custom)
        button.frame = CGRect.init(x: 100, y: 100, width: 200, height: 200)
        var img = UIImage.init(named: "chat")!
        img = img.stretchableImage(withLeftCapWidth: Int(img.size.width/2.0), topCapHeight: Int(img.size.height/2.0))//指定被拉伸的像素,就是在图片的中心像素开始拉伸,如果没有渐变的背景,以上和这个二选一
        button.setBackgroundImage(img, for: .normal)
        view.addSubview(button)
绘制线条

override func draw(_ rect: CGRect) {
        UIColor.red.set()
        /**获取当前的图形上下文*/
        let context = UIGraphicsGetCurrentContext()
        /**设置线宽*/
        (context as! CGContext).setLineWidth(10)
        /**设置线的划线方式*/
        (context as! CGContext).setLineCap(.round) //z
        /**设置线的起点*/
        (context as! CGContext).move(to: CGPoint.init(x: 10, y: 10))
         /**设置线的终点*/
        (context as! CGContext).addLine(to: CGPoint.init(x: 90, y: 90))
        /**设置两条线直接的链接的方式*/
        (context as! CGContext).setLineJoin(.round)

         /**如果绘制连续颜色,则直接addLine就可以*/
        (context as! CGContext).addLine(to: CGPoint.init(x: 10, y: 90))

        /**使用上下文当前的颜色绘制线条*/
        (context as! CGContext).strokePath()

    }
绘制路径

    override func draw(_ rect: CGRect) {
        let path = CGMutablePath()
        path.move(to: CGPoint.init(x: 0, y: 0 ))
        path.addLine(to: CGPoint.init(x: 100, y: 100))
        path.move(to: CGPoint.init(x: 100, y: 0 ))
        path.addLine(to: CGPoint.init(x: 0, y: 100))
        UIColor.red.setStroke()
        let context = UIGraphicsGetCurrentContext()
        context?.addPath(path)
       context?.drawPath(using: .stroke)
    }
绘制矩形
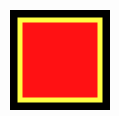
    override func draw(_ rect: CGRect) {
        let path = CGMutablePath()
        /**绘制矩形的边界*/
        let rectangle = CGRect.init(x: 10, y: 10, width: 80, height: 80)
        /**将矩形添加到路径中*/
        path.addRect(rectangle)
        /**获取当前上下文句柄*/
        let currentContext = UIGraphicsGetCurrentContext()
        currentContext?.addPath(path)
        /**设置填充颜色*/
        UIColor.red.setFill()
        /**设置边框颜色*/
        UIColor.yellow.setStroke()
        /**设置线宽*/
        currentContext?.setLineWidth(5)
        /**在上下文毛边并填充路径*/
        currentContext?.drawPath(using: .fillStroke)
    }
添加阴影
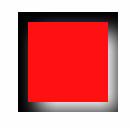
    override func draw(_ rect: CGRect) {
        /**获取当前上下文句柄*/
        let currentContext = UIGraphicsGetCurrentContext()
        let offset = CGSize.init(width: 10, height: 10)
        currentContext?.setShadow(offset: offset, blur: 20, color: UIColor.white.cgColor)

        let path = CGMutablePath()
        /**绘制矩形的边界*/
        let rectangle = CGRect.init(x: 10, y: 10, width: 80, height: 80)
        /**将矩形添加到路径中*/
        path.addRect(rectangle)
        currentContext?.addPath(path)
        /**设置填充颜色*/
        UIColor.red.setFill()
        /**在上下文毛边并填充路径*/
        currentContext?.drawPath(using: .fill)

    }
绘制渐变
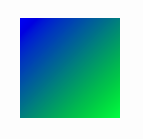
    override func draw(_ rect: CGRect) {
        let currentContext = UIGraphicsGetCurrentContext()
        /**创建颜色空间*/
        let colorSpace = CGColorSpaceCreateDeviceRGB()
        let startColor = UIColor.blue
        /**获取颜色组件*/
        let startColorComponents = startColor.cgColor.components

        let endColor = UIColor.green
        let endColorComponents = endColor.cgColor.components
        let colorComponents = [
            startColorComponents?[0],
            startColorComponents?[1],
            startColorComponents?[2],
            startColorComponents?[3],
            endColorComponents?[0],
            endColorComponents?[1],
            endColorComponents?[2],
            endColorComponents?[3]
            ] as! [CGFloat]
        let colorIndices = [0.0,1.0] as [CGFloat]
        let gradient = CGGradient.init(colorSpace: colorSpace, colorComponents: colorComponents, locations: colorIndices, count: 2)

        currentContext?.drawLinearGradient(gradient!, start: CGPoint.init(x: 0, y: 0), end: CGPoint.init(x: 100, y: 100), options: [])
    }
变换视图
    override func draw(_ rect: CGRect) {
        let path = CGMutablePath()
        /**绘制矩形的边界*/
        let rectangle = CGRect.init(x: 10, y: 10, width: 80, height: 80)
        /**将矩形添加到路径中*/
//        path.addRect(rectangle)
        /**使用缩放*/
//        let transform = CGAffineTransform.init(scaleX: 0.5, y: 0.5)
//        path.addRect(rectangle, transform: transform)
         /**使用旋转*/
        let transform = CGAffineTransform.init(rotationAngle: CGFloat((45.8 * M_PI)/180))
        path.addRect(rectangle, transform: transform)

        /**获取当前上下文句柄*/
        let currentContext = UIGraphicsGetCurrentContext()
        /**保存上下文,便于后期恢复*/
        currentContext?.saveGState()
//        /*像右移动10个点*/
//        currentContext?.translateBy(x: 10, y: 0)

        currentContext?.addPath(path)
        /**设置填充颜色*/
        UIColor.red.setFill()
        /**设置边框颜色*/
        UIColor.yellow.setStroke()
        /**设置线宽*/
        currentContext?.setLineWidth(5)
        /**在上下文毛边并填充路径*/
        currentContext?.drawPath(using: .fillStroke)
        /**回复上下文状态*/
        currentContext?.restoreGState()
    }

 浙公网安备 33010602011771号